49 Testing SOA Composite Applications
This chapter describes how to create, deploy, and run test cases that automate the testing of SOA composite applications. Test cases enable you to simulate the interaction between a SOA composite application and its web service partners before deployment in a production environment. This helps to ensure that a process interacts with web service partners as expected by the time it is ready for deployment to a production environment.
This chapter includes the following sections:
-
Section 49.1, "Introduction to the Composite Test Framework"
-
Section 49.2, "Introduction to the Components of a Test Suite"
49.1 Introduction to the Composite Test Framework
Oracle SOA Suite provides an automated test suite framework for creating and running repeatable tests on a SOA composite application.
The test suite framework provides the following features:
-
Simulates web service partner interactions
-
Validates process actions with test data
-
Creates reports of test results
49.1.1 Test Cases Overview
The test framework supports testing at the SOA composite application level. In this type of testing, wires, service binding components, service components (such as BPEL processes and Oracle Mediator service components), and reference binding components are tested.
For more information, see Section 49.3, "Creating Test Suites and Test Cases."
49.1.2 Test Suites Overview
Test suites consist of a logical collection of one or more test cases. Each test case contains a set of commands to perform as the test instance is executed. The execution of a test suite is known as a test run. Each test corresponds to a single SOA composite application instance.
For more information, see the following:
49.1.3 Emulations Overview
Emulations enable you to simulate the behavior of the following components with which your SOA composite application interacts during execution:
-
Internal service components inside the composite
-
Binding components outside the composite
Instead of invoking another service component or binding component, you can specify a response from the component or reference.
For more information, see the following:
49.1.4 Assertions Overview
Assertions enable you to verify variable data or process flow. You can perform the following types of assertions:
-
Entire XML document assertions:
Compare the element values of an entire XML document to the expected element values. For example, compare the exact contents of an entire loan request XML document to another document. The
XMLTestCaseclass in theXMLUnitpackage includes a collection of methods for performing assertions between XML files. For more information about these methods, visit the following URL:http://xmlunit.sourceforge.net
-
Part section of message assertions:
Compare the values of a part section of a message to the expected values. An example is a payload part of an entire XML document message.
-
Nonleaf element assertions:
Compare the values of an XML fragment to the expected values. An example is a loan application, which includes leaf elements SSN, email, customerName, and loanAmount.
-
Leaf element assertions:
Compare the value of a selected string or number element or a regular expression pattern to an expected value. An example is the SSN of a loan application.
For more information about asserts, see Section 49.2.3, "Assertions."
49.2 Introduction to the Components of a Test Suite
This section describes and provides examples of the test components that comprise a test case. Methods for creating and importing these tests into your process are described in subsequent sections of this chapter.
49.2.1 Process Initiation
You first define the operation of your process in a binding component service such as a SOAP web service. Example 49-1 defines the operation of initiate to initiate the TestFwk SOA composite application. The initiation payload is also defined in this section:
Example 49-1 Process Initiation
<?xml version="1.0" encoding="UTF-8" ?>
<!-- Generated by Oracle SCA Test Modeler version 1.0 at [6/13/07 10:50 AM]. -->
<compositeTest compositeDN="TestFwk"
 xmlns="http://xmlns.oracle.com/sca/2006/test">
  <about></about>
  <initiate serviceName="client" operation="initiate" isAsync="true">
    <message>
      <part partName="payload">
        <content>
          <loanApplication xmlns="http://www.autoloan.com/ns/autoloan">
            <SSN>111222333</SSN>
            <email>joe.smith@oracle.com</email>
            <customerName>Joe Smith</customerName>
            <loanAmount>20000</loanAmount>
            <carModel>Camry</carModel>
            <carYear>2007</carYear>
            <creditRating>800</creditRating>
          </loanApplication>
        </content>
      </part>
    </message>
  </initiate>
</compositeTest>
49.2.2 Emulations
You create emulations to simulate the message data that your SOA composite application receives from web service partners.
In the test code in Example 49-2, the loan request is initiated with an error. A fault message is received in return from a web service partner:
<?xml version="1.0" encoding="UTF-8" ?>
<!-- Generated by Oracle SCA Test Modeler version 1.0 at [7/3/07 3:29 PM]. -->
<compositeTest compositeDN="CompositeTest"
 xmlns="http://xmlns.oracle.com/sca/2006/test">
  <about></about>
  <initiate serviceName="client" operation="initiate" isAsync="true">
    <message>
      <part partName="payload">
        <filePath>loanApplication.xml</filePath>
      </part>
    </message>
  </initiate>
  <wireActions wireSource="LoanBroker/CreditRatingService" operation="process">
    <emulate duration="PT0S">
      <fault faultName="ser:NegativeCredit" xmlns:ser="http://services.otn.com">
        <message>
          <part partName="payload">
            <filePath>creditRatingFault.xml</filePath>
          </part>
        </message>
      </fault>
    </emulate>
  </wireActions>
</compositeTest>
Two message files, loanApplication.xml and creditRatingFault.xml, are invoked in this emulation. If the loan application request in loanApplication.xml contains a social security number beginning with 0, the creditRatingFault.xml file returns the fault message shown in Example 49-3:
<error xmlns="http://services.otn.com">
  Invalid SSN, SSN cannot start with digit '0'.
</error>
For more information, see Section 49.4, "Creating the Contents of Test Cases."
49.2.3 Assertions
You create assertions to validate an entire XML document, a part section of a message, a nonleaf element, or a leaf element at a point during SOA composite application execution. Example 49-4 instructs Oracle SOA Suite to ensure that the content of the customername variable matches the content specified.
<?xml version="1.0" encoding="UTF-8" ?>
<!-- Generated by Oracle SCA Test Modeler version 1.0 at [6/13/07 10:51 AM]. -->
<compositeTest compositeDN="TestFwk"
 xmlns="http://xmlns.oracle.com/sca/2006/test">
  <about></about>
  <initiate serviceName="client" operation="initiate" isAsync="true">
    <message>
      <part partName="payload">
        <content>
          <loanApplication xmlns="http://www.autoloan.com/ns/autoloan">
            <SSN>111222333</SSN>
            <email>joe.smith@oracle.com</email>
            <customerName>Joe Smith</customerName>
            <loanAmount>20000</loanAmount>
            <carModel>Camry</carModel>
            <carYear>2007</carYear>
            <creditRating>800</creditRating>
          </loanApplication>
        </content>
      </part>
    </message>
  </initiate>
  <wireActions wireSource="client" operation="initiate">
    <assert comparisonMethod="string">
      <expected>
        <location key="input" partName="payload"
 xpath="/s1:loanApplication/s1:customerName"
 xmlns:s1="http://www.autoloan.com/ns/autoloan"/>
        <simple>Joe Smith</simple>
      </expected>
    </assert>
  </wireActions>
</compositeTest>
For more information, see Section 49.4, "Creating the Contents of Test Cases."
49.2.4 Message Files
Message instance files provide a method for simulating the message data received back from web service partners. You can manually enter the received message data into this XML file or load a file through the test mode of the SOA Composite Editor. For example, the following message file simulates a credit rating result of 900 returned from a partner:
<rating xmlns="http://services.otn.com">900</rating>
For more information about loading message files into test mode, see Section 49.4, "Creating the Contents of Test Cases."
49.3 Creating Test Suites and Test Cases
This section describes how to create test suites and their test cases for a SOA composite application. The test cases consist of sets of commands to perform as the test instance is executed.
Note:
Do not enter a multibyte character string as a test suite name or test case name. Doing so causes an error to occur when the test is executed from Oracle Enterprise Manager Fusion Middleware Control Console.49.3.1 How to Create Test Suites and Test Cases
To create test suites and test cases:
-
Open the SOA Composite Editor.
-
Open the SOA composite application in which to create a test suite.
-
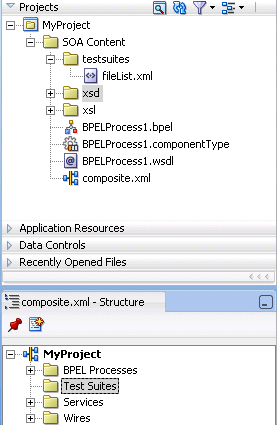
Go to the Application Navigator or Structure window. If the Structure window shown in Figure 49-1 does not appear, select Structure from the View main menu.
-
Create a test suite in either of two ways:
-
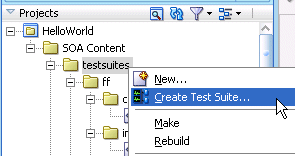
In the Application Navigator, right-click testsuites and select Create Test Suite. Figure 49-2 provides details.
-
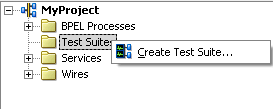
In the Structure window, right-click Test Suites and select Create Test Suite. Figure 49-3 provides details.
-
-
Click OK.
The Create Composite Test dialog appears.
-
Enter a test name (for this example,
TestDeliveryis entered) and an optional description. This description displays in the Description column of the Test Cases page of the Unit Tests tab in Oracle Enterprise Manager Fusion Middleware Control Console. -
Click OK.
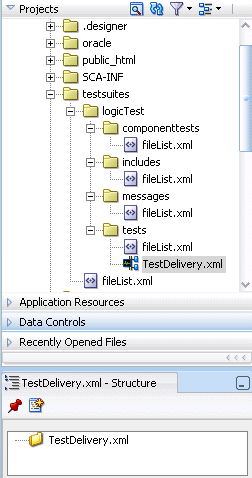
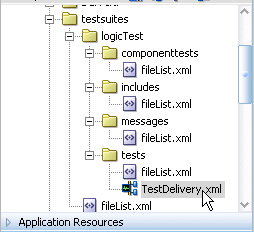
This action creates a test named TestDelivery.xml in the Applications Navigator, along with the following subfolders:
-
componenttests
This folder is not used in 11g Release 1.
-
includes
This folder is not used in 11g Release 1.
-
messages
Contains message test files that you load into this directory through the test mode user interface.
-
tests
Contains TestDelivery.xml.
A TestDelivery.xml folder also displays in the Structure window. Figure 49-4 provides details. This indicates that you are in the test mode of the SOA Composite Editor. You can create test initiations, assertions, and emulations in test mode. No other modifications, such as editing the property dialogs of service components or dropping service components into the editor, can be performed in test mode.
The following operating system test suite directory is also created:
C:\JDeveloper\mywork\application_name\project_name\testsuites\logicTest
The following subdirectories for adding test files are created beneath
logicTest: componenttests,includes,messages, andtests. -
-
If you want to exit test mode and return to design mode in the SOA Composite Editor, click the last icon below TestDelivery.xml above the designer. Figure 49-5 provides details.
-
Save your changes when prompted.
-
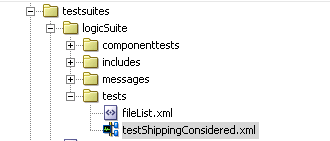
Under the testsuites folder in the Application Navigator, double-click TestDelivery.xml to return to test mode. Figure 49-6 provides details.
Notes:
-
Do not edit the filelist.xml files that display under the subfolders of the testsuites folder. These files are automatically created during design time, and are used during runtime to calculate the number of test cases.
-
You cannot create test suites within other test suites. However, you can organize a test suite into subdirectories.
-
49.4 Creating the Contents of Test Cases
Test cases consist of process initiations, emulations, and assertions. You add these actions to test cases in the test mode of the SOA Composite Editor. You create process initiations to initiate client inbound messages into your SOA composite application. You create emulations to simulate input or output message data, fault data, callback data, or all of these types that your SOA composite application receives from web service partners. You create assertions to validate entire XML documents, part sections of messages, nonleaf elements, and leaf elements as a process is executed.
49.4.1 How to Initiate Inbound Messages
You must first initiate the sending of inbound client messages to the SOA composite application.
-
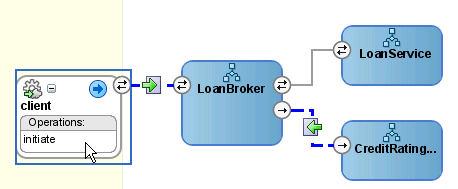
Double-click the service binding component shown in Figure 49-7 (for this example, named initiate).
Figure 49-7 Binding Component Service Access
Description of "Figure 49-7 Binding Component Service Access"
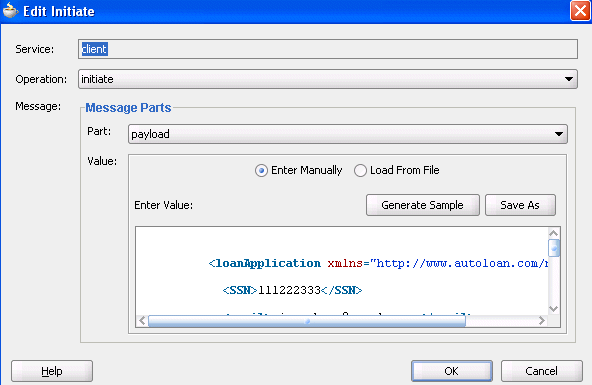
The Edit Initiate dialog appears.
-
Enter the details shown in Table 49-1:
Table 49-1 Edit Initiate Dialog Fields and Values
Field Value Service
Displays the name of the binding component service (client).
Operation
Displays the operation type of the service binding component (initiate).
Part
Select the type of inbound message to send (for example, payload).
Value
Create a simulated message to send from a client:
-
Enter Manually
Click to manually enter message data in the Enter Value field. A Generate Sample button enables you to automatically generate a sample file for testing. Click Save As to save the sample file.
-
Load From File
Click the Browse icon to load message data from a file. The file is added to the messages folder in the Application Navigator.
Figure 49-8 shows this dialog:
Example 49-5 shows an inbound process initiation message from a client:
Example 49-5 Inbound Process Initiation Message
<?xml version="1.0" encoding="UTF-8" ?>
<!-- Generated by Oracle SCA Test Modeler version 1.0 at [7/12/07 8:36 AM]. -->
<compositeTest compositeDN="CompositeTest"
 xmlns="http://xmlns.oracle.com/sca/2006/test">
  <about/>
  <initiate serviceName="client" operation="initiate" isAsync="true">
    <message>
      <part partName="payload">
        <filePath>loanApplication.xml</filePath>
      </part>
    </message>
  </initiate>
. . .
. . .
The
loanApplication.xmlreferenced in the process initiation file contains a loan application payload. Example 49-6 provides details.Example 49-6 Loan Application Payload
<loanApplication xmlns="http://www.autoloan.com/ns/autoloan">
  <SSN>111222333</SSN>
  <email>joe.smith@oracle.com</email>
  <customerName>Joe Smith</customerName>
  <loanAmount>20000</loanAmount>
  <carModel>Camry</carModel>
  <carYear>2007</carYear>
  <creditRating>800</creditRating>
</loanApplication>
-
-
Click OK.
49.4.2 How to Emulate Outbound Messages
Note:
The creation of multiple emulations in an instance in a test case is supported only if one emulation is for an output message and the other is for a callback message.You can simulate a message returned from a synchronous web service partner.
-
Beneath the testsuites folder in the Application Navigator, double-click a test case. Figure 49-9 provides details.
The SOA composite application in the SOA Composite Editor is refreshed to display in test mode. This mode enables you to define test information.
-
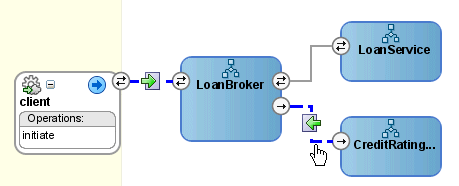
Double-click the wire of the SOA composite application area to test. For the example shown in Figure 49-10, the wire between the LoanBroker process and the synchronous CreditRating web service is selected.
This displays the Wire Actions dialog shown in Figure 49-11, from which you can design emulations and assertions for the selected part of the SOA composite application.
-
Click the Emulates tab.
-
Click the Add icon.
-
Click Emulate Output.
-
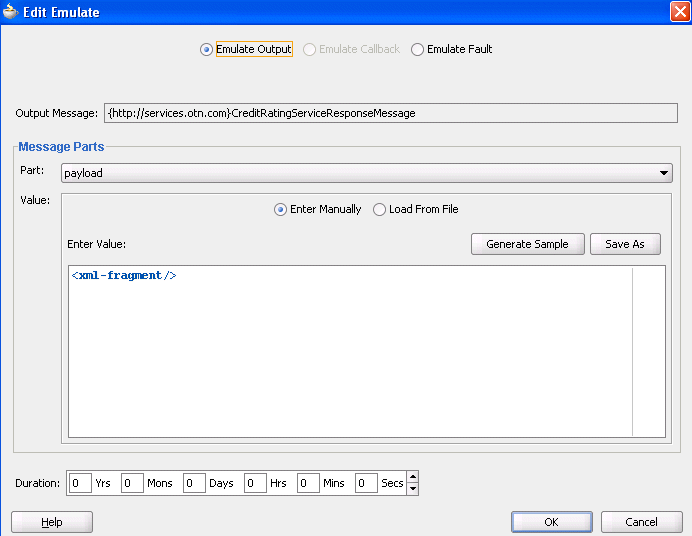
Enter the details described in Table 49-2:
Table 49-2 Emulate Output Message Dialog Fields and Values
Field Value Part
Select the message part containing the output (for example, payload).
Value
Create a simulated output message to return from a web service partner:
-
Enter Manually
Click to manually enter message data in the Enter Value field. A Generate Sample button enables you to automatically generate a sample file for testing. Click Save As to save the sample file.
-
Load From File
Click the Browse icon to load message data from a file. The file is added to the messages folder in the Application Navigator.
Duration
Enter the maximum amount of time to wait for the message to be delivered from the web service partner.
Figure 49-12 shows this dialog:
Figure 49-12 Emulate Dialog with Emulate Output Selected
Description of "Figure 49-12 Emulate Dialog with Emulate Output Selected"
Example 49-7 shows a simulated output message from a synchronous web service partner that you enter manually or load from a file:
Example 49-7 Simulated Output Message Example
<?xml version="1.0" encoding="UTF-8" ?>
<!-- Generated by Oracle SCA Test Modeler version 1.0 at [7/3/07 3:26 PM]. -->
<compositeTest compositeDN="CompositeTest"
 xmlns="http://xmlns.oracle.com/sca/2006/test">
  <about></about>
  <initiate serviceName="client" operation="initiate" isAsync="true">
    <message>
      <part partName="payload">
        <filePath>loanApplication.xml</filePath>
      </part>
    </message>
  </initiate>
  <wireActions wireSource="LoanBroker/CreditRatingService" operation="process">
    <emulate duration="PT0S">
      <message>
        <part partName="payload">
          <filePath>creditRatingResult.xml</filePath>
        </part>
      </message>
    </emulate>
  </wireActions>
</compositeTest>
The
creditRatingResult.xmlmessage file referenced in the output message provides details about the credit rating result.<rating xmlns="http://services.otn.com">900</rating>
-
-
Click OK.
49.4.3 How to Emulate Callback Messages
Note:
The creation of multiple emulations in an instance in a test case is supported only if one emulation is for an output message and the other is for a callback message.You can simulate a callback message returned from an asynchronous web service partner.
-
Access the Wire Actions dialog by following Step 1 through Step 3.
-
Click the Emulates tab.
-
Click the Add icon.
-
Click Emulate Callback. This field is only enabled for asynchronous processes.
-
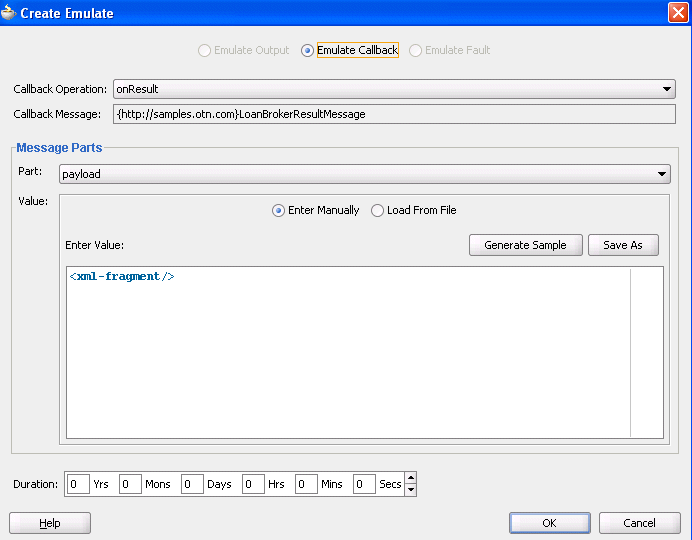
Enter the details described in Table 49-3:
Table 49-3 Emulate Callback Message Fields
Field Value Callback Operation
Select the callback operation (for example, onResult).
Callback Message
Displays the callback message name of the asynchronous process.
Part
Select the message part containing the callback (for example, payload).
Value
Create a simulated callback message to return from an asynchronous web service partner:
-
Enter Manually
Click to manually enter message data in the Enter Value field. A Generate Sample button enables you to automatically generate a sample file for testing. Click Save As to save the sample file.
-
Load From File
Click the Browse icon to load message data from a file. The file is added to the messages folder in the Application Navigator.
Duration
Enter the maximum amount of time to wait for the callback message to be delivered from the web service partner.
Figure 49-13 shows this dialog:
Figure 49-13 Emulate Dialog with Emulate Callback Selected
Description of "Figure 49-13 Emulate Dialog with Emulate Callback Selected"
Example 49-8 shows a simulated callback message from a web service partner. You enter this message manually or load it from a file:
Example 49-8 Simulated Callback Message Example
<?xml version="1.0" encoding="UTF-8" ?>
<!-- Generated by Oracle SCA Test Modeler version 1.0 at [7/3/07 3:27 PM]. -->
<compositeTest compositeDN="CompositeTest"
 xmlns="http://xmlns.oracle.com/sca/2006/test">
  <about></about>
  <initiate serviceName="client" operation="initiate" isAsync="true">
    <message>
      <part partName="payload">
        <filePath>loanApplication.xml</filePath>
      </part>
    </message>
  </initiate>
  <wireActions wireSource="LoanBroker/LoanService" operation="initiate">
    <emulate callbackOperation="onResult" duration="PT0S">
      <message>
        <part partName="payload">
          <filePath>loanOffer.xml</filePath>
        </part>
      </message>
    </emulate>
  </wireActions>
</compositeTest>
The
loanOffer.xmlmessage file referenced in the callback message provides details about the credit rating approval. Example 49-9 provides details. -
-
Click OK.
49.4.4 How to Emulate Fault Messages
You can simulate a fault message returned from a web service partner. This simulation enables you to test fault handling capabilities in your process.
-
Access the Wire Actions dialog by following Step 1 through Step 3.
-
Click the Emulates tab.
-
Click the Add icon.
-
Click Emulate Fault.
-
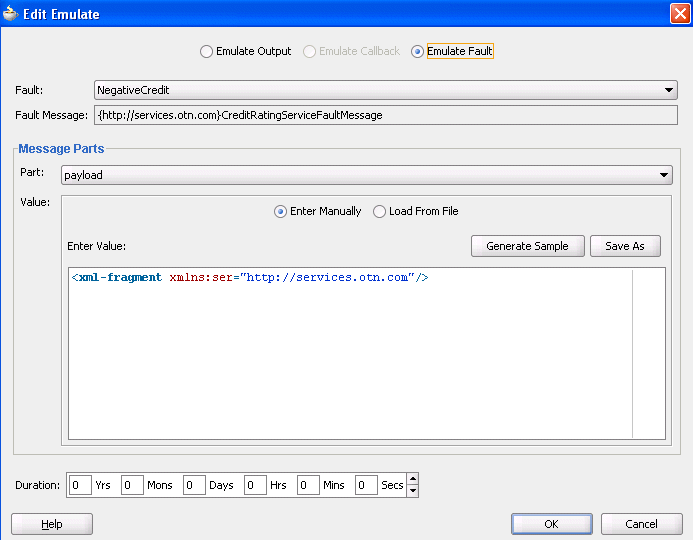
Enter the details described in Table 49-4:
Table 49-4 Emulate Fault Message Fields
Field Value Fault
Select the fault type to return from a partner (for example, NegativeCredit).
Fault Message
Displays the message name.
Part
Select the message part containing the fault (for example, payload).
Value
Create a simulated fault message to return from a web service partner:
-
Enter Manually
Click to manually enter message data in the Enter Value field. A Generate Sample button enables you to automatically generate a sample file for testing. Click Save As to save the sample file.
-
Load From File
Click the Browse icon to load message data from a file. The file is added to the messages folder in the Application Navigator.
Duration
Enter the maximum amount of time to wait for the fault message to be delivered from the web service partner.
Figure 49-14 shows this dialog:
Figure 49-14 Emulate Dialog with Emulate Fault Selected
Description of "Figure 49-14 Emulate Dialog with Emulate Fault Selected"
An example of a simulated fault message from a web service partner that you enter manually or load from a file is shown in Section 49.2.2, "Emulations."
-
-
Click OK.
49.4.5 How to Create Assertions
You perform assertions to verify variable data or process flow. Assertions enable you to validate test data in an entire XML document, a part section of a message, a nonleaf element, or a leaf element as a process is executed. This is done by extracting a value and comparing it to an expected value.
-
Access the Wire Actions dialog by following Step 1 through Step 3.
-
Click the Asserts tab.
Figure 49-15 shows this dialog:
Figure 49-15 Wire Actions Dialog with Asserts Tab Selected

Description of "Figure 49-15 Wire Actions Dialog with Asserts Tab Selected"
-
Click the Add icon.
The Create Assert dialog appears.
-
Select the type of assertion to perform at the top of the dialog, as shown in Table 49-5. If the operation supports only input messages, the Assert Input button is enabled. If the operation supports both input and output messages, the Assert Input and Assert Output buttons are both enabled.
Type Description Assert Input
Select to create an assertion in the inbound direction.
Assert Output
Select to create an assertion in the outbound direction.
Assert Callback
Select to create an assertion on a callback.
Assert Fault
Select to assert a fault into the application flow.
-
See the section shown in Table 49-6 based on the type of assertion you want to perform.
For an Assertion on... See... -
A part section of a document
-
A nonleaf element
-
An entire XML document
Section 49.4.5.1, "Creating Assertions on a Part Section, Nonleaf Element, or Entire XML Document"
A leaf element
-
49.4.5.1 Creating Assertions on a Part Section, Nonleaf Element, or Entire XML Document
To create assertions on a part section, nonleaf element, or entire XML document:
This test compares the values to the expected values.
Note:
If the message contains multiple parts (for example, payload1, payload2, and payload3), you must create separate assertions for each part.-
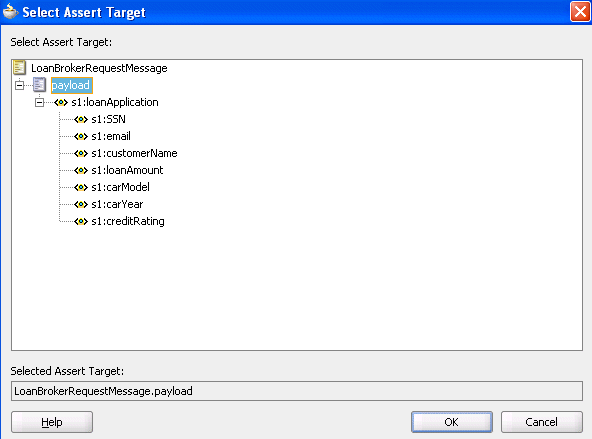
Click Browse to select the target part section, nonleaf element, or entire XML document to assert.
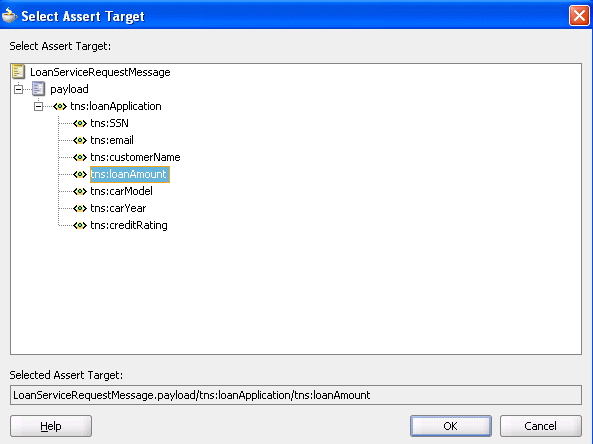
The Select Assert Target dialog appears.
-
Select a value, and click OK. For example, select a variable such as payload to perform a part section assertion.
Figure 49-16 shows this dialog. While this example shows how to perform a part section assertion, selecting LoanBrokerRequestMessage is an example of an entire XML document assertion and selecting loanApplication is an example of a nonleaf assertion.
Figure 49-16 Select a Part Section of a Message
Description of "Figure 49-16 Select a Part Section of a Message"
The Create Assert dialog refreshes based on your selection of a variable.
-
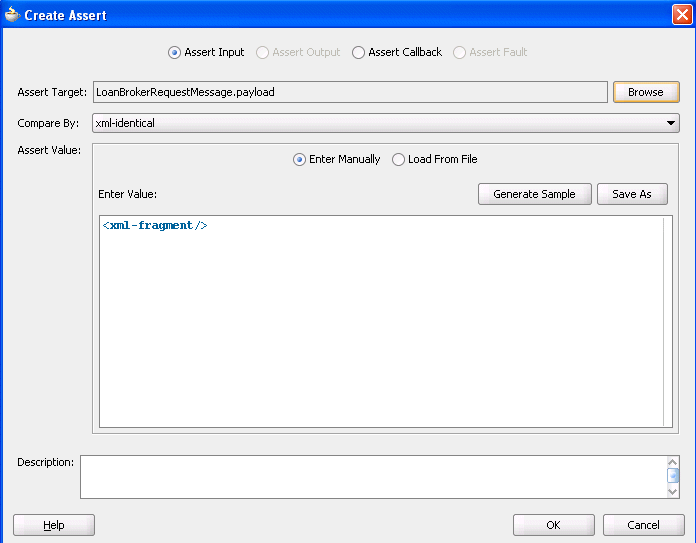
Enter details in the remaining fields, as shown in Table 49-7:
Table 49-7 Create Assert Dialog Fields and Values
Field Value Fault
Select the type of fault to assert (for example, NegativeCredit). This field only displays if you select Assert Fault in Step 4.
Assert Target
Displays the assert target you selected in Step 2.
Compare By
Specify the strictness of the comparison.
-
xml-identical: Used when the comparison between the elements and attributes of the XML documents must be exact. If there is any difference between the two XML documents, the comparison fails. For example, the comparison fails if one document uses an element name of
purchaseOrder, while the other uses an element name ofinvoice. The comparison also fails if the child attributes of two elements are the same, but the attributes are ordered differently in each element. -
xml-similar: Used when the comparison must be similar in content, but does not need to exactly match. For example, the comparison succeeds if both use the same namespace URI, but have different namespace prefixes. The comparison also succeeds if both contain the same element with the same child attributes, but the attributes are ordered differently in each element.
In both of these examples, the differences are considered recoverable, and therefore similar.
For more information about comparing the contents of XML files, see the XMLUnit web site:
http://xmlunit.sourceforge.net/userguide/html/ar01s03.html#The%20Difference%20Engine
Part
Select the message part containing the XML document (for example, payload).
Value
Create an XML document whose content is compared to the assert target content:
-
Enter Manually
Click to manually enter message data in the Enter Value field. A Generate Sample button enables you to automatically generate a sample file for testing. Click Save As to save the sample file.
-
Load From File
Click the Browse icon to load message data from a file. The file is added to the messages folder in the Application Navigator.
Description
Enter an optional description.
Figure 49-17 shows this dialog with Assert Input selected:
Figure 49-17 Create Assert Dialog with Assert Input Selected
Description of "Figure 49-17 Create Assert Dialog with Assert Input Selected"
-
-
Click OK.
The Wire Actions dialog shown in Figure 49-18 displays your selection.
Figure 49-18 Wire Actions Dialog with Asserts Tab Selected

Description of "Figure 49-18 Wire Actions Dialog with Asserts Tab Selected"
-
Click OK.
49.4.5.2 Creating Assertions on a Leaf Element
To create assertions on a leaf element:
This test compares the value to an expected value.
-
Click Browse to select the leaf element to assert.
The Select Assert Target dialog appears.
-
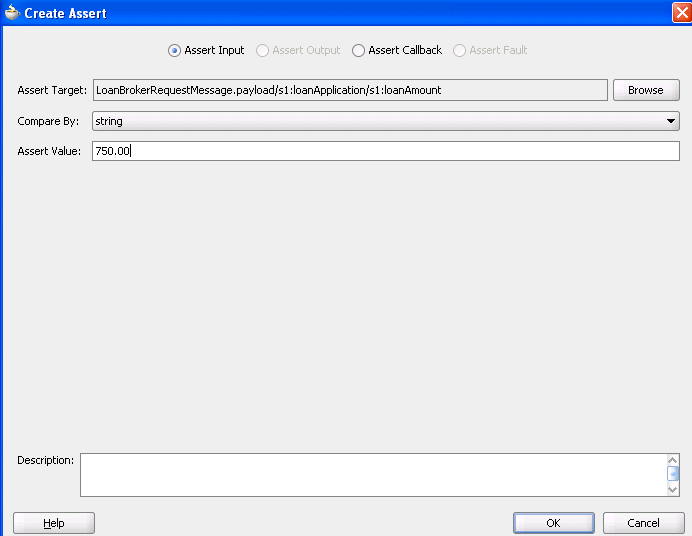
Select a leaf element, and click OK. For example, select loanAmount to perform an assertion. Figure 49-19 provides details.
The Create Assert dialog refreshes based on your selection of an entire XML document.
-
Enter details in the remaining fields, as shown in Table 49-8:
Table 49-8 Create Assert Dialog Fields and Values
Field Value Fault
Select the type of fault to assert (for example, NegativeCredit). This field only displays if you select Assert Fault in Step 4.
Callback Operation
Select the type of callback to assert (for example, onResult). This field only displays if you select Assert Callback in Step 4.
Assert Target
Displays the variable assert target you selected in Step 2.
Compare By
Select the type of comparison:
-
string: Compares string values
-
number: Compares numerical values
-
pattern-match: Compares a regular expression pattern (for example,
[0-9]*). Java Development Kit (JDK) regular expression (regexp) constructs are supported. For example, entering a pattern ofab[0-9]*cdmeans that a value ofab123cdorab456cdis correct. An asterisk (*) indicates any number of occurrences.
Assert Value
Enter the value you are expecting. This value is compared to the value for the assert target.
Description
Enter an optional description.
Figure 49-20 shows this dialog with Assert Input selected:
-
-
Click OK.
The Wire Actions dialog shown in Figure 49-18 displays your selection.
Figure 49-21 Wire Actions Dialog with Asserts Tab Selected
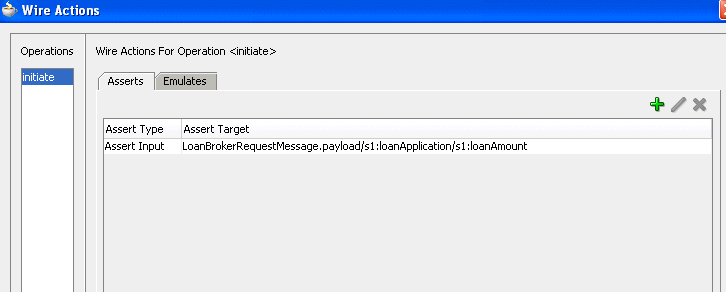
Description of "Figure 49-21 Wire Actions Dialog with Asserts Tab Selected"
49.4.6 What You May Need to Know About Assertions
When a test is executed, and the response type returned is different from the type expected, the assertion is skipped. For example, you are expecting a fault (RemoteFault) to be returned for a specific message, but a response (BpelResponseMessage) is instead returned.
As a best practice, always assert and emulate the expected behavior.
49.5 Deploying and Running a Test Suite
After creating a test suite of test cases, you deploy the suite as part of a SOA composite application. You then run the test suites from Oracle Enterprise Manager Fusion Middleware Control Console.
See Section 43.2.1, "How to Deploy a Single SOA Composite" for instructions on deploying a SOA composite application from Oracle JDeveloper. See Oracle Fusion Middleware Administrator's Guide for Oracle SOA Suite for instructions on deploying a SOA composite application and running a test suite from Oracle Enterprise Manager Fusion Middleware Control Console.
