43 Deploying SOA Composite Applications
This chapter describes how to deploy SOA composite applications with Oracle JDeveloper and scripting tools and create configuration plans that enable you to move SOA composite applications to and from development, test, and production environments without having to redefine the URLs and properties of each environment.
This chapter includes the following sections:
-
Section 43.2, "Deploying a Single SOA Composite in Oracle JDeveloper"
-
Section 43.3, "Deploying Multiple SOA Composite Applications in Oracle JDeveloper"
-
Section 43.4, "Deploying and Using Shared Metadata Across SOA Composite Applications"
-
Section 43.5, "Deploying an Existing SOA Archive in Oracle JDeveloper"
-
Section 43.6, "Managing SOA Composite Applications with Scripts"
See Oracle Fusion Middleware Administrator's Guide for Oracle SOA Suite for instructions on deploying SOA composite applications from Oracle Enterprise Manager Fusion Middleware Control Console.
Note:
Deployment from Oracle JDeveloper to a two-way, SSL-enabled Oracle WebLogic Server is not supported.43.1 Creating an Application Server Connection
You must create a connection to the Oracle WebLogic Server to which to deploy a SOA composite application.
To create an application server connection:
-
From the File main menu, select New.
-
In the General list, select Connections.
-
Select Application Server Connection, and click OK.
-
In the Connection Name field, enter a name for the connection.
-
In the Connection Type list, select WebLogic 10.3.
-
Click Next.
-
In the Username field, enter the user authorized for access to the application server.
-
In the Password field, enter the password for this user.
-
Click Next.
-
In the Weblogic Hostname field, enter the host on which the Oracle WebLogic Server is installed.
-
In the Port and SSL Port fields, enter the appropriate port values.
-
If you want to use SSL, enable the Always use SSL checkbox.
-
In the WLS Domain field, enter the Oracle SOA Suite domain. For additional details about specifying domains, click Help.
-
Click Next.
-
Click Test Connection to test your server connection.
-
If the connection is successful, click Finish. Otherwise, click Back to make corrections in the previous dialogs.
43.2 Deploying a Single SOA Composite in Oracle JDeveloper
Oracle JDeveloper requires the use of profiles for SOA projects and applications to be deployed to Oracle WebLogic Server.
43.2.1 How to Deploy a Single SOA Composite
This section describes how to deploy a single SOA composite application with Oracle JDeveloper.
43.2.1.1 Optionally Creating a Project Deployment Profile
A required deployment profile is automatically created for your project. The application profile includes the JAR files of your SOA projects. If you want, you can create additional profiles.
To create a deployment profile:
-
In the Application Navigator, right-click the SOA project.
-
Select Project Properties.
The Project Properties dialog appears.
-
Click Deployment.
-
Click New.
The Create Deployment Profile dialog appears.
-
Table 43-1 Create Deployment Profile Dialog Fields and Values
-
Click OK.
The SAR Deployment Profile dialog appears.
-
Click OK to close the SAR Deployment Profile Properties dialog.
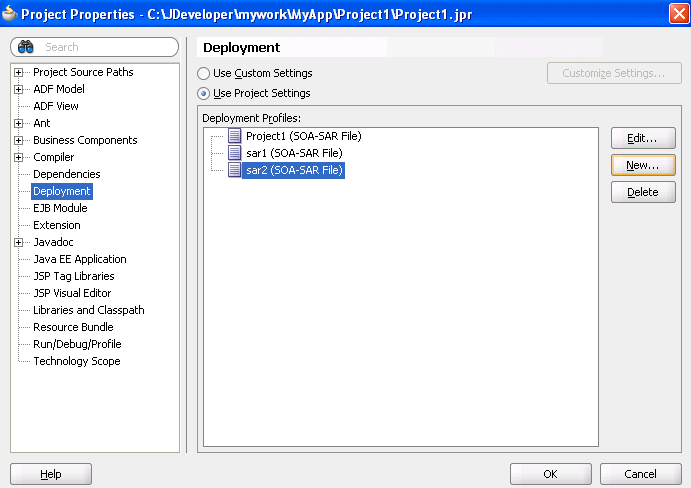
The deployment profile shown in Figure 43-1 displays in the Application Properties dialog.
43.2.1.2 Deploying the Profile
You now deploy the project profile to Oracle WebLogic Server. Deployment requires the creation of an application server connection. You can create a connection during deployment by selecting New Connection in Step 3 or before deployment by following the instructions in Section 43.1, "Creating an Application Server Connection."
-
In the Application Navigator, right-click the SOA project.
-
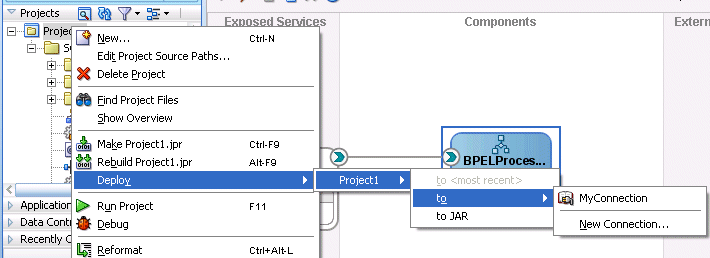
Select Deploy > deployment_profile_name > to.
The value for deployment_profile_name is the SOA project name. Figure 43-2 provides an example.
-
Select one of the following deployment options:
-
to JAR
Creates a JAR file of the selected SOA project, but does not deploy it to Oracle WebLogic Server. This option is useful for environments in which:
-
Oracle WebLogic Server may not be running, but you want to create the JAR file.
-
You want to deploy multiple JAR files to Oracle WebLogic Server from a batch script. This option offers an alternative to opening all project profiles (which you may not have) and deploying them from Oracle JDeveloper.
-
-
to Server_Connection_Name
Creates a JAR file for the selected SOA project and deploys it to Oracle WebLogic Server. To deploy to Oracle WebLogic Server, you must first create a connection to it.
The SOA Deployment Configuration dialog that displays differs based on your selection.
-
-
Select the deployment option appropriate for your environment.
If You Select... Go to... to JAR
to Server_Connection_Name
-
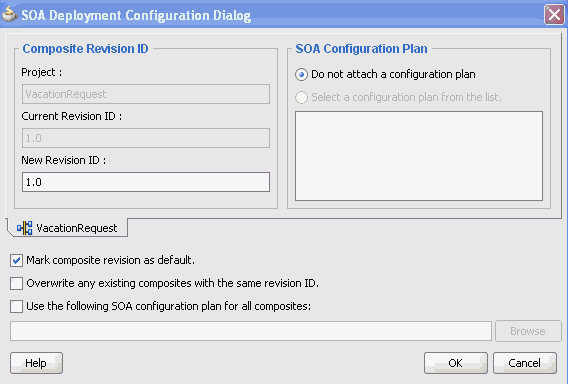
View the SOA Deployment Configuration dialog shown in Figure 43-3.
Figure 43-3 SOA Deployment Configuration Dialog - JAR Deployment
Description of "Figure 43-3 SOA Deployment Configuration Dialog - JAR Deployment"
-
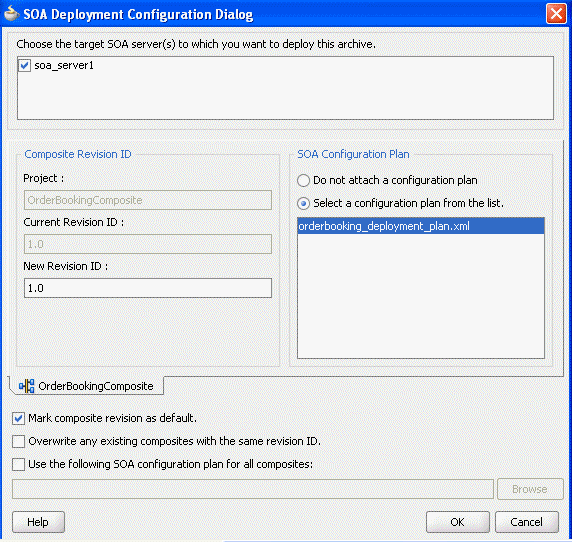
View the SOA Deployment Configuration dialog shown in Figure 43-4.
Figure 43-4 SOA Deployment Configuration Dialog - Server Deployment
Description of "Figure 43-4 SOA Deployment Configuration Dialog - Server Deployment"
-
-
Provide values appropriate to your environment. If you selected to deploy to a server, an additional field for selecting the server to which to deploy is displayed at the top of the dialog.
Table 43-3 SOA Deployment Configuration Dialog
Field Description Choose the target SOA server(s) to which you want to deploy this archive
Note: This option only displays if you selected to deploy to a server.
If there are multiple servers or cluster nodes, select to deploy to one or more servers or nodes.
Project
Displays the project name.
Current Revision ID
Displays the current revision ID of the project.
New Revision ID
Optionally change the revision ID of the SOA composite application.
Mark composite revision as default
If you do not want the new revision to be the default, you can uncheck this box. By default, a newly deployed composite revision is the default. This revision is instantiated when a new request comes in.
Overwrite any existing composites with the same revision ID
Select to overwrite any existing SOA composite application of the same revision value.
Use the following SOA configuration plan for all composites
Click Browse to select the same configuration plan to use for all composite applications. This option is used when deploying multiple composite applications.
Do not attach configuration plan
Select to not include a configuration plan with the SOA composite application JAR file. If you have not created a configuration plan, this field is disabled.
Select a configuration plan from the list
Select to include a configuration plan with the SOA composite application.
The configuration plan enables you to define the URL and property values to use in different environments. During process deployment, the configuration plan is used to search the SOA project for values that must be replaced to adapt the project to the next target environment.
If you have not created a configuration plan, this field is disabled.
See Section 43.7, "Moving SOA Composite Applications to and from Development, Test, and Production Environments" for instructions on creating a configuration plan.
-
View the messages that display in the Deployment log window at the bottom of Oracle JDeveloper.
If deployment is successful, a JAR file for the SOA project is created under the deploy folder in Oracle JDeveloper with a naming convention of sca_composite_name_revrevision_number.jar.
You are now ready to monitor your application from Oracle Enterprise Manager Grid Control Console. See Oracle Fusion Middleware Administrator's Guide for Oracle SOA Suite for details.
If deployment is unsuccessful, view the messages that display in the Deployment log window and take corrective actions.
Note:
If you want to redeploy the same version of a SOA composite application, you cannot change the composite name. You can deploy with the same revision number if you selected the Overwrite any existing composites with the same revision ID checkbox on the SOA Deployment Configuration dialog.
43.2.2 What You May Need to Know About Oracle JDeveloper Deployment to a Managed Oracle WebLogic Server
If you start a managed Oracle WebLogic Server without starting an Oracle WebLogic Administration Server (known as running in independence mode) and attempt to deploy a SOA composite application from Oracle JDeveloper, you receive the following error:
Deployment cannot continue! No SOA Configured target servers found
The Oracle WebLogic Administration Server must be running. Deployment uses the Oracle WebLogic Administration Server connection to identify the servers running Oracle SOA Suite. In addition, do not create an application server connection to a managed Oracle WebLogic Server; only create connections to an Oracle WebLogic Administration Server.
You can also receive a similar error if the condition of the SOA-configured Oracle WebLogic Server is not healthy. This condition displays in the Health column of the Servers page of Oracle WebLogic Server Administration Console.
Note that you can use the WebLogic Scripting Tool (WLST) to deploy SOA composite applications to a managed Oracle WebLogic Server without starting an Oracle WebLogic Administration Server. See Section 43.6.1, "How to Manage SOA Composite Applications with the WLST Utility" for details.
43.2.3 What You May Need to Know About Invoking References in One-Way SSL Environments in Oracle JDeveloper
When invoking a web service as an external reference from a SOA composite application in one-way SSL environments, ensure that the certificate name (CN) and the hostname of the server exactly match. This ensures a correct SSL handshake.
For example, if a web service is named adfbc and the certificate has a server name of myhost05, the following results in an SSL handshake exception.
  <import namespace="/adfbc1/common/"

@ location="https://myhost05.us.oracle.com:8002/CustomApps-adfbc1-context-root/Ap
pModuleService?WSDL"
          importType="wsdl"/>
 <import namespace="/adfbc1/common/" location="Service1.wsdl"
          importType="wsdl"/>
If you switch the order of import, the SSL handshake passes.
<import namespace="/adfbc1/common/" location="Service1.wsdl"
          importType="wsdl"/>
  <import namespace="/adfbc1/common/"

@ location="https://myhost05.us.oracle.com:8002/CustomApps-adfbc1-context-root/Ap
pModuleService?WSDL"
          importType="wsdl"/>
Note the following restrictions around this issue:
-
There are no options for ignoring hostname verification in Oracle JDeveloper as exist with the Oracle WebLogic Server Administration Console. This is because the SSL kit used by Oracle JDeveloper is different. Only the trust store can be configured from the command line. All other certificate arguments are not passed.
-
In the WSDL file,
https://hostnamemust match with that in the certificate, as described above. You cannot perform the same procedures as you can with a browser. For example, if the hostname ismyhost05.us.oracle.comin the certificate's CN, then you can usemyhost05,myhost05.us.oracle.com, or the IP address from a browser. In Oracle JDeveloper, always use the same name as in the certificate (that is,myhost05.us.oracle.com).
43.3 Deploying Multiple SOA Composite Applications in Oracle JDeveloper
You can deploy multiple SOA composite applications to Oracle WebLogic Server at the same time by using the SOA bundle profile. This profile enables you to include one or more SAR profiles in the bundle and deploy the bundle to Oracle WebLogic Server.
Note:
You cannot deploy multiple SOA applications that are dependent upon one another in the same SOA bundle profile. For example, if application A calls application B, then you must first deploy application B separately.43.3.1 How to Deploy Multiple SOA Composite Applications
To deploy multiple SOA composite applications
-
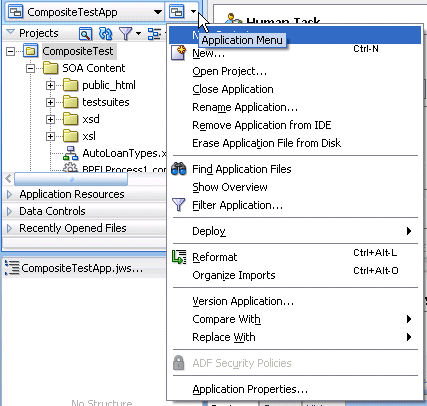
From the Application menu, select Application Properties, as shown in Figure 43-5.
-
In the Application Properties dialog, click Deployment.
-
Click New.
The Create Deployment Profile dialog appears.
-
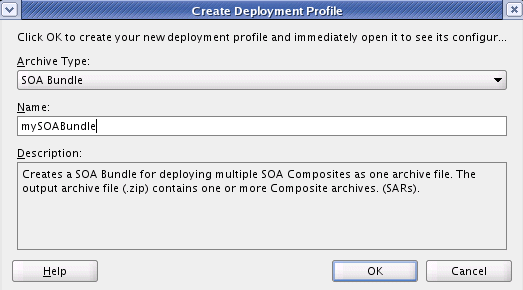
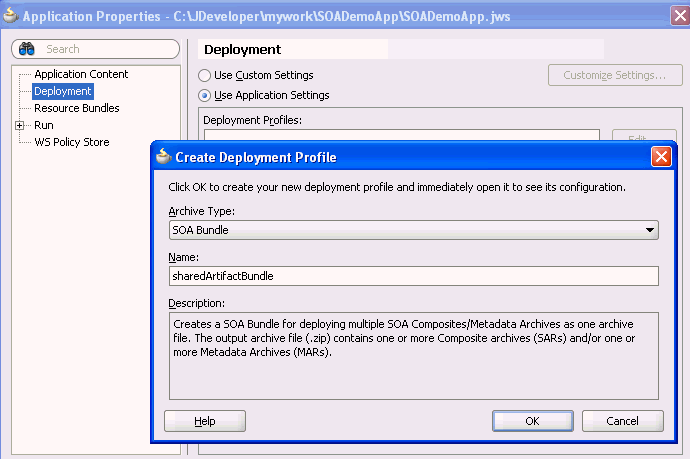
In the Archive Type list, select SOA Bundle.
-
In the Name field, enter a name.
Figure 43-6 provides details.
-
Click OK.
-
In the navigator on the left, select the Dependencies node.
-
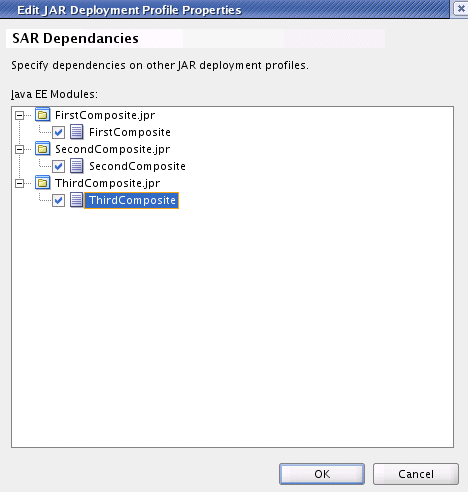
Select the SARs you want to include in this bundle, as shown in Figure 43-7.
-
Click OK.
-
Click OK to close the Application Properties dialog.
-
Select the Application menu again, then select Deploy > SOA_bundle_name > to. Figure 43-8 provides details.
-
Select one of the following options:
-
to Server_Connection_Name
Creates a ZIP file of the application deployment profile that includes JAR files of all selected SOA projects and deploys it to Oracle WebLogic Server. To deploy to Oracle WebLogic Server, you must first create a connection to it.
-
to ZIP
Creates a ZIP file of the application deployment profile that includes JAR files of all selected SOA projects, but does not deploy it to Oracle WebLogic Server. This option is useful for environments in which:
-
Oracle WebLogic Server may not be running.
-
You want to deploy multiple JAR files to Oracle WebLogic Server from a batch script. This option offers an alternative to opening all application profiles (which you may not have) and deploying them from Oracle JDeveloper.
-
The SOA Deployment Configuration dialog that displays is based on your selection:
-
If you selected to deploy to a ZIP file, the SOA Deployment Configuration dialog shown in Figure 43-3 appears.
-
If you selected to deploy to the server, the SOA Deployment Configuration dialog shown in Figure 43-4 appears.
-
-
See Step 5 for details about responses to provide.
-
Click OK.
43.4 Deploying and Using Shared Metadata Across SOA Composite Applications
This section describes how to deploy and use shared metadata across SOA composite applications.
43.4.1 How to Deploy Shared Metadata
Shared metadata is deployed to the SOA Infrastructure on the application server as a JAR file. The JAR file should contain all the resources to share. In Oracle JDeveloper, you can create a JAR profile for creating a shared artifacts archive.
All shared metadata is deployed to an existing SOA Infrastructure partition on the server. This metadata is deployed under the /apps namespace. For example, if you have a MyProject/xsd/MySchema.xsd file in the JAR file, then this file is deployed under the /apps namespace on the server. When you refer to this artifact in Oracle JDeveloper using an SOA-MDS connection, the URL becomes oramds:/apps/MyProject/xsd/MySchema.xsd.
This section describes how to perform the following tasks:
-
Create a JAR profile and include the artifacts to share
-
Create a SOA bundle that includes the JAR profile
-
Deploy the SOA bundle to the application server
43.4.1.1 Create a JAR Profile and Include the Artifacts to Share
To create a JAR profile and include the artifacts to share:
-
In the Application Navigator, right-click the SOA project.
-
Select Project Properties.
The Project Properties dialog appears.
-
Click Deployment in the navigational tree on the left.
-
Click New.
The Create Deployment Profile dialog appears.
-
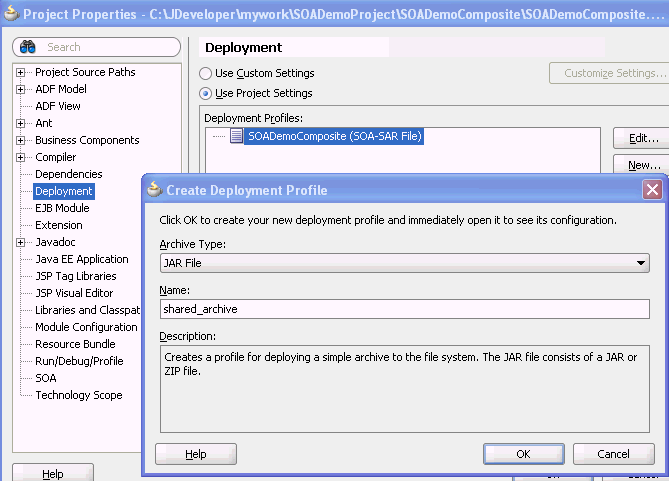
From the Archive Type list, select JAR File.
-
In the Name field, enter a name (for this example,
shared_archiveis entered).The Create Deployment Profile looks as shown in Figure 43-9.
-
Click OK.
The JAR Deployment Profile Properties dialog appears.
-
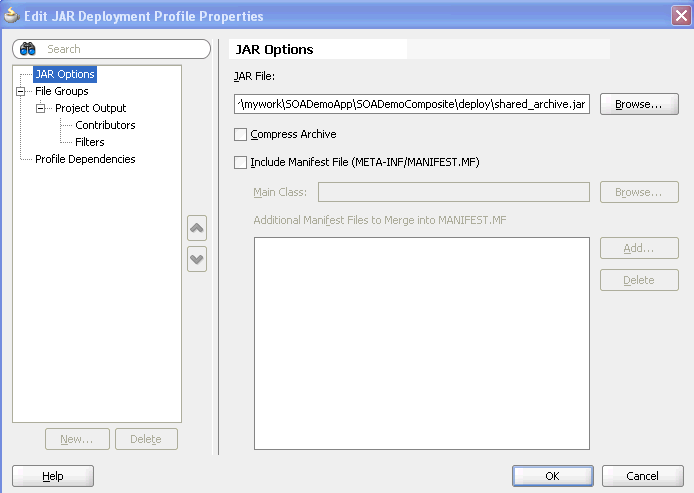
Select JAR Options from the navigational tree on the left.
-
Deselect Include Manifest File (META-INF/MANIFEST.MF), as shown in Figure 43-10.
This prevents the archive generator from adding the manifest file (
META-INF/MANIFEST.MF) into the JAR file. -
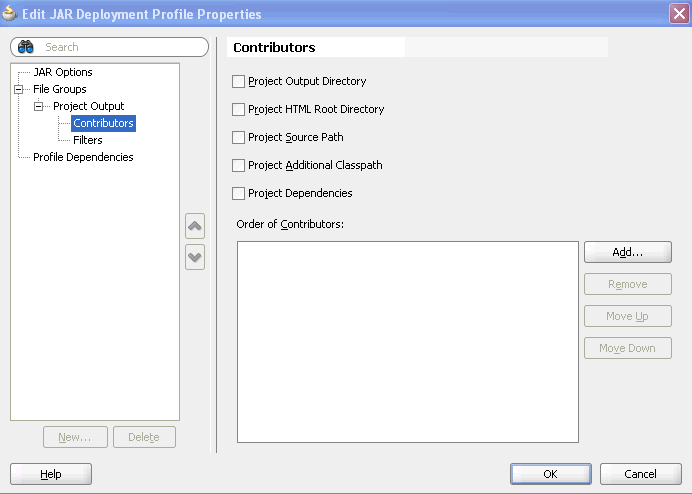
Select File Groups > Project Output > Contributors from the navigational tree on the left.
-
Deselect the Project Output Directory and Project Dependencies options, as shown in Figure 43-11.
This prevents the archive generator from adding the contents of the project output and project dependencies into the archive.
-
Click Add to add a new contributor.
The Add Contributor dialog appears. This dialog enables you to add artifacts to your archive.
-
Click Browse.
-
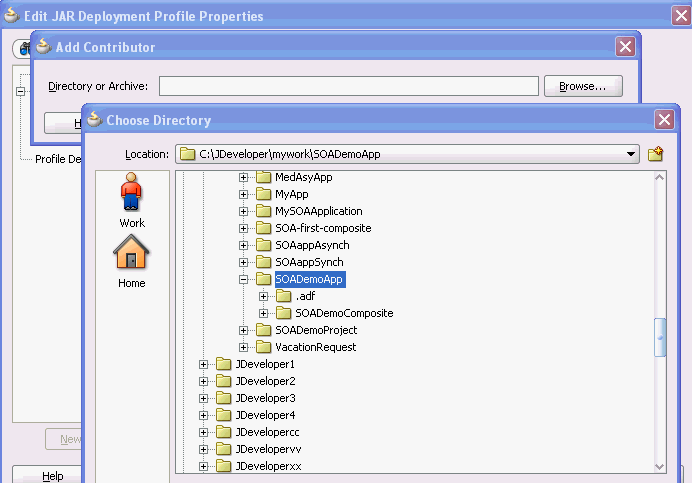
Select the folder in which your artifacts reside, as shown in Figure 43-12. Note that this also determines the hierarchy of artifacts in the archive.
-
Click Select to close the Choose Directory dialog.
-
Click OK to close the Add Contributor dialog.
-
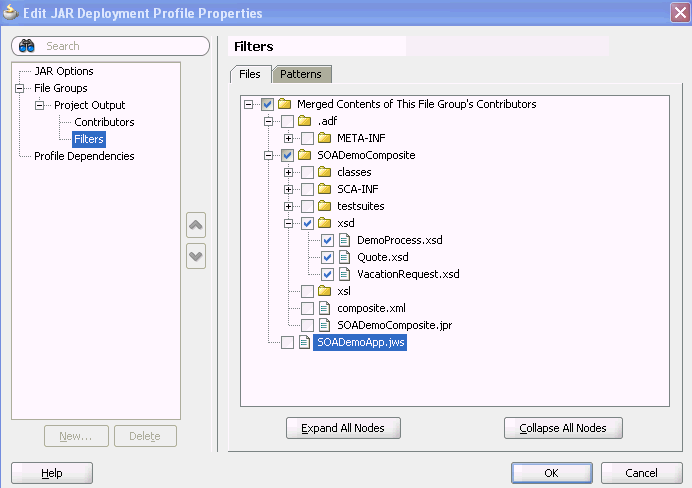
Select File Groups > Project Output > Filters from the navigational tree on the left.
-
Select only the artifacts to include in the archive, as shown in Figure 43-13. For this example, the archive contains the following XSD files:
-
SOADemoComposite/xsd/DemoProcess.xsd
-
SOADemoComposite/xsd/Quote.xsd
-
SOADemoComposite/xsd/VacationRequest.xsd
Figure 43-13 Artifacts to Include in the Archive
Description of "Figure 43-13 Artifacts to Include in the Archive "
-
-
Click OK to save changes to the JAR deployment profile.
-
Click OK to save the new deployment profile.
-
From the File main menu, select Save All.
43.4.1.2 Create a SOA Bundle that Includes the JAR Profile
To create a SOA bundle that includes the JAR profile:
-
From the Application Menu, select Application Properties > Deployment.
-
Click New to create a SOA bundle profile.
The Create Deployment Profile dialog appears.
-
From the Archive Type list, select SOA Bundle. A bundle is a collection of multiple SOA composite applications.
-
In the Name field, enter a name (for this example,
sharedArtifactBundleis entered). -
Click OK.
-
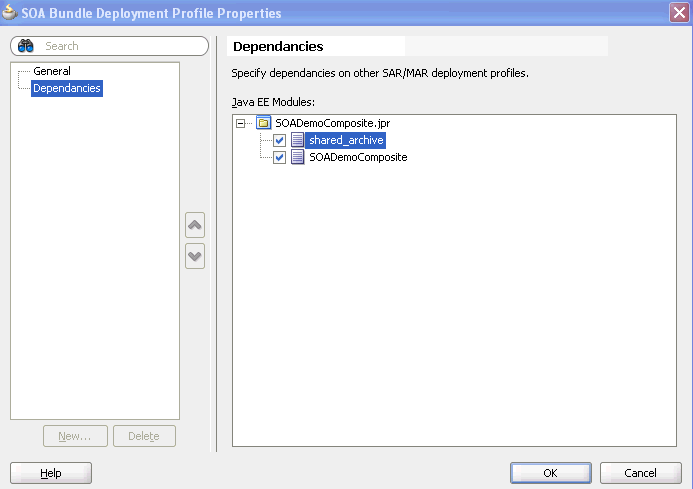
Select Dependencies from the navigational tree on the left.
-
Select the JAR file and SOA-SAR profiles you previously created (for this example, named shared_archive and sharedArtifactBundle, respectively). You have the option of a JAR, an SOA-SAR, or both.
Figure 43-15 Deployment Profile Dependencies
Description of "Figure 43-15 Deployment Profile Dependencies"
-
Click OK to save the SOA bundle deployment profile changes.
-
Click OK to save the new deployment profile.
-
From the File main menu, select Save All.
43.4.1.3 Deploy the SOA Bundle
-
Right-click the Application menu and select Deploy > SOA_bundle_name > to server_connection. If you do not have an existing connection, you must first create one.
This deploys the SOA bundle to the application server (shared artifacts are deployed to the MDS database of Oracle SOA Suite).
43.4.2 How to Use Shared Metadata
This section describes how to browse and select the shared metadata you created in Section 43.4.1, "How to Deploy Shared Metadata."
43.4.2.1 Create a SOA-MDS Connection
To create a SOA-MDS connection:
-
From the File menu, select New > Connections > SOA-MDS Connection.
-
In the Welcome page, click Next.
-
In the Connection Name field, enter a name.
-
From the Connection Type list, select DB based MDS.
-
Click Next.
The Connection Type page appears.
-
Select an existing connection or create a new connection to the Oracle SOA Suite database with the MDS schema.
-
From the Select MDS partition list, select the MDS partition (for example, soa-infra).
-
Click Next.
-
Click Finish.
You can now browse the connection in the Resource Palette and view shared artifacts under the /apps node.
43.4.2.2 Create a BPEL Process
You can now browse and use the shared metadata from a different SOA composite application. For this example, you create a BPEL process service component in a different application.
-
Create a new BPEL process service component in a different application. For more information, see Section 5.1.1, "How to Add a BPEL Process Service Component."
-
In the Create BPEL Process dialog, click the Browse icon to the right of the Input field.
The Type Chooser dialog appears.
-
In the upper right corner, click the Import Schema File icon.
The Import Schema File dialog appears.
-
To the right of the URL field, click the Browse icon.
The SOA Resource Browser dialog appears.
-
At the top of the dialog, select Resource Palette from the list.
-
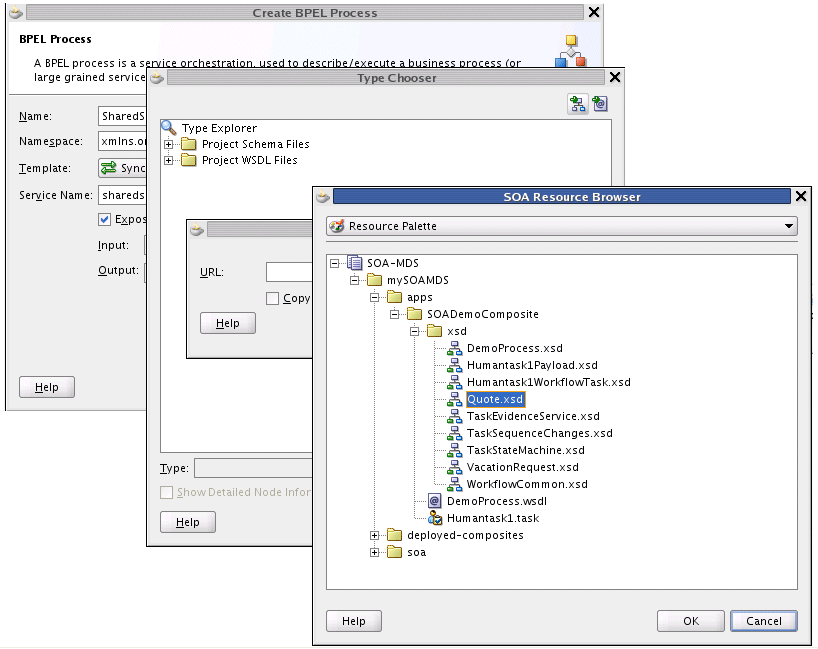
Select shared metadata, as shown in Figure 43-16. For this example, the Quote.xsd file that you selected to include in the archive in Step 18 of Section 43.4.1.1, "Create a JAR Profile and Include the Artifacts to Share" is selected.
Figure 43-16 Shared Metadata in the SOA Resource Browser
Description of "Figure 43-16 Shared Metadata in the SOA Resource Browser"
-
Click OK.
-
In the Import Schema File dialog, click OK.
-
In the Type Chooser dialog, select a node of Quote.xsd (for this example, QuoteRequest), and click OK.
-
In the Create BPEL Process dialog, click OK to complete creation.
-
In the Application Navigator, select the WSDL file for the BPEL process.
-
Click Source.
The WSDL file includes the following definition.
<wsdl:types> <schema xmlns="http://www.w3.org/2001/XMLSchema"> <import namespace="http://www.mycompany.com/ns/salesquote" schemaLocation="oramds:/apps/SOADemoComposite/xsd/Quote.xsd" /> </schema> </wsdl:types> -
Continue modeling the BPEL process as necessary.
-
Deploy the SOA composite application that includes the BPEL process.
43.5 Deploying an Existing SOA Archive in Oracle JDeveloper
You can deploy an existing SOA archive from the Application Server Navigator in Oracle JDeveloper.
Notes:
-
The archive must exist. You cannot create an archive in the Deploy SOA Archive dialog.
-
These instructions assume you have created an application server connection to an Oracle WebLogic Administration Server on which the SOA Infrastructure is deployed. Creating a connection to an Oracle WebLogic Administration Server enables you to browse for SOA composite applications deployed in the same domain. From the File main menu, select New > Connections > Application Server Connection to create a connection.
43.5.1 How to Deploy an Existing SOA Archive from Oracle JDeveloper
To Deploy an Existing SOA Archive from Oracle JDeveloper:
-
From the View menu, select Application Server Navigator.
-
Expand your connection name (for this example, named myConnection).
-
Right-click the SOA folder.
-
Select Deploy SOA Archive.
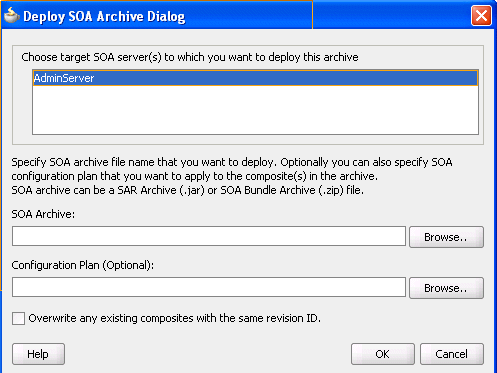
The Deploy SOA Archive dialog shown in Figure 43-17 appears.
-
Provide responses appropriate to your environment, as shown in Table 43-4.
Table 43-4 Create Deployment Profile Dialog Fields and Values
Field Description Choose target SOA server(s) to which you want to deploy this archive
Select the Oracle WebLogic Administration Server to which to deploy the archive.
SOA Archive
Click Browse to select a prebuilt SOA composite application archive. The archive consists of a JAR file of a single application or a SOA bundle ZIP file containing multiple applications.
Configuration Plan (Optional)
Click Browse to select a configuration plan to attach to the SOA composite application archive. The configuration plan enables you to define the URL and property values to use in different environments. During process deployment, the configuration plan is used to search the SOA project for values that must be replaced to adapt the project to the next target environment.
For information about creating configuration plans, see Section 43.7.4, "How to Create a Configuration Plan in Oracle JDeveloper" or Section 43.7.5, "How to Create a Configuration Plan with the WLST Utility."
Overwrite any existing composites with the same revision ID
Select to overwrite (redeploy) an existing SOA composite application with the same revision ID. The consequences of this action are as follows:
-
A new version 1.0 of the SOA composite application is redeployed, overwriting a previously deployed 1.0 version.
-
The older, currently-deployed version of this revision is removed (overwritten).
-
If the older, currently-deployed version of this revision has running instances, the state of those instances is changed to stale.
-
-
Click OK.
43.6 Managing SOA Composite Applications with Scripts
You can also manage SOA composite applications from a command line or scripting environment using WLST or ant. These options are well-suited for automation and can be easily integrated into existing release processes.
43.6.1 How to Manage SOA Composite Applications with the WLST Utility
You can manage SOA composite applications with the WLST scripting utility. For instructions, see Oracle Fusion Middleware WebLogic Scripting Tool Command Reference.
43.6.2 How to Manage SOA Composite Applications with ant Scripts
You can manage SOA composite applications with the ant utility. ant is a Java-based build tool used by Oracle SOA Suite for managing SOA composite applications. The configuration files are XML-based and call out a target tree where various tasks are executed.
Table 43-5 lists the ant scripts available in the Middleware_Home\SOA_Suite_Home\bin directory.
Table 43-5 ant Management Scripts
| Script | Description |
|---|---|
|
|
Attaches, extracts, generates, and validates configuration plans for a SOA composite application. |
|
|
Compiles a SOA composite application. |
|
|
Packages a SOA composite application into a composite SAR file. |
|
|
Deploys a SOA composite application. |
|
|
Undeploys a SOA composite application. |
|
|
Manages a SOA composite application, including starting, stopping, activating, retiring, assigning a default revision version, and listing deployed SOA composite applications. |
|
|
Migrates BPEL and ESB release 10.1.3 metadata to release 11g. Note: If any Java code is part of the project, you must manually modify the code to pass compilation with an 11g compiler. For BPEL process instance data, active data used by the 10.1.3 Oracle BPEL Server is not migrated. |
For additional information about ant, visit the following URL:
http://ant.apache.org
43.6.2.1 Testing a SOA Composite Application
Example 43-1 provides an example of executing a test case. Test cases enable you to automate the testing of SOA composite applications.
Example 43-1 Testing an Application
ant -f ant-sca-test.xml -Dscatest.input=MyComposite
-Djndi.properties=/home/jdoe/jndi.properties
| Argument | Definition |
|---|---|
scatest |
Possible inputs are as follows:
|
jndi. properties |
Absolute path to the JNDI property file. This is a property file that contains JNDI properties for connecting to the server. For example:
java.naming.factory.initial=weblogic.jndi.WLInitialContextFactory
java.naming.provider.url=t3://myserver.us.oracle.com:8001/soa-infra
java.naming.security.principal=weblogic
dedicated.connection=true
dedicated.rmicontext=true
Since a composite test (in a test suite) is executed on the SOA Infrastructure, this properties file contains the connection information. For this example, these properties create a connection to the SOA Infrastructure hosted in You typically create one |
For more information on creating and running tests on SOA composite applications, see Chapter 49, "Testing SOA Composite Applications" and Oracle Fusion Middleware Administrator's Guide for Oracle SOA Suite.
43.6.2.2 Compiling a SOA Composite Application
Example 43-2 provides an example of compiling a SOA composite application, which validates it for structure and syntax.
Example 43-2 Compiling an Application
ant -f ant-sca-compile.xml
-Dscac.input=/myApplication/myComposite/composite.xml
| Argument | Definition |
|---|---|
scac |
Possible inputs are as follows:
|
43.6.2.3 Packaging a SOA Composite Application into a Composite SAR file
Example 43-3 provides an example of packaging a SOA composite application into a composite SAR file. The outcome of this command is a SOA archive. Check the output of the command for the exact location of the resulting file.
Example 43-3 Packaging an Application
ant -f ant-sca-package.xml
-DcompositeDir=C:\demo\end2end-105-POProcessing\po\solutions\ch9\POProcessing\POPr
ocessing
-DcompositeName=POProcessing
-Drevision=6-cmdline
-Dsca.application.home=C:\demo\end2end-105-POProcessing\po\solutions\ch9\POProces
sing
| Argument | Definition |
|---|---|
compositeDir |
Absolute path of a directory that contains composite artifacts. |
compositeName |
Name of the composite. |
revision |
Revision ID of the composite. |
sca.application.home |
Optional. Absolute path of the application home directory. This property is required if you have shared data. |
oracle.home |
Optional. The oracle.home property. |
43.6.2.4 Deploying SOA Composite Application
Example 43-4 provides an example of deploying a SOA composite application.
Example 43-4 Deploying an Application
ant -f ant-sca-deploy.xml
-DserverURL=http://localhost:8001
-DsarLocation=C:\demo\end2end-105-POProcessing\po\solutions\ch9\POProcessing\POPro
cessing\deploy\sca_POProcessing_rev6-cmdline.jar
-Doverwrite=true
-Duser=weblogic
-DforceDefault=true
-Dconfigplan=C:\demo\end2end-105-POProcessing\po\solutions\ch9\POProcessing\POProc
 essing\demed_cfgplan.xml
Note:
After specifying the user name, enter the password when prompted.| Argument | Definition |
|---|---|
serverURL |
URL of the server that hosts the SOA Infrastructure application (for example, http://myhost10:8001). |
sarLocation |
Absolute path to one the following:
|
overwrite |
Optional. Indicates whether to overwrite an existing SOA composite application on the server.
|
user |
Optional. User name to access the composite deployer servlet when basic authentication is configured. |
password |
Optional. Password to access the composite deployer servlet when basic authentication is configured.
If you enter the user name, you are prompted to enter the password if you do not provide it here. |
forceDefault |
Optional. Indicates whether to set the version being deployed as the default version for that composite application.
|
configplan |
Absolute path of a configuration plan to be applied to a specified SAR file or to all SAR files included in the ZIP file. |
sysPropFile |
Passes in a system properties file that is useful for setting extra system properties, for debugging, for SSL configuration, and so on.
If you specify a file name (for example, javax.net.debug=all |
43.6.2.5 Undeploying a SOA Composite Application
Example 43-5 provides an example of undeploying a SOA composite application.
Example 43-5 Undeploying a SOA Composite Application
ant -f ant-sca-deploy.xml undeploy
-DserverURL=http://localhost:8001
-DcompositeName=POProcessing
-Drevision=rev6-cmdline
-Duser=weblogic
Note:
After specifying the user name, enter the password when prompted.| Argument | Definition |
|---|---|
serverURL |
URL of the server that hosts the SOA Infrastructure application (for example, http://myhost10:7001). |
compositeName |
Name of the SOA composite application. |
revision |
Revision ID of the SOA composite application. |
user |
Optional. User name to access the composite deployer servlet when basic authentication is configured.
If you enter the user name, you are prompted to enter the corresponding password. |
password |
Optional. Password to access the composite deployer servlet when basic authentication is configured. |
43.6.2.6 Managing a SOA Composite Application
Example 43-6 through Example 43-11 provide examples of managing a SOA composite application.
Example 43-6 Starting an Application
ant -f ant-sca-mgmt.xml startComposite -Dhost=myhost -Dport=8001 -Duser=weblogic
  -DcompositeName=HelloWorld -Drevision=1.0
Note:
After specifying the user name, enter the password when prompted.| Argument | Definition |
|---|---|
host |
Hostname of the Oracle WebLogic Server (for example, myhost). |
port |
Port of the Oracle WebLogic Server (for example, 7001). |
user |
User name for connecting to the running server to get MBean information (for example, weblogic). |
password |
Password for the user name. |
compositeName |
Name of the SOA composite application. |
revision |
Revision of the SOA composite application. |
label |
Optional. Label of the SOA composite application. The label identifies the metadata service (MDS) artifacts associated with the application. If the label is not specified, the system finds the latest one. |
Example 43-7 Stopping an Application
ant -f ant-sca-mgmt.xml stopComposite -Dhost=myhost -Dport=8001 -Duser=weblogic
-DcompositeName=HelloWorld -Drevision=1.0
Note:
After specifying the user name, enter the password when prompted.| Argument | Definition |
|---|---|
host |
Hostname of the Oracle WebLogic Server (for example, myhost). |
port |
Port of the Oracle WebLogic Server (for example, 7001). |
user |
User name for connecting to the running server to get MBean information (for example, weblogic). |
password |
Password for the user name. |
compositeName |
Name of the SOA composite application. |
revision |
Revision of the SOA composite application. |
label |
Optional. Label of the SOA composite application. The label identifies the MDS artifacts associated with the application. If the label is not specified, the system finds the latest one. |
Example 43-8 Activate an Application
ant -f ant-sca-mgmt.xml activateComposite -Dhost=myhost -Dport=8001
-Duser=weblogic-DcompositeName=HelloWorld -Drevision=1.0
Note:
After specifying the user name, enter the password when prompted.| Argument | Definition |
|---|---|
host |
Hostname of the Oracle WebLogic Server (for example, myhost). |
port |
Port of the Oracle WebLogic Server (for example, 7001). |
user |
User name for connecting to the running server to get MBean information (for example, weblogic). |
password |
Password for the user name. |
compositeName |
Name of the SOA composite application. |
revision |
Revision of the SOA composite application. |
label |
Optional. Label of the SOA composite application. The label identifies the MDS artifacts associated with the application. If the label is not specified, the system finds the latest one. |
Example 43-9 Retire an Application
ant -f ant-sca-mgmt.xml retireComposite -Dhost=myhost -Dport=8001 -Duser=weblogic
-DcompositeName=HelloWorld -Drevision=1.0
Note:
After specifying the user name, enter the password when prompted.| Argument | Definition |
|---|---|
host |
Hostname of the Oracle WebLogic Server (for example, myhost). |
port |
Port of the Oracle WebLogic Server (for example, 7001). |
user |
User name for connecting to the running server to get MBean information (for example, weblogic). |
password |
Password for the user name. |
compositeName |
Name of the SOA composite application. |
revision |
Revision of the SOA composite application. |
label |
Optional. Label of the SOA composite application. The label identifies the MDS artifacts associated with the application. If the label is not specified, the system finds the latest one. |
Example 43-10 Assigning the Default Version to a SOA Composite Application
ant -f ant-sca-mgmt.xml assignDefaultComposite -Dhost=myhost -Dport=8001
-Duser=weblogic -DcompositeName=HelloWorld -Drevision=1.0
Note:
After specifying the user name, enter the password when prompted.| Argument | Definition |
|---|---|
host |
Hostname of the Oracle WebLogic Server (for example, myhost). |
port |
Port of the Oracle WebLogic Server (for example, 7001). |
user |
User name for connecting to the running server to get MBean information (for example, weblogic). |
password |
Password for the user name. |
compositeName |
Name of the SOA composite application. |
revision |
Revision of the SOA composite application. |
Example 43-11 Listing the Deployed SOA Composite Applications
ant -f ant-sca-mgmt.xml listDeployedComposites -Dhost=myhost -Dport=8001
-Duser=weblogic
Note:
After specifying the user name, enter the password when prompted.| Argument | Definition |
|---|---|
host |
Hostname of the Oracle WebLogic Server (for example, myhost). |
port |
Port of the Oracle WebLogic Server (for example, 7001). |
user |
User name for connecting to the running server to get MBean information (for example, weblogic). |
password |
Password for the user name. |
43.6.2.7 Upgrading a SOA Composite Application
You can use ant to upgrade a SOA composite application from 10.1.3 to 11g. For information, see Oracle Fusion Middleware Upgrade Guide for Oracle SOA Suite, WebCenter, and ADF.
43.6.2.8 How to Manage SOA Composite Applications with ant Scripts
The WebLogic Fusion Order Demo application provides an example of using ant scripts to compile, package, and deploy the application. You can create the initial ant build files by selecting New > Ant > Buildfile from Project from the File main menu.
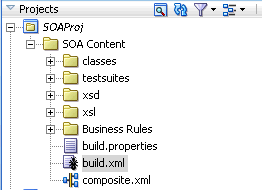
Figure 43-18 shows the build.properties and build.xml files that display in the Application Navigator after creation.
-
build.properties
A file that you edit to reflect your environment (for example, specifying Oracle home and Java home directories, setting server properties such as hostname and port number to use for deployment, specifying the application to deploy, and so on).
-
build.xml
Used by
antto compile, build, and deploy composite applications to the server specified in the build.properties file.
-
Modify the
build.propertiesfile to reflect your environment. -
From the Build menu, select Run Ant on project_name.
This builds targets defined in the current project's build file.
For more information about downloading the WebLogic Fusion Order Demo and modifying and using these files, see Oracle Fusion Middleware Tutorial for Running and Building an Application with Oracle SOA Suite.
43.7 Moving SOA Composite Applications to and from Development, Test, and Production Environments
As you move projects from one environment to another (for example, from testing to production), you typically must modify several environment-specific values, such as JDBC connection strings, hostnames of various servers, and so on. Configuration plans enable you to modify these values using a single text (XML) file called a configuration plan. The configuration plan is created in either Oracle JDeveloper or from the command line. During process deployment, the configuration plan is used to search the SOA project for values that must be replaced to adapt the project to the next target environment.
43.7.1 Introduction to Configuration Plans
A configuration plan enables you to replace the following attributes and properties:
-
You create and edit a configuration plan file in which you can replace the following attributes and properties:
-
Any composite, service component, reference, service, and binding properties in the SOA composite application file (
composite.xml) -
Attribute values for bindings (for example, the location for
binding.ws) -
schemaLocationattribute of an import in a WSDL file -
locationattribute of an include in a WSDL file -
schemaLocationattribute of an include, import, and redefine in an XSD file -
Any properties in JCA adapter files
-
Modify and add policy references for the following:
-
Service component
-
Service and reference binding components
-
Note:
The configuration plan does not alter XSLT artifacts in the SOA composite application. If you want to modify any XSL, do so in the XSLT Mapper. Using a configuration plan is not useful. For example, you cannot change references in XSL using the configuration plan file. Instead, they must be changed manually in the XSLT Mapper in Oracle JDeveloper when moving to and from test, development, and production environments. This ensures that the XSLT Mapper opens without any issues in design time. However, leaving the references unchanged does not impact runtime behavior. -
-
You attach the configuration plan file to a SOA composite application JAR file or ZIP file (if deploying a SOA bundle).
-
During deployment, the configuration plan file is used to search the
composite.xml, WSDL, and XSD files in the SOA composite application JAR file for values that must be replaced to adapt the project to the next target environment.
43.7.2 Introduction to a Configuration Plan File
The following example shows a configuration plan in which you modify the following:
-
An
inFileFolderproperty for compositeFileAdaptorCompositeis replaced withmytestserver/newinFileFolder. -
A hostname (
myserver17) is replaced withtest-serverand port8888is replaced with8198in the following locations:-
All import WSDLs
-
All reference
binding.wslocations
-
The composite.xml file looks as shown in Example 43-12:
Example 43-12 composite.xml File
<composite .....>
  <import namespace="http://example.com/hr/"
 location="http://myserver17.us.oracle.com:8888/hrapp/HRAppService?WSDL"
 importType="wsdl"/>
  <service name="readPO">
    <interface.wsdl
interface="http://xmlns.oracle.com/pcbpel/adapter/file/readPO/#wsdl.interface(Read
_ptt)"/>
    <binding.jca config="readPO_file.jca"/>
    <property name="inFileFolder" type="xs:string" many="false"
 override="may">/tmp/inFile</property>
  </service>
  <reference name="HRApp">
    <interface.wsdl
 interface="http://example.com/hr/#wsdl.interface(HRAppService)"/>
    <binding.ws
port="http://example.com/hr/#wsdl.endpoint(HRAppService/HRAppServiceSoapHttpPort)"
 location="http://myserver17.us.oracle.com:8888/hrapp/HRAppService?WSDL"/>
    <binding.java serviceName="{http://example.com/hr/}HRAppService"
 registryName="HRAppCodeGen_JBOServiceRegistry"/>
  </reference>
</composite>
The configuration plan file looks as shown in Example 43-13.
Example 43-13 Configuration Plan File
<?xml version="1.0" encoding="UTF-8"?>
<soaConfigPlan xmlns:jca="http://xmlns.oracle.com/pcbpel/wsdl/jca/">
  <composite name="FileAdaptorComposite">
    <service name="readPO">
      <binding type="*">
        <property name="inFileFolder">
          <replace>/mytestserver/newinFileFolder</replace>
        </property>
      </binding>
    </service>
  </composite>
  <!-- For all composite replace host and port in all imports wsdls -->
  <composite name="*">
    <imports>
      <searchReplace>
        <search>myserver17</search>
        <replace>test-server</replace>
      </searchReplace>
      <searchReplace>
        <search>8888</search>
        <replace>8198</replace>
      </searchReplace>
    </imports>
    <reference name="*">
      <binding type="ws">
        <attribute name="location">
          <searchReplace>
            <search>myserver17</search>
            <replace>test-server</replace>
          </searchReplace>
          <searchReplace>
            <search>8888</search>
            <replace>8198</replace>
          </searchReplace>
        </attribute>
      </binding>
    </reference>
  </composite>
</soaConfigPlan>
A policy is replaced if a policy for the same URI is available. Otherwise, it is added. This is different from properties, which are modified, but not added.
43.7.3 Introduction to Use Cases for a Configuration Plan
The following steps provide an overview of how to use a configuration plan when moving from development to testing environments:
-
User A creates SOA composite application Foo.
-
User A deploys Foo to a development server, fixes bugs, and refines the process until it is ready to test in the staging area.
-
User A creates and edits a configuration plan for Foo, which enables the URLs and properties in the application to be modified to match the testing environment.
-
User A deploys Foo to the testing server using Oracle JDeveloper or a series of command-line scripts (can be WLST-based). The configuration plan created in Step 3 modifies the URLs and properties in Foo.
-
User A deploys SOA composite application Bar in the future and applies the same plan during deployment. The URLs and properties are also modified.
The following steps provide an overview of how to use a configuration plan when creating environment-independent processes:
Note:
This use case is useful for users that have their own development server and a common development and testing server if they share development of the same process. Users that share the same deployment environment (that is, the same development server) may not find this use case as useful.-
User A creates SOA composite application Foo.
-
User A deploys Foo to their development server, fixes bugs, and refines the process until it is ready to test in the staging area.
-
User A creates a configuration plan for Foo, which enables the URLs and properties in the process to be modified to match the settings for User A's environment.
-
User A checks in Foo and the configuration plan created in Step 3 to a source control system.
-
User B checks out Foo from source control.
-
User B makes a copy of the configuration plan to match their environment and applies the new configuration plan onto Foo's artifacts.
-
User B imports the application into Oracle JDeveloper and makes several changes.
-
User B checks in both Foo and configuration plan B (which matches user B's environment).
-
User A checks out Foo again, along with both configuration plans.
43.7.4 How to Create a Configuration Plan in Oracle JDeveloper
This section describes how to create and use a configuration plan. In particular, this section describes the following:
-
Creating and editing a configuration plan
-
Attaching the configuration plan to a SOA composite application JAR file
-
Validating the configuration plan
-
Deploying the SOA composite application JAR or ZIP file in which the configuration plan is included
To create a configuration plan in Oracle JDeveloper:
-
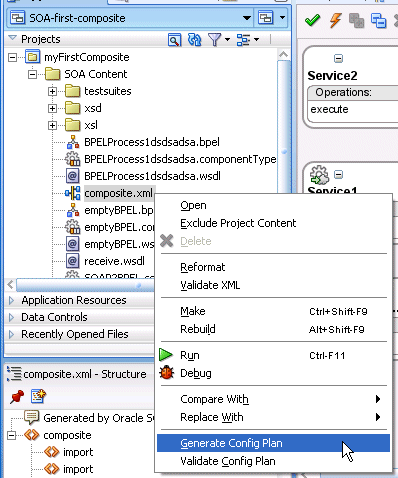
Right-click the composite.xml file of the project in which to create a configuration plan, and select Generate Config Plan. Figure 43-19 provides details.
Figure 43-19 Generate a Configuration Plan
Description of "Figure 43-19 Generate a Configuration Plan"
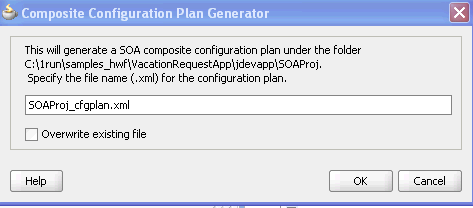
The Composite Configuration Plan Generator dialog appears.
Figure 43-20 Composite Configuration Plan Generator Dialog
Description of "Figure 43-20 Composite Configuration Plan Generator Dialog"
-
Create a configuration plan file for editing, as shown in Table 43-6.
Table 43-6 Generate a Configuration Plan
Field Description Specify the file name (.xml) for the configuration plan
Enter a specific name or accept the default name for the configuration plan. The file is created in the directory of the project and packaged with the SOA composite application JAR or ZIP file.
Note: During deployment, you can specify a different configuration file when prompted in the SOA Deployment Configuration dialog.
Overwrite existing file
Click to overwrite an existing configuration plan file with a different file in the project directory.
-
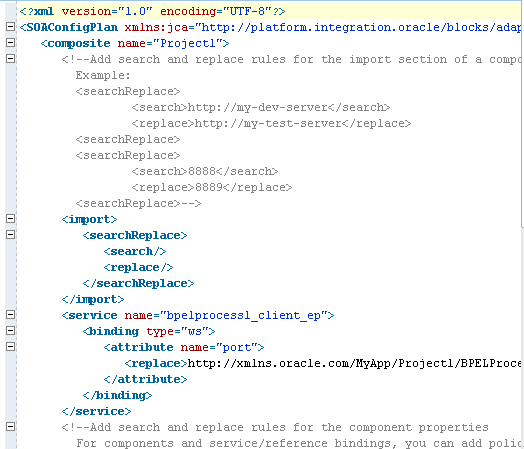
This creates and opens a single configuration plan file for editing, similar to that shown in Example 43-13. You can modify URLs and properties for the
composite.xml, WSDL, and schema files of the SOA composite application. Figure 43-21 provides details. -
Add values for server names, port numbers, and so on to the existing syntax. You can also add replacement-only syntax when providing a new value. You can add multiple search and replacement commands in each section.
-
From the File menu, select Save All.
-
Above the editor, click the x to the right of the file name to close the configuration plan file.
-
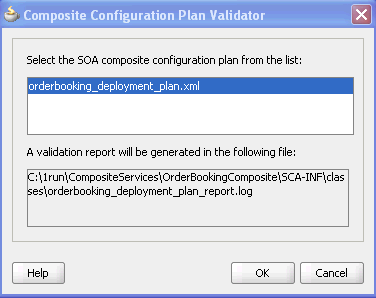
Right-click the composite.xml file again, and select Validate Config Plan.
The Composite Configuration Plan Validator appears, as shown in Figure 43-22.
Figure 43-22 Validate the Configuration Plan
Description of "Figure 43-22 Validate the Configuration Plan"
-
Select the configuration plan to validate. This step identifies all search and replacement changes to be made during deployment. Use this option for debugging only.
-
Note the directory in which a report describing validation results is created, and click OK.
The Log window in Oracle JDeveloper indicates if validation succeeded and lists all search and replacement commands to perform during SOA composite application deployment. This information is also written to the validation report.
Note:
The oldcomposite.xml, WSDL, and XSD files are not replaced with files containing the new values for the URLs and properties appropriate to the next environment. Replacement occurs only when the SOA composite application is deployed. -
Deploy the SOA composite application by following the instructions in one of the following sections:
-
Section 43.2, "Deploying a Single SOA Composite in Oracle JDeveloper"
-
Section 43.3, "Deploying Multiple SOA Composite Applications in Oracle JDeveloper"
-
Section 43.4, "Deploying and Using Shared Metadata Across SOA Composite Applications"
During deployment, the SOA Deployment Configuration dialog shown in Step 5 prompts you to select the configuration plan to include in the SOA composite application archive.
-
-
Select the configuration plan to include with the SOA composite application.
-
Click OK.
43.7.5 How to Create a Configuration Plan with the WLST Utility
As an alternative to using Oracle JDeveloper, you can use the WLST command line utility to perform the following configuration plan management tasks:
-
Generate a configuration plan for editing
-
Attach the configuration plan file to the SOA composite application JAR file
-
Validate the configuration plan
-
Extract a configuration plan packaged with the JAR file for editing
For instructions, see Oracle Fusion Middleware WebLogic Scripting Tool Command Reference.
