| Oracle® Fusion Middleware Tutorial for Running and Building an Application with Oracle SOA Suite 11g Release 1 (11.1.1) Part Number E10275-02 |
|
|
View PDF |
| Oracle® Fusion Middleware Tutorial for Running and Building an Application with Oracle SOA Suite 11g Release 1 (11.1.1) Part Number E10275-02 |
|
|
View PDF |
This chapter describes how to deploy Fusion Order Demo, place an order, and monitor the order as it is processed by the WebLogic Fusion Order Demo application. It explains two different order scenarios for the Web client and how to monitor orders processed through the business flow.
Before following the instructions in this chapter, perform all the procedures in Chapter 1.
This chapter includes the following sections:
Section 2.3, "Starting Fusion Middleware Control to Monitor Orders"
Section 2.6, "Undeploying the Composites for the WebLogic Fusion Order Demo Application"
To run the demo, deploy the applications for the Store Front module and the WebLogic Fusion Order Demo application, performing the following tasks:
To install the schema for the sample application:
Start Oracle JDeveloper 11g and from the main menu choose File > Open.
In the Open dialog, browse to DEMO_DOWNLOAD_HOME/Infrastructure and select Infrastructure.jws. Click Open.
When prompted to migrate files to the 11.1.1.1.0 format, click Yes. When the migration is complete, click OK.
In the Application Navigator, expand MasterBuildScript and then Resources, and double-click build.properties.
In the editor, modify the following properties for your environment:
From the JDeveloper main menu, choose File > Save All.
In the Application Navigator, under the Resources node, right-click build.xml and choose Run Ant Target > buildAll.
When prompted, enter the administrative-user password for your database.
The buildAll command then creates the FOD user and populates the tables in the FOD schema. In the Apache Ant - Log, a series of SQL scripts display, followed by:
buildAll:
BUILD SUCCESSFUL
Total time: nn minutes nn seconds
For more information on the demo schema and scripts, see the README.txt file in the MasterBuildScript project.
You place orders by running the home.jspx page in the StoreFrontUI project of the Store Front module. The StoreFrontUI project uses JavaServer Faces (JSF) as the view technology, and relies on the Oracle ADF Model layer to interact with Oracle ADF Business Components in the StoreFrontService project.
From the home page, you can browse the Web site as an anonymous user, then log in as a registered customer to place an order.
The Fusion Order Demo application ships with predefined customer data. Because the Fusion Order Demo application implements Oracle ADF Security to manage access to Oracle ADF resources, only the authenticated user can view orders in their cart. The following table shows the preregistered customers. You place orders as ngreenbe later in this chapter.
| Username | Password | Application Role |
|---|---|---|
ngreenbe |
welcome1 |
Customer (CUST) |
sking |
welcome1 |
Staff (STAFF) |
pbrown |
welcome1 |
Supplier (SUPP) |
To learn more about the Store Front module and to understand its implementation details, see Oracle Fusion Middleware Fusion Developer's Guide for Oracle Application Development Framework.
To deploy the Store Front module:
Choose File > Open.
In the Open dialog, browse to DEMO_DOWNLOAD_HOME/StoreFrontModule and select StoreFrontModule.jws. Click Open.
When prompted to migrate files to the 11.1.1.1.0 format, click Yes. When the migration is complete, click OK.
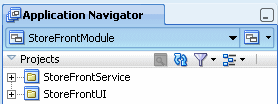
The following figure shows the Application Navigator after you open the file for the application workspace.
Deploy the services used by the Store Front module to send orders to the OrderBookingComposite composite.
In the Application Navigator, right click StoreFrontModule and choose Deploy > StoreFrontModule_SDOServices > to > MyAppServerConnection. You created this connection in Section 1.2.4, "Task 4: Create a Connection to an Oracle WebLogic Server."
In the Select Deployment Targets dialog, select the Managed Server for the Oracle WebLogic Server, such as soa_server, and click OK
In the Deployment Configuration dialog, accept the default MDS repository name and partition name, and then click Deploy.
Deploy the Store Front module. From the Application menu, select Deploy > StoreFrontModule > to > MyAppServerConnection.
To deploy the WebLogic Fusion Order Demo application to an Oracle SOA Suite installation, containing an Oracle WebLogic Server domain with an Administration Server and a Managed Server.
In the Application Navigator, select WebLogicFusionOrderDemo.
Expand bin and then Resources, and double-click build.properties.
In the editor, modify the following properties for your environment:
From the JDeveloper main menu, choose File > Save All.
In the Application Navigator, under the Resources node, right-click build.xml and choose Run Ant Target and select the following ant targets in the following sequential order:
Do not run the next target in the sequence until the previous one completes successfully. In the Apache Ant - Log, ensure you see the following message before proceeding to the next script:
BUILD SUCCESSFUL
Total time: nn minutes nn seconds
For more information about the ant targets, see the following resources:
The ordering process begins in the storefront UI, where a user shops for and orders products. When an order is submitted, the Application Development Framework Business Component writes the order to database and raises an NewOrderSubmitted business event using the Events Delivery Network (EDN). The OrderPendingEvent mediator subscribes this event, and initiates the main BPEL process, OrderProcessor, to process the order.
In this task, place two orders, one for under $2000 and the other for over $2000. By placing these order, you can see how orders totalling more than $2000 require human approval.
To place orders:
Access the storefront from the following URL:
http://hostname:port/StoreFrontModule/faces/home.jspx
where hostname is the DNS name or IP address of the Oracle WebLogic Server for Oracle SOA Suite and port is the address of the port on which the Managed Server for the Oracle WebLogic Server is listening for requests (8001 by default).
You begin the order process by browsing the product catalog. When you click Add next to a product, the site updates the shopping cart region to display the item.
Place an order for under $2000:
Click the Ipod Nano 1 Gb for $149.95 and click Add.
Click the Ipod Nano 2 Gb for $199.95 nd click Add.
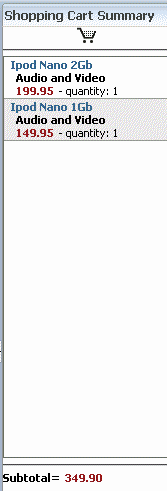
The following shows the cart summary with the two products added. The summary displays a subtotal purchase total of $349.90 for the two items that appear in the cart.
Click the Checkout link, located in the middle of the menu bar.
A login dialog displays.
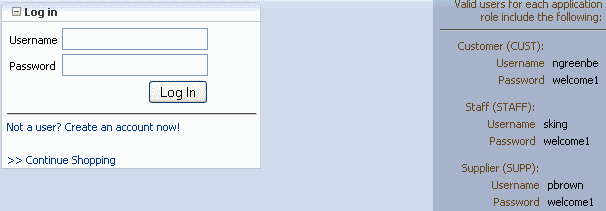
Enter ngreenbe and welcome1 in the Username and Password fields, respectively.
Click Log In.
The Shipping Details page displays.
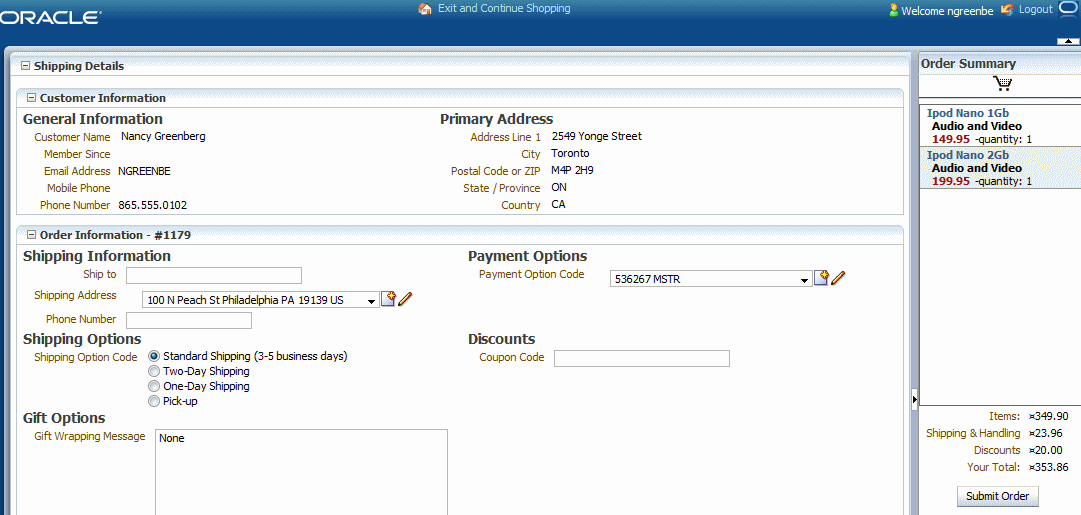
In the Order Information #order_id section, take note of the order ID, as you need it for a later task. In this example, the order ID is 1179.
In the Shipping Information section, take note of the following default settings:
- 100 N Peach St Philadelphia PA 19139 US
- 536267 MSTR
In the Order Summary section, take note of the order total, which is $353.86 and click Submit Order to complete the first order.
The Invoice Details page displays.
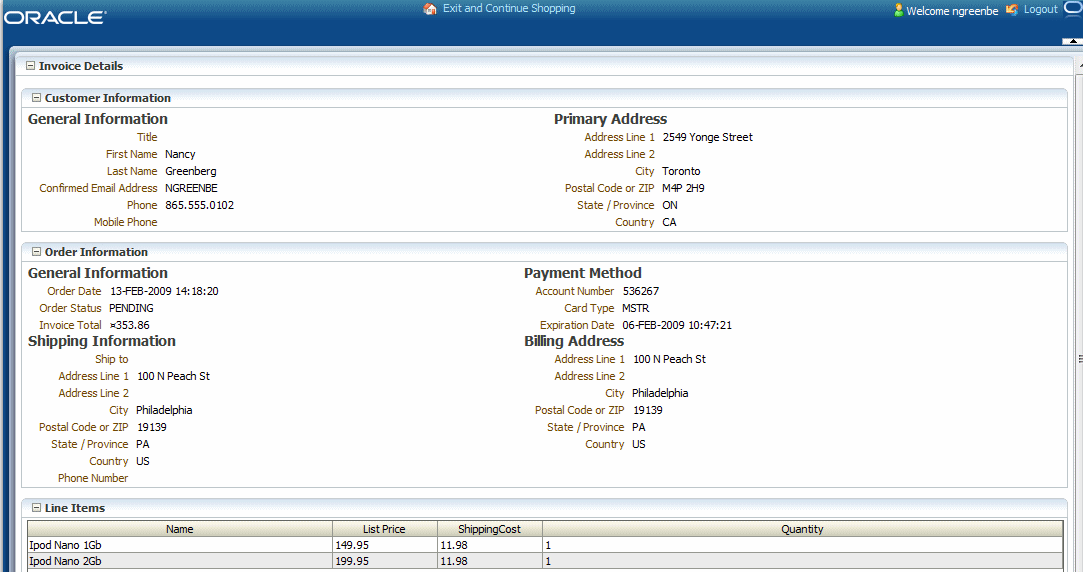
Click the Exit and Continue Shopping link, located in the menu bar, to return to the home page.
Place an order for over $2000:
Click the Plasma HD Television for $1,999.99 and click Add.
Click the Playstation 2 Video Game for $199.95 and click Add.
The Shopping Cart Summary section displays a subtotal purchase total of $2,199.94 for the two items that appear in the cart.
Click the Checkout link.
The Shipping Details page displays.
In the Order Information #order_id section, take note of the order ID, as you need it for a later task. In this example, the order ID is 1180.
In the Shipping Information section, modify any of the options, such as the address in the Shipping Address field and the credit card in the Payment Options section. Take note of the settings you select.
- 2100 S Casino Dr. Laughlin NV 89029 US
- 4111111111111111 VISA
In the Order Summary section, take note of the order total, which is $2,219.42 and click Submit Order to complete the second order.
The Invoice Details page displays.
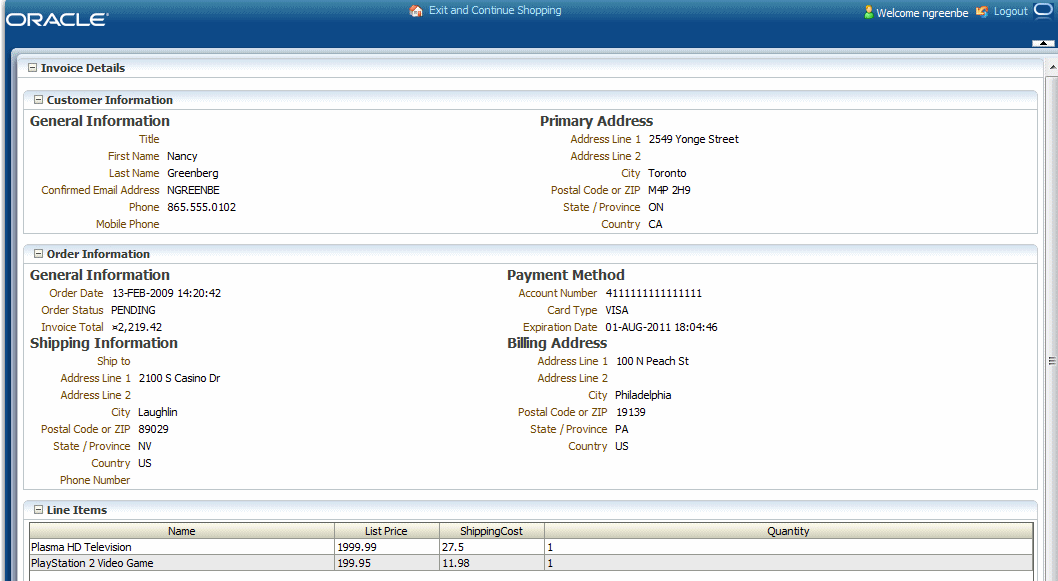
Click the Logout link, located in the right-hand-side of the menu bar, to log ngreenbe out of the session.
To start Oracle Enterprise Manager Fusion Middleware Control to monitor orders:
Use Mozilla FireFox, version 2.0 or higher, or Internet Explorer, version 7.0 or higher, to access the following URL:
http://hostname:port/em
where hostname is the host name and port is the port of the Fusion Middleware Control for the Oracle SOA Suite installation.
The login dialog appears.
Enter weblogic/password and click Login
where:
weblogic is the Fusion Middleware Control Console administrator user name
password is the password you provided for the weblogic administrator during installation
From the navigation pane, expand SOA > soa-infra to see the deployed applications:
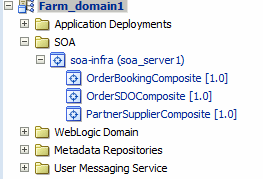
OrderBookingComposite and PartnerSupplierComposite are the two main composites in the WebLogic Fusion Order Demo application.
You now monitor the first order sent from the Store Front module to the OrderBookingComposite composite from the Fusion Middleware Control. This order was submitted by Nancy Greenberg for $353.86.
To monitor the first order:
From the navigation pane, expand SOA > soa-infra to see the deployed applications:

OrderBookingComposite and PartnerSupplierComposite are the two main composites in the WebLogic Fusion Order Demo application.
Click the OrderBookingComposite composite.
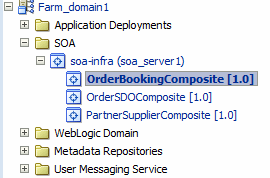
The SOA Infrastructure home page displays. The upper part of the page displays details about recent SOA composite application instances, recent faults, and rejected messages. The topmost two instances in the Recent Instances table represents the instance of the SOA composite application you created when you placed orders in Section 2.2, "Placing Two Orders in the Store Front."
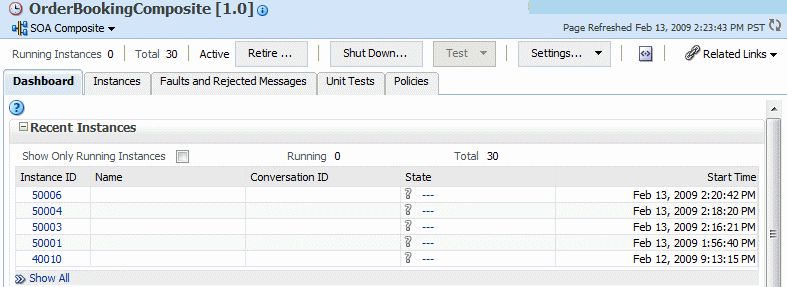
In the Recent Instances section, click the second instance, representing the order for $353.86. Note the instance number.
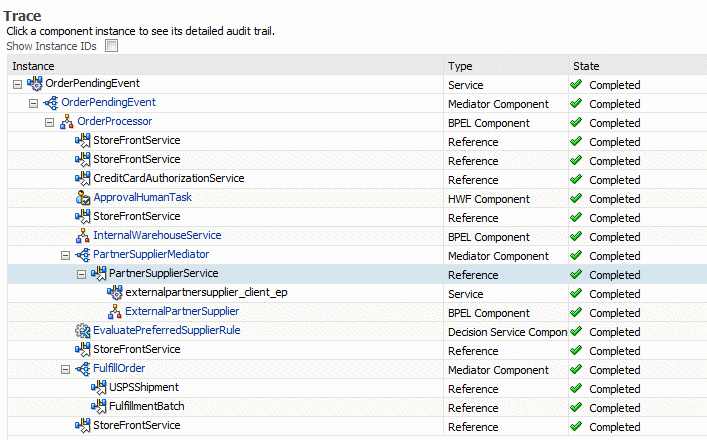
The Flow Trace page displays. The Trace section shows the sequence of the message flow through the services, service components, and references that comprise the SOA composite application.
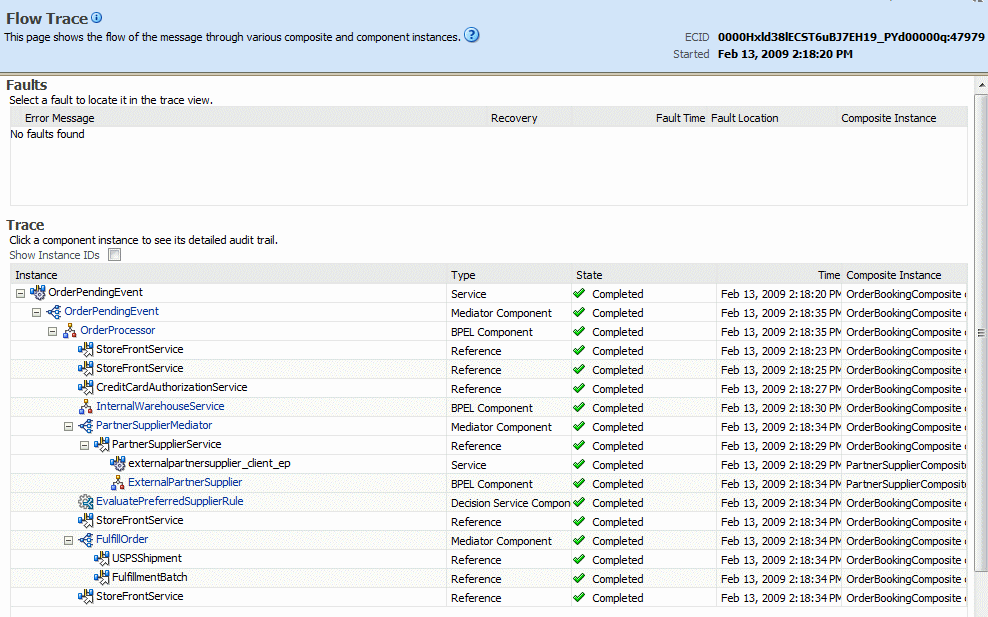
The Trace section displays the state of each service component within the OrderBookingComposite composite. Notice all the service components have a status of Completed, indicating that the order was successfully processed.
Click the OrderProcessor BPEL process service component in the Instance column to view instance more carefully.
The Audit Trail tab of the Instance of OrderProcessor window displays execution details about the activities in the BPEL process. Notice, too, the instance you selected displays in the Instance ID field on the right side.
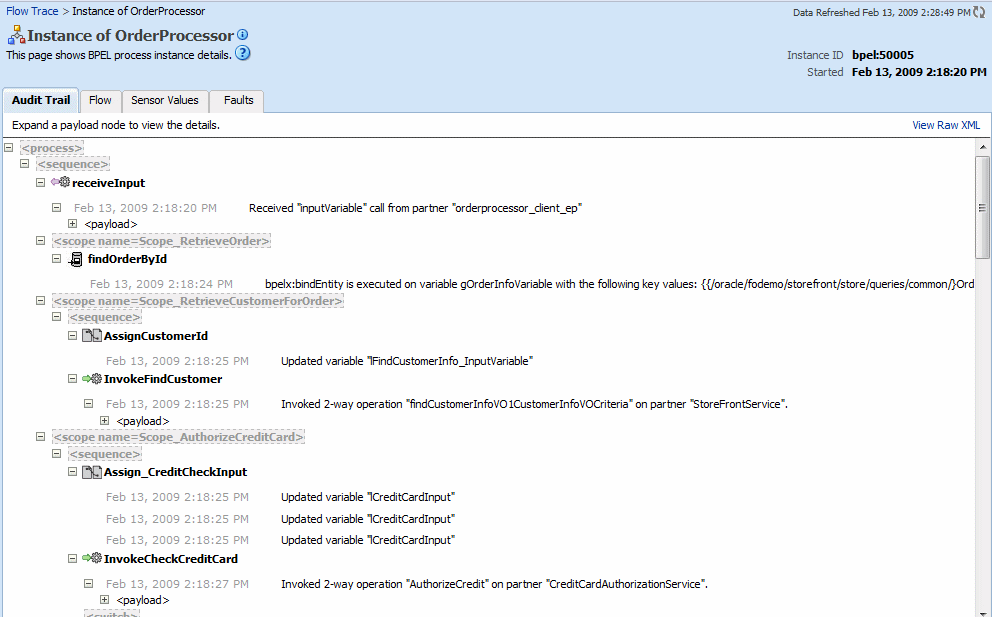
Click the Flow tab to see a visual representation of the instance.
A visual representation of the BPEL process activities appears. The icons in the flow are referred to as activities. You can click them to view their details.
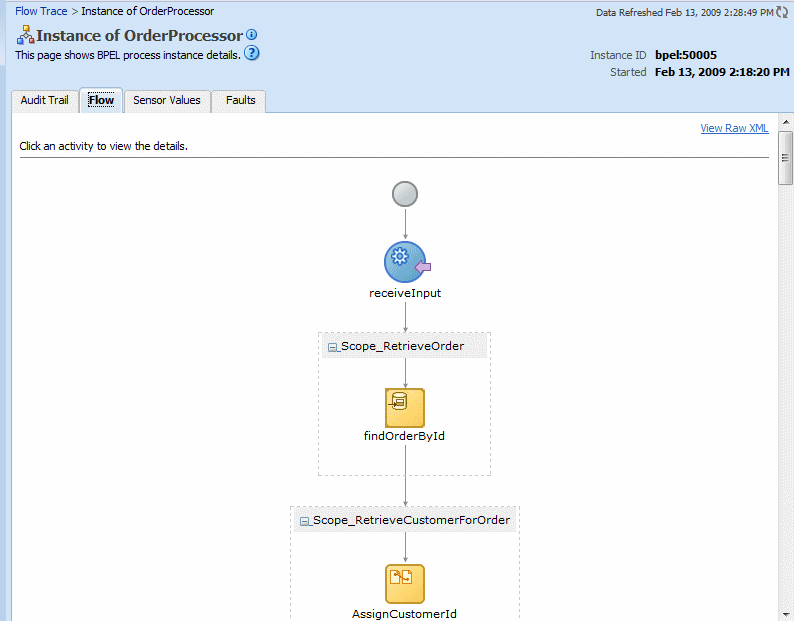
Click the first activity, the blue, circle receive activity labeled receiveInput.

The Activity Details dialog displays the XML input to this BPEL process instance. It shows the order ID (orderID) you were given when you placed the order through the Store Front module. In this example, the order ID is 1179.
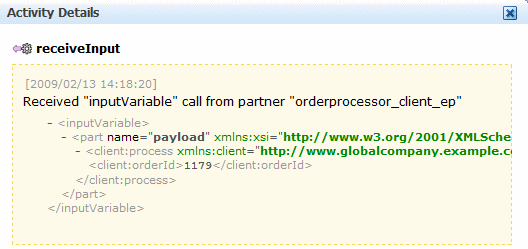
Click X or Close to the dismiss the Activity Details dialog.
Scroll further in the process to the Scope_RetrieveOrder activity and click findOrderByID to order ID as input to variable gOrderInfoVariable:
bpelx:bindEntity is executed on variable gOrderInfoVariable with the following key values:
{{/oracle/fodemo/storefront/store/queries/common/}OrderId=1179}
Click X or Close to the dismiss the Activity Details dialog.
Scroll to the Scope_RetrieveCustomerForOrder scope and click the InvokeFindCustomer activity to see the StoreFrontService service being invoked and returning the customer information. Note the following in the Activity Details window:
lFindCustomerInfo_InputVariable represents the input variable to the StoreFrontService service. The CustId parameter represents the ID of the customer of customer ngreenbe.
gCustomerInfoVariable represents the output from the StoreFrontService service, which returns the customer information for back to the BPEL process.
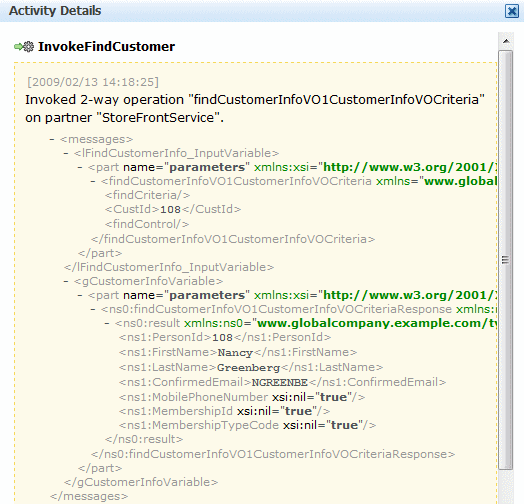
Click X or Close to the dismiss the Activity Details dialog.
Scroll to the Scope_AuthorizeCreditCard scope and click InvokeCheckCreditCard to see the CreditCardAuthorization service being invoked and returning the status of the credit card.
Note the following in the Activity Details window:
lCreditInput represents the input variable to the CreditCardAuthorizationService service. Parameters CCType, CCNumber, and PurchaseAmount represent the input credit card type, number, and order total. These values are set as follows:
<CCType>MSTR</CCType>
<CCNumber>536267</CCNumber>
<PurchaseAmount>353.86</PurchaseAmount>
lCreditCardOuput shows the service returned a status of APPROVED. Therefore, the OrderProcessor BPEL process continues.
Click X or Close to the dismiss the Activity Details dialog.
Scroll to the Scope_CheckApprovalLimit scope and click the Invoke link under the BusinessRule_ApprovalRequired to see the RequiresApprovalRule business rule being invoked.
Note the following in the Activity Details window:
dsIn represents the input variable sent to the business rule. The approve parameter shows the invocation of the rules engine at run time. The price parameter shows the order total was $353.86. The rule engine requires this input to determine whether human approval is required.
dsOut shows the output from the business rule. The approvalRequired parameter has a value false. Because this order is under $2,000, no human approval is required. Therefore, the return value is set to false.
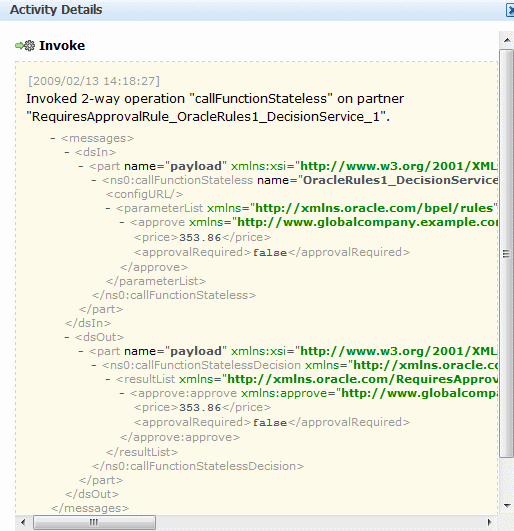
Click X or Close to the dismiss the Activity Details dialog.
In the Scope_RetrieveQuotes scope, perform the following:
Click the Invoke_PartnerSupplier link to see the order information being sent to the PartnerSupplierMediator mediator. The PartnerSupplierMediator routes the order information to the ExternalPartnerSupplier BPEL process, located in PartnerSupplierComposite composite.
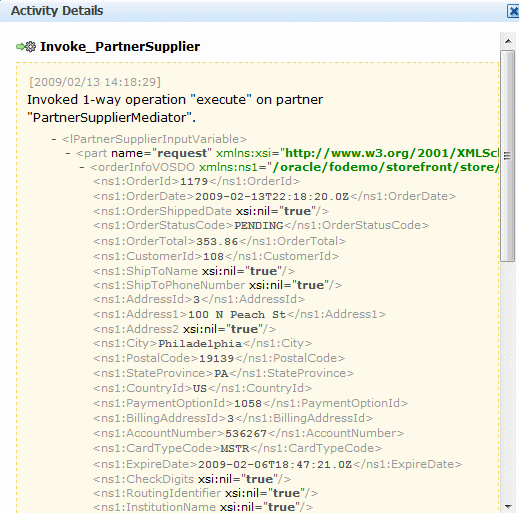
Click X or Close to the dismiss the Activity Details dialog.
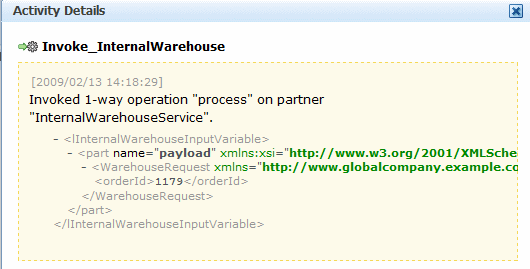
Click the Invoke_InternalWarehouse link to see the order ID being sent to the InternalWarehouseService BPEL process through the lInternalWarehouseInputVariable variable:
Click X or Close to the dismiss the Activity Details dialog.
In the Scope_SelectPreferredSupplier scope, click the Invoke link under BusinessRule_SelectPreferredSupplier to see the EvaluatePreferredSupplierRule business rule being invoked.
Note the following in the Activity Details window:
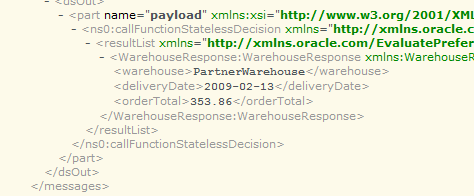
dsIn represents the input variable sent to the business rule. The warehouse, deliveryDate, and orderTotal parameter values provide the input to the business rule. The rule engine uses this input to pick the supplier with the lowest shipping price to fulfill the order.
The returned input data for the two warehouse suppliers is as follows:
<warehouse>InternalWarehouse</warehouse>
<deliveryDate>2009-02-13</deliveryDate>
<orderTotal>1000</orderTotal>
...
<warehouse>PartnerWarehouse</warehouse>
<deliveryDate>2009-02-13</deliveryDate>
<orderTotal>353.86</orderTotal>
The InternalWarehouse supplier returns a static value of $1,000 for all orders.
dsOut shows the output from the business rule. The warehouse parameter value shows the selected warehouse supplier. The PartnerWarehouse supplier was selected, because it provided a lower quote.
Click X or Close to the dismiss the Activity Details dialog.
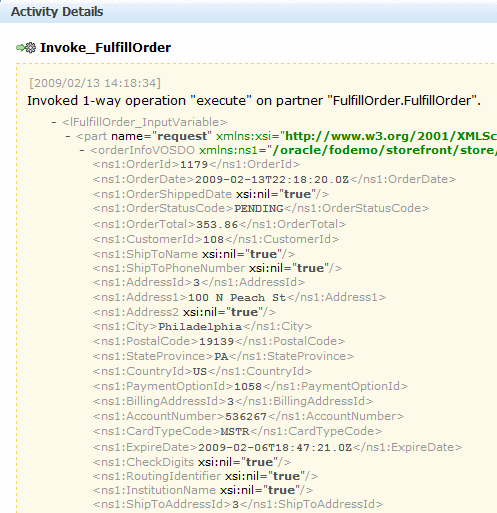
In the Scope_FulfillOrder scope, click Invoke_FulfillOrder link to see the order information being sent to the FulfillOrder mediator. The FulfillOrder mediator stores the order in a temporary queue and routes the order to USPS for shipment.
Click X or Close to the dismiss the Activity Details dialog.
Scroll to the Scope_NotifyCustomerOfCompletion scope and click the InvokeNotificationService link to see the output E-mail notification sent to Nancy Greenberg.
Click X or Close to the dismiss the Activity Details dialog.
Close the Flow Trace window.
You now monitor the second order you submitted for $2,219.42 as Nancy Greenberg. This order is processed differently than the first order, because the order amount is for more than $2,000. Therefore, it requires human approval. In this task, monitor the order with the Fusion Middleware Control, approve the order with Oracle BPM Worklist, and see the order complete in the Fusion Middleware Control.
To monitor the second order, complete the following tasks:
From the SOA Infrastructure home page, in the Recent Instances section, click the first instance, representing the order for $2,219.42.
The Flow Trace page displays.
Click the OrderProcessor BPEL process service component in the Instance column.
The Audit Trail tab of the Flow Trace window displays execution details about the activities in the BPEL process.
In the Recent Instances section, click the first instance, representing the order for 2,219.42. Note the instance number.
The Flow Trace page displays.
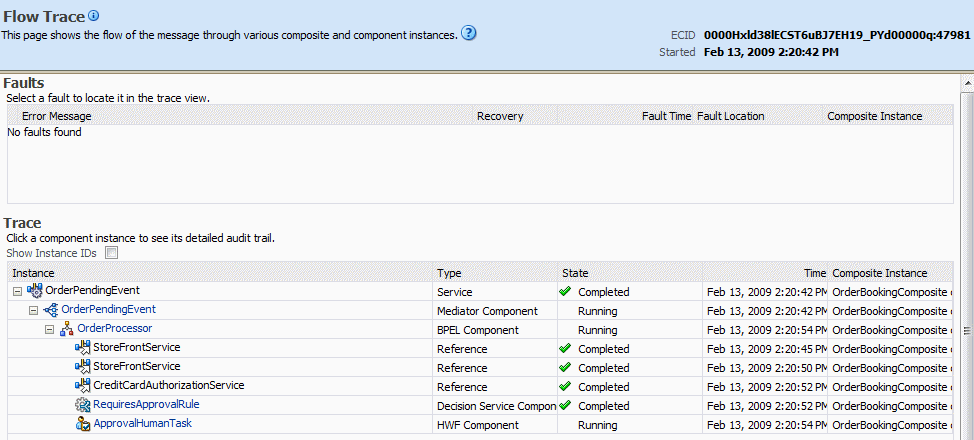
Unlike the first order, notice in the Trace section how the service components in the OrderBookingComposite composite are not all complete and the process is stopped at the ApprovalHumanTask component.
Click the OrderProcessor BPEL process service component in the Instance column to look at the instance more carefully in the Instance of OrderProcessor window.
Click the Flow tab to see a visual representation of the instance.
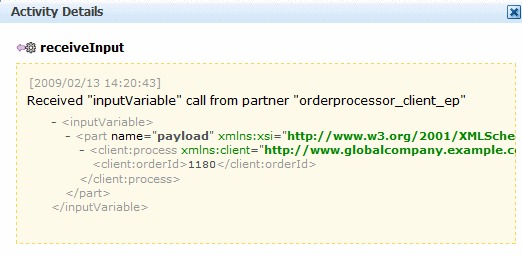
Click the receiveInput. activity to see the order ID you placed.
The Activity Details dialog displays the XML input to this BPEL process instance. It shows the order ID (orderID) you were given when you placed the order through the Store Front module. In this example, the order ID is 1180.
Click X or Close to the dismiss the Activity Details dialog.
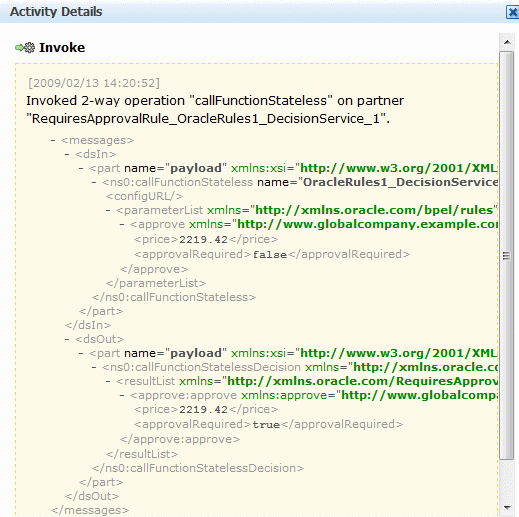
Scroll to the Scope_CheckApprovalLimit scope and click the Invoke link under the BusinessRule_ApprovalRequired to see the RequiresApprovalRule business rule being invoked.
Note the following in the Activity Details window:
dsIn represents the input variable sent to the business rule. The approve parameter shows the invocation of the rules engine at run time. The price parameter shows the order total was $2,219.42.
dsOut shows the output from the business rule. The approvalRequired parameter has a value true. Because this order is over $2,000, human approval is required. Therefore, the return value is set to true.
Click the Collapse icon (-) icon on the BusinessRule_ApprovalRequired to collapse it.
Scroll toward the bottom of the Scope_CheckApprovalLimit scope to see the ApprovalHumanTask human task was initiated after the business rule. The switch under the business rule is like a if-then-else, case, or switch statement in other programming languages. In this case, if approval is required, this switch submits data to the ApprovalHumanTask human task.
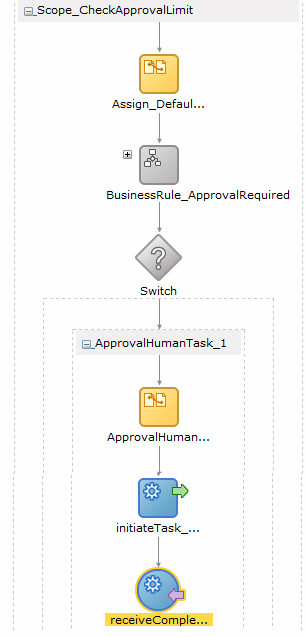
Click the initiateTask_ApprovalHumanTask_1 activity.
In the Activity Details dialog, scroll to the initiateTaskResponseMessages variable to see the assigneeUsers parameter. This parameter specifies the human task has been assigned to user jstein:
- <assigneeUsers>
   <id>jstein</id>
   <type>user</type>
</assigneeUsers>
Click X or Close to the dismiss the Activity Details dialog.
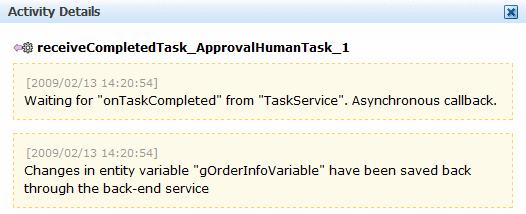
Click the receiveCompletedTask_ApprovalHumanTask_1 activity to see the human task is awaiting approval.
Click X or Close to the dismiss the Activity Details dialog, but do not close the Flow Trace page, as you need it to view order processing when it completes.
To approve the order, use the Oracle BPM Worklist:
Use Internet Explorer 7 or Mozilla Firefox 2.0.0.2 to access the following URL:
http://hostname:port/integration/worklistapp/faces/home.jspx
where hostname is the DNS name or IP address of the Oracle WebLogic Server for Oracle SOA Suite and port is the address of the port on which the Managed Server for the Oracle WebLogic Server is listening for requests (8001 by default).
The login dialog appears.
Enter jstein in the Username field and welcome1 in the Password field and click Login.
The Inbox shows the order number 1180 is awaiting approval.
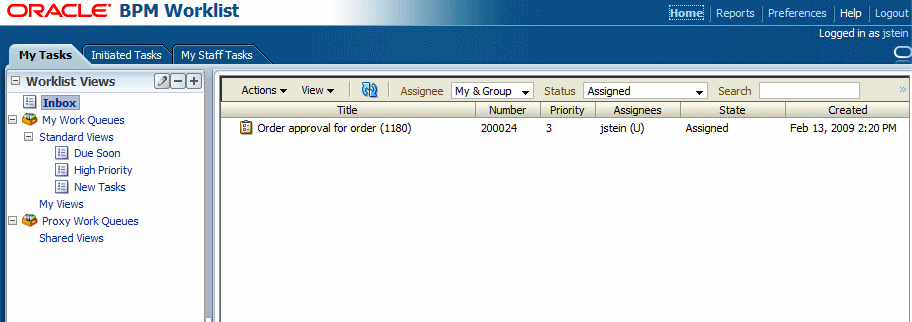
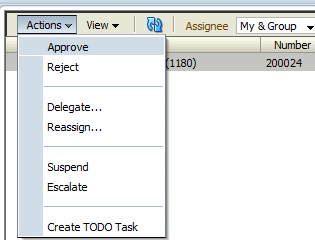
Select the order from the table and from the Actions menu, select Approve.
Click OK to acknowledge the approval message.
The My Tasks tab updates so that no worklist tasks are currently assigned to jstein.
With the order approval completed, the processing for the order is now complete.
To verify the order completed processing with Fusion Middleware Control:
Go back to the Flow Trace page and click the Refresh icon, located in the top right corner:
Scroll toward the bottom of the Scope_CheckApprovalLimit scope to see the ApprovalHumanTask human proceeded.
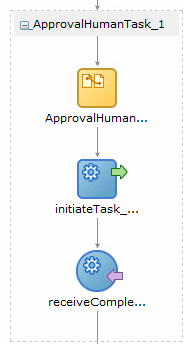
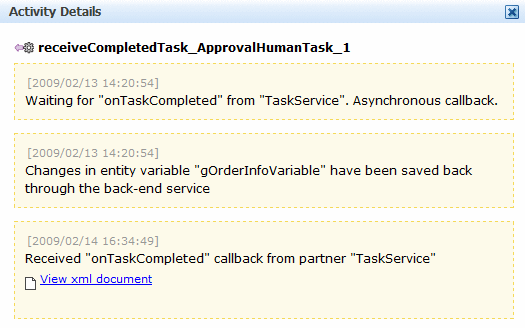
Click the receiveCompletedTask_ApprovalHumanTask_1 activity to see the human task.
Click X or Close to the dismiss the Activity Details dialog.
In the Scope_SelectPreferredSupplier scope, click the Invoke link under BusinessRule_SelectPreferredSupplier to see the EvaluatePreferredSupplierRule business rule being invoked.
Note the following in the Activity Details window:
dsIn represents the input variable sent to the business rule. The warehouse, deliveryDate, and orderTotal parameter values provide the input to the business rule. The rule engine uses this input to pick the supplier with the lowest shipping price to fulfill the order.
The returned input data for the two warehouse suppliers is as follows:
<warehouse>InternalWarehouse</warehouse>
<deliveryDate>2009-03-13</deliveryDate>
<orderTotal>1000</orderTotal>
...
<warehouse>PartnerWarehouse</warehouse>
<deliveryDate>2009-03-13</deliveryDate>
<orderTotal>2219.42</orderTotal>
The warehouse parameter value shows the selected warehouse supplier. The InternalWarehouse supplier was selected, because it provided a lower quote.
Click X or Close to the dismiss the Activity Details dialog.
In the Instance of OrderProcessor window, click the Flow Trace breadcrumb to return to the main Flow Trace window.
Notice in the Trace section how the service components in the OrderBookingComposite composite are now all complete.
The remainder of this tutorial describes how to build the composite applications for the WebLogic Fusion Order Demo applications. Because you deploy the composite applications during the development process, you can now undeploy the completed ones.
To undeploy the composite applications:
Access Undeploy SOA Composite wizard in Fusion Middleware Control through the following options:
| From the SOA Infrastructure Menu... | From the SOA Folder in the Navigator... | From the SOA Infrastructure Home Page... | From the SOA Composite Menu... |
|---|---|---|---|
|
|
|
Select SOA Deployment > Undeploy. |
The Confirmation page appears.
Click Undeploy. Note that you are warned if you are about to undeploy the last remaining revision of a deployed composite application.
Processing messages are displayed.
When undeployment has completed, click Close.