| Oracle® Fusion Middleware Tutorial for Running and Building an Application with Oracle SOA Suite 11g Release 1 (11.1.1) Part Number E10275-02 |
|
|
View PDF |
| Oracle® Fusion Middleware Tutorial for Running and Building an Application with Oracle SOA Suite 11g Release 1 (11.1.1) Part Number E10275-02 |
|
|
View PDF |
In Chapter 5, "Creating the First Half of the OrderProcessor BPEL Process," you created the OrderProcessor BPEL process. The CheckIfRequiresApproval switch of that process uses a human task to pass control to the ApprovalHumanTask human task activity. This human task activity enables a manager named jstein to approve or reject orders totalling more than $2,000. In this chapter, you create the task form for jstein.
This chapter contains the following sections:
Section 9.2, "Task 1: Create a New Task Form for the ApprovalHumanTask Human Task"
Section 9.3, "Task 2: Add the ADF Business Components Service Runtime Library to the Project"
Section 9.4, "Task 3: Create the Contents for the Task Form"
Section 9.5, "Task 4: Deploy the OrderApprovalHumanTask Task Form"
The task form is a way for jstein to interact with the ApprovalHumanTask human task. The task form displays the contents of the task to a user's worklist. Earlier, when you deployed and ran Fusion Order Demo in Chapter 2, you can use the Oracle BPM Worklist to display all the worklist tasks and approve or deny orders totalling more than $2,000.
You create the task form using Oracle Application Development Framework (Oracle ADF) in Oracle JDeveloper. With Oracle ADF, you can design a task display form that depicts the human task in the SOA composite.
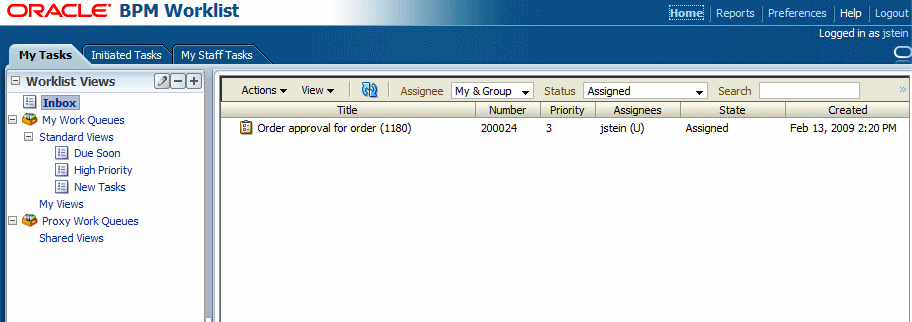
The task form is a Java Server Page XML (.jspx) file that you create in a new project of the WebLogicFusionOrderDemo application. Figure 9-1 shows a sample worklist.
Figure 9-1 Task Form in Oracle BPM Worklist
When you create a task form based on a human task, Oracle JDeveloper performs the following during task-flow creation:
Creates data controls based on the task parameters and outcomes
Creates the initial task form, including the payload
To create a task form based on the ApprovalHumanTask human task:
Open the OrderProcessor BPEL process within the SOA composite application.
Scroll to the Scope_CheckApprovalLimit scope and expand it.
Expand the sequence.
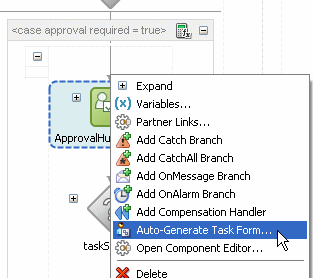
Right-click the ApprovalHumanTask_1 human task activity and select Auto-Generate Task Form, as shown in the following figure.
The Create Project dialog displays.
Enter OrderApprovalHumanTask for the project name and click OK.
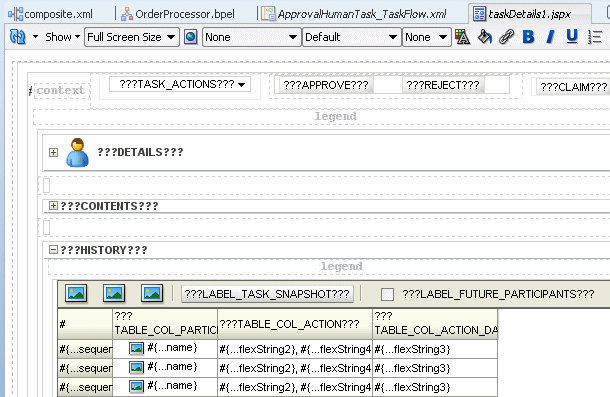
The ApprovalHumanTask_TaskFlow.xml tab displays with the task flow definition and the taskDetails1.jspx tab displays the JSP page with the payload.
To add the ADF Business Components service run-time library:
In the Application Navigator, right-click OrderApprovalHumanTask and select Project Properties.
Select Libraries and Classpath, and from the Libraries and Classpath page, and click Add Library.
In the Add Library dialog, select BC4J Service Runtime, and then click OK.
In the Libraries and Classpath page, click OK.
To provide input from the StoreFrontService service in the Contents showDetailHeader for the task form.
Add a data control for the StoreFrontService service.
In the Application Navigator, right-click the OrderApprovalHumanTask project and select New.
In the New Gallery dialog, click the All Technologies tab.
In the Categories tree, select Business Tier, and then Data Controls.
Select Web Service Data Control and click OK.
The Create Web Service Data Control - Step 1 of 5 page displays.
In the Name field, enter StoreFrontService.
In the URL field, click Browse and select StoreFrontService.wsdl in MY_FOD_HOME\CompositeServices\OrderBookingComposite\services\oracle\fodemo\storefront\store\service\common\serviceinterface.
In many ways, this process is similar to creating a references to a service in the SOA Composite Editor.
In the Create Web Service Data Control - Step 1 of 5 page, click Next.
In the Create Web Service Data Control - Step 2 of 5 page, select the getOrderInfoVOSDO operation from the Available list and click the Add button. Click Next to proceed to the next page in the wizard.
In the Create Web Service Data Control - Step 3 of 5 page, accept the default, and click Finish.
The StoreFrontService data control displays in the Data Controls panel of the Application Navigator.
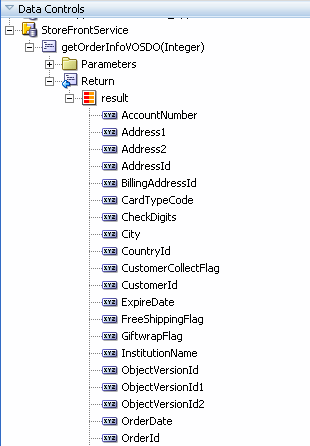
In the Data Controls panel of the Application Navigator, expand the StoreFrontService > getOrderInfoVOSDO > Return > result to see the data controls you can include in the form.
In the taskDetails1.jpsx page, select the CONTENTS showDetailHeader and from the menu, select Design this Container.
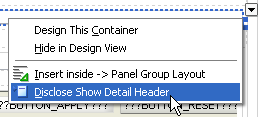
With the CONTENTS showDetailHeader still selected, from the menu, select Disclose Show Detail Header.
The CONTENTS header shows the order ID is included.

Select the panelFormLayout containing the orderID input label and click Enter.
The following image shows the panelgroupLayout being selected.

After you click Enter, a new label displays.

Add parameters from the StoreFrontService service into the task form:
In the Data Controls panel of the Application Navigator, drag the result icon into the empty input field.
From the Create menu, select Forms, and then ADF Read-only Form, as shown in the following figure.

The Edit Action dialog displays with the ApprovalHumanTask_ApprovalHumanTask data control selected.
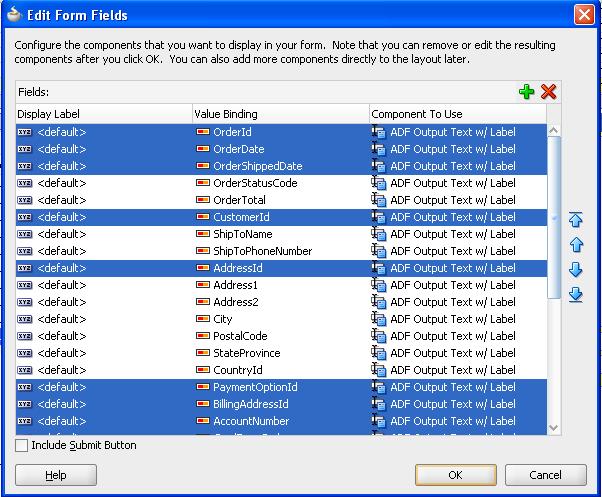
In the Edit Form Fields dialog, select all but the following fields and click the Delete icon:
- OrderStatusCode
- OrderTotal
- ShipToName
- ShipToPhoneNumber
- Address1
- Address2
- City
- PostalCode
- StateProvince
- CountyId
The Edit Form Fields dialog should look like the following image:
Click OK.
The Edit Action dialog displays with the StoreFrontService data collection selected.
In the Parameters section, in the Value field, select Show El Expression Builder.
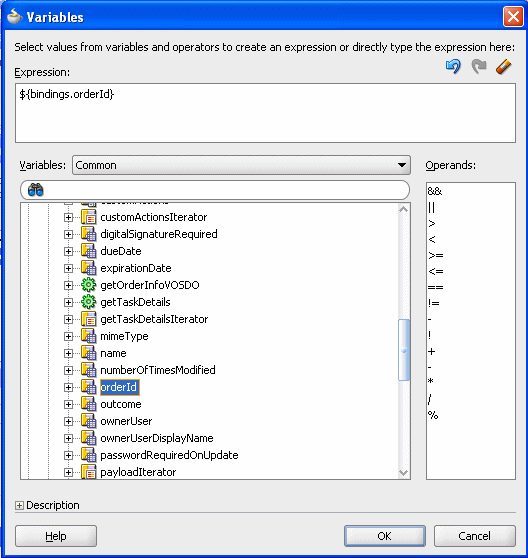
The Variables dialog displays.
Expand ADF Bindings > bindings and select orderId and then select OK.
In the Edit Action dialog, click OK.
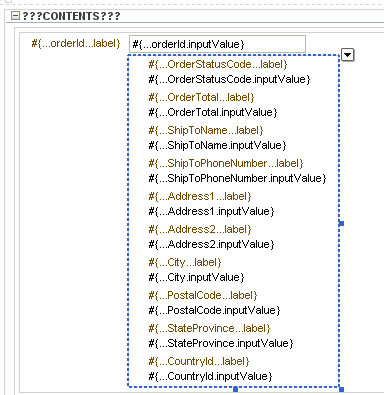
The CONTENTS header shows the selected input parameters:
Select Save All from the File main menu to save your work.
To deploy the OrderApprovalHumanTask form:
In the Application Navigator, right-click OrderApprovalHumanTask and select Deploy > OrderApprovalHumanTask > to MyAppServerConnection.
The SOA Deployment Configuration Dialog displays.
Accept the default settings and click OK.
When prompted with the Authorization Request dialog, enter weblogic in the Username field and the password in the Password field.
In SOA - Log, a series of validations display, followed by:
BUILD SUCCESSFUL
Total time: nn seconds