Release 10.1.3.4
Part Number E12187-01
Contents
Previous
Next
| Oracle Business Intelligence Publisher Report Designer's Guide Release 10.1.3.4 Part Number E12187-01 | Contents | Previous | Next |
Note: You must be assigned the BI Publisher Developer role or BI Publisher Administrator role to create or edit reports.
Creating a new report consists of the following steps:
Create the report entry in the desired folder on the Reports page.
Open the Report Editor.
Specify the general properties for the report.
Define the Data Model.
Your report data may come from a SQL query, an HTTP feed, a Web service, an Oracle BI Answers request, a file, an Oracle Discoverer Worksheet, or BI Publisher's data template.
Define the parameters that you want users to pass to the query, and define lists of values for users to select parameter values.
Test your data model.
Design the layout template.
If you are designing an RTF template, load the data to the Template Builder for Word. Use the Template Builder in conjunction with the instructions in Creating an RTF Template to build your report layout.
If you are designing a PDF template, follow the instructions in Creating a PDF Template to build your report layout.
If you are using a predesigned PDF form (such as a government form) follow the instructions under Mapping Data to PDF Form Fields.
If you are designing a Flash template, follow the instructions in Creating a Flash Template.
If you are creating an eText template, follow the instructions in Creating an eText Template.
Upload your templates to the Report Editor.
(Optional) Set runtime configuration properties for your report. See Setting Runtime Configuration Properties.
(Optional) Enable bursting.
(Optional) Add translations for your reports. See Translating Reports.
Note: You must be assigned the BI Publisher Developer role or BI Publisher Administrator Role to create or upload reports.
Navigate to the folder in which you want the new report to reside.
To create a new folder for this report, select the Create a new folder link.
Select the Create a new report link from the Folder and Report Tasks menu. This will invoke a text box for you to enter the name of your new report.
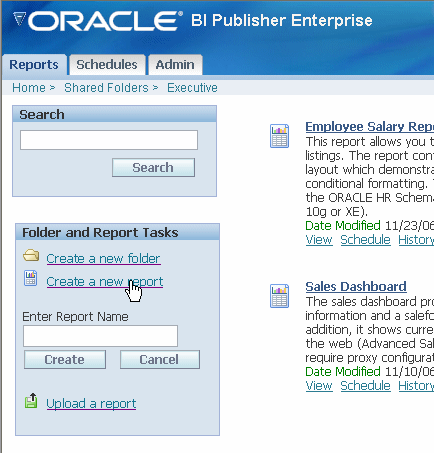
Enter the name for your new report and select Create. This creates the listing for your report within the current folder.
Select the Edit link for the new report entry. This invokes the Report Editor.
Navigate to the Report Editor by selecting the Edit link for a report.
From this page you can:
Report Editor
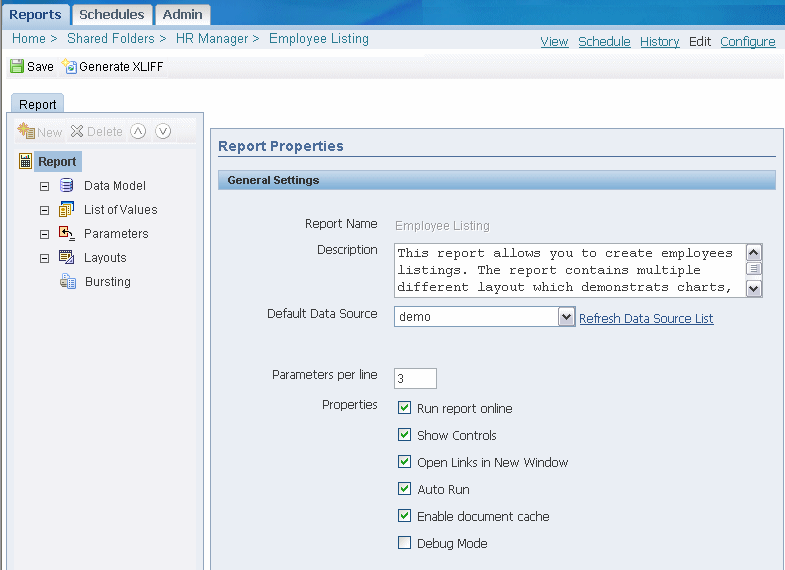
Enter the Report Properties:
Description - the description will display beneath the report name within the report folder.
Default Data Source - select the data source from the list of values. You may define multiple data sources for your report when you define the Data Model. The Default Data Source you select here will be presented as the default for each new data set you define. Select Refresh Data Source List to see any new data sources added since your session was initiated.
Parameters per line - enter the number of parameters that you want to display before creating a second parameter line for the report. The parameter line is displayed in the online report View page and the Schedule page.
Run report online - disable this property if you do not want users to view this report in the online Viewer. When disabled, users will be able to Schedule the report only. For most reports you will keep this enabled. Disable it for long-running, batch, or other reports for which online viewing is not appropriate.
Show controls - enable this property to display the control region of the report. Control region consists of the Template list, Output list, and Parameter lists.
Show Report Links - when you view a report in BI Publisher's report viewer, a "Link to this Report" link displays enabling you to copy the URL of the current report. If you do not want to enable users to see and copy the report link, disable this property.
Open Links in New Window - enable this property to open any links contained in the report in a new browser window.
Auto Run - enable this property to automatically run the report when the user selects the report or the View link for the report within the report folder. When Auto Run is not turned on, selecting the report or the View link for the report displays the online Viewer and parameters for the report only. The user must select the View button from the online Viewer to run the report.
Enable document cache - enable this property to cache the report document per user. With document cache enabled, when a user views the report online, the document (data plus layout) will be placed in cache. When the same user uses the online viewer to view the exact same report (same layout, same output type, same parameter selections) the document will be retrieved from cache. The document will remain in cache according to the cache specifications set in the System Maintenance page. See Setting Cache Specifications, Oracle Business Intelligence Publisher Administrator's and Developer's Guide. Note that scheduled reports do not use document cache.
Disable Client Access from Analyzer for Excel - this property controls the method by which report data is downloaded to Excel and also impacts the ability to interact with the BI Publisher server from Microsoft Excel. Turning this property on has the following effects:
Your report data downloads faster and large data sets are handled more efficiently
You do not have to enable macros
You can enable your own custom macros
You cannot log in or connect to the BI Publisher server from your Microsoft Excel session. Therefore you cannot upload a template directly from Excel, nor can you update the report parameters or apply a new template.
You would typically consider turning this property on for reports that generate very large data sets that you wish to manipulate in Excel.
The following table details the differences when this property is enabled:
| Consideration | "Disable Client Access from Analyzer for Excel" property turned on | Native Mode |
|---|---|---|
| Performance | Data is downloaded faster to Excel and large data sets are handled more efficiently | Download is slower and very large data sets can impact the functioning of the Add-in |
| Macros | You do not have to enable macros to use the Excel Analyzer in this mode. You can also create your own custom macros to use with the Excel Analyzer. | You must enable macros to use the Excel Analyzer in this mode. Custom macros are not supported in this mode. |
| Connection with BI Publisher | No connection after data is downloaded. You cannot upload templates, change parameters, or apply new templates to the data. | You can connect to the BI Publisher server from your Excel session. You can directly upload templates to the report, update the report parameters, and apply new templates from within your Excel session. |
For more information about the Analyzer for Excel, see Using the BI Publisher Analyzer for Excel.
Select the Save icon to save your report definition.
BI Publisher requires XML data to publish reports. The XML data can come from any of the following sources:
SQL query against any database you have set up, including the Oracle BI Server. See Defining a SQL Query Data Set Type.
HTTP (XML feed)
Web service - enter the WSDL URL to access the data generated by the Web service. See Defining a Web Service Data Set Type.
Data Template - a data template is a method for defining a query and output structure using the BI Publisher data engine. See Defining a Data Template Data Set Type.
Oracle BI Answers - choose a request that is already defined in Oracle BI Answers. See Defining an Oracle BI Answers Data Set Type.
Oracle BI Discoverer - choose a Worksheet that is already defined in Oracle BI Discoverer. See Defining an Oracle BI Discoverer Data Set Type.
File - choose an XML file in your file system that can be accessed by BI Publisher. See Defining a File as a Data Set Type.
MDX Query - you can enter an MDX query against your OLAP data source. See Defining an MDX Query as a Data Set Type.
You can define multiple data sets for one report and each data set can have a different data source and source type. When you define multiple SQL queries, you can concatenate the resulting data sets.
Select Data Model.
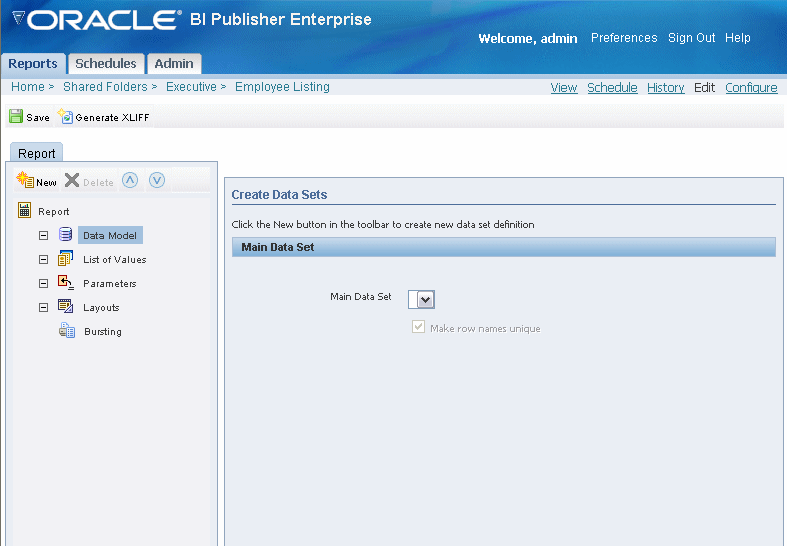
This will display the Main Data Set list. This list will be empty until you define a data set. To define a data set, select New.
Enter a Name and Type for the data set. The Type can be:
SQL Query
HTTP (XML Feed)
Web Service
Data Template
Oracle BI Answers
Oracle BI Discoverer
File
MDX Query
Important: If your data set is a Web Service or HTTP (XML Feed) you must define any parameters before you define the data set.
After you have defined your data sets, select Data Model. The data sets that you have defined will now populate the list for Main Data Set.
Note: If you are defining multiple data sets from SQL queries, you can combine them into a single data set by selecting Concatenated SQL Data Source. It is strongly recommended that you select Make row names unique if you are concatenating datasets.
Add parameters to your report definition to enable your users to interact with the report and specify the data of interest from the data set; or specify hidden parameters to control the data returned to a user from a data set.
Note: Parameters are not supported for Oracle BI Answers request data set type.
BI Publisher supports the following parameter types:
Text - allows the user to enter a text entry to pass as the parameter.
Menu - allows the user to pass parameters by making selections from a list of values. This option supports multiple selections, a "Select All" option, and partial page refresh for cascading parameters. Define the properties for the list of values in the report definition. A list of values can contain fixed data that you specify or the list can be created via a SQL query executed against any of the defined data sources.
To add a parameter as a menu, define the list of values first. Then define the parameter and associate it to the list of values. See Adding a List of Values.
Date - allows the user to enter a date as a parameter. Note that the data type must also be "Date" and the format must be Java date format.
Hidden - enables you to pass the default value always, without allowing the user to see or change it.
Adding a List of Values:
Select List of Values and then select the New icon in the toolbar. This will create a New List of Values entry.
Enter a Name for the list and select a Type: SQL Query or Fixed Data.
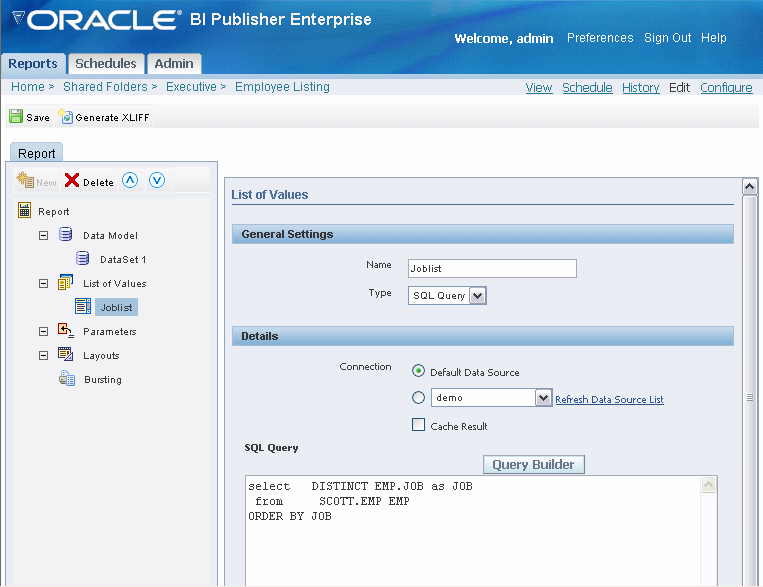
If you select SQL Query:
Select a Connection from the data source list.
Select Cache Result if you want the results of the query cached for the report session.
Enter the SQL query or use the Query Builder. See Using the Query Builder for information on the Query Builder utility.
If you select Fixed Data:
Select the Add link to add the Label and Value pairs for the LOV.
Select Parameters and then select the New icon to define parameters for the report.
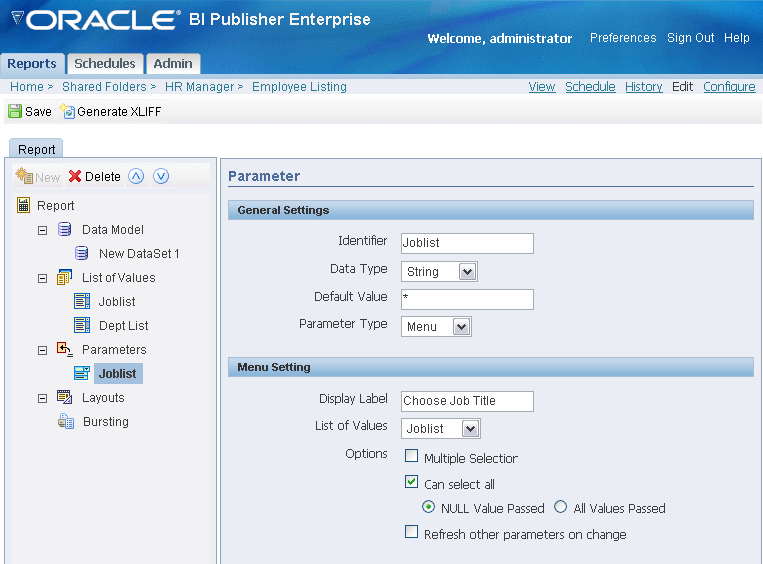
Enter a name Identifier and the Data Type (String, Integer, Boolean, Date, or Float).
Enter a Default Value for the parameter, if desired. Enter * to pass All as the default.
Note: Using * passes a null, so you must handle the null in your data source. A method to handle the null would be the standard Oracle NVL command, for example:
where customer_id = nvl(:cstid, customer_id)
where cstid is a value passed from the LOV and when the user selects All it will pass a null value.
If your data source is the Oracle BI Server, use the following macro to handle the null:
{$ if ${sYear}='*'$}
{$elsif ${sYear}='2000' $}
where Year = :sYear
{$else $}
where Year = :sYear
{$endif$}
where Year is a value passed from the LOV and when the user selects All it will pass a null value.
Note that the test operator must be either "=" or "!=".
Select the Parameter Type:
Text - this type allows the user to enter a text entry to pass as the parameter. Enter the Display Label for the parameter and the Text Field Size in characters. You may also enable the following options:
Text field contains comma-separated values - select this option to enable the user to enter multiple comma-separated values for this parameter.
Refresh other parameters on change - performs a partial page refresh to refresh any other parameters whose values are dependent on the value of this one.
Menu - this type presents a list of values to the user. Enter the Display Label and select from the lists you defined in the previous step. You may also enable the following options:
Multiple Selection - allows the user to select multiple entries from the list.
Can select all - inserts an "All" option in the list. When the user selects "All" from the list of values, you have the option of passing a null value for the parameter or all list values. Choose NULL Value Passed or All Values Passed.
Refresh other parameters on change - performs a partial page refresh to refresh any other parameters whose values are dependent on the value of this one.
Date - passes a date parameter. If you select a Parameter Type of Date, the Data Type automatically defaults to Date. Enter the following:
Display Label and Text Field Size in characters.
Date Format String - enter a format string for the date. It must be a Java data format.
Date From and Date To - enter the to and from dates that you want to restrict the calendar date picker to..
Hidden - select this option to pass the default value always, without allowing the user to see or change it.
BI Publisher offers several options for designing templates for your reports. Templates can be in any of the following formats. Note that some formats restrict output types.
Rich Text Format (RTF)
RTF is the most common template type. Use Microsoft Word to design the template. Most Microsoft Word formatting features are supported. BI Publisher provides a plugin utility for Microsoft Word that automates template design and enables you to connect to BI Publisher to access data and upload templates directly from your Word session. See Creating an RTF Template.
Portable Document Format (PDF)
PDF templates are used primarily for using predefined forms as templates for your reports. For example, you can download forms from government Web sites and load them to BI Publisher as report templates. You can also design your own PDF templates using Adobe Acrobat Professional. BI Publisher provides a mapping tool to enable you to map fields from your data source to the form fields in the PDF template. See Creating a PDF Template.
Microsoft Excel (XLS)
Use BI Publisher's Analyzer for Excel to download your report data to an Excel spreadsheet. Create a layout for the data in Excel and then upload the spreadsheet back to BI Publisher to use as a template. See Using the BI Publisher Analyzer for Excel.
XSL Stylesheet
You can define a template in XSL formatting language. Specify whether your template is for FO, HTML, XML, or Text transformation. To add your template, follow the steps in Adding a Layout - General Steps.
eText
These are specialized RTF templates used for constructing EDI or EFT transactions. See Creating an eText Template. To add your template, follow the steps in Adding a Layout - General Steps.
Flash
BI Publisher's support for Flash templates enables you to develop Adobe Flex templates that can be applied to BI Publisher reports to generate interactive Flash output documents. See Creating a Flash Template. To add your template, follow the steps in Adding a Layout - General Steps.
Autogenerate Layout - if your data model type is a SQL query or Data Template, BI Publisher can autogenerate an RTF template. The autogenerated template constructs a simple table containing all the elements from your data. See Adding a Layout - General Steps.
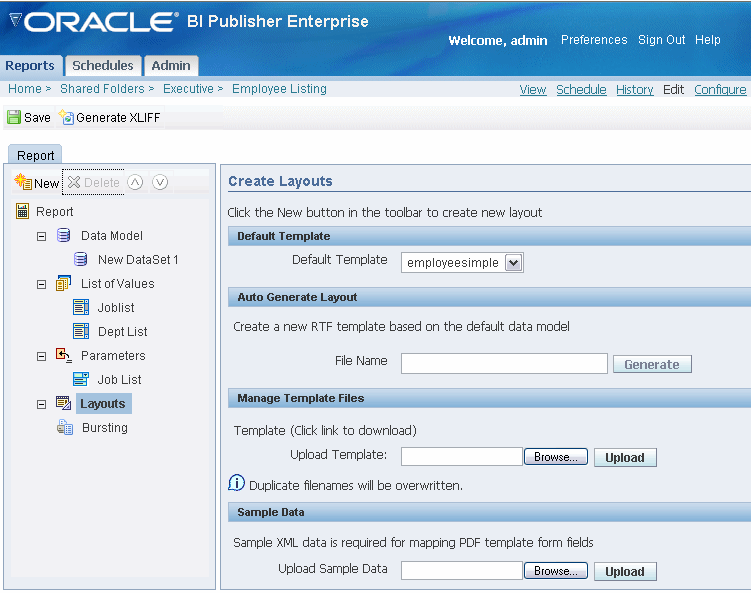
To add a layout to your report definition, select Layouts to specify the layout template for the report. Defining layouts consists of two steps: Upload a template file, and then assign the template file to a Layout definition. If you are connected to BI Publisher through the Template Builder or Excel Analyzer, you can upload the layout file in one step.
Note: To build a template for your report, you must have sample data. Once you have defined your query, you can select the View link to generate XML. Select the Export button and save the file to your local directory. If you are building an RTF template or Excel template you can load this data directly to the Template Builder for Word or Excel using BI Publisher's desktop tools described in the following sections.
To add a layout to your report definition, select Layouts to specify the layout template for the report. Defining layouts consists of two steps: Upload a template file, and then assign the template file to a Layout definition. If you are connected to BI Publisher through the Template Builder or Excel Analyzer, you can upload the layout file in one step.
See Creating an RTF Template Using the Template Builder for Word.
BI Publisher can also autogenerate a template for you if your data model type is a SQL query or data template. See Autogenerating a Layout.
The general guidelines for uploading and defining the layout for any template type are as follows:
Upload your layout template file.
From the BI Publisher Report Editor. Select Layouts.
Use the Browse button to locate it in your local file system, then select Upload. The template will now appear in the Manage Template Files region. You can upload as many templates as you want to make available to this report.
Select the New icon to create the definition for the new template.
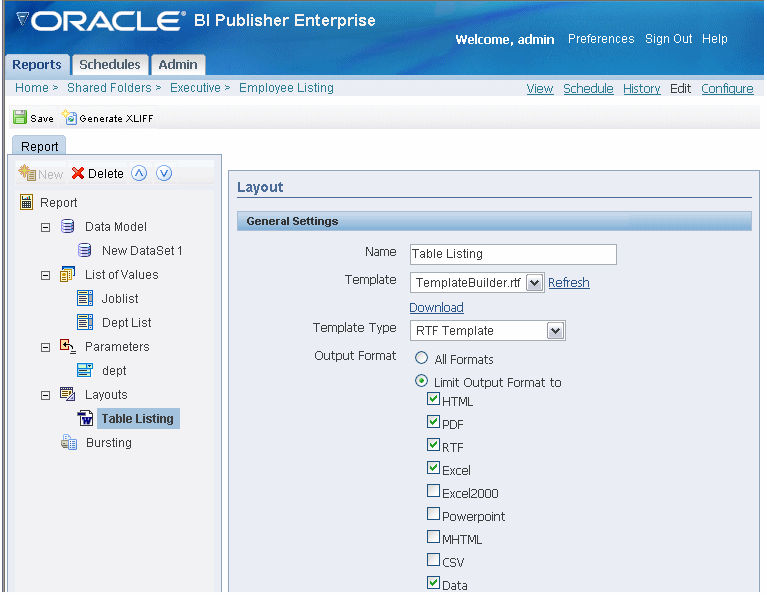
Enter a Name for the layout definition. This name will appear in the Template list on the View report page.
Select the Template file from the list of uploaded templates to correspond to this layout definition.
Select the appropriate template type you are uploading: RTF, PDF, Excel, XSL, or eText.
Select the Output Format types to allow for this layout.
If the template type is RTF, you can either select All Formats or limit the allowed formats by selecting only those desired.
All other template types have specific output formats. For these, All Formats is automatically selected. The allowed output type for each of the other template types is the same as the template type (example: PDF Templates allow PDF output only).
Note: You can also manage the output types allowed through the Runtime Configuration properties. However, the setting on the report definition will override the configuration. See Setting Runtime Properties.
Select Save. The Layout will now appear as an available template when you run the report.
Select a Default Template. The Default Template will be used by default by the online viewer and the scheduler unless the user selects another.
If your data model type is a SQL query or a Data Template, BI Publisher can autogenerate an RTF template for you using the default data model for your report. The autogenerated template will present the elements from your data in a simple table layout.
To autogenerate a layout:
From the BI Publisher Report Editor. Select Layouts.
In the Auto Generate Layout region enter a name with the .rtf extension for your layout file (for example: simplelisting.rtf).
Follow the instructions starting with Step 2 in the above procedure, Adding a Layout - General Steps to associate the template file with a layout definition.
Your report data model has been created and runs successfully.
Microsoft Word version 2000 or later and Microsoft Windows version 2000 or later are installed on your client.
The Template Builder has been downloaded and installed on your client.
The Template Builder can be downloaded from the BI Publisher Folder and Report Tasks region.
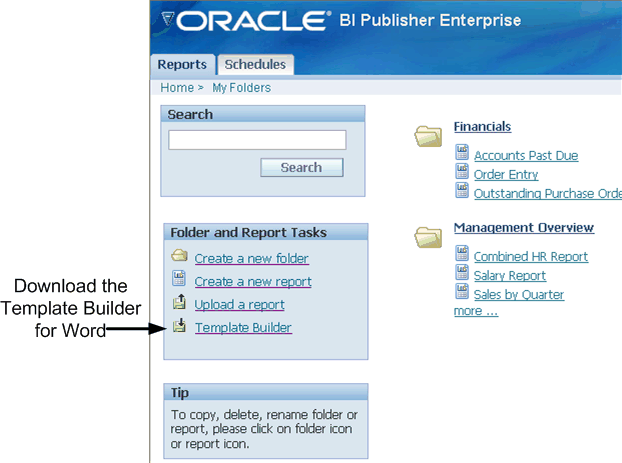
When you open Microsoft Word after installing the Template Builder you will notice the Oracle BI Publisher menu and the BI Publisher toolbar.
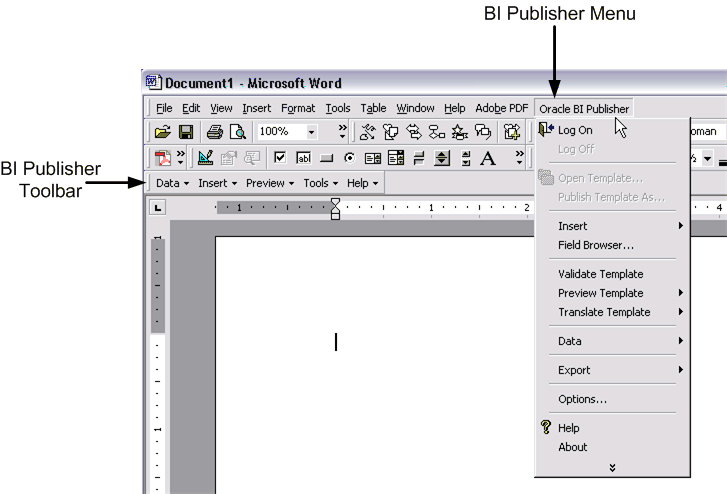
The toolbar and the menu provide two methods of performing many of the same functions, including:
Insert data fields into your RTF templates
Insert tables, forms, charts, and crosstabs
Preview your template in multiple outputs
Browse and update the content of form fields
Validate your template
Perform calculations on fields within the template
Connect to the Oracle BI Publisher server or the Oracle BI server to retrieve data to build your template
Publish your template to the Oracle BI Publisher server
Extract boilerplate text into an XLIFF translation file and test translations
You can build and upload your template via a direct connection with the BI Publisher server, or you can build and upload your template in disconnected mode.
Open Microsoft Word.
From the Oracle BI Publisher menu, select Log On.
Enter your BI Publisher credentials and the URL for the BI Publisher server. (Contact your system administrator if you do not know the URL.)
The Open Template dialog presents the same folder structure as your BI Publisher Reports home page. Select the report for which you want to build a template.
Select Open Report to load the data to the Template Builder; or double-click <New> in the Layout Templates pane.
Note that any existing templates will be listed in the Layout Templates pane.

Follow the guidelines in the Template Builder online help (from the Oracle BI Publisher menu) to insert data fields and design your template using features such as tables, charts, graphics, and crosstabs. Use Microsoft Word to apply formatting to fonts and other objects in your template.
For more advanced template options, use the guidelines in Creating an RTF Template.
To upload your template to the BI Publisher server and add it to your report definition, select Publish Template As from the Oracle BI Publisher menu.
If you have not saved your template, you will be prompted to save it in Rich Text Format.
Enter a name for your template in the Upload as New dialog. Note that this is the name that appears under Layouts in the Report Editor. This is also the template name that will be displayed whenever the user is presented an option for selecting a template for this report (for example, in the View Report page).
(Optional) Limit the output formats for this template.
From the BI Publisher Enterprise interface, open the report in the Report Editor. Under Layouts, select your uploaded template. If you wish to limit the output formats for this report, select only the formats you want to make available.
From the Report Editor:
Generate a sample data file.
From the Report Editor or from the Reports page, select View. If no layouts are defined for your report, then the output type will default to xml, otherwise, choose data for the output type. Select Export. Save the results as an XML file to a local directory.
Open Microsoft Word with the Template Builder installed.
From the Oracle BI Publisher menu select Data and then select Load Sample XML Data. Locate your sample data file in your local directory and select Open. A pop up message will indicate your data has loaded successfully.
Follow the guidelines in the Template Builder online help (from the Oracle BI Publisher menu) to insert data fields and design your template using features such as tables, charts, graphics, and crosstabs. Use Microsoft Word to apply formatting to fonts and other objects in your template.
For more advanced template options, use the guidelines in Creating an RTF Template.
Upload your layout template file.
Return to your report definition in the BI Publisher Report Editor. Select Layouts.
Use the Browse button to locate it in your local file system, then select Upload. The template will now appear in the Manage Template Files region. You can upload as many templates as you want to make available to this report.
Select the New icon to create the definition for the new template.
Enter a Name for the layout definition. This name will appear in the Template list on the View report page.
Select the Template file from the list of uploaded templates to correspond to this layout definition.
Select the appropriate template type: RTF or PDF.
Select the Output Format types to allow for this layout.
If the template type is RTF, you can either select All Formats or limit the allowed formats by selecting only those desired.
If the template type is PDF, All Formats is automatically selected. The only allowed output type for a PDF template is PDF.
Note: You can also manage the output types through the Runtime Configuration Properties. However, the setting on the report definition will override the configuration setting. For more information, see Setting Runtime Properties.
Typically, the source for a PDF template is a predefined form from a third party, such as the government. If form fields have already been defined in the PDF, then you have two options for associating the XML data to the PDF form fields:
Map the data fields to the form fields in the PDF, using BI Publisher's PDF mapping tool
Name the fields from your data source to match the names of the form fields.
If you are creating a report to be used exclusively for the preparation of a PDF form, then consider naming the fields in your data according to the form field names in the PDF. If the field names match, no mapping is required.
If the predefined PDF does not have form fields defined, or if you wish to design your own PDF template, then you must use Adobe Acrobat Professional to insert the form fields. You can then either name the fields according to the data source (no mapping will be required) or use BI Publisher's PDF mapping tool. For information on designing a PDF template and inserting form fields, see Creating a PDF Template.
If you have the full version of Adobe Acrobat 5.0 or later:
Open the file in Adobe Acrobat.
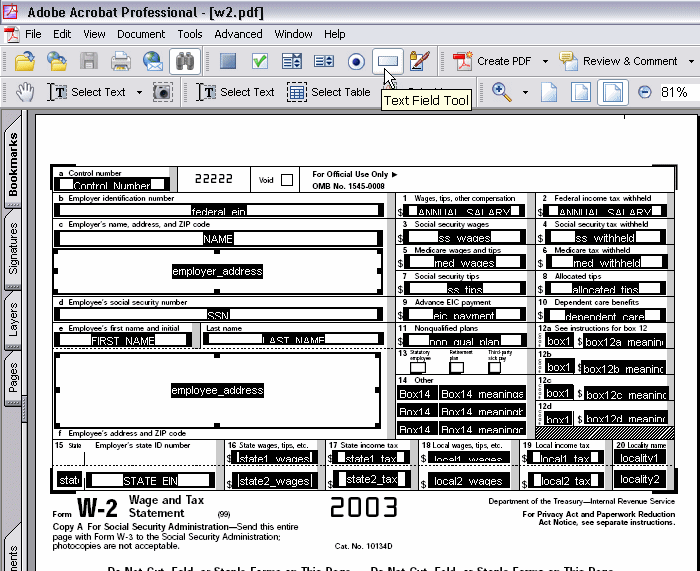
Select the Text Field Tool (Adobe Acrobat Professional 6.0 users) or the Form Tool (Adobe Acrobat 5.0 users). This will highlight text fields that have already been defined. If no fields are highlighted then you must add the fields to the PDF. See Adding Markup to the Template Layout for instructions on inserting PDF form fields.
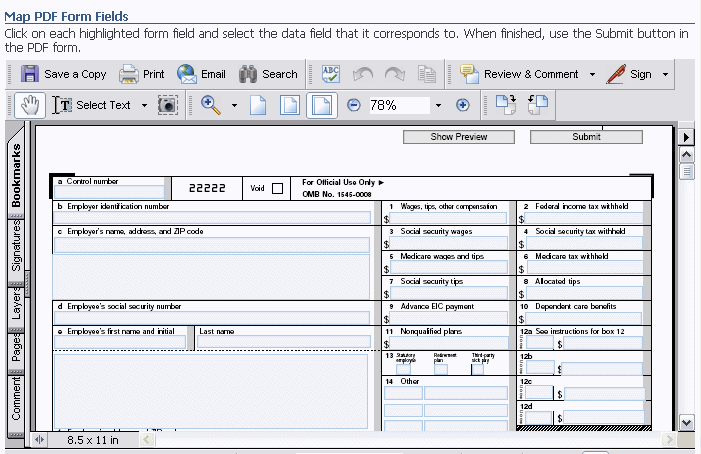
The following figure shows a sample PDF form opened in Adobe Acrobat Professional 6.0. The Text Field Tool has been selected to display all the available form fields.
If you do not have the full version of Adobe Acrobat 5.0 or later:
Follow the instructions in Adding a Predefined PDF Form as a Template.
If no highlighted fields display for mapping, or you cannot select a field, then you must add them before you can use BI Publisher's mapping tool. Adding form fields requires Adobe Acrobat 5.0 or later, or Adobe Acrobat Professional 6.0 or later. For more information, see Creating a PDF Template.
Prerequisites:
A report data model defined in BI Publisher.
A PDF document with form fields defined.
Adobe Acrobat Reader installed as a Web browser plugin. Recommended version is Adobe Acrobat Reader 7.0 or later. (You can use Acrobat Reader 6 if English is the only language required for your site.)
From the Report Editor, select Layouts.
Upload the PDF template file.
From the Manage Template Files region, select Browse to locate the PDF file, and then select Upload.
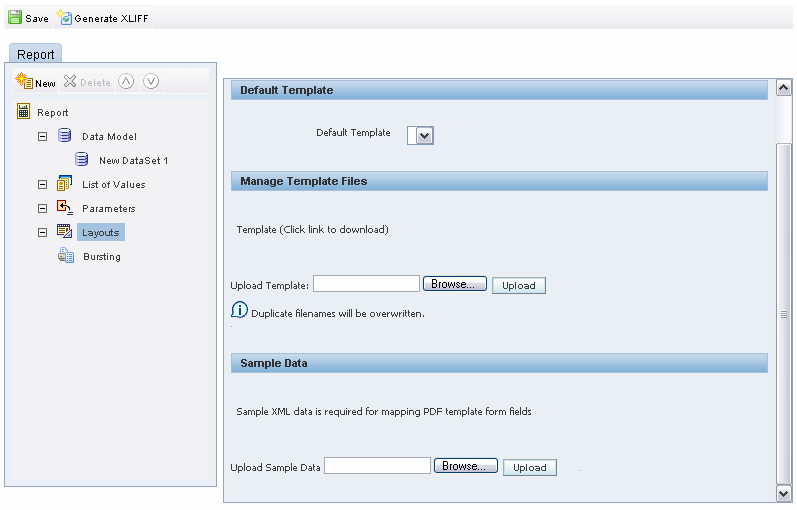
Generate a sample data file.
From the Report Editor or from the Reports page, select View. If no layouts are defined for your report, then the output type will default to xml, otherwise, choose data for the output type. Select Export. Save the results as an XML file to a local directory.
Upload the sample data file.
From the Report Editor, Layouts pane, in the Sample Data region, browse for and upload your sample data file.
Map the PDF form fields.
Once you have uploaded your template and sample data, the Map Form Fields button will become enabled.
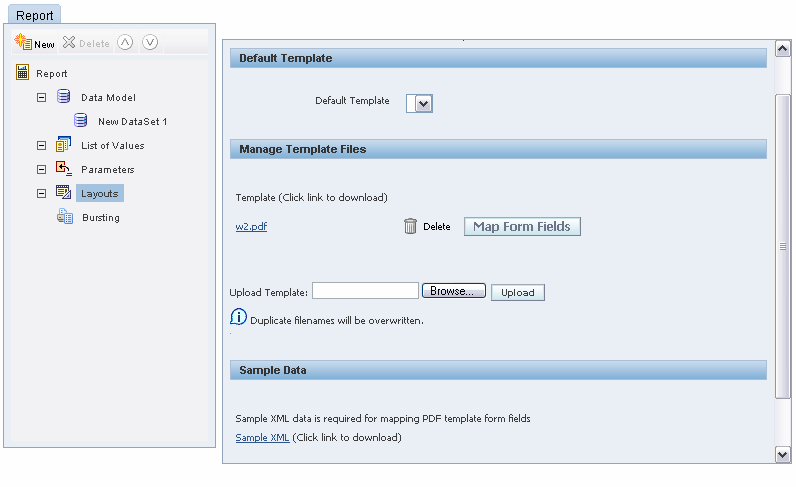
Select Map Form Fields.
The BI Publisher mapping tool will launch in a separate browser window.
Note that as you mouse over the fields, the name of the field in the PDF form will display.
Click in the field on the PDF form that you want to map data to.
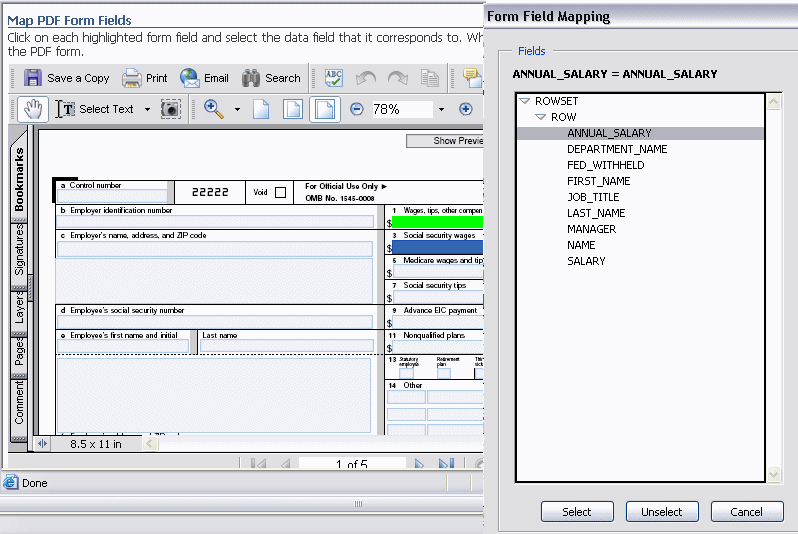
A second window will launch, displaying the field names from the sample data that you loaded. Note that the form field selected is shown at the top of the dialog. If the field is already mapped, the dialog will display the name of the data field that it is currently mapped to. In the figure below, ANNUAL_SALARY is the name of the selected form field. It is shown as being mapped to ANNUAL_SALARY in the data (ANNUAL_SALARY = ANNUAL_SALARY).
Select the field from the Form Field Mapping dialog and then click Select. This will complete the mapping for the field.
Repeat the selection process for each field that you want to map from the PDF template.
To see a preview of your template with the sample data mapped to the fields, select Show Preview.
When you have mapped all fields, select Submit to save your mapping file.
Note that the PDF mapping file is saved in the report definition as a .map file.
Select the New icon to create the definition for the new template.
Enter a Name for the layout definition. This name will appear in the Template list on the View report page.
Select the Template file from the list of uploaded templates to correspond to this layout definition.
Select the appropriate template type: PDF.
The Output Format for PDF templates defaults to All Formats and does not allow update. PDF output is the only allowed output type for PDF templates.
Using BI Publisher's bursting feature you can split a single report based on a key in the report data and deliver the report based on a second key in the report data. Driven by the delivery key, you can apply a different template, output format, delivery method, and locale to each split segment of your report. Example implementations include:
Invoice generation and delivery based on customer-specific layouts and delivery preference
Financial reporting to generate a master report of all cost centers, bursting out individual cost center reports to the appropriate manager
Generation of payslips to all employees based on one extract and delivered via e-mail
Prerequisite: A report defined in BI Publisher. The report data must contain an element by which the report will be split and an element by which the report will be delivered.
Enabling a report for bursting consists of the following steps:
Open the report in Edit mode.
Select Bursting under the report definition.
Select the Enable Bursting check box.
Select the Split By and Deliver By elements.
The Split By element is the data element from the report file that you wish to split the report by. For example, to split a batch of invoices by each invoice, you may use an element called CUSTOMER_NAME.
The Deliver By element is the data element from the report file by which to determine the delivery method. In the invoice example, it is likely that each invoice will have delivery criteria determined by customer, therefore the Deliver By element may be CUSTOMER_ID.
Select the data source for the delivery XML.
The delivery XML can be sourced from the same data source as the main data set, or it can be generated from a different data source.
Enter the SQL query to build the delivery XML. See Defining the Delivery Data Set for details.
Based on the SQL query that you provide on the Bursting criteria page of the Report Editor, BI Publisher will build the delivery XML data set. The delivery XML data set contains the information to deliver your burst report appropriately to each recipient. The delivery data in this XML document is used as a mapping table for each Deliver By element. The structure of the delivery XML is as follows:
<ROWSET>
 <ROW>
  <KEY></KEY>
  <TEMPLATE></TEMPLATE>
  <TEMPLATE_FORMAT></TEMPLATE_FORMAT>
  <LOCALE></LOCALE>
  <OUTPUT_FORMAT></OUTPUT_FORMAT>
  <DEL_CHANNEL></DEL_CHANNEL>
  <PARAMETER1></PARAMETER1>
  <PARAMETER2></PARAMETER2>
  <PARAMETER3></PARAMETER3>
  <PARAMETER4></PARAMETER4>
  <PARAMETER5></PARAMETER5>
  <PARAMETER6></PARAMETER6>
  <PARAMETER7></PARAMETER7>
  <PARAMETER8></PARAMETER8>
  <PARAMETER9></PARAMETER9>
  <PARAMETER10></PARAMETER10>
  </ROW>
</ROWSET>
where
KEY is the Delivery key and must match the Deliver By element. The bursting engine uses the key to link delivery criteria to a specific section of the burst data.
TEMPLATE - is the name of the Layout template to apply. Note that the value is the Layout name (for example, "Invoice"), not the template file name (for example, invoice.rtf).
TEMPLATE_FORMAT - is the format of the layout template. Valid values are:
RTF
ETEXT
XSL_FO
LOCALE - is the template locale, for example, "en-US".
OUTPUT_FORMAT - is the output format. Valid values are:for example: pdf, html, excel.
HTML
RTF
EXCEL
DEL_CHANNEL - is the delivery method. Valid values are:
FAX
FILE
FTP
WEBDAV
Delivery parameters by channel. The delivery parameters by channel are defined in the following table:
| Channel | Parameter 1 | Parameter 2 | Parameter 3 | Parameter 4 | Parameter 5 | Parameter 6 | Parameter 7 |
|---|---|---|---|---|---|---|---|
| Email address | cc | From | Subject | Message Body | Attachment (true/false) Note that if your output format is pdf, you must set this parameter to "true" to attach the pdf to the email. | Reply-To | |
| Printer | Printer Group | Printer | Number of copies | Sides | Tray | ||
| Fax | Fax server Name | Fax Number | |||||
| WEBDAV | Server Name | Username | Password | Remote Directory | Remote File Name | ||
| File | Directory | File Name | |||||
| FTP | Server Name | Username | Password | Remote Directory | Remote File Name |
The following example shows bursting enabled for a report based on the Split By key CUSTOMER_NAME and the Deliver By key CUSTOMER_ID.
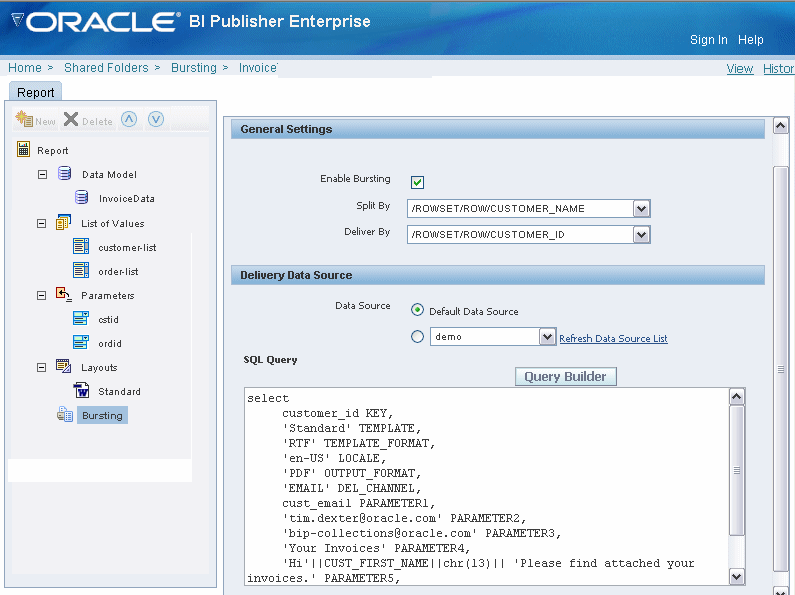
The report will be burst and delivered via e-mail. The template, template format, locale, output format, delivery channel, and customer e-mail address are all specified in elements from the delivery data source and will be returned by the query. The SQL to generate the delivery XML for this example is as follows:
select distinct
CUSTOMER_ID KEY,
CST_TEMPLATE TEMPLATE,
TMPL_TYPE TEMPLATE_FORMAT,
CST_LOCALE LOCALE,
CST_FORMAT OUTPUT_FORMAT,
CST_DEL_CHAN DEL_CHANNEL,
CST_EMAIL PARAMETER1,
'accounts.receivable@oracle.com' PARAMETER2,
'bip-collections@oracle.com'PARAMETER3,
'Your Invoices' PARAMETER4,
'Hi'||CUST_FIRST_NAME||chr(13)|| 'Please find attached your
invoices.' PARAMETER5,
'true' PARAMETER6,
'donotreply@nowhere.com' PARAMETER7
from customers
For information on running the report, see Scheduling a Report to Be Burst.
This section describes how to call a BI Publisher report via a URL from another application, for example from a portal or from an Application Express application.
In the BI Publisher security model, reports are placed in folders and those folders are then secured to a role and a role assigned to a user. For a user to successfully access the report, you must ensure that the user is credentialed within BI Publisher to see it. There are two options for this:
Use the Guest folder
Enable the Guest folder via the Security Configuration tab of the Security Center page (for more information see Allowing Guest Access, Oracle Business Intelligence Publisher Administrator's and Developer's Guide). Any report in this folder is open to all users to see and run. Use this option if the report does not contain sensitive data.
Use SSO
If both the calling application and BI Publisher are configured as partner applications in an SSO server, you can call any report via a URL and as long as the user has rights to see or run the report, then BI Publisher will render it without the need for the user to log in. For more information on setting up security options, see Defining a Security Model, Oracle Business Intelligence Publisher Administrator's and Developer's Guide.
The basic URL for a report is as follows:
http://<server:port>/xmlpserver/<ReportDirectory>/<ReportName>.xdowhere
server:port - is the name of the server and port number where BI Publisher is running
xmlpserver - is a required string (the name of the application)
ReportDirectory - is the folder path to the report
Important: On the BI Publisher server, a report resides in a folder named for the report. For example, assume you have a report called Salary Report. On your BI Publisher desktop it is located in a folder of reports called Executive. Within Executive, it is located in a folder called Private. The path to this report would therefore be
Executive/Private/Salary+Report
Note that you must replace a space in the folder or report name with the + character.
ReportName.xdo - is the name of the report with the .xdo extension.
This will render the complete report inside the BI Publisher page with all the report controls. The default template, output and parameters will be used to render the report. For example:
http://xdopf.us.oracle.com:9999/xmlpserver/Executive/Salary+Report/Salary+Report.xdo
server:port - xdopf.us.oracle.com:9999
xmlpserver
ReportDirectory - Executive/Salary+Report
ReportName.xdo - Salary+Report.xdo
If you want to specify parameters for your output report, such as the template, the output format, and any parameters defined for the report, you can add name/value pairs to the URL. The easiest way to generate the URL is to use the Export function from the BI Publisher View Report page. The URL generated will look similar to the basic URL described above, but the name/value pairs will be added.
For example:
http://xdopf.us.oracle.com:9999/xmlpserver/Executive/Employee+Salary+Report/Employee+Salary+Report.xdo?_xpf=&_xpt=1&_xdo=%2FExecutive%2FEmployee+Salary+Report%2FEmployee+Salary+Report.xdo&dept=10&_xt=Standard&_xf=html The URL components through the report name are described in the previous section. The URL after the report name consists of:
?_xpf=&_xpt=1&_xdo=%2FExecutive%2FEmployee+Salary+Report%2FEmployee+Salary+Report.xdo&dept=10=*&_xt=Standard&_xf=html Note the following standard URL syntax:
? - denotes the first parameter
& - denotes each additional parameter
The BI Publisher parameters are as follows:
_xpf - required string for internal use
_xpt - defines whether to render the report in the full BI Publisher window (as above), or to render just the report document. Valid values are
0 - uses the BI Publisher window
1- renders just the document
_xdo - (optional) provides the path to the current report
dept - this is a parameter specific to the report as defined in the report definition. In this case the department for the data. Notice it takes the department ID. The parameter definition is to show the user the department name and then pass the ID to the query. You can have multiple parameters and their values in the URL.
_xt - this controls the template to be used. This is the template name, not the template file name. In this case, the template name is "Standard".
_xf - this controls the format of the output to be generated. Valid values are same as for the report: pdf, html, excel, rtf, or data.
![]()
Copyright © 2003, 2008, Oracle and/or its affiliates. All rights reserved.