|
|
The BEA JRockit Runtime Analyzer (JRA) tool provides a wealth of information on internals in BEA JRockit that are interesting to the development team of BEA JRockit. Some of these metrics are also interesting to Java developers using BEA JRockit as their runtime VM.
| Note: | The JRA tool itself requires J2SE version 1.4 or higher. |
The BEA JRockit Runtime Analyzer consists of two parts. One is running inside the JVM and recording information about the JVM and the Java application currently running. This information is saved to a file which is then opened in the other part: the analyzer tool. This is a regular Java application used to visualize the information contained in the JRA recording file.
This section describes how to get started with JRA, i.e. creating a recording and open the tool. The following subjects will be covered:
For a complete list of the enhancements for this release, please see the Release Notes.
The following license types are currently available:
To download the correct license, please visit:
http://dev2dev.bea.com/jrockit/tools.html
There are several ways to create and start a JRA recording:
-Xmanagement option to the command line.If you run the application without stress, the data captured from that application will not show where there is room for improvements.
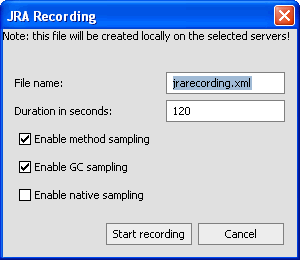
The JRA Recording dialog box appears (Figure 1-1).
This is the name of the file on the host machine where the recording is made. The file is created in the current directory of the BEA JRockit process, unless you specify a different path. It will be overwritten if it already exists.
| Note: | If you set a time that is too short, e.g. shorter than 30 seconds, you will probably not get enough sample data for the recording to be meaningful. |
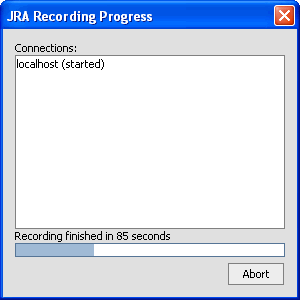
The JRA Recording Progress box appears (Figure 1-2).
This box indicates that the recording has started. You will see a confirmation message, in the JRockit command line window, halfway through the recording and when the recording is finished. After the final message is printed you can shut down your application if you want.
If you run the application without stress, the data captured from that application will not show where there is room for improvements.
bin\jrcmd.exe <pid> jrarecording time=<jrarecording time> filename=<filename>
bin/jrcmd <pid> jrarecording time=<jrarecording time> filename=<filename>
jrarecording time—the duration of the recording in seconds (a good length is 300 seconds, i.e., five minutes).filename—the name of the file you want to save the recording to (for example jrarecording.xml.zip). The file will be created in the current directory of the BEA JRockit process. It will be overwritten if it already exists.
For example:bin\jrcmd.exe <pid> jrarecording time=300 filename=c:\temp\jra.xml.zipStarts a JRA recording of 300s and stores the result in the specified file.
After the recording is initiated, BEA JRockit prints a message indicating that the recording has started. When the recording is done, it will print another message; it is now safe to shut down your application.
You can also start a JRA recording from the command line by using some additional options to the java command when you start up the application you want to record. Table 1-1 lists the different options depending on which version of JRockit you are running.
If you are running BEA JRockit version 7.0sp7/1.4.2_04 or newer use the command -XXjra together with the parameters listed in the BEA JRockit 7.0sp7/1.4.2_04 or newer.
If you are running BEA JRockit version 1.4.2_03 or older, you need to set each parameter with its own startup option (listed in BEA JRockit 1.4.2_03 or older in Table 1-1).
| Note: | Setting methodtraces to false can still result in some stack traces being captured. These stack traces are captured as part of JRockit’s dynamic optimizations and will have a depth of 3. If optimizations are turned off (-Xnoopt) these traces will not be captured. |
An example of using the -XXjra startup command:
-XXjra:delay=10,recordingtime=100,filename=jrarecording2.xml
would result in a recording that:
To replicate this data with the JRA version released with BEA JRockit 1.4.2_03 or older, you would need to enter the following four separate commands:
Use the JRA tool to see the recording you just created. Start the tool with java -jar RuntimeAnalyzer.jar. This will open the JRA application (see Figure 1-3):

The Improve JRockit window opens. In this window you find information on how you can help the JRockit engineering team improving JRockit and the JRA.
The JRA General window is now filled with data (see Figure 1-3).
| Note: | If you are running an older version of the JRA, some fields may not have any relevant data, since that data was impossible to obtain. |


|