


|
|
If you are using a WLP repository that is library services-enabled, you can enforce a workflow process when users add and publish content in the repository. WLP repositories include one default content workflow. You can create additional content workflows or customize content workflows to suit your business needs.
For example, your content workflow can dictate how extensive the review process should be before content can be published in the portal. You can also customize a content workflow so that when content is published, e-mail is sent to an administrator.
Although you can add new workflows to your repository at any time, if you want to use custom workflows, it is recommended that you create workflows for your repository before you create your content types.
Content workflows are only available in WLP repositories that are library services-enabled. For more information about library services, see Adding Content to a WLP Repository.
This chapter includes the following sections:
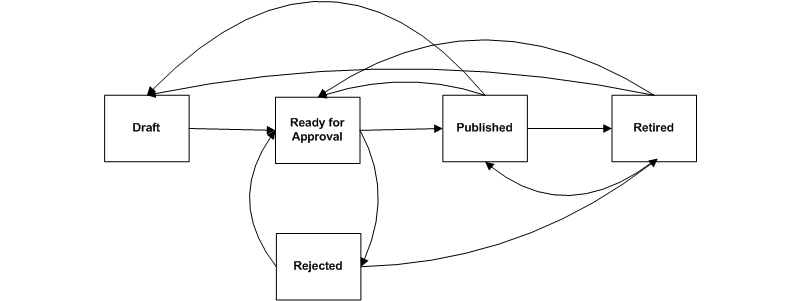
All content created in a library services-enabled WLP repository uses the default content workflow, unless you implement a customized workflow. The default content workflow includes Draft, Ready for Review, Rejected, Published, and Retired states, as shown in Figure 5-1. The default workflow uses delegated administration to prevent or allow users to transition content to different statuses. However, you can visitor entitlements. It is recommended that you use either delegated administration or visitor entitlements, but not both.
| Note: | The capabilities you give to a role determines how a user role participates in the content workflow. For example, if a role is not granted the proper capabilities, a user may not be able to transition content to a Published or Retired status. |
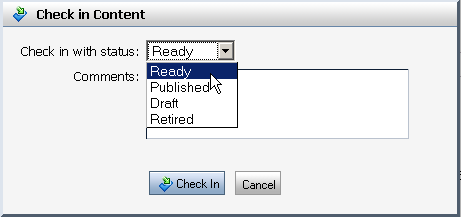
Users choose from available statuses when they check in content within a library services-enabled repository. Figure 5-2 shows an example of the statuses available within the default content workflow.
Each transition within the default workflow requires different administrative capabilities. For a complete review of all the available Delegated Administration capabilities for Content Management, see Setting Delegated Administration on Content Management Resources and Removing and Editing Delegated Administration on Content Management Resources in the WebLogic Portal Security Guide.
Table 5-1 describes the default content workflow statuses and required Visitor Entitlements or Delegated Administration capabilities for transition to different statuses.
Content workflows are XML files that store process information. Once these files are added to your repository, you can associate their defined workflow with content. You create and add content workflows by:
You can customize your content workflow according to your needs. The following sections contain some examples of customized content workflows:
When creating or modifying a content workflow document, keep the following in mind:
| Note: | For an explanation about how content items transit through a workflow, see Understanding Assigned Items. |
<from-status> and <to-status> elements as shown in Listing 5-1.int) 4. The Workflow Action class requires this number for versioning. Use integers 100 – 999 to add new status ID numbers within a customized workflow.APP-INF/classes) or in the system classpath. If the workflow actions are shared across enterprise applications, also put them in the system classpath. If your classes do not use anything in content management, you can use only the system classpath.
The best way to write a new class is using an EJB or Utility project in Workshop for WebLogic. Both of these methods will automatically compile and redeploy the classes as needed and you do not have to add the class to enterprise’s classpath. You should put any custom workflow actions should in the enterprise application’s classpath (APP-INF/classes). For information about creating EJB or Utility projects, see
Tutorial: Building Enterprise JavaBeans and
New Utility Project Wizard in Workshop for WebLogic Product Family Documentation.
Until you create and associate custom workflows, all content within your repository (folders, content and content types) use the default workflow.
When you associate workflows with content, the following inheritance rules apply:
| Note: | For content management, you need to use enterprise application-scoped visitor entitlements roles not web application-scoped visitor entitlements roles. For more information about visitor entitlement roles on portal resources, see Setting Up Role-Based Authorization in the Security Guide. |
To use visitor entitlements instead of delegated administration, in the default Content Workflow Document, change the value of the <capabilityConstraint> elements as shown in Table 5-2. For example:
If you want change the name of the workflow status (for example, Figure 5-2), you change the value for the status ID in the default Content Workflow (Listing 5-1). For example, change <status id="2" text="Ready" /> to <status id="2" text="Submitted" />
| Tip: | The default content workflow is not internationalized. If you want to create a localized content workflow, the XML elements must remain in English. The values of the elements can be in the localized language. For example, <status id = “3” text=”publicado”>. |
To remove a status, you remove the Status ID and any transitions to and from it. For example if you wanted to remove the Retired status from the default Content Workflow (Listing 5-1):
<status id> for the Retired status:<status id="5" text="Retired" />
<to-status> elements in each of the other statuses that transition to the Retired status. For example, for the transition from Draft to Retired, delete the XML shown in bold:<transition>
<from-status id="1"/>
<to-status id="2">
<action class="com.bea.content.virtual.workflow.ReadyAction"/>
</to-status>
<to-status id="4">
<capabilityConstraint>can_publish</capabilityConstraint>
<action class="com.bea.content.virtual.workflow.PublishAction"/>
</to-status><to-status id="5"></transition>
<capabilityConstraint>can_publish</capabilityConstraint>
<action class="com.bea.content.virtual.workflow.RetireAction"/>
</to-status>
<transition>
<from-status id="5"/>
<to-status id="1">
<action class="com.bea.content.virtual.workflow.DraftAction"/>
</to-status>
<to-status id="2">
<action class="com.bea.content.virtual.workflow.ReadyAction"/>
</to-status>
<to-status id="4">
<capabilityConstraint>can_publish</capabilityConstraint>
<action class="com.bea.content.virtual.workflow.PublishAction"/>
</to-status>
</transition>
| Tip: | Keep the default IDs (1 – 4) for the default statuses. See Guidelines for Creating or Modifying a Content Workflow Document. |
If you want to change a transition, you must add or remove the transition from the default Workflow Document. Table 5-3 describes the default transitions for each state.
The default workflow does not assign different capabilities for different statuses—every status transition requires can_publish. This means if you designate an article as Ready for Approval, you can also publish it. For your business needs, you may want to change the user role associated with transition from a writer to a publisher.
The capability constants are defined in the com.bea.content.manager.ContentEntitlementHelper class. For more information, see the WebLogic Portal
Javadoc. You’ll need the values of these constants if you are creating a custom workflow.
There are two ways you can create an action for a workflow:
WorkflowAction interface. For more information, see com.bea.content.virtual.workflow.WorkflowAction in the WebLogic Portal
Javadoc.StandardAction class to your own class. This class defines some methods called assignNodeToRoles and assignNodeToUser that you can use programatically to assign nodes to a particular roles, such as writers and publishers. For more information, see com.bea.content.virtual.workflow.StandardAction in the WebLogic Portal
Javadoc.The easiest way to create a new content workflow document is to use the default content workflow and save it as a new document.
| Tip: | Because a workflow affects the entire repository, it is best to play it safe and copy the default workflow to a new workflow, and then apply it to one folder in the repository for testing. |
To create a new content workflow document by modifying an existing document:
| Note: | An XML editor reads the workflow schema and the schemas the schema imports. It shows you the elements and attributes that can be added to an XML document. |
Listing 5-1 shows the default workflow document and Table 5-4 provides information about the content workflow XML schema.
| Tip: | Become familiar with the content workflow schema before you create or modify a content workflow document. |
<?xml version="1.0" encoding="UTF-8"?>
<workflow xmlns="http://schema.workflow.virtual.content.bea.com"
xmlns:xsi="http://www.w3.org/2001/XMLSchema-instance"
xsi:schemaLocation="http://schema.workflow.virtual.content.bea.com">
<transition>
   <from-status id="1"/>
   <to-status id="2">
      <action class="com.bea.content.virtual.workflow.ReadyAction"/>
   </to-status>
   <to-status id="4">
      <capabilityConstraint>can_publish</capabilityConstraint>
      <action class="com.bea.content.virtual.workflow.PublishAction"/>
   </to-status>
   <to-status id="5">
      <capabilityConstraint>can_publish</capabilityConstraint>
      <action class="com.bea.content.virtual.workflow.RetireAction"/>
   </to-status>
</transition>
<transition>
<from-status id="2">
<capabilityConstraint>can_publish</capabilityConstraint>
</from-status>
<to-status id="3">
<capabilityConstraint>can_publish</capabilityConstraint>
<action class="com.bea.content.virtual.workflow.RejectAction"/>
</to-status>
<to-status id="4">
<capabilityConstraint>can_publish</capabilityConstraint>
<action class="com.bea.content.virtual.workflow.PublishAction"/>
</to-status>
<to-status id="5">
<capabilityConstraint>can_publish</capabilityConstraint>
<action class="com.bea.content.virtual.workflow.RetireAction"/>
</to-status>
</transition>
<transition>
<from-status id="3"/>
<to-status id="1">
<action class="com.bea.content.virtual.workflow.DraftAction"/>
</to-status>
<to-status id="2">
<action class="com.bea.content.virtual.workflow.ReadyAction"/>
</to-status>
</transition>
<transition>
<from-status id="4"/>
<to-status id="1">
<capabilityConstraint>can_publish</capabilityConstraint>
<action class="com.bea.content.virtual.workflow.DraftAction"/>
</to-status>
<to-status id="5">
<capabilityConstraint>can_publish</capabilityConstraint>
<action class="com.bea.content.virtual.workflow.RetireAction"/>
</to-status>
</transition>
<transition>
   <from-status id="5"/>
   <to-status id="1">
      <action class="com.bea.content.virtual.workflow.DraftAction"/>
   </to-status>
   <to-status id="2">
      <action class="com.bea.content.virtual.workflow.ReadyAction"/>
   </to-status>
   <to-status id="4">
      <capabilityConstraint>can_publish</capabilityConstraint>
      <action class="com.bea.content.virtual.workflow.PublishAction"/>
   </to-status>
</transition>
<!--An undefined transition is indicated by using a value of -1 for the
from-status id.  This is used when you change the workflow of a node and
the current status of the node is not a valid from-status in any of the
transitions in this workflow. -->
<transition>
   <from-status id="-1"/>
   <to-status id="1">
      <action class="com.bea.content.virtual.workflow.DraftAction"/>
   </to-status>
</transition>
<!--The numbers 1-5 are reserved for use within the default content workflow. As
a best practice, use the numbers 100-999 as status ID numbers within a customized
workflow. -->
<beginStatus id="1" />
<status id="1" text="Draft" />
<status id="2" text="Ready" />
<status id="3" text="Rejected" />
<status id="4" text="Published" />
<status id="5" text="Retired" />
</workflow>
Table 5-4 lists the XML elements of a content workflow document and the considerations for each element. Listing 5-2 shows the schema itself.
Indicates the status from which the transition originates.
<from-status> is a child element of the transition element.
|
|||
|
You can also create your own custom classes. If you use your own custom class, be sure you add them to the portal enterprise application classpath. and/or system class path. See Guidelines for Creating or Modifying a Content Workflow Document.
|
|||
Delegated Administration: The syntax for defining a Delegated Administration capability restraint is:
|
|||
<?xml version="1.0" encoding="UTF-8"?>
<xs:schema targetNamespace="http://schema.workflow.virtual.content.bea.com" xmlns:xs="http://www.w3.org/2001/XMLSchema" xmlns="http://schema.workflow.virtual.content.bea.com" elementFormDefault="qualified" attributeFormDefault="unqualified">
   <xs:element name="workflow">
      <xs:annotation>
         <xs:documentation>The content workflow</xs:documentation>
      </xs:annotation>
      <xs:complexType>
         <xs:sequence>
            <xs:element name="transition" maxOccurs="unbounded">
               <xs:complexType>
                  <xs:sequence>
                     <xs:element name="from-status">
                        <xs:complexType>
                           <xs:sequence>
                              <xs:element name="capabilityConstraint"
                                 type="xs:string" maxOccurs="unbounded" />
                              <xs:element name="roleConstraint"
                                 type="xs:string" maxOccurs="unbounded" />
                           </xs:sequence>
                           <xs:attribute name="id" type="xs:integer"
                              use="required"/>
                        </xs:complexType>
                     </xs:element>
                     <xs:element name="to-status" maxOccurs="unbounded">
                        <xs:complexType>
                           <xs:sequence>
                              <xs:element name="action"
                                 maxOccurs="unbounded">
                                 <xs:complexType>
                                    <xs:attribute name="class"
                                       type="xs:string" use="required"/>
                                 </xs:complexType>
                              </xs:element>
                              <xs:element name="capabilityConstraint"
                                 type="xs:string" maxOccurs="unbounded" />
                              <xs:element name="roleConstraint"
                                 type="xs:string" maxOccurs="unbounded" />
                           </xs:sequence>
                           <xs:attribute name="id" type="xs:integer"
                              use="required"/>
                        </xs:complexType>
                     </xs:element>
                  </xs:sequence>
               </xs:complexType>
            </xs:element>
            <xs:element name="status" maxOccurs="unbounded">
               <xs:complexType>
                  <xs:attribute name="id" type="xs:integer"
                     use="required" />
                  <xs:attribute name="text" type="xs:string"
                     use="required" />
               </xs:complexType>
            </xs:element>
            <xs:element name="beginStatus" maxOccurs="1">
               <xs:complexType>
                  <xs:attribute name="id" type="xs:integer"
                     use="required" />
               </xs:complexType>
            </xs:element>
         </xs:sequence>
      </xs:complexType>
   </xs:element>
</xs:schema>
Content workflows must reside in your repository before you can associate them with content. You do this using the Content Management section of the WebLogic Portal Administration Console.
To create a new content workflow document by modifying an existing document:
To add a content workflow to your repository:
Workflows can be associated with content types or folders. Workflows define the process that content contributors must follow when adding content to a repository.
| Note: | If you intend to allow users to change the associated workflow for content, you must include an undefined status within the workflow document, see Guidelines for Creating or Modifying a Content Workflow Document. |
When a content workflow is associated with a content folder, all content within that folder follows the workflow. If content within the folder uses a content type that is also associated with a content workflow, the content type workflow overrides the folder workflow. You can also change the content workflow for an individual content item. If the content workflow is set at the content item-level, that content workflow overrides any other associated content workflow.
After you have added a content workflow to your repository, you can associate it with a content folder. You can choose to associate content workflows at the folder level, or only with content types.
To associate a content workflow with a folder within the Virtual Content Repository:
You can also use the Content Management APIs to assign a content workflow to a folder:
com.bea.content.federated.IWorkflowManager.setNodeWorkflow
   (ContentContext context, ID nodeId, ID workflowId)
For information about the API, see the WebLogic Portal Javadoc.
When you create a content type, you can assign a content workflow to a content type. For instructions on how create a content type, see Understanding Content Type Properties.
When a content workflow is associated with a content type, all content of that type uses that workflow. However, users can change the workflow for a particular content item, as described in the next section, Assigning a Content Workflow to a Content Item.
If you assign a content workflow to a content type other than the WebLogic Portal default workflow, you can use the View Assigned Workflows tab to view which content types use particular workflows. For more information, see Managing Content Workflows in Your WLP Repository.
You can also use the Content Management APIs to assign a content workflow to a content type:
com.bea.content.federated.IWorkflowManager.setTypeWorkflow
   (ContentContext context, ID typeId, ID workflowId)
For information about the API, seethe WebLogic Portal Javadoc.
When content is added to a folder, it is automatically associated with the content workflow associated with that folder or to the content type it uses. For more information, see How Content Workflows Are Inherited. However you can explicitly assign content a content workflow.
If you assign content to a different workflow than the default WebLogic Portal workflow, you can use the View Assigned Workflows tab to view which content types use which particular workflows. For more information about managing workflows, see Managing Content Workflows in Your WLP Repository.
To assign a content workflow to a content item:
You can also use the Content Management APIs to assign a content workflow to a content item:
com.bea.content.federated.IWorkflowManager.setNodeWorkflow
   (ContentContext context, ID nodeId, ID workflowId)
For information about the API, seethe WebLogic Portal Javadoc.


|