|
|
To get started developing a portal, at a minimum, you need to create a portal EAR and a portal WAR. These are just regular EAR and WAR projects that have been configured to include portal libraries and other artifacts.
This chapter includes the following topics:
On the left side of the Workshop for WebLogic is the Project Explorer view. You use this view to navigate within your projects.
| Note: | Although other ways exist for creating a new portal ear project, such as File > New > Project... > Portal Ear Project, the path from the Project Explorer is the easiest and most direct. |
| Tip: | Workshop for WebLogic includes cheat sheets for developing portal applications, how to use Workshop for WebLogic features, developing Java applications, and other topics. To access a cheat sheet from the menu bar, select Help > Cheat Sheets. |
|
The default location for projects is within your workspace. However, as recommended in Preparing and Creating Your Workspace, your project should not go within your workspace directory.
|
|||
Browse to the location where you want to put your EAR project. This should be an empty directory with the same name as the project. Based on the example in Listing 2-1, it would be something like
HOME/projects/projectX/projectXapp.
|
|||
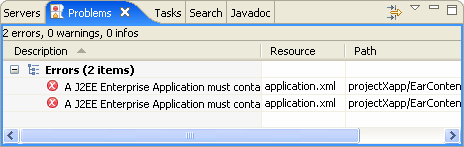
Your EAR project is created, but shows an error, as indicated by the red X  on the project in the Project Explorer. The Problems view (Figure 3-2) shows EAR projects are required to contain one or more modules.
The error occurs because you have not yet created a WAR project (or other kind of project) in the EAR.
|
The default location for projects is within your workspace. However, as recommended in Preparing and Creating Your Workspace, your project should not go within your workspace directory.
|
|
Browse to the location where you want to put your WAR project. This should be an empty directory with the same name as the project. Based on the example in Listing 2-1, it would be something like
HOME/projects/projectX/projectX.
|
|
A datasync project is an optional project that stores general purpose portal services data used in the development of personalized applications and portals. These portal services include User profiles, session properties, and campaigns.
To create the Datasync project:
|
The default location for projects is within your workspace. However, as recommended in Preparing and Creating Your Workspace, your project should not go within your workspace directory.
|
|
Browse to the location where you want to put your Datasync project. This should be an empty directory with the same name as the project. Based on the example in Listing 2-1, it would be something like
HOME/projects/projectX/projectXdatasync.
|
|
Use a Utility project for application-scoped source code. In particular, for plain Java classes that are shared by other projects that are included in your EAR. The Utility project code is in the EAR’s APP-INF/classes directory. This means it is not a deployed submodule and does not get a <java> entry in META-INF/application.xml.
| Note: | A submodule can be deployed separately from an EAR, which can significantly improve redeployment time. For more information, see Prefer Quicker Redeploys. |
To create the Utility project:
|
The default location for projects is within your workspace. However, as recommended in Preparing and Creating Your Workspace, your project should not go within your workspace directory.
|
|
Browse to the location where you want to put your Datasync project. This should be an empty directory with the same name as the project. Based on the example in Listing 2-1, it would be something like
HOME/projects/projectX/projectXutility.
|
|
If you are planning to write any EJBs, you need to create an EJB project. An EJB project requires an ejb-jar.xml with at least one EJB. If you do not want to create an EJB project now, you can always do it later.
| Tip: | EJB projects are also useful for plain Java code because an EJB is deployed as a submodule. Submodules are advantageous because they can significantly improve the time it takes to redepoy. So you might want to create an EJB project even if you are not using EJBs. For more information, see EJB Projects in a Sub-classloader Deploy Faster. |
|
The default location for projects is within your workspace. However, as recommended in Preparing and Creating Your Workspace, your project should not go within your workspace directory.
|
|||
Browse to the location where you want to put your EJB project. This should be an empty directory with the same name as the project. Based on the example in Listing 2-1, it would be something like
HOME/projects/projectX/projectXejb.
|
|||
If you will be writing EJB or Java code in this project that uses the WebLogic Portal APIs, make sure you select the correct facets to give access to those APIs.
|
The new EJB project shows an error until you create at least one EJB. You can create a placeholder EJB for now. For information on how to do this, see Tutorial: Building Enterprise JavaBeans.
If your EJB project depends on code in your Utility project:
The following topics provide more detail for creating new portal projects:


|