|
|
WebLogic Portal includes a Unified User Profile (UUP) service that lets you add and manage users and their properties in a single logical location—even if the user data is stored in external systems, such as an LDAP server. You can add this additional data to a user’s profile.
A UUP extension lets WebLogic Portal read property values stored in external data stores, such as openLDAP servers, legacy applications, Netscape iPlanet user stores, and flat files. If you have an existing provider with users, groups, and additional properties (such as address, e-mail address, phone number, and so on), you can use a UUP to bring those user properties into WebLogic Portal.
A UUP allows you to access existing user information without migrating that data into the portal schema. See Planning to Use a UUP to determine when to use UUP.
Whether or not you have additional properties stored in your external user store, the external users and groups you connect to WebLogic Portal are automatically assigned the default user property values you have set up in WebLogic Portal (without using a UUP). With the Administration Console, you can change the WebLogic Portal property values for those users. These values are stored in WebLogic Portal's RDBMS user store using the portal schema.
In WebLogic Portal, you can retrieve and edit user property values and use those property values to set up personalization, delegated administration, or visitor entitlement. See the Security Guide for instructions on setting up delegated administration and visitor entitlement.
| Note: | In WebLogic Portal 8.1, you configured a UUP by creating an EJB and then adding the appropriate descriptors to the ejb-jar.xml file and the weblogic-ejb-jar.xml file in the p13n-ejb-jar file. You can use Workshop for WebLogic during portal application development, or you can use the Administration Console during portal runtime to register a UUP EJB. See Choosing a Method to Configure a UUP and Creating a UUP EJB. |
Figure 6-1 shows where a UUP fits between an external user store and the WebLogic product environment.
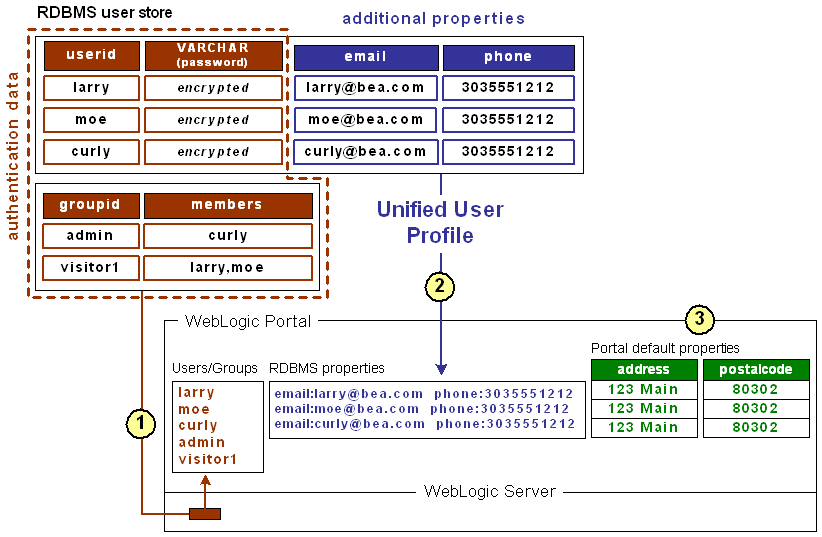
External RDBMS User Store – The user store supports authentication, and contains users and passwords in one database table and groups in another. Giving a user store authentication capabilities (as an authentication provider or identity asserter) involves configuration steps that are not associated with the UUP configuration process. UUP configuration is not dependent on the user store configuration and vice versa.
After the RDBMS user store is connected to WebLogic Server, both WebLogic Server and WebLogic Portal can see those users and groups. Those users can log into your portal applications, and you can include those users and groups in your rules for personalization, delegated administration, and visitor entitlement. Also, WebLogic Portal's
ProfileWrapper maps the principals to properties kept in the portal schema, thereby establishing the user profile.
|
|
UUP – The same external table that contains users and passwords also contains additional properties (e-mail and phone) for each user. These additional properties are not part of authentication, but they can be part of each user's profile. If you want to access these properties in your portal applications (with the WebLogic Portal JSP tags, controls, or API), you must configure a UUP for the RDBMS user store. When you configure the UUP, the
ProfileWrapper includes the external properties in the user profile. The UUP extension consists of a stateless session bean and associated classes that you create.
If you want to surface any of these properties in the Administration Console to define rules for personalization, delegated administration, or visitor entitlement, create a user profile property set for the external user store in addition to implementing your UUP session bean. The property set provides metadata about your external properties so that Workshop for WebLogic and the Administration Console can display them.
|
|
Workshop for WebLogic and Administration Console – You can create default user and group properties and set default values for those properties. Any user or group in WebLogic Server, whether created in the default RDBMS user store or brought in through a connection to an external user store, is automatically assigned those default property values. You can change the default values for each user or group, either programmatically or in the Administration Console. This does not involve a UUP, because the properties being retrieved are WebLogic Portal properties, so they are not stored in an external user store.
After the user store or identity asserter provides the users and groups, as shown in Figure 6-1, the
ProfileWrapper combines the users and groups with the external properties of e-mail and phone (retrieved by the UUP) and the default WebLogic Portal properties of address and postal code, all of which make up the complete user profile.
|
The chapter includes the following sections:
In WebLogic Portal 8.1, you could configure a UUP manually, but that method is no longer supported. See the WebLogic Portal 8.1 documentation for more information.
WebLogic Portal now provides two ways to configure a UUP:
p13n-profile-config.xml descriptor file in Workshop for WebLogic to configure the UUP extension during the portal development phase. The descriptor file is deployed with the packaged enterprise application. A UUP that you configured in the Administration Console at runtime uses the deployment plan and takes precedence over the same UUP that you create in Workshop for WebLogic during portal development.See Verifying the UUP. Existing UUPs that you configured manually in previous versions of WebLogic Portal can co-exist with new UUPs that you configure in the Administration Console or in Workshop for WebLogic. See Creating a UUP EJB for instructions for manually configuring a UUP for Portal 9.2.
You can retrieve data from an external source by configuring a UUP in the Administration Console. The steps below assume that you have created a new portal domain in Workshop for WebLogic. This section contains the following topics:
Before you configure the UUP, you must create an EntityPropertyManager Enterprise Java Bean (EJB) to represent the external data. See Creating and Configuring an EntityPropertyManager EJB for instructions.
To configure a UUP and add properties to it using the Administration Console:
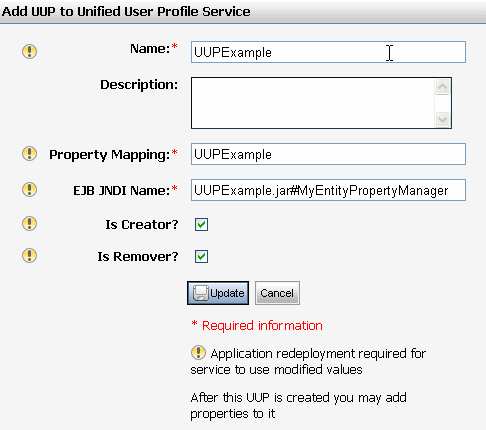
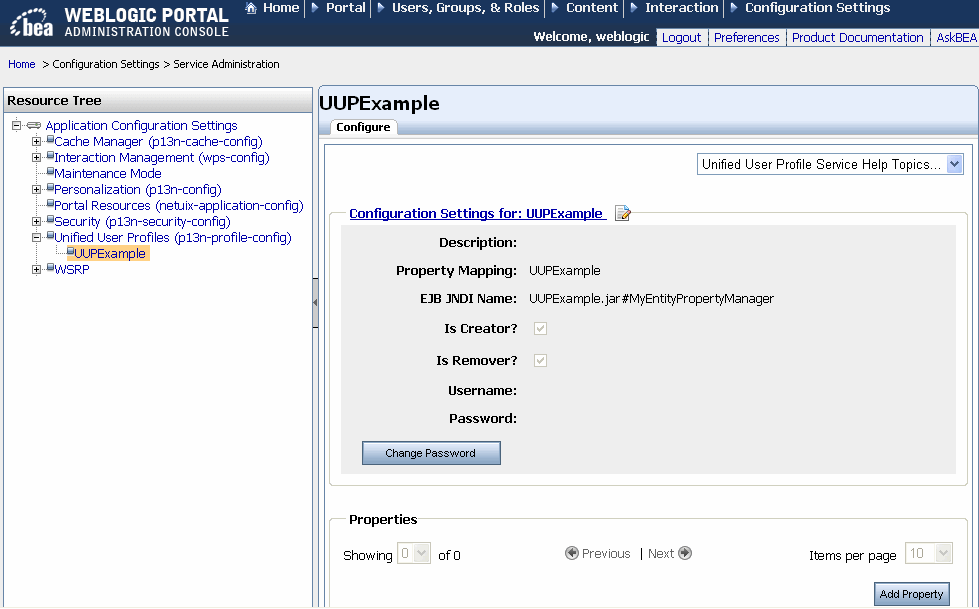
EntityPropertyManage EJB, open the Administration Console by launching a web browser and entering the URL for the application.UUPExample. See Figure 6-2.UUPExample. PropertyManager at runtime. The format of this field is <UUP JAR file name>#<EJB name defined in UUP ejb-jar.xml>. For example, UUPExample.jar#MyEntityPropertyManager. PropertyManager you created earlier implements certain methods and receives callbacks from the ProfileManager when profiles are created and removed. The default for these fields is unchecked. See Figure 6-2.PropertyManager in the EJB descriptor file.p13n-profile-config descriptor file stored in the META-INF directory of the portal application. Then the ProfileManager resolves the EJB references to the deployed custom PropertyManager using the name in the EJB JNDI Name field. If the references resolve successfully, property set mappings are created according to the property-adapter section specifications in the descriptor bean. At runtime, the properties in this property set are routed to the new PropertyManager. The new PropertyManager can also use descriptor beans to retrieve adapter-specific configuration parameters stored in one or more of the <adapter-property> fields.After you configure the UUP in the Administration Console (or Workshop for WebLogic), you should verify the UUP in the Administration Console.
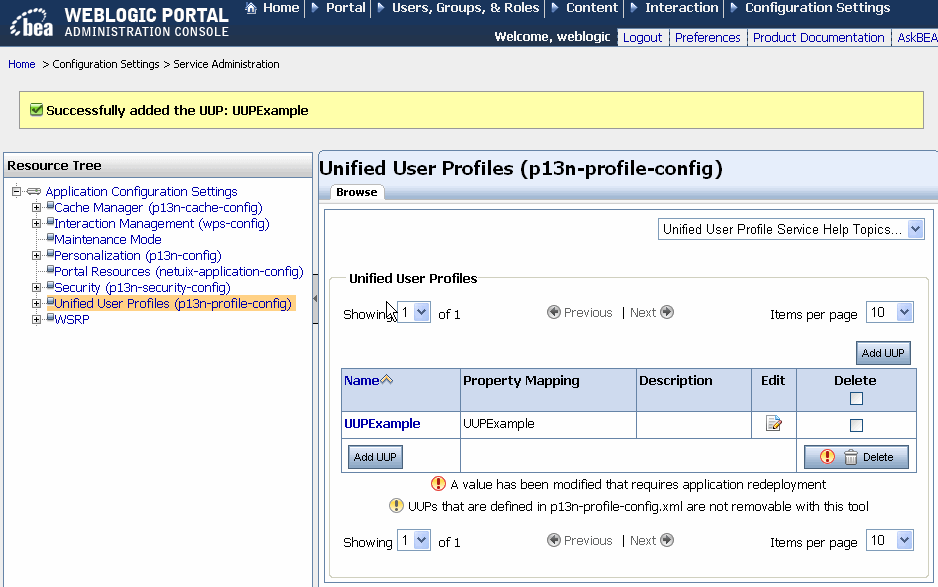
UUPExample.| Note: | You can also verify that the data exists by checking your database. |
You can use the Administration Console to change the configuration settings or properties for your UUP.
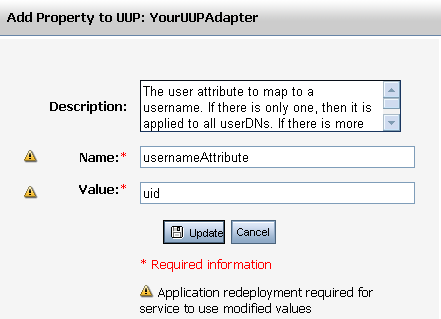
| Note: | You can also edit the properties in your UUP by locating the property name in the UUP Browse tab and clicking Edit. |
A second way to retrieve data from an external source is to configure a UUP in the Workshop for WebLogic. (The other method is through the Administration Console; see Configuring a UUP in the Administration Console.) A descriptor file called p13n-profile-config.xml lets you define the mappings for the UUP.
Before you configure the UUP, you must create an EntityPropertyManager Enterprise Java Bean (EJB) to represent the external data. See Creating the EJB for instructions.
To create a UUP in Workshop for WebLogic:
EntityPropertyManager EJB in Workshop for WebLogic, open the Portal Perspective, and open the Merged Projects View.p13n-profile-config.xml file in the <UUPApp>/EARContent/META-INF directory.p13n-profile-config.xml file is italicized, it exists in a library module and is not in the project itself. Select the file, right-click, and choose Copy To Project. The filename changes from italics to a normal font.p13n-profile-config.xml file by double-clicking it.UUPExample is the name of a user profile property set with properties that exactly match the LDAP properties you want to appear, UUPExample.jar is the EJB project and MyEntityPropertyManager is the name of the EntityPropertyManager class you created.
<property-adapter>
     <name>UUPExample</name>
     <description>UUP EJB</description>
     <property-mapping>UUPExample</property-mapping>
     <ejb-jndi>UUPExample.jar#MyEntityPropertyManager</ejb-jndi>
     <is-creator>true</is-creator>
     <is-remover>true</is-remover>
</property-adapter>
You can use Workshop for WebLogic to change the configuration settings or properties for your UUP.
To edit a UUP in Workshop for WebLogic:
p13n-profile-config.xml file by double-clicking it. For details on this configuration file, see Creating a UUP EJB. <property-adapter> entry for your UUP.
Your WebLogic Portal 9.2 or 9.2 MP1 UUP automatically works in WebLogic Portal 10.0 and later versions. You do not need to upgrade your Portal 9.2 UUP.
When you upgrade a UUP from WebLogic Portal 8.1, the p13n_ejb.jar file is deleted and replaced with a new WebLogic Portal version of this file. The new p13n_ejb.jar file is packaged in the library modules that ship with WebLogic Portal.
To upgrade a UUP configured in WebLogic Portal 8.1 to Portal 9.2:
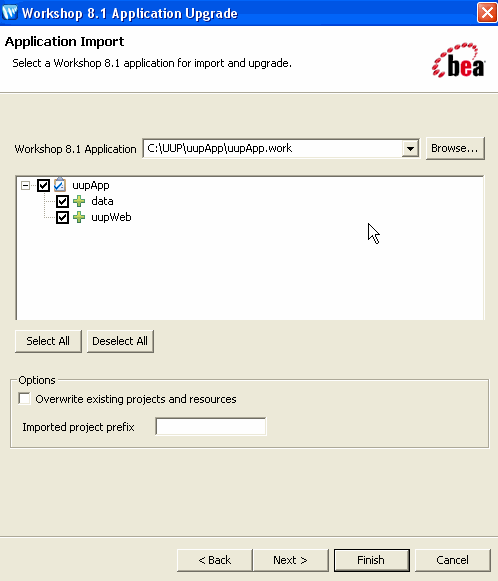
.work file and click Open. Verify that the check boxes for the UUP application are selected and click Next, as shown in Figure 6-7.p13n-ejb.jar file was removed from the EARContent directory of the UUP application.UUPExample.jar) exists in the EARContent directory of the UUP application.application.xml file in the <UUPApplication>/EARContent/META-INF/ directory.p13n-cache-config.xml file in the <UUPApplication>/EARContent/META-INF/ directory:<p13n:cache>
<p13n:name>UUPExampleCache</p13n:name>
<p13n:description>Cache for UUP Example</p13n:description>
<p13n:time-to-live>60000</p13n:time-to-live>
<p13n:max-entries>100</p13n:max-entries>
</p13n:cache>UUPExample.usr) file exists in the data/src/userprofiles/ directory (or where your Datasync folder exists).For more information about upgrading other non-portal applications from WebLogic Portal 8.1, see the Upgrade Guide.


|