|
|
The Message Broker module allows you to:
| Note: | You must be logged in as a member of the Administrators or IntegrationAdministrators group to modify channel security policies. For more information, see About WebLogic Integration Users, Groups, Roles, and Security Policies in User Management in Using the Worklist Console. |
The following topics are provided:
A Message Broker channel has similar properties to a Java Message Service (JMS) topic, but is optimized for use with Oracle WebLogic Integration processes, controls, and event generators. Within a Oracle WebLogic Integration application:
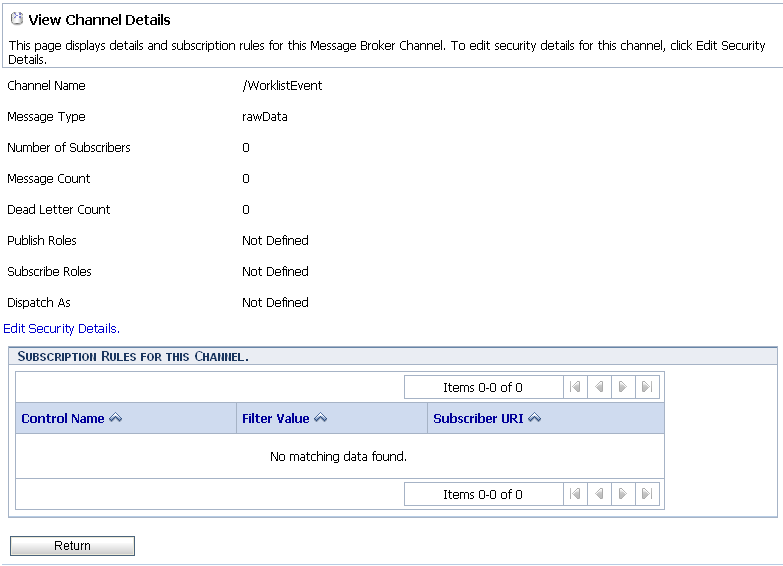
Channel files define the channels available in a deployed application. To restrict the messages routed to static or dynamic subscribers, XQuery filters can be applied against message metadata (if the metadata is typed XML) or message body (if the body is string or typed XML). All subscribers registered to receive a message on a channel receive the message, subject to any filters they have set up.
The following table lists the pages you can access from the Message Broker module. The tasks and help topics associated with each are provided.
The Channel Summary List displays the channel name, type (xml, rawData, string, or none), number of subscribers, messages, and dead letters for each channel.
? to match any single character or * to match zero or more characters.), then click Search. The channels matching the search criteria are displayed.| Note: | If the Search field is empty, all entries are returned. |
 and descending
  arrow buttons indicate sortable columns. Click the arrow to change the sort order.
 , previous
  , first
  , or last
  page.
page.You can view channel details and subscriptions on the View Channel Details page.
| Note: | The suppressible attribute works only if the same process contains both static and dynamic subscriptions on the same channel. If two different processes subscribe to a channel, or the same process subcribes to two different channels, the suppressible attribute has no effect. |
| Note: | Setting suppressible to true specifies that the static subscription is suppressed in favor of a dynamic subscription. An instance of the process should already be running and dynamically subscribed. When an event arrives and suppressible is set to true: the message is delivered to the running instance. |
| Note: | No new instances are created if suppressible is set to false: the message is delivered to the running instance. Additionally one new instance of the process is created. |
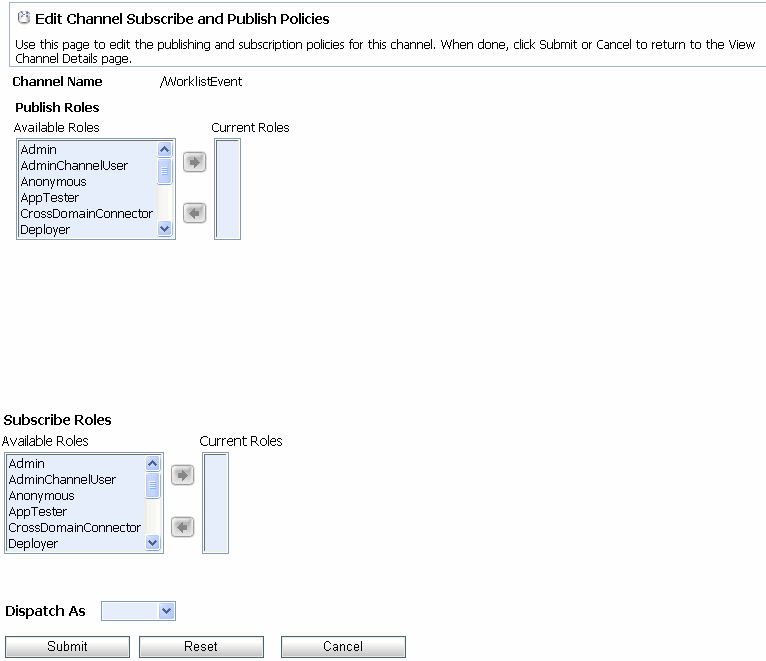
The Edit Channel Subscribe and Publish Policies page allows you to set the following channel properties:
| Note: | If an authenticator that implements the required MBeans is not configured, the options for configuring the channel security policies are disabled. To learn more about the authenticator requirements, see “Security Provider Requirements for User Management” in User Management in Using Worklist Console. |
| Note: | If the publish and subscribe roles are not defined, everyone is authorized. If the Dispatch As user is not defined, messages are dispatched as though from an anonymous user. |
a. From the Available Roles list, select the required roles. (To select multiple roles, press and hold the Ctrl key as you click each additional role.)
b. Click the  icon to move the selected roles to the Current Roles list.
a. From the Current Roles list, select the required roles. (To select multiple roles, press and hold the Ctrl key as you click each additional role.)
b. Click the  icon to move the selected roles to the Available Roles list.
| Note: | If no user is specified, messages are dispatched as anonymous. |
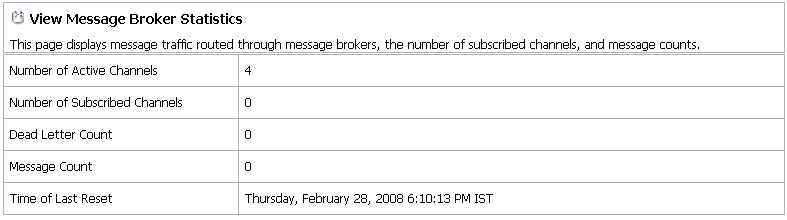
The View Message Broker Statistics page displays the following:
You can reset the message counts for one or more channels from the Channel Summary List.
The Channel Summary List is displayed.
| Note: | You can filter the list as described in Listing and Locating Channels. |


|