|
|
This example demonstrates how to configure the security settings for ebXML message exchange between trading partners over HTTPS protocol through a proxy server. Although any proxy server can be used in this configuration, the example demonstrates how to configure the iPlanet Web Server 6.0 (Sun ONE 6.0) as the proxy server. A demonstration version of this server is available for download at http://wwws.sun.com/software/download/products/3f186391.html.
In the Figure A-1, the example involves two trading partners. Both the trading partners, Trading Partner 1 and Trading Partner 2 are configured in Oracle WebLogic Integration. The WLI instance that hosts Trading Partner 1 is termed as WLI 1 and the WLI instance that hosts Trading Partner 2 is termed WLI 2.
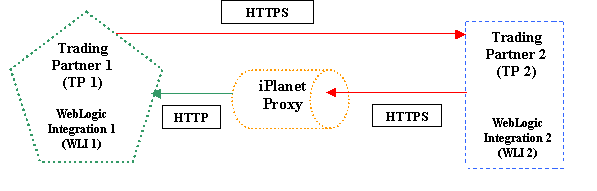
| Note: | In production scenarios, firewalls are usually configured between Oracle WebLogic Integration 1 and the proxy server and between the proxy server and Oracle WebLogic Integration 2. To keep the IP addresses simple in this sample, the firewalls are left out of the examples. |
The following topics are discussed in this section:
Managing Oracle WebLogic Security
Trading Partner Integration Security
Guide to Building Business Processes
The instructions in this sample is geared towards users that are already familiar with Oracle WebLogic Integration tasks and procedures.
Before you can configure and run this example, you need to generate a certificate which you will later on import into your Oracle WebLogic Integration keystore. Once the certificate is imported into the keystore, you can use it as an encryption, a signature, or a client certificate for Oracle WebLogic Integration and also as a Oracle WebLogic Server certificate. In a production environment, you would most likely have several certificates, but since this example is for testing only, you use one certificate for both client and server purposes.
You can generate the test certificate using any tool, however, the procedures in this section describe how to generate the certificates using OpenSSL. This is an open source tool which can be downloaded from www.openssl.org.
Before you create the certificate, you need to create the a Public/Private key pair that you then use to create the test certificate. If you are running OpenSSL in a Windows environment, you must first complete the Configuring Windows to Run OpenSSL below, before you can create the key pair. stand
This step includes the following procedures:
The following steps should be completed to configure your Windows environment to run OpenSSL:
OPENSSL_CONF environment variable to point to the OpenSSL configuration file:
$ set OPENSSL_CONF=c:\openssl-[X.X.X]-src\apps\gencert.conf
Where [X.X.X] is the version of your OpenSSL installation, for example 0.9.7.
| Note: | Due to the fact that Internet Explorer uses files of the type .cnf for Speed Dial configuration files, the OpenSSL configuration file might appear without the .cnf suffix and may have a shortcut icon. |
file1, file2, file3, file4, and file5. These files will be used by the OpenSSL facility to create the public/private key pair.c:\openssl\bin.You are now ready to create a public/private key pair using OpenSSL.
The following section describes how to create 1024-bit RSA public/private key pair using OpenSSL:
In a DOS command window, type the following:
$ openssl genrsa rand file1:file2:file3:file4:file5 out WLCert.key 1024
where file1:file2:file3:file4:file5 represents the five large files you created in Configuring Windows to Run OpenSSL.
You are now ready to create any type of X.509 certificate using OpenSSL.
To generate the self-signed test certificate, complete the following procedure:
Digital certificates are stored in two types of keystores in Oracle WebLogic Integration:
This example assumes that you have created your own keystores and trusts. However, you can also complete this example by using the demonstration keystore file (DemoIdentity.jks) and the demonstration trust (DemoTrust.jks) that are part of your Oracle WebLogic Server installation and therefore Oracle WebLogic Integration installation. These Java Key Store files are located in the following location:
BEA_HOME\wlserver_<version>\server\lib\
where BEA_HOME is the directory in which you installed your product.
Since the underlying server used by Oracle WebLogic Integration is the Oracle WebLogic Server application, this section demonstrates how to use the Oracle WebLogic Server Administration Console to configure the keystores.
server_name is the name of your Oracle WebLogic Server.The Configure Keystore Properties screen appears.
BEA_HOME\wlserver_<version>\server\lib\DemoIdentity.jks
Where BEA_HOME is the directory in which you installed Oracle WebLogic Server.
JKS.DemoIdentityKeyStorePassPhrase.Note: This attribute is optional or required depending on the type of keystore. All keystores require the passphrase in order to write to the keystore. Some keystores do not require the passphrase to read from the keystore. Whether or not you define this property depends on the requirements of the keystore. For example, Oracle WebLogic Server only reads from the keystore so a passphrase is not required, however, Oracle WebLogic Integration writes to keystores and therefore requires a passphrase.
BEA_HOME\wlserver_<version>\server\lib\DemoTrust.jks.
Where BEA_HOME is the directory in which you installed Oracle WebLogic Server.
JKS.DemoTrustKeyStorePassPhrase.Note: This attribute is optional or required depending on the type of keystore. All keystores require the passphrase in order to write to the keystore. Some keystores do not require the passphrase to read from the keystore. Whether or not you define this property depends on the requirements of the keystore. For example, Oracle WebLogic Server only reads from the keystore so a passphrase is not required, however, Oracle WebLogic Integration writes to keystores and therefore requires a passphrase.
| Note: | However, since you need to load the private key you created in Creating a Public/Private Key Pair into the keystore before you can configure the SSL settings, you can minimize this window for now. Instead restart your Oracle WebLogic Server and continue to the next section, Step 3: Configuring the Local Trading Partner in Oracle WebLogic Integration 1, which includes loading the private key into the keystore. |
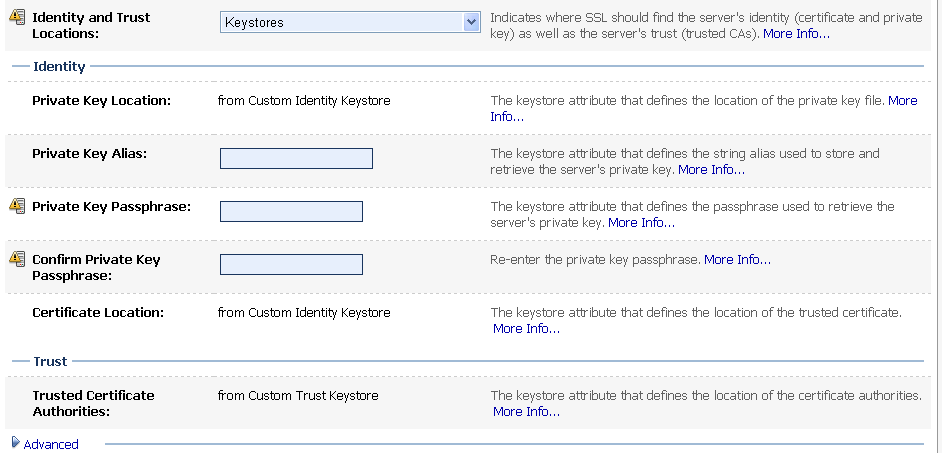
To learn more about the setting you just entered, see “Configuring Keystores” in Configuring SSL.
Oracle WebLogic Integration contains two default trading partners named Test_TradingPartner_1(TP 1)and Test_TradingPartner_2(TP 2). In this section, you configure Test_TradingPartner_1 to be your local trading partner in Oracle WebLogic Integration 1(WLI 1).
| Note: | Before you start any of the procedures in this section, you must have configured your keystores as described in Step 2: Configuring Keystores for Oracle WebLogic Integration and restarted your Oracle WebLogic Server after completing the keystore configuration. |
This section contains the following procedures:
The following procedure describes how to configure the default trading partner Test_TradingPartner_1 to act as the local trading partner in your Oracle WebLogic Integration application:
The View and Edit Trading Partner Profiles screen appears with the two trading partners Test_TradingPartner_1 and Test_TradingPartner_2 listed, as shown in Figure A-3.
Since you are going to import the configuration for the remote trading partner from Oracle WebLogic Integration 2, you can delete Test_TradingPartner_2 from the list.
You now need to add the appropriate certificates to your local trading partner so that they will be imported into the keystore.
The following procedure describes how to add the certificate, which you created in Generating the Test Certificate, to your local trading partner configuration:
The details of your trading partner, including general information, bindings, and certificates are displayed. Note that there are no certificates configured for this trading partner.
The Add Certificate (Step 1 of 2) screen appears.
The Add Certificate (Step 2 of 2) screen appears. You use this screen to import a client certificate file to be stored in the key store and used by the local trading partner. However, before you can create the client certificate, you have to create a password alias.
The Add New Password Alias screen appears.
The Add Certificate (Step 2 of 2) screen appears again, with the alias values you just entered.
WLCert.crt file which you created in Generating the Test Certificate.WLCert.key file which you created in Generating the Test Certificate.By selecting CLIENT from the Type drop-down list, you specified the certificate to be a client certificate. You can add a signature certificate by using this same procedure, but instead selecting SIGNATURE from the Type drop-down list.
You can review all your configurations of the Test_TradingPartner_1 trading partner by navigating to Trading Partner Management > Profile Management and clicking on the Test_TradingPartner_1 trading partner.
The next step is to edit the protocol bindings for your trading partner.
The default trading partner you just configured to be the local trading partner for Oracle WebLogic Integration, contains two ebXML default bindings. The following steps describes how to edit the ebXML 2.0 binding with the correct transport protocol and signature settings:
The Edit Binding screen appears.
The View Binding Details screen appears
Your new binding settings are saved. To learn more about how to configure ebXML bindings including how to configure signatures and signature transforms, see “ Adding Protocol Bindings to a Trading Partner” in Trading Partner Management.
Since you have completed the configuration of the local trading partner and have imported the test certificate into the keystore, you can now return to the Oracle WebLogic Server console and configure the SSL settings.
Although you specified the certificate you loaded into the keystore as a client certificate when you configured the Oracle WebLogic Integration, for testing purposes you can also use this certificate as the server certificate for Oracle WebLogic Server. You just have to configure the server with the correct alias in the SSL settings.
You configure the SSL settings on the Oracle WebLogic Server in the WebLogic Console:
From Oracle WebLogic Integration, you do this by selecting Tools > WebLogic Server > WebLogic Console.
TP1-clientThis is the alias you specified when loading the private key for WebLogic Server from the keystore in Adding the Test Certificate to the Keystore.
TP1ClientThis is the password specified when loading the private key for WebLogic Server into the keystore in Adding the Test Certificate to the Keystore.
An alert screen appears, which informs you that you need to restart your server. You can ignore this for now, instead restart your server after you have completed all the SSL configuration steps.
The Keystore Configuration screen appears.
To learn more about the settings you just entered, see “Configuring Two-Way SSL” in Configuring SSL.
<Feb 1, 2007 4:11:45 PM IST> <Notice> <Security> <achepuri02> <examplesServer> <[ACTIVE] ExecuteThread: '0' for queue: 'weblogic.kernel.Default (self-tuning)'> <<WLS Kernel>> <> <> <1170326505038> <BEA-090082> <Security initializing using security realm myrealm.>
<Feb 1, 2007 4:11:49 PM IST> <Notice> <WebLogicServer> <achepuri02> <examplesServer> <Main Thread> <<WLS Kernel>> <> <> <1170326509604> <BEA-000365> <Server state changed to STANDBY>
<Feb 1, 2007 4:11:49 PM IST> <Notice> <WebLogicServer> <achepuri02> <examplesServer> <Main Thread> <<WLS Kernel>> <> <> <1170326509604> <BEA-000365> <Server state changed to STARTING>
<Feb 1, 2007 4:12:04 PM IST> <Warning> <HTTP> <achepuri02> <examplesServer> <[ACTIVE] ExecuteThread: '0' for queue: 'weblogic.kernel.Default (self-tuning)'> <<WLS Kernel>> <> <> <1170326524145> <BEA-101369> <weblogic.servlet.internal.WebAppServletContext@1dab0f0 - appName: 'BEA_WLS_DBMS_ADK', name: 'BEA_WLS_DBMS_ADK_Web', context-path: '/BEA_WLS_DBMS_ADK_Web': The encoding jsp-descriptor param has been deprecated. Consider declaring the encoding in the jsp-config element (web.xml) or as a page directive (pageEncoding) instead.>
<Feb 1, 2007 4:12:18 PM IST> <Notice> <Log Management> <achepuri02> <examplesServer> <[STANDBY] ExecuteThread: '5' for queue: 'weblogic.kernel.Default (self-tuning)'> <<WLS Kernel>> <> <> <1170326538816> <BEA-170027> <The server initialized the domain log broadcaster successfully. Log messages will now be broadcasted to the domain log.>
<Feb 1, 2007 4:12:19 PM IST> <Notice> <WebLogicServer> <achepuri02> <examplesServer> <Main Thread> <<WLS Kernel>> <> <> <1170326539377> <BEA-000365> <Server state changed to ADMIN>
<Feb 1, 2007 4:12:19 PM IST> <Notice> <WebLogicServer> <achepuri02> <examplesServer> <Main Thread> <<WLS Kernel>> <> <> <1170326539407> <BEA-000365> <Server state changed to RESUMING>
<Feb 1, 2007 4:12:21 PM IST> <Notice> <Security> <achepuri02> <examplesServer> <[ACTIVE] ExecuteThread: '2' for queue: 'weblogic.kernel.Default (self-tuning)'> <<WLS Kernel>> <> <> <1170326541089> <BEA-090171> <Loading the identity certificate and private key stored under the alias DemoIdentity from the jks keystore file C:\bea_GA\WEBLOG~1\server\lib\DemoIdentity.jks.>
<Feb 1, 2007 4:12:21 PM IST> <Notice> <Security> <achepuri02> <examplesServer> <[ACTIVE] ExecuteThread: '2' for queue: 'weblogic.kernel.Default (self-tuning)'> <<WLS Kernel>> <> <> <1170326541360> <BEA-090169> <Loading trusted certificates from the jks keystore file C:\bea_GA\WEBLOG~1\server\lib\DemoTrust.jks.>
<Feb 1, 2007 4:12:21 PM IST> <Notice> <Security> <achepuri02> <examplesServer> <[ACTIVE] ExecuteThread: '2' for queue: 'weblogic.kernel.Default (self-tuning)'> <<WLS Kernel>> <> <> <1170326541370> <BEA-090169> <Loading trusted certificates from the jks keystore file C:\bea_GA\JROCKI~1\jre\lib\security\cacerts.>
<Feb 1, 2007 4:12:21 PM IST> <Error> <Server> <achepuri02> <examplesServer> <DynamicListenThread[Default[2]]> <<WLS Kernel>> <> <> <1170326541620> <BEA-002606> <Unable to create a server socket for listening on channel "Default[2]". The address 127.0.0.1 might be incorrect or another process is using port 7001: java.net.BindException: Address already in use: JVM_Bind.>
.
.
.
You have now completed the WebLogic Server configuration. To learn more about WebLogic Server SSL configuration, see Configuring SSL. The next step is to export the Test_TradingPartner_1 data so that you can import this data later on when you configure the remote trading partner in WebLogic Integration 2.
Instead of configuring both the company profile and partner profile by going through the configuration screens in WLI 2, you can import data that has been exported from WLI 1directly into WLI 2 and have the partner profile automatically configured.
Complete the following procedure to export the WebLogic Integration trading partner data:
TP1.xml as the filename and click Save.| Note: | Remember the navigation path to the file. You need this when you import your trading partner information. |
You have completed the WebLogic Integration local trading partner configuration. To learn more about creating, configuring, and managing trading partners in WebLogic Integration, see Trading Partner Management.
You can create your remote trading partner in WLI 1 using the procedures you just completed for Test_TradingPartner_1. However, in this example you take a short cut by importing the company profile settings from WLI 2 and use that as the remote trading partner.
The next step shows you how to configure a trading partner named Test_TradingPartner_2 as the company profile partner in the WLI 2 application and how to export the company profile information into a file that you can then import into WLI 1.
In this section, you configure the default trading partner Test_TradingPartner_2 to be your local trading partner with WLI 1 at the other end. You then edit the trading partner bindings and add the appropriate certificates to the trading partner and keystore. Then export TPM data.
To configure the Test_Trading Partner_2 in WebLogic Integration 2, follow the same steps through 2 to 5.
In this section, you create a remote trading partner in the WLI 1 application by importing the company profile information which you exported from WLI 2 .
In WLI 1, import the TPM file you that you exported from WLI 2 in step 5(TP2.xml). Open the TP2.xml file and change type = Local to type = Remote before importing it in WLI 1. Repeat the same to import the TPM file that you exported from WLI 1.
The following steps describes the importing procedure:
TP2.xml location to the file you exported from WebLogic Integration.After successfully importing the trading partner information, remember to review the new trading partner profile and make sure that the end point URL is correct. You do this by navigating to Profile Management, clicking on Test_TradingPartner_2, and clicking on its binding. When you click on Test_TradingPartner_2, note that three certificates (client, server, signature) were automatically created in the Company Profile in WLI 2 and imported into WLI 1.
Now that you have configured both the local and the remote trading partner for WLI, the next step is to add services and service profiles to those trading partners.
Once the Test_TradingPartner_1 and Test_TradingPartner_2 configurations are completed, you have to create services and corresponding service profiles for those trading partners.
For WLI 2, create a process service with the name as the URL of the participant jpd process. Configure the service profiles for the local and remote trading partner profiles in WebLogic Integration.
In Oracle WebLogic Integration:
To be able to configure the services correctly, the business process which initiates the ebXML message exchange must be currently deployed. This section contains the following procedures:
Complete the following steps to add a service to your trading partner profile in WLI 1.
If you are not familiar with how to build and deploy ebXML business processes, consider completing one of the exercises in Tutorials: Building ebXML Solutions.
The Add Service screen appears.
Your service is created and the View And Edit Service Details screen appears on which you add the service profile.
Complete the following steps to add a service to your trading partner profile in WLI 2.
If you are not familiar with how to build and deploy ebXML business processes, consider completing one of the exercises in Tutorials: Building ebXML Solutions.
The Add Service screen appears.
/testWeb/processes/Process.jpdYour process is created and the View And Edit Service Details screen appears on which you add the process service.
After you have created the trading partner service, you create a service profile which specify the protocol binding and URL endpoints for the local and remote trading partners that offer and call the service. The following procedure describes how to add a service profile:
The Add Service Profile screen is displayed.
| Note: | Similarly, for WLI 2, the local trading partner will be Test_TradingPartner_2 and remote trading partner will be Test_TradingPartner_1. |
| Note: | Also, make sure you change the endpoint URLs to use https, not http. If they are set to the wrong protocol, follow the directions in Editing the Trading Partner Binding to select the correct one. |
| Note: | Although it is not enforced, typically the same type of authentication is selected for both the local and remote trading partner. |
Where xxxx is a number which was randomly generated when you imported the WLI 2 self-signed certificate file.
Authentication is added and the View and Edit Service Details page is displayed.
| Note: | If there is an error, the Add Authentication page is redisplayed. A message indicating the problem is displayed above the input requiring correction. |
| Note: | Repeat the same steps for configuring Service Profile in WLI 2. |
You have now created a service and its service profile. To learn more about services and service profiles, see “Adding Services” and “Adding Service Profiles to a Service” in Trading Partner Management. The next step is to configure the iPlanet SSL settings and then proceed to complete the configuration of WLI 2.
This section describes how to configure your iPlanet Web Server as the proxy server for this sample.
If you do not already have iPlanet Web Server installed, you can download it from Sun’s website the following location: http://www.sun.com/software/download/products/3f186391.html
Refer to the product documentation to install and start the iplanet admin and managed server.
This section contains the following procedures:
Before you can configure your iPlanet server certificates, you have to create a trust database in which to store the certificates. To do so, complete the following procedure:
A dialog window confirming the successful initialization appears. The next step is to request a trial digital certificate from Verisign which you use as the server certificate for iPlanet and also imported later on into the Partner Profile in WebLogic Integration 2.
You can request a trial digital certificate from Verisign to use for testing purposes. The certificate is valid for a limited number of days. To request a certificate, complete the following steps:
A confirmation message is displayed in the Managed Server Console.
and paste it into a text file. This is your certificate request which you send to a certificate authority such as Verisign.
After you complete the request, Verisign will send you an email with the digital certificate. Copy the content and save it in a file named iPlanetServer.pem. This file is your digital certificate for the iPlanet Server.
You have completed the trial digital certificate request process. The next step is to install the digital trial certificate as the iPlanet server certificate.
You are now ready to install the server certificate for iPlanet. The following procedure describes the steps to complete:
The Install a Server Certificate screen appears.
iPlanetServer.pem file that you created in
Requesting a Trial Digital Certificate from Verisign.The Add Server Certificate screen appears with the details of the certificate you are adding.
You have successfully added the server certificate. The next step is to download and convert the trusted CA server certificate.
In addition to the server certificate you just installed, you also need a trusted certificate from an Certificate Authority such as Verisign. To request a trusted certificate from Verisign, complete the following procedure:
iPlanetCA.der.
The server certificate is in binary format. Before you can use it with iPlanet, you must convert it to PEM format. The der2pem command line utility included with WebLogic Server can be used to convert the certificate. To learn how to use the utility, see “der2pem” in
Using the WebLogic Server Java Utilities in the WebLogic Server Command Reference.
Follow the procedure described to convert the iPlanetCA.der file to iPlanetCA.pem.
| Note: | A DER format file contains binary data and can only be used for a single certificate. A PEM format file supports multiple digital certificates. For example, a certificate chain can be included. The order of the files is important, they should be in the order of trust. The server digital certificate should be the first digital certificate in the file, the issuer of the digital certificate should be next, and so on, until you get to the self-signed root certificate authority certificate. |
After you have completed the conversion, the next step is to install the trusted CA certificate.
To install the trusted certificate you just requested, do the following:
iPlanetCA.pem file you created in
Requesting a Trusted CA Certificate from VerisignThe Add Server Certificate screen appears with the details of the certificate you are adding.
You have successfully installed the trusted CA certificate.
The next step is to install the WebLogic Integration 2 certificate.
Use the procedures described in Installing the Trusted CA Certificate to import the TP2.xml file which you exported to create WLI 2 CA certificate for your iPlanet server.
You have now successfully installed the necessary iPlanet certificates. There is just one final step required to get the iPlanet configuration to work with SSL.
obj.conf file add the following lines of code:
<Object name="myProxy" ppath="*">
PathCheck fn="get-client-cert" method="(GET|POST)" dorequest="1"
Service fn=wl_proxy FileCaching="OFF" Debug="ALL" KeepAliveEnabled=false DebugConfigInfo="ON" WebLogicHost=172.16.17.183\
WebLogicPort=7001 WLLogFile="C:/depot/newlog.txt" SecureProxy="OFF" WLProxySSL="ON" RequireSSLHostMatch="False"
</Object>
magnus.conf file, add the following lines of code:
Init fn="load-modules" shlib="D:/iPlanet/Servers/bin/https/bin/proxy36.dll" funcs="wl_proxy,wl_init"
Init fn="wl_init"
This concludes the iPlanet configuration step. To learn more about the settings you just configured, see Installing and Configuring the Netscape Enterprise Server Plug-In in Using Web Server Plug-Ins With WebLogic Server.


|