Using Oracle Jolt

     Previous  Next    Open TOC in new window  Open Index in new window  View as PDF - New Window  Get Adobe Reader - New Window
Content starts here

Using the Jolt Repository Editor

Use the Jolt Repository Editor to add, modify, test, export, and delete Oracle Tuxedo service definitions from the Repository based on the information available from the Oracle Tuxedo configuration file. The Jolt Repository Editor accepts Oracle Tuxedo service definitions, including the names of the packages, services, and parameters.

This topic includes the following sections:


Introduction to the Repository Editor

The Jolt Repository is used internally by Jolt to translate Java parameters to an Oracle Tuxedo type buffer. The Repository Editor is available as a downloadable Java applet. When an Oracle Tuxedo service is added to the repository, it must be exported to the Jolt server to ensure that the client requests can be made from a Jolt client.

Repository Editor Window

Repository Editor windows contain entry fields, scrollable displays, command buttons, status, and radio buttons. The figure Sample Repository Editor Window illustrates the parts of the window. The table Repository Editor Window Parts contains details about each part.

Figure 4-1 Sample Repository Editor Window

Sample Repository Editor Window

Repository Editor Window Description

The following table details the parts of the Repository Editor window shown in the previous figure.


Getting Started

Before starting the Repository Editor, make sure that you install the minimally required components, the Jolt Server and the Jolt Client.

To use the Repository Editor:

  1. Start the Repository Editor.
  2. You can start the Repository Editor from either the JavaSoft appletviewer or from your Web browser. Both of these methods are detailed in the following sections.

  3. Log on to the Repository Editor.
Note: For information about exiting the Repository Editor after you enter information, refer to Exiting the Repository Editor.

Starting the Repository Editor Using the Java Applet Viewer

  1. Set the CLASSPATH to include the Jolt class directory.
  2. If loading the applet from a local disk, type the following at the URL location:
  3. appletviewer <full-pathname>/RE.html

    If loading the applet from the Web server, type the following at the URL location:

    appletviewer http://<www.server>/<URL path>/RE.html
  4. Press Enter.
  5. The window is displayed as shown in the figure Oracle Jolt Repository Editor Logon Window.

Starting the Repository Editor from Your Web Browser

Use one of the following procedures to start the Repository Editor from your Web Browser.

To Start from a Local File

  1. Set the CLASSPATH to include the Jolt class directory.
  2. Type the following:
  3. file:<full-pathname>/RE.html
  4. Press Enter.
  5. The editor is displayed as shown in Oracle Jolt Repository Editor Logon Window.

To Start from a Web Server

  1. Ensure that the CLASSPATH does not include the Jolt class directory.
  2. Unset the CLASSPATH.
  3. Type the following:
  4. http://<www.server>/<URL path>/RE.html
    Note: Before opening the file, modify the applet codebase parameter in RE.html to match your Jolt Java classes directory.
  5. Press Enter.
  6. The editor is displayed as shown in the Oracle Jolt Repository Editor Logon Window.

Logging On to the Repository Editor

Note: If you are using the JDK 1.3 appletviewer to start the Jolt Repository Editor, you will not be able to connect to a remote machine, only to a local host JSL. This is due to a security restriction imposed in the JDK 1.3 appletviewer. Also, for JDK 1.2, you must use the -nosecurity option in the appletviewer if you are connecting to a remote machine JSL.
  1. Complete the appropriate steps to start the Repository Editor.
  2. The Oracle Jolt Repository Editor Logon Window must be displayed before you continue with step 2. Refer to this figure as you perform the following procedure.

  3. Type the name of the Server machine designated as the “access point” to the Oracle Tuxedo application and press Tab.
  4. Type the Port Number and press Enter.
  5. The system validates the server and port information.

    Note: Unless you are logging on through the Jolt Relay, the same port number is used to configure the Jolt Listener. Refer to your UBBCONFIG file for additional information.
  6. Type the Oracle Tuxedo Application Password and press Enter.
  7. Depending upon the authentication level, complete steps 5 and 6 as required.

  8. Type the Oracle Tuxedo User Name and press Tab.
  9. Type the Oracle Tuxedo User Password and press Enter.
  10. The Packages and Services command buttons are enabled.

    Note: See the JoltSessionClass for additional information.
    Figure 4-2 Oracle Jolt Repository Editor Logon Window


    Oracle Jolt Repository Editor Logon Window

The following table, Repository Editor Logon Window Description, describes Repository Editor logon window elements.

Repository Editor Logon Window Description

Table 4-2 Repository Editor Logon Window Description
Option
Description
Server
Server name.
Port Number
Port number in decimal value.

Note: After the Server Name and Port Number are entered, the User Name and Password fields are activated. Activation is based on the authentication level of the Oracle Tuxedo application.

User Role
Oracle Tuxedo user role. Required only if Oracle Tuxedo authentication level is USER_AUTH or higher.
Application Password
Oracle Tuxedo administrative password text entry.
User Name
Oracle Tuxedo user identification text entry. The first character must be an alpha character.
User Password
Oracle Tuxedo password text entry.
Packages
Accesses the Packages window. (Enabled after the logon.)
Services
Accesses the Services window. (Enabled after the logon.)
Log Off
Terminates the connection with the server.

Exiting the Repository Editor

Exit the Repository Editor when you finish adding, editing, testing, or deleting packages, services, and parameters. Prior to exit, the window is displayed as shown in the figure Oracle Jolt Repository Editor Logon Window Prior to Exit.

Figure 4-3 Oracle Jolt Repository Editor Logon Window Prior to Exit

Oracle Jolt Repository Editor Logon Window Prior to Exit

Note that only the Packages, Services, and Log Off command buttons are enabled. All of the text entry fields are disabled.

Follow the steps below to exit the Repository Editor:

  1. Click Back to return to the Repository Editor Logon window.
  2. Click Log Off to terminate the connection with the server.
  3. The Repository Editor Logon window continues to be displayed with disabled fields.

  4. Select Close from your browser menu to close the window.


Main Components of the Repository Editor

The Repository Editor allows you to add, modify, or delete any of the following components:

Repository Editor Flow

After you log on to the Repository Editor, two buttons are enabled, Packages and Services.

The following figure illustrates the Repository Editor flow to help you determine which of these two buttons to select.

Figure 4-4 Repository Editor Flow Diagram

Repository Editor Flow Diagram

Select Packages to open the Packages window and perform the following functions:

Refer to What Is a Package? for complete details.

Select Services to open the Services window and perform the following functions:

Refer to What Is a Service? for complete details.

What Is a Package?

Packages provide a convenient method for grouping services for Jolt administration. (A service consists of parameters, such as pin number, account number, payment, rate, term, age, or Social Security number.)

You use the Packages window to perform the following:

Click the Packages button in the Jolt Repository Editor logon window to display the available packages. When you select a specific package from the display list, its services within that package are displayed.

The following figure contains a sample Packages window. The BANKAPP package is selected, and the services within the BANKAPP package is displayed.

Figure 4-5 Sample Packages Window

Sample Packages Window

Packages Window Description

Table 4-3 Packages Window Description 
Option
Description
Packages
Lists available packages.
Services
Lists available services within the selected package.
Package Organizer
Accesses the Package Organizer window to review available packages and services. Use this window to move the services among the packages or add a new package.
Option
Description
Export
Makes the most current services available to the client. This option is enabled when a package is selected.
Unexport
Select this option before testing an existing service. This option is enabled when a package is selected.
Delete
Deletes a package. This option is enabled when a package is selected and the package is empty (no services contained within the package).
Back
Returns the user to the previous window.

Instructions for Viewing a Package

  1. Click Packages in the Repository Editor Logon window.
  2. The Packages window opens and displays the list of available packages.

    In the figure Sample Packages Window, BANKAPP, BULKPKG, and SIMPSERV are the available packages.

  3. Refer to Instructions for Viewing a Parameter for additional information.

What Is a Service?

A service is a definition of an available Oracle Tuxedo service. Services include parameters such as pin number, account number, payment, and rate. Adding or editing a Jolt service does not affect an existing Oracle Tuxedo service.

You use the Services Window to add, edit, or delete services.

The following figure is an example of a Services window with the BANKAPP package selected, and the display list of services and parameters available for this package (parameters are detailed later).

Figure 4-6 Sample Services Window

Sample Services Window

Services Window Description

Table 4-4 Services Window Description 
Option
Description
Packages
Lists the available packages.
Services
Lists the services in the selected package, which you can edit or delete. Selecting a service displays the parameters within the service.
Parameters
Displays the parameters of the selected service.
New
Displays the Edit Services window for adding a new service.
Edit
Displays the Edit Services window for editing an existing service. This button is enabled only if a service has been selected.
Delete
Deletes a service. This button is only enabled if a service has been selected.
Back
Returns the user to the previous window.

Instructions for Viewing a Service

  1. Select Services from the Repository Editor Logon window.
  2. The Services window opens and displays the list of available packages.

  3. Select a package.
  4. The list of available services for the selected package is displayed.

    In the figure Sample Services Window, BANKAPP is the selected package. DEPOSIT, INQUIRY, TRANSFER, and WITHDRAWAL are the available services for BANKAPP.

  5. Refer to Instructions for Viewing a Parameter for additional information.

Working with Parameters

A service contains parameters, which may be a pin number, account number, payment, rate, term, age, or Social Security number. The following figure shows a Services window displaying a selected service and its parameters.

Note: Adding or editing a parameter does not modify or change an existing Oracle Tuxedo Service.
Figure 4-7 Sample Services Window with Parameters List

Sample Services Window with Parameters List

Instructions for Viewing a Parameter

  1. Select Services from the Repository Editor Logon window.
  2. The Services window opens and displays the list of available packages.

  3. Select a package.
  4. The list of available services for the selected package is displayed.

    In the preceding figure, BANKAPP is the selected package.

  5. Select a service.
  6. The list of available parameters for the selected service is displayed.

    In the preceding figure, INQUIRY is the selected service.

  7. View the parameters for a selected service in the Parameters display list.
  8. In the preceding figure, ACCOUNT_ID, FORMNAM, SBALANCE, and STATLIN are the available parameters for the INQUIRY service.

  9. Refer to Adding a Parameter for additional information.


Setting Up Packages and Services

This section includes the necessary steps for setting up a package and its services:

Saving Your Work

As you create and edit services and parameters, it is important to regularly save information to avoid losing input. Clicking Save Service in the Edit Services window can prevent the need to re-enter information in the event of a system failure.

Caution: When you add or edit the parameters of a service, you must select Add before choosing Back from the Edit Parameters window and returning to the Edit Services window.

If adding a new service or modifying an existing service in the Edit Services window, be sure to select Save Service before choosing Back. If you select Back before you save the modified information, a warning is briefly displayed on the status line at the bottom of the window.

Adding a Package

When you need to add a new group of services, you create a new package before adding the services. The Package Organizer Window and the following procedure show how to add a new package, BALANCE, to the Packages listing.

Figure 4-8 Package Organizer Window

 Package Organizer Window

Instructions for Adding a Package

  1. Click Packages in the Repository Editor Logon window to display the Packages window.
  2. Select Package Organizer to display the Package Organizer window, similar to that shown in the figure Package Organizer Window.
  3. For a description of contents of this window, see Package Organizer Window Description.

  4. Click the New Package button in the Package Organizer window.
  5. The text field is activated.

  6. Type the name of the new package (not to exceed 32 characters) and press Enter.
  7. The new name (shown in the preceding figure as BALANCE) is displayed on the Packages list in random order.

Adding a Service

Services are definitions of available Oracle Tuxedo services and can only be a part of a Jolt package.You must create the service as a part of a new or existing package.

The Repository Editor accepts the new service name exactly as it is typed (that is, all uppercase letters, abbreviations, misspellings are accepted). Service names must not exceed 30 characters.

The following figure shows the Edit New Services window for adding a service.

Figure 4-9 Edit Services Window: Add a New Service to a Package

Edit Services Window: Add a New Service to a Package

Adding a Service Window Description

The following table describes the options for adding services to a package in a package window.

 
Option
Description
Edit Services Selections
Service Name
Name of the new service to be added to the Jolt Repository.
Input Buffer Type/Output Buffer Type
VIEW— C-structure and 16-bit integer field. Contains subtypes that have a particular structure. X_C_TYPE and X_COMMON are equivalent. X_COMMON is used for COBOL and C.
VIEW32—similar to VIEW, except 32-bit field identifiers are associated with VIEW32 structure elements.
CARRAY—array of uninterrupted binary data that is neither encoded nor decoded during transmission; it may contain null characters. X_OCTET is equivalent.
XML—well-formed XML document. Similar to CARRAY.
FML—type in which each field carries its own definition.
FML32—similar to FML except the ID field and length field are 32 bits long.
STRING—character array terminated by a null character that is encoded or decoded.
Input View Name/Output View Name
Unique name assigned to the Input View Buffer and Output View Buffer types. These fields are only enabled if VIEW or VIEW32 are the selected buffer types.
Export Status
Unexport
Export
Radio button with current status of the service. EXPORT or UNEXPORT status is checked. UNEXPORT is the default.
Service Level Actions
Save Service
Saves the newly created service in the Repository.
Test
Tests the service. This command button is disabled until a new service is created or edits to an existing service are saved.
Back
Returns you to the previous window.
Parameter
Parameters
List of service parameters to edit or delete.
Parameter Level Actions
New
Adds new parameters to the service.
Edit
Used to edit an existing parameter. This command button is disabled until a new parameter is selected.
Delete
Deletes a parameter. This option is disabled until a parameter is selected.

Instructions for Adding a Service

  1. Select Services from the Repository Editor Logon window.
  2. The Services window opens, similar to the figure shown in Sample Services Window.

  3. Select the package to which you will add the service.
  4. If you later decide that another package should contain the new service, use the Package Organizer to move the service to a different package. (See Grouping Services Using the Package Organizer for additional information.)

  5. From the Services window, select New to display the Edit Services window, as shown in Edit Services Window: Add a New Service to a Package.
  6. Select the Service Name text field to activate it.
  7. Type the name of the new service you want to add.
  8. Select the input buffer type.
  9. Although the same buffer type selected for the Input Buffer is automatically selected for the Output Buffer, you can select a different Output Buffer type.

    • If VIEW or VIEW32 is selected, you must type the Input View Name and Output View Name in the associated text fields.
    • If another buffer type is selected, the Input View Name and Output View Name text fields are disabled.
    • If CARRAY or STRING is selected, refer to Selecting CARRAY or STRING as a Service Buffer Type for additional instructions.
  10. Select Save Service to save the newly created service.

Selecting CARRAY or STRING as a Service Buffer Type

If CARRAY or STRING is selected as the buffer type for a new service, only CARRAY or STRING can be added as the data type for the accompanying parameters. See also Adding a Parameter and Selecting CARRAY or STRING as a Parameter Data Type. For additional information, refer to Using the Jolt Class Library..

The following figure shows an example Edit Services window with STRING selected as the buffer type for the service SIMPAPP.

Figure 4-10 Edit Services Window: Select STRING Buffer Type

Edit Services Window: Select STRING Buffer Type

Adding a Parameter

Clicking New under the label Parameter level actions in the Edit Services window is displayed in the Edit Parameters window. Review the features in the following figure. Use this window to enter the parameter and screen information for a service.

Figure 4-11 Edit Parameters Window: Add a Parameter

Edit Parameters Window: Add a Parameter

Adding a Parameter Window Description

Option
Description
Field Name
Adds the field name (for example, asset, inventory).
Data Type
Lists data type choices:
byte—8-bit
short—16-bit
integer—32-bit
float—32-bit
double—64-bit
string—null-terminated character array
carray—variable length 8-bit character array
Direction
Radio button choices for direction of information:
Input—information is directed from the client to the server.
Output—information is directed from the server to the client.
Both—information is directed from the client to the server, and from the server to the client.
Occurrence(s)
Number of times that an identical field name can be used. If 0, the field name can be used an unlimited number of times. Occurrences are used by Jolt to build test screens; not to limit information sent or retrieved by Oracle Tuxedo.
Screen Information
This button is disabled when the window is launched.
Clear
Clears the fields of the window.
Change
Is disabled while new parameters are added.
Add
Adds new parameters to the service. The parameters are saved when the service is saved.
Back
Returns the user to the previous window.

Instructions for Adding a Parameter

  1. Select Field Name to activate the field, and type the field name.
  2. Note: If the buffer type is FML or VIEW, the field name must match the corresponding parameter field name in FML or VIEW.
  3. Select the data type.
  4. Specify a direction by selecting the input, output, or both radio buttons.
  5. Select the Occurrences text field to activate it, and then enter the number of occurrences.
  6. Select Add to append the information. Add does not save the parameter.
  7. In the Edit Services window, click Save Service to save the parameter as a part of the service.
  8. WARNING:
    Edit Parameters Window: Add a Parameter
    If you do not click Save Service before you click Back, the parameters are not saved as part of the service.
  9. Click Back to return to the Edit Services window.

Selecting CARRAY or STRING as a Parameter Data Type

If CARRAY or STRING is the selected buffer type for a new service, only CARRAY or string can be added as the data type for the accompanying parameters.

In this case, only one parameter can be added. It is recommended that you use the parameter name “CARRAY” for a CARRAY buffer type, and the parameter name “STRING” for a STRING buffer type.

See also Instructions for Adding a Service and Selecting CARRAY or STRING as a Service Buffer Type. For additional information, refer to Using the Jolt Class Library..

The following figure is an example of the Edit Parameters window with string as the selected data type for the parameter. The Data Type defaults to string and does not allow you to modify that particular data type. The Field Name can be any name.

Figure 4-12 Edit Parameters Window: string Data Type

Edit Parameters Window: string Data Type


Grouping Services Using the Package Organizer

The Package Organizer moves services between packages. You may want to group related services in a package (for example, WITHDRAWAL services that are exported only at a certain time of the day can be grouped together in a package).

Use the Package Organizer arrow buttons to move a service from one package to another. These buttons are useful if you have several services to move between packages. The packages and services display listings to help track a service within a particular package.

The following figure is an example of a Package Organizer window with a service selected for transfer to another package.

Figure 4-13 Package Organizer Window

Package Organizer Window

Package Organizer Window Description

Option
Description
Packages (left display list)
Lists packages containing services in the selected package.
Packages (right display list)
Lists packages available as destinations for the selected service.
Services (left display list)
Lists available services for the selected package.
Services (right display list)
Lists available services of the highlighted package that you moved.
Left arrow
Moves services (one service at a time) to the package highlighted on the left.
Right arrow
Moves services (one service at a time) to the package highlighted on the right.
New Package
Adds the name of a new package.
Back
Returns user to the previous window.

Instructions for Grouping Services with the Package Organizer

  1. In the Packages window, click Package Organizer.
  2. In the Package Organizer window, select the package containing the services to be moved from the Packages left display window.
  3. Select the service to be moved from the Services left display window.
  4. In the previous figure, INQUIRY is the selected service in the BANKAPP package.

  5. Select the package to receive the service from the Packages right display window.
  6. The previous figure shows the selected service, INQUIRY, and the selected package, BANK, to which the INQUIRY service will be moved.

    Figure 4-14 Example of a Moved Service


    Example of a Moved Service

  7. To move the service between the packages, select the left arrow (ยจ) or right arrow (Arrow symbol).
  8. These keys are activated only when both packages (left and right are displayed) and a service are selected. The keys are only active in the direction of the package where the service is to be moved. The previous figure, Example of a Moved Service, shows that the INQUIRY service has been moved to the BANK package on the right.

    Note:  You cannot select the same package in both the left and right display lists.


Modifying Packages, Services, and Parameters

You can make the following changes to packages, services, and parameters:

Editing a Service

You can edit an existing service name or service information, or access the window to add new parameters to an existing service. For a description of the Edit Services window, see Adding a Service Window Description. The following figure is an example of the Edit Services window.

Figure 4-15 Edit Services Window

Edit Services Window

Instructions for Editing a Service

Follow these steps to edit a service:

  1. From the Services window, select the package containing the service that requires editing.
  2. The services available for the selected package are displayed.

  3. Select the service to edit.
  4. The parameters available for the selected service are displayed.

  5. Click Edit to display the Edit Services window, as shown in the previous figure.
  6. Type or select the new information, and click Save Service.

Editing a Parameter

All parameter elements can be changed, including the name of the parameter.

WARNING:
Edit Services Window
If you create a new parameter using an existing name, the system overwrites the existing parameter.

The following figure is an example of the Edit Parameters window.

Figure 4-16 Edit Parameters Window

Instructions for Editing a Parameter

Follow these steps to change a parameter:

  1. In the Services window (see Sample Services Window with Parameters List), select the package and service that contain the parameter you want to change.
  2. Click Edit to display the Edit Services window.
  3. Select the Parameter you want to edit from the Parameters display list and click Edit.
  4. The Edit Parameters Window is displayed as shown in the previous figure.

  5. Type the new information and click Change.
  6. Click Back to return to the previous window.

Deleting Parameters, Services, and Packages

This section describe how to delete a package. Before deleting a package, all the services must be deleted from the package. The Delete option is not enabled until all components of the package or service are deleted.

WARNING:
Edit Parameters Window
The system does not display a prompt to confirm that items are to be deleted. Be certain that the parameter, service, or package is scheduled to be deleted or has been moved to another location before selecting Delete.

Deleting a Parameter

Determine which parameters to delete and follow these steps:

  1. In the logon window, click Services to display the Services window.
  2. In the Services window, select the package and service that contain the parameter you want to delete.
  3. Click Edit to display the Edit Services window.
  4. Select the parameter you want to delete from the Parameters display list.
  5. Under Parameter Level Actions, click Delete.

Deleting a Service

Determine which services to delete and follow these steps:

Note: Make certain that all parameters within this service are deleted before selecting this option.
  1. Select the package containing the service you want to delete.
  2. Select the service you want to delete.
  3. Delete is enabled.

  4. Click Delete. The service is deleted.

Deleting a Package

Determine which packages to delete and follow these instructions. Make sure all services contained in this package are deleted or moved to another package before selecting this option.

  1. In the Repository Editor Logon window, click Packages to display the Packages window.
  2. Select a package.
  3. Click Delete.
  4. The package is deleted.


Making a Service Available to the Jolt Client

To make a service available to a Jolt client, you export it. All services in a package must be exported or unexported as a group. A service is made available by using the Export and Unexport radio buttons.

This topic includes the following sections:

Exporting and Unexporting Services

Determine which services are being made available or unavailable to the Jolt client. Services are exported to ensure that the Jolt client can access the most current service definitions from the Jolt server.

The following figure shows the Packages window, where you can export and unexport services.

Figure 4-17 Packages Window: Export and Unexport Buttons

Packages Window: Export and Unexport Buttons

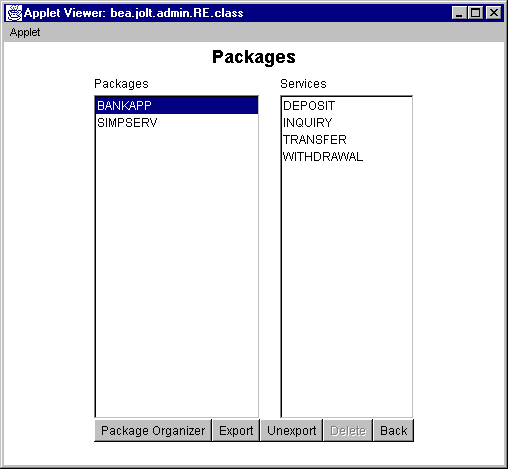
Follow these steps to export or unexport a service:

  1. From the Repository Editor Logon window, select Packages to display the Packages window.
  2. Select a package.
  3. The Export and Unexport buttons are enabled.

  4. To make the services in the selected package available, click Export.
  5. To make the services in the selected package unavailable, select Unexport.

Caution: The system does not display a confirmation message indicating that the service is exported or unexported. See Reviewing the Exported and Unexported Status for additional information.

Reviewing the Exported and Unexported Status

When a service is exported or unexported, you can review its status from the Edit Services window.

The following figure displays the Export radio button as active, for Export Status; therefore, the current status for the service TRANSFER is exported.

Figure 4-18 Export Status

Export Status

To review the current exported or unexported status of a service, follow these steps:

  1. From the Repository Editor Logon window, select Services to display the Services window shown in the Sample Services Window.
  2. Select a package from the Package display list.
  3. The Services display list of available services for the selected package is displayed.

  4. Select the service you want to review.
  5. Click Edit.
  6. The Edit Services window is displayed as shown in the figure Edit Services Window.

    One of the radio buttons (Unexport or Export) next to the Export Status label will be active, indicating the current status of the service.


Testing a Service

Test a service and its parameters before you make them available to Jolt clients. You can test currently available services without making changes to the services and parameters.

Note: The Jolt Repository Editor allows you to test an existing Oracle Tuxedo service with Jolt, without writing a line of Java code.

An exported or unexported service can be tested; if you need to change a service and its parameters, unexport the service prior to editing.

This topic includes the following sections:

Jolt Repository Editor Service Test Window

Use the Run button to test the service to ensure that the parameter information is accurate. A service can only be tested when the corresponding Oracle Tuxedo server is running for the service being tested.

Although the Test button in the Edit Services window is enabled when parameters are not added to the service, the Service Test window displays unused in the parameter fields, and they are disabled. Refer to Sample Service Test Window for an example of unused parameter fields.

Note: The Service Test window displays up to 20 items of any multiple-occurrence parameters. All items that follow the twentieth occurrence of a parameter cannot be tested.

The following figure is an example of a Service Test window with both writable and read-only text fields.

Figure 4-19 Sample Service Test Window

Sample Service Test Window

Service Test Window Description

The following table describes the Service Test window options.

Note: You can enter a two-digit hexadecimal character (0-9, a-f, A-F) for each byte in the CARRAY data field. For example, the hexadecimal value for 1234 decimal is 0422.

Option
Description
Service
Displays the name of the tested service (read-only).
Parameters displayed
Tracks the parameters displayed in the window (read-only).
Parameter text fields
The parameter information text entry field. These fields are writable or read-only. Disabled if read-only.
RUN
Runs the test with the data entered.
Clear
Clears the text entry field.
Next
Lists additional parameter fields, if applicable.
Prev
Lists previous parameter fields, if applicable.
Back
Returns to the Edit Services window.

Testing a Service

You can test a service without making changes to the service or its parameters. You can also test a service after editing the service or its parameters.

Test Service Process Flow

The following figure shows a typical Repository Editor service flow test.

Figure 4-20 Test Service Flow

Test Service Flow

Instructions for Testing a Service

Follow these steps to test a service. For troubleshooting information, see the first two entries in the Repository Editor Troubleshooting table.

  1. Select Services from the Repository Editor Logon window.
  2. The Services window is displayed.

  3. Select the package and the service to test.
  4. Click Edit to access the Edit Services window.
  5. Click Test to access the Service Test window.
  6. Enter data in the Service test window parameter text fields.
  7. Click RUN.
  8. The status line displays the outcome as follows:

    • If the test passed: “Run Completed OK
    • If the test failed: “Call Failed
    • See Repository Editor Troubleshooting for additional Repository Editor troubleshooting information.

If Edits are Required After Testing

Follow these steps if editing is required to pass the test:

  1. Return to the Repository Editor Logon window and click Packages.
  2. Select the package with the services to be retested.
  3. Click Unexport.
  4. Click Back to return to the Repository Editor Logon window.
  5. Click Services to display the Services window.
  6. Select the package and the service that requires editing and click Edit.
  7. In the Edit Services window, edit the service.
  8. Save the service, click Test, and repeat steps 5 and 6 of the Instructions for Testing a Service section.


Repository Editor Troubleshooting

Consult the following table if you encounter problems while using the Repository Editor.

Table 4-5 Repository Editor Troubleshooting 
If...
Then...
A parameter is incorrect
Edit the service.
The Jolt server is down
Check the server. The Oracle Tuxedo service is down. You do not need to edit the service.
You receive any error
Make sure the browser you are running is Java-enabled:
  • For Netscape browsers, make sure that Enable Java and Enable JavaScript are checked under EditArrow symbolPreferencesArrow symbolAdvanced. Then select CommunicatorArrow symbolToolsArrow symbolJava Console. If the Java Console does not exist on the menu, the browser probably does not support Java.
  • For Internet Explorer, make sure the version is 3.0 (or later).
  • If running Netscape Navigator, check the Java Console for error messages.
  • If running appletviewer, check the system console (or the window where you started the appletviewer).
You cannot connect to the Jolt Server (after entering Server and Port Number)
Make sure that:
  • Your Server name is correct (and accessible from your machine). Check that the port number is the correct port. A JSL or JRLY must be configured to listen on that port.
  • The Jolt Server is up and running. If any authentication is enabled, check that you are entering the correct usernames and passwords.
  • If the applet was loaded through HTTP, make sure that the Web server, JRLY, and the Jolt server are on the same machine. (To do this, enter the server name into the Repository Editor that refers to the same machine name as the one used in the URL to download the applet).
You cannot start the Repository Editor
If you are running the editor in a browser and downloading the Repository Editor applet through HTTP, make sure that:
  • The browser is Java-enabled.
  • The Web server is running and accessible.
  • The RE.html file is available to the Web server.
  • The RE.html file contains the correct <codebase> parameter. Codebase identifies where the Jolt class files are located.
If running the editor in a browser (or appletviewer) and loading the applet from disk, make sure that:
  • The browser is Java-enabled.
  • The RE.html file exists and is readable.
  • The RE.html file is Java-enabled.
  • The RE.html file contains the correct <codebase> parameter (this is where the Jolt class files are installed on the local disk).
  • CLASSPATH is set and points to the Jolt class directory.
You cannot display Packages or Services even though you are sure they exist
  • Make sure that the Jolt Repository Server is running (JREPSVR).
  • Make sure that the JREPSVR can access the repository file.
  • Make sure that the configuration of JREPSVR: verify CLOPT parameters and verify that jrep.f16 (FML definition file) is installed and accessible (follow installation documentation).
You cannot save changes in the Repository Editor
Check permissions on the repository file. The file must be writable by the user who starts JREPSVR.
You cannot test services
  • Check that the service is available.
  • Verify the service definition matches the service.
  • If Oracle Tuxedo authentication is enabled, check that you have the required permissions to execute the service.
  • Check if the application file (FML or VIEW) is specified correctly in the variables (FIELDTBLS or VIEWFILES) in the ENVFILE. All applications FML field tables or VIEW files must be specified in the FIELDTBLS and VIEWFILES environment variables in the ENVFILE. If these files are not specified, the JSH cannot process data conversion and you receive the message “ServiceException: TPEJOLT data conversion failed.”
  • Check the ULOG file for any additional diagnostic messages.


  Back to Top       Previous  Next