|
|
This section provides information and guidelines to assist you in installing, configuring, and managing the database server and the database client to used with the AquaLogic Enterprise Security Administration Server. This information is not meant to replace or supersede in any way the database documentation provided by Oracle and Sybase for their database server and client products. Also, the information provided here assumes that you are familiar with the Oracle database documentation.
BEA AquaLogic Enterprise Security stores all policy and configuration data used by the Administration Server and Security Service Modules in the policy database. You can use either an Oracle database or a Sybase database for your policy data storage. You must install and configure the database server software before you install the Administration Server. If you install the Administration Server on a machine other than the machine on which you install the database, you must also install and configure the respective Oracle or Sybase client on that machine.
| Note: | To perform a database installation and setup, you must be a database administrator with a database administrator username and password and permission to create a new instance. In addition, you should be knowledgeable about the operating system you are working with and be adept at database installations and configuration issues. If you do not feel comfortable performing any of these tasks, ask your database administrator for assistance. |
This section covers the following topics:
This section contains the procedures for setting up and administering an Oracle database and an Oracle Client. It covers the following topics:
Before you install and set up your Oracle database, review the following topics to better understand Oracle database configuration requirements:
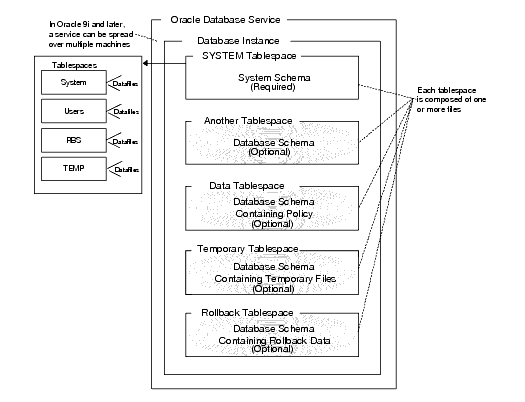
Each Oracle service is identified by a global database name and an Oracle system identifier referred to as the SID (see Figure A-1). The Oracle global database name is the full name of a database that uniquely differentiates it from any other databases in your network domain. One global database name can represent several database instances. The global database name is also known as the service name. The SID distinguishes the database instance from any other database instances on the same machine.
An Oracle instance is a running Oracle database made up of memory structures and background processes. Each instance is associated with an SID. With the Oracle Parallel Server, multiple instances can exist on different machines for a single database.
The policy database is a set of database schemas in which all data are stored. A database schema is a collection of objects associated with a particular schema name. The objects include tables, views, domains, constraints, assertions, privileges, and so on.
A datafile is an Oracle term for a file that contains the contents of logical database structures, such as tables and indexes. One or more datafiles form a logical unit of storage called a tablespace. A datafile is associated with only one tablespace and only one database.
A tablespace is a logical portion of a database used to allocate storage for table and index data. Each tablespace corresponds to one or more physical datafiles. Every Oracle database has a tablespace called SYSTEM and may have additional tablespaces. A tablespace is used to group related logical structures. The database username or user ID is a login that is given permission by the database administrator to access a specific database instance. This user is also called the schema owner, that is, the owner of the schema objects such as tables, views and triggers that are created.
Table 0-1 describes the minimum requirements for the system on which the Oracle database server is installed.
This section provides additional instructions for installing and configuring an Oracle database for use with the AquaLogic Enterprise Security Administration Server.
To install and configure the database, perform the following tasks:
This section provides recommendations for installing the Oracle database and creating a database instance. When you run the Oracle installation program, it automatically starts the Database Configuration Assistant, which you use to create an instance of the database. If the Oracle database is already installed on the database host machine, you can skip this procedure and go to Creating an Instance of an Oracle Database and then go to Configuring an Oracle Policy Database.
To install the Oracle database and create a database instance, perform these steps:
The install program creates four user accounts,
SYS, SYSTEM, SYSMAN, and DBSNMP and assigns default passwords. During the installation, you are prompted to change these passwords. For security reasons, Oracle recommends that you specify new passwords for these user accounts when you install the database software. Be sure to record your password settings as you will need them later.
|
| Note: | For Oracle 10g, the Database Configuration Assistant is run after the installer program (just as it is with Oracle 9i), however, for 10g, it does not prompt you for input. |
|
|||
|
|
|||
PATH environment variables:<drive>:\oracle\ora920\bin;
C:\Program Files\Oracle\jre\1.3.1\bin;
C:\Program Files\Oracle\jre\1.1.8\bin;Where <drive> is the hard drive on which the Oracle database is installed.To configure the Oracle database to accept remote connections from the Administration Server, you must configure an Oracle listener. This would only be necessary if you intend to install the Administration Server on a machine other than the machine on which the Oracle data is installed.
To configure an Oracle listener, perform the following steps:
SQLplus system/password@listenername.
where password is the password you assigned to the SYSTEM account upon installation and listenername is the name you assigned to the Oracle listener, for example asi.
This section describes how to create and configure an instance of an Oracle database. It assumes that the Oracle database software was installed.
| Note: | You should only perform this procedure when you want to create and configure instances of the database in addition to the instance that was created when the database software was installed. |
Perform the following steps to create an instance of an Oracle database:
| Note: | The section provides guidance to assist you, but it does not supersede the documentation provided by Oracle. |
To configure an Oracle policy database, you must create the policy database, create a security role and a user, and grant the security role and user access.
To configure a policy database, perform the following steps:
SYSTEM with the password you set for that user account when you installed the Oracle database software.sqlplus system/password@asi
where: password is the password you set for the system account when you installed the database software and asi is the database instance name.
SQL> prompt:SQL>connect sys as sysdba
SQL>create tablespace DATA datafile`C:/Oracle/oradata/ASI/data.dbf'
size 10M autoextend on next 1M MAXSIZE 250M;
SQL>CREATE ROLEasi_role;
SQL>GRANT CREATE SESSION toasi_role;
SQL>GRANT CREATE TABLE toasi_role;
SQL>GRANT CREATE PROCEDURE toasi_role;
SQL>GRANT CREATE SEQUENCE toasi_role;
SQL>GRANT CREATE TRIGGER toasi_role;
SQL>GRANT CREATE VIEW to asi_role;
SQL>CREATE USERwlesIDENTIFIED BYpassworddefault tablespace DATA QUOTA UNLIMITED on DATA;
SQL>GRANT asi_role to wles;
SQL>GRANT SELECT on SYS.V_$LOCKED_OBJECT towles;
where: asi_role is the security role you define, wles is the user you define, and password is the user password.
sqlpluswles/password@asi
where: wles and password are the user and password you defined and asi is the database instance name.
This completes the configuration of the instance of the policy database.
If you intend to install the AquaLogic Enterprise Security Administration Server on the same machine as you installed the Oracle database, you do not need to install or configure the Oracle Client. The Oracle database installation includes the Oracle Client, so you can skip this task.
However, if you intend to install the Administration Server on a machine other than the machine on which the Oracle database is installed, you must install and configure an Oracle client on that machine to be able to access the Oracle database server from the client machine.
To install and configure an Oracle Client, you need to know the following information:
For instructions on installing and configuring an Oracle Client, see the following topics:
To install and configure an Oracle Client, perform these steps:
| Note: | This section provides guidance to assist you, but it does not supersede the documentation provided by Oracle. |
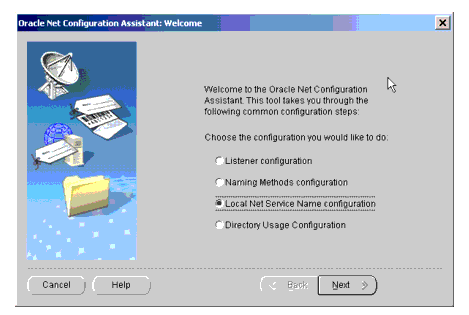
| Note: | Figure A-2 shows the Oracle 9i screen. The Oracle 10g screen offers the same options. |
In this step, you set up a service entry in the Oracle configuration file, which is located on the client machine at: ORACLE_HOME/network/admin/tnsnames.ora.
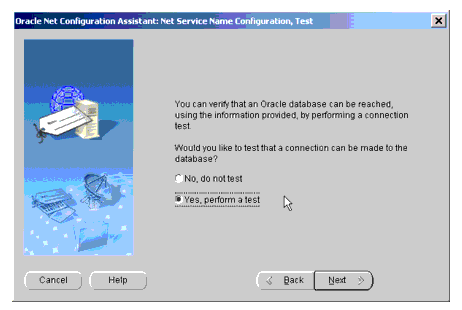
| Note: | Figure A-3 shows the Oracle 9i screen. The Oracle 10g screen offers similar options. |
| Note: | If you experience problems getting the Oracle Client to connect to the Oracle database instance, check the configuration of the database instance in the ORACLE_HOME\ora<version>\network\admin\tnsnames.ora file located on the database server host machine, where <version> is 81, 90, or 92. |
wles user, open a command window and type:sqlpluswles/password@asi
where: wles and password are the user and password you defined when you configured the policy database and asi is the database instance name.
This completes the configuration of the Oracle Client.
To install and configure the Oracle Client on a Sun Solaris platform, perform these steps:
| Note: | This section provides guidance to assist you, but it does not supersede the documentation provided by Oracle. |
dba and a user ID called oracle.dba as the primary group for oracle.oracle.ORACLE_HOME environment variable to the local directory. If necessary, refer to your Oracle Installation Guide.PATH environment variable to include the bin subdirectory of $ORACLE_HOME.LD_LIBRARY_PATH environment variable to include the lib subdirectory of $ORACLE_HOME.
where: wles and password are the user and password you defined when you configured the policy database and asi is the database instance name.
If this command is successful, the client is configured, and you can skip the next step of this procedure. If this command fails, proceed to step 9.
$ORACLE_HOME/network/admin/tnsnames.ora.| Note: | You may also use a text editor to edit the tnsnames.ora file. However, you should be familiar with Oracle Net before editing the tnsnames.ora file with a text editor. |
This completes the configuration of an Oracle Client.
There may be some additional considerations when installing Oracle Clients on Red Hat Advanced Server 2.1. To understand all the considerations relative to installing on the Red Hat Advanced Server in your environment, see the Oracle and Red Hat documentation.
To install and configure an Oracle Client on Red Hat Advanced Server 2.1, perform the following steps:
| Note: | This section provides guidance to assist you, but it does not supersede the documentation provided by Oracle. |
ship_9204_linux_disk1.cpio.gz
ship_9204_linux_disk2.cpio.gz
ship_9204_linux_disk3.cpio.gz
gunzip<filename>
cpio archive, run the following command on each file:cpio -idmv<filename>.cpio
This command creates directories named Disk1, Disk2, and Disk3.
./runInstaller
Error in invoking target install of makefile /path/app/oracle/product/version/xyz/lib/ins_xyz.mk, and prompt for Retry, Ignore, and Cancel
where xyz may be precomp, or plsql, or something else and version is either 9i or 10g.
$ORACLE_HOME/install/make.log. The file contains the following lines of text.
path/app/oracle/product/version/bin/genclntsh
/lib/libc.so.6: undefined reference to \Q_dl_lazy@GLIBC_2.1.1'
/lib/libc.so.6: undefined reference to \Q_dl_dst_substitute@GLIBC_2.1.1'
/lib/libc.so.6: undefined reference to \Q_dl_out_of_memory@GLIBC_2.2'
/lib/libc.so.6: undefined reference to \Q_dl_relocate_object@GLIBC_2.0'
/lib/libc.so.6: undefined reference to \Q_dl_clktck@GLIBC_2.2'
/lib/libc.so.6: undefined reference to \Q__libc_enable_secure@GLIBC_2.0'
/lib/libc.so.6: undefined reference to \Q_dl_catch_error@GLIBC_2.0'
.....
/usr/bin/ld: cannot find -lclntsh
collect2: ld returned 1 exit status
/bin/chmod: getting attributes of \Qprocob18': No such file or directory
make: *** [procob18] Error 1
/usr/bin/make -f ins_precomp.mk relink ORACLE_HOME=/pathora/u01/app/oracle/product/version EXENAME=ott...ORACLE_HOME, PATH and LD_LIBRARY_PATH.$ORACLE_HOME/bin directory. genclntsh script by setting LD_SELF_CONTAINED="". ./genclntshThe following message appears:
Created /path/app/oracle/product/version/lib/libclntst#.a
root.sh../root.shThe installer continues. At the last step, it starts the Net Configuration tool to let you configure the first Net Service Name.
where: wles and password are the user and password you defined when you configured the policy database and asi is the database instance name.
If this command is successful, the client is configured and you can skip the remaining steps of this procedure. If this command fails, proceed to step 16.
$ORACLE_HOME/network/admin/tnsnames.ora).This completes the configuration of an Oracle Client.
There may be some additional considerations when installing Oracle Clients on Red Hat Advanced Server 3. To understand all the considerations relative to installing on the Red Hat Advanced Server in your environment, see the Oracle and Red Hat documentation.
To install and configure an Oracle Client on Red Hat Advanced Server 3.0, perform the following steps:
| Note: | This section provides guidance to assist you, but it does not supersede the documentation provided by Oracle. |
ship_9204_linux_disk1.cpio.gz
ship_9204_linux_disk2.cpio.gz
ship_9204_linux_disk3.cpio.gz
gunzip<filename>
cpio archive, run the following command on each file:cpio -idmv<filename>.cpio
This command creates directories named Disk1, Disk2, and Disk3.
LD_ASSUME_KERNEL to 2.4.1.compat-db-4.0.14-5.i386.rpm \
compat-gcc-7.3-2.96.122.i386.rpm \
compat-gcc-c++-7.3-2.96.122.i386.rpm \
compat-libstdc++-7.3-2.96.122.i386.rpm \
compat-libstdc++-devel-7.3-2.96.122.i386.rpm \gcc to gcc296 and g++ to g++296. | Note: | Be sure to restore the gcc and g++ to gcc323 and g++323 after the installation. |
p3006854_9204_LINUX.zip from http://metalink.oracle.com/. For more information, see Oracle bug 3006854. To apply this patch, run:su - root
# unzip p3006854_9204_LINUX.zip
Archive: p3006854_9204_LINUX.zip
creating: 3006854/
inflating: 3006854/rhel3_pre_install.sh
inflating: 3006854/README.txt
# cd 3006854
# sh rhel3_pre_install.sh
Applying patch...
Patch successfully applied
Disk1 directory and run this command: ./runInstaller.| Note: | You cannot run this command as root. |
| Note: | If you are accessing the system through a Telnet connection, make sure that your display is set correctly. |
The ./runInstaller command displays the Oracle Universal Installer: Welcome window.
/export/home/oracle. The UNIX Group Name window appears./tmp/orainstRoot.sh command as root. Running this command outputs the following two lines:Creating Oracle Inventory pointer file (/etc/oraInst.loc)
Changing groupname of /export/home/oracle to engineering.
Name: ORACLE
Path: /export/home/oracle
The Loading products progress indicator displays in the upper right corner of the window. When the loading completes, the Available Products window appears.
A configuration script needs to be run as root before installation can proceed. Please leave this window up, run /export/home/oracle/root.sh as root from another window, then come back here and click OK to continue.
root.sh command. The root.sh command outputs the following:Running Oracle9 root.sh script...
\nThe following environment variables are set as:
ORACLE_OWNER= dbooth
ORACLE_HOME= /export/home/oracle
Enter the full pathname of the local bin directory: [/usr/local/bin]:
Copying dbhome to /usr/local/bin ...
Copying oraenv to /usr/local/bin ...
Copying coraenv to /usr/local/bin ...
\nCreating /etc/oratab file...
Adding entry to /etc/oratab file...
Entries will be added to the /etc/oratab file as needed by Database Configuration Assistant when a database is created
Finished running generic part of root.sh script.
Now product-specific root actions will be performed.
mydbhost.mydomain.com.mydbhost.mydomain.com.Connecting...Test successful.
If not, click Back, correct the settings, and retest. If successful, click Next.
mydbhost.This completes the configuration of an Oracle Client.
This section covers the following topics:
This section describes how to configure a new user account in an Oracle policy database. This account is necessary so that the policy for the instance of the Administration Server managed by this user can have a dedicated storage area allocated in the database instance.
| Note: | To perform this procedure, you must log into the Oracle database server as a database administrator. |
To set up a database user account, perform these steps:
sqlplusdba/password@ASERVER
dba is the username you use to access the database.
password is your database administrator password.
ASERVER is the name of the Oracle service (as defined in your tnsnames.ora file).
SQL>create roleasi_role;
SQL> grant create session toasi_role;
SQL> grant create table toasi_role;
SQL> grant create procedure toasi_role;
SQL> grant create sequence toasi_role;
SQL> grant create trigger toasi_role;
SQL> grant create view toasi_role;
where: asi_role is the new role.
The following example uses the default tablespaces generated when the Oracle database was first installed, although you can specify any tablespaces.
| Note: | In this example, you use the default tablespaces generated when you created and configured the Oracle database instance, however, you can specify any tablespaces. |
SQL> create userusernameidentified bypassword
SQL>default tablespaceusersquotaunlimitedonusers
SQL>temporary tablespacetempquotaunlimitedontemp;
username is the name to assign to the new user account.
password is the password to assign to the new user account.
unlimited is size of the tablespace (shown here as set to unlimited).
grantasi_roletousername;
conn sys as sysdba;GRANT SELECT ON SYS.V_$LOCKED_OBJECTtousername;
commit;
In this case, you grant SELECT permission to the user you created in step 3. The Oracle database server does not allow you to grant the permission to the asi_role. BEA AquaLogic Enterprise Security uses this dynamic view to check whether one of its tables is currently being accessed. Therefore, the SELECT permission is required.
Table 0-5 lists and describes the batch and shell files provided for database administration. The files are located in the following directory:
bea\ales22-admin\bin\
bea is the BEA_HOME directory.ales22-admin is the installation directory for the Administration Server.
Exports policy data. See the
BEA AquaLogic Enterprise Security Policy Managers Guide for information on how to export policy. The
dbtype is the type of database, Sybase or Oracle.
|
|
Installs the policy database schema. See Installing the Policy Database Schema for information on how to install the database schema.
|
|
Switches the sort order. When using Administration Console, the list of usernames and other policy elements can be sorted in alphabetical order or in discretionary order. This script is used to switch such sorting order. Alphabetical sort order has better performance than discretionary sort order. The parameters for this script are same as the
install_schema script, except the parameter for sorting type, which can take value of either A (ASCII) or D (Dictionary).
|
|
Before running these scripts with an Oracle database, you need to ensure the following setup steps are completed:
PATH environment.PATH includes the BIN and DLL directory of Oracle installation. ORACLE_HOME is set, $ORACLE_HOME/bin is in the PATH, and $ORACLE_HOME/lib in the LD_LIBRARY_PATH.BEA strongly recommends that you backup your original policy database regularly. A database backup is always recommended before you uninstall or re-install the policy database. You may need to contact your database or system administrator to assist with this process. Backups should be done on a regularly scheduled basis.
For instructions on backing up your Oracle database, see the Oracle Backup and Recovery Guide that comes with your Oracle documentation.
This section contains the procedures for setting up and administering an Sybase database and a Sybase Client. It covers the following topics:
Before you begin to set up your Sybase database, review the following topics to better understand Sybase database configuration requirements:
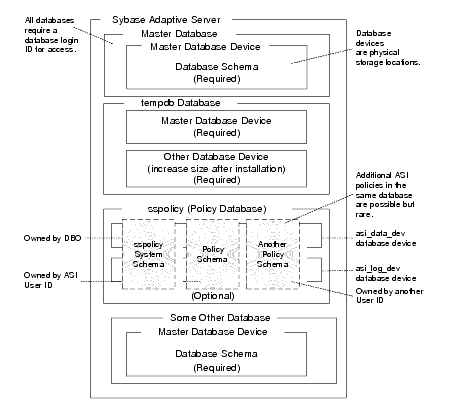
The Sybase Adaptive Server is the server in the Sybase client/server architecture (see Figure A-4). It manages multiple databases and multiple users, keeps track of the actual location of data on disks, maintains mapping of logical data description to physical data storage, and maintains data and procedure caches in memory.
The policy database is a set of database schemas in which all data are stored. The Sybase database contains a set of related data tables and other database objects organized and presented to serve a specific purpose.
A database device is a Sybase term that represents the portion of a device (a portion of a hard drive, such as a partition) that is dedicated to holding database data. When creating the database device, you can choose either a raw partition or an existing file system. Choosing a raw partition can increase the performance of the database server.
The Database Login ID is a login created by a system administrator to log onto the Adaptive Server. Each Database Login has a password and a default database to access. A login is valid if the Adaptive Server has an entry for that user in the system table syslogins.
The Database Administrator (DBA) has a special database login ID that can access all databases in the Adaptive Server. The DBA is also referred to as the system administrator. In fact, the name of the DBA login is sa (for System Administrator).
The Database Owner (DBO) is a special database login with permission to perform all actions on a policy database. Usually, the login that creates the database automatically becomes the DBO. The Database User ID is dbo (lowercase), which is different from its Database Login ID. For your policy database, you can use any Database Login ID as the DBO.
The Database User ID pertains to one specific database and is a login given permission by the DBO or DBA (system administrator) to access that one database. In most cases, the database user ID is the same as the Database Login ID. However, in some cases, they may be different, as with the special dbo user ID.
A database schema is a collection of objects associated with a particular schema name. The objects include tables, views, domains, constraints, assertions, privileges, and so on.
The policy owner is a Database User ID that controls the set of database schema in the database. BEA recommends that you not use dbo as a policy owner because it requires special administration. The AquaLogic Enterprise Security architecture allows multiple policy owners in its database, each owning a policy different from the other policies.
Table 0-6 describes the minimum requirements for the system on which the Sybase Adaptive Server is installed.
This section provides instructions for installing and configuring a Sybase database for use with the AquaLogic Enterprise Security Administration Server.
For guidance on installing and configuring the database, see the following topics:
This section provides recommendations for installing and configuring the Sybase database software. If the Sybase database is already installed on the database host machine, you can skip this procedure and go to Creating Sybase Database Devices.
To install the Sybase Adaptive Server, perform these steps:
| Note: | By default SYBASE names your database server based on your machine name. |
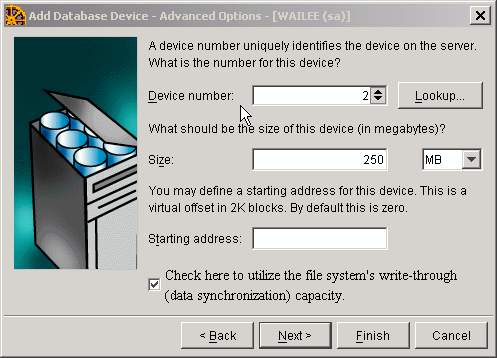
The policy database requires at least two database devices, each having at least 250 MB of free space. The first device stores policy data and the other stores the transaction log. You must create these two database devices before you create and configure the policy database.
| Note: | For better performance, BEA recommends a raw partition as the best configuration for the database device. Obviously, you must allocate sufficient disk space to ensure that the database meets your performance requirements. |
To Create Sybase Database devices on the Windows platform, perform the following steps:
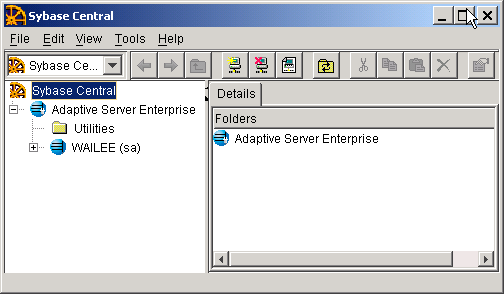
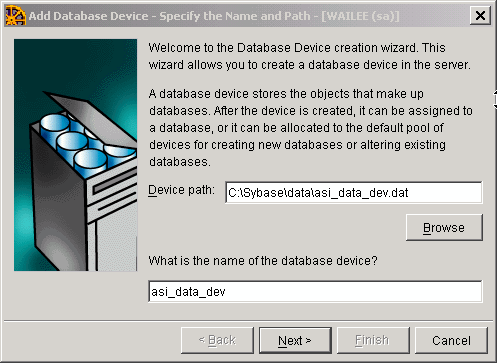
sa (no password is required). The Sybase Central screen appears as shown in Figure A-5.| Note: | The user sa does not have a password by default. |
asi_log_dev, repeat steps 4. to 6., but set the database device name to asi_log_dev instead of asi_data_dev, and click Finish.| Note: | For instructions for creating Sybase database devices on Solaris and Linux platforms, see the Chapter "Managing Adaptive Server Databases" in the Sybase Adaptive Server Enterprise Configuration Guide for the particular platform. |
Like other Sybase databases, the policy database contains at least one set of database schemas, owned by a user referred to as the policy owner. While it is unusual, the same database may contain multiple sets of policies, each owned by a different user.
| Note: | Before continuing, be sure that you have the names of two existing database devices that have sufficient free space to hold the data and transaction log for the policy database. If the database devices do not exist, go to Creating Sybase Database Devices and create them. |
To create and configure the policy database, perform these steps:
isql -Usa -Sserver_name
where: sa is the sa user and server_name is the name of your database server.
1>use master
2>go
1>create databasesspolicy on asi_data_dev = 250 log on asi_log_dev =
250
where: sspolicy is the name of the database. The name sspolicy is used only for the purpose of the example. You can assign any name to the database. In this example, the minimum database sizes, 250 MB, are used. If you choose to use other sizes, enter those sizes instead.
asi_data_dev and asi_log_dev are the names of the two devices.
2>gosp_dboption system procedure to set the database options, type the following commands at the isql command prompt:1>use master2>go
1>sp_dboptionsspolicy, "select into/bulkcopy",true
2>go
1>sp_dboptionsspolicy, "abort tran on log full", true
2>go
1>sp_dboptionsspolicy, "trunc log on chkpt", true
2>go
1>sp_dboptionsspolicy, "trunc. log on chkpt.", true
2>go
For more information on the sp_dboption system procedure, see Sybase Adaptive Server Enterprise Reference Manual: Procedures.
| Note: | In a development database, you may be set the trunc log on chkpt option to true because the DBA may not have time to run a dump transaction from time-to-time to truncate the transaction log. In a production database, you must set this option to false and perform a dump transaction to back up and truncate the database and transaction logs. |
isql command prompt, type the following commands:1>use master1>
2>gosp_addlogin asi,password,sspolicy, null, "asi login"2>go
The password must be at least six alphanumeric characters or other characters allowed by Sybase. The name of the default database is sspolicy. If an asi login already exists, you must use the sp_modifylogin command to set its default database to sspolicy.
1>usesspolicy2>go1>sp_adduser asi2>go
1>usesspolicy2>go
1>grant all to asi
2>go
asi can connect to the target Sybase database using isql, open a command window on the machine on which the database is installed and login. For example, using the values specified in the previous step, type the following:isql -Uasi-Ppassword-Sserver_name
1>
where: asi is the username, password is the password of the user specified, and server_name is the database server name.
This completes the configuration of the policy database.
Skip this step if you want to administer the Sybase Adaptive Server and run the AquaLogic Enterprise Security Administration Server on the machine on which the Sybase Adaptive Server is installed.
You must install the Sybase Open Client (Sybase client for Adaptive Server) to:
The information you need to install and configure the Sybase Open Client includes:
The following topics provide guidance for installing and testing a Sybase Open Client:
If the Sybase Open Client is already installed, you need to ensure that you can access the Adaptive Server from the client. To do so, open a command window and type:
isql-U loginid -SASERVER-Ploginidpassword
where: loginid is the identity you defined when configured the policy database, ASERVER is the name of the policy database, and loginidpassword is the password of the identity.
The isql prompt appears, indicating a successful connection.
If this command fails and you know the client is installed, the client is probably not configured properly to point to the database server. If the client is on the same machine as the Sybase database, the client is configured automatically when you do the installation. If the client is on a machine other than the Sybase database machine, you need to configure the client. For instructions on how to configure the Open Client, see the installation and configuration procedure that applies to you particular platform:
To install the Sybase Open Client in a Windows environment, do the following:
| Note: | The section provides guidance to assist you, but it does not supersede the documentation provided by Sybase. |
SYBASE=D:\Sybase
SYBASE-JRE=D:\sybase\shared-1_0\JRE-1_3
SYBASE_OCS=OCS-12_5
PATH environmental variable includes the bin and dll subdirectories of your Sybase installation directory, as shown in the following example (where the installation is on the D: drive):D:\Sybase\OCS-12_5\bin and D:\Sybase\OCS-12_5\dll
Dsedit utility provided by Sybase, edit the Sybase configuration file sql.ini in the \ini sub-folder of your Sybase Open Client installation directory to include a server entry that points to your policy database server. For instructions on how to use the Dsedit utility to edit the sql.ini file, see the Sybase Adaptive Server Enterprise Installation Guide for Windows. For parameters required to edit the sql.ini file, see the sql.ini file located in \sybase\ini directory on the machine on which the Sybase database server is installed. Here is an example sql.ini file produced by the Dsedit utility:[ASERVER]
master=TCP,PCWIZ, 5000
query=TCP,PCWIZ, 5000
isql -Uloginid-SASERVER-Ploginidpassword
where: loginid is the identity you defined when configured the policy database, ASERVER is the name of the policy database, and loginidpassword is the password of the identity.
The isql prompt appears, indicating a successful connection.
This completes the configuration of the Sybase Open Client.
To install and configure a Sybase Open Client on Sun Solaris, perform the following steps:
| Note: | The section provides guidance to assist you, but it does not supersede the documentation provided by Sybase. |
sybase. If the user sybase does not exist, have your Solaris system administrator create it.SYBASE environment variable to point to the Sybase installation directory, as shown in the following example:/export/home/sybase
PATH environment variable to include the bin subdirectory of your Sybase installation directory, as shown in the following example:/export/home/sybase/OCS-12_5/bin
LD_LIBRARY_PATH environment variable to include the lib subdirectory of your Sybase installation directory, as shown in the following example:/export/home/sybase/OCS-12_5/lib
Dsedit utility provided by Sybase, edit the Sybase configuration file sql.ini in the \ini sub-folder of your Sybase Open Client installation directory to include a server entry that points to your database server. For instructions on how to use the Dsedit Utility to edit the sql.ini file, see the Sybase Adaptive Server Enterprise Installation Guide for Solaris. For parameters required to edit the sql.ini file, see the sql.ini file located in \sybase\ini directory on the machine on which the Sybase database server is installed. Here is an example sql.ini file produced by the Dsedit utility:[ASERVER]
master=TCP,PCWIZ, 5000
query=TCP,PCWIZ, 5000
isql -Uloginid-SASERVER-Ploginpassword
where: loginid is the identity you defined when configured the policy database, ASERVER is the name of the policy database, and loginidpassword is the password of the identity.
The isql prompt appears, indicating a successful connection.
Include these settings in either .profile or .cshrc, depending on the default user shell.
This completes the configuration of the Sybase Open Client.
To install and configure a Sybase Open Client on Red Hat Advanced Server 2.1, perform the following steps:
| Note: | The section provides guidance to assist you, but it does not supersede the documentation provided by Sybase. |
isql -Usa -Ppassword-Sserver_name
where: server_name is the database server name and password in the password of the sa user.
The isql prompt appears, indicating a successful connection.
This completes the configuration of the Sybase Open Client.
This section covers the following database administration topics:
This section describes how to configure a new user account in a Sybase database. This account is necessary so that the policy for the instance of the Administration Server managed by this user can have a dedicated storage area allocated in the database instance.
To set up the user account, create the login to the Adaptive Server Enterprise database, create the user for policy database, and grant the user privileges to manipulate the policy schema.
| Note: | BEA strongly recommends that you not use the dbo of the policy database as the policy owner. While it is possible to do so, it requires additional database configuration that is beyond the scope of this guide. |
To create a database user account, perform these steps:
where: server_name is the database server name.
isql command prompt, type the following commands:1>use master1>
2>gosp_addlogin asi,password,sspolicy, null, "asi login"2>go
where: password must be at least six alphanumeric characters or other characters allowed by Sybase and sspolicy is the name of the default database. If an asi login already exists, you must use the sp_modifylogin command to set its default database to sspolicy.
isql command prompt, type the following commands:1>usesspolicy2>go1>sp_adduser asi2>go
isql command prompt, type the following commands:1>usesspolicy2>go
1>grant all to asi
2>go
Table 0-7 lists and describes the batch and shell files provided for database administration. The files are located in the following directory:
bea\ales22-admin\bin\
bea is the BEA_HOME directory.ales22-admin is the installation directory for the Administration Server.
Exports policy data. See the
BEA AquaLogic Enterprise Security Policy Managers Guide for information on how to export policy. The
dbtype is the type of database, Sybase or Oracle.
|
|
Installs the policy database schema. See Installing the Policy Database Schema for information on how to install the database schema.
|
|
Switches the sort order. When using Administration Console, the list of usernames and other policy elements can be sorted in alphabetical order or in discretionary order. This script is used to switch such sorting order. Alphabetical sort order has better performance than discretionary sort order. The parameters for this script are same as the
install_schema script, except the parameter for sorting type, which can take value of either A (ASCII) or D (Dictionary).
|
|
Before running these scripts with a Sybase database, you need to ensure the following setup steps are completed:
PATH environment.SYBASE environmental variable is set. PATH includes %SYBASE%\OCS-12_5\bin and %SYBASE%\OCS-12_5\dll.PATH includes $SYBASE/OCS-12_5/bin and that LD_LIBRARY_PATH includes $SYBASE/OCS-12_5/lib.isql command (the name of the database server, login ID and password).BEA strongly recommends that you backup your original policy database regularly. A database backup is always recommended before you uninstall or re-install the policy database. You may need to contact your database or system administrator to assist with this process. Backups should be done on a regularly scheduled basis.
If you have an existing backup procedure in place, you may choose to run it. Otherwise, follow these steps:
| Note: | See your Sybase documentation for further information on using these commands. |


|