

|
This section covers tasks that you must perform after installing and completing the post-installation tasks for the WebLogic Server 8.1 Security Service Module. Note that the WebLogic Server 9.x Security Service Module uses a different security framework from the one used in the WLS 8.1 SSM and therefore has configuration procedures. See Chapter 8, Configuring the WebLogic Server 9.x SSM for more information.
The following topics are covered in this section:
For the purposes of the example presented here, this document assumes that the WebLogic Server domain is in the following location:
BEA_HOME/user_projects/domains/mydomain
However, your domain can be in any location you desire. If you want to create a domain, you can use the WebLogic Server Configuration Wizard to create a domain or create it manually. The domain includes a startWebLogic file, which you are instructed to modify in
Modifying the startWebLogic File on page 7-2.
The WebLogic startup script does the following:
Before you can start a WebLogic Server that uses BEA AquaLogic Enterprise Security, you must edit the startWebLogic file that is located in the WebLogic Server domain directory. For example:
BEA_HOME/user_projects/domains/mydomain
See
Listing 7-1 for an example of a modified startWebLogic file. To edit the startWebLogic file, do the following:
CLASSPATH is set, add a call to the set-wls-env script file in your the bin directory for your instance. The set-wls-env script sets environment variables that are used in the next steps: WLES_PRE_CLASSPATH, WLES_POST_CLASSPATH and WLES_JAVA_OPTIONS. For example:BEA_HOME/ales26-ssm/wls-ssm/instance/wls-ssm/binales26-ssm is the directory where you installed the Security Service Module.
instance is the directory where all instances are stored.
wls-ssm is the name of the Security Service Module instance you created earlier.
For example, if you created an instance called myInstance, the call looks like this:
call "C:\bea\ales26-ssm\wls-ssm\instance\myInstance\bin\set-wls-env.bat"
. "/bea/ales26-ssm/wls-ssm/instance/myInstance/bin/set-wls-env.sh"CLASSPATH: %WLES_PRE_CLASSPATH% and %WLES_POST_CLASSPATH%${WLES_PRE_CLASSPATH} and ${WLES_POST_CLASSPATH}%JAVA_HOME%\bin\java in the weblogic.Server command."%JAVA_HOME%\bin\java"java command that starts WebLogic Server with the weblogic.Server class:%WLES_JAVA_OPTIONS%${WLES_JAVA_OPTIONS}...set SERVER_NAME=myserver
call "C:\BEA_HOME\ales26-ssm\wls-ssm\instance\myInstance\bin\set-wls-env.bat"set CLASSPATH=%WLES_PRE_CLASSPATH%;%WEBLOGIC_CLASSPATH%;
%POINTBASE_CLASSPATH%;%JAVA_HOME%\jre\lib\rt.jar;
%WL_HOME%\server\lib\webservices.jar;%CLASSPATH%;%WLES_POST_CLASSPATH%
@REM Call WebLogic Server
echo .
echo CLASSPATH=%CLASSPATH%
echo .
echo PATH=%PATH%
echo .
echo ***************************************************
echo *  To start WebLogic Server, use a username and   *
echo *  password assigned to an admin-level user.  For *
echo *  server administration, use the WebLogic Server *
echo *  console at http:\\[hostname]:[port]\console    *
echo ***************************************************
"%JAVA_HOME%\bin\java"%JAVA_VM% %MEM_ARGS% %JAVA_OPTIONS%%WLES_JAVA_OPTIONS%
-Dweblogic.Name=%SERVER_NAME%
-Dweblogic.ProductionModeEnabled=%PRODUCTION_MODE%
-Djava.security.policy="%WL_HOME%\server\lib\weblogic.policy" weblogic.Server
ENDLOCAL
You can use the security.properties file to set the necessary security properties. To set the security properties, create a security.properties file and put it in the WebLogic Server domain directory; for example:
BEA_HOME/user_projects/domains/mydomain
Include the information shown in
Listing 7-2 in the security.properties file, where:
You may also copy this file from the BEA_HOME/ales26-ssm/wls-ssm/instance/myInstance/config folder.
| Note: | The security.properties file is not required if you add these parameters to Java Options. |
wles.realm=ConfigurationIDwles.default.realm=ConfigurationID
After you install the Security Service Module, create the instance, and enroll it, you must start the necessary processes by running the appropriate batch or shell scripts. Before you start these processes, make sure that the Administration Server and all of its services are running.
For each machine, you must start the following processes:
For instructions on how to start and stop the required processes, see Starting and Stopping Processes for Security Service Modules in the Administration and Deployment Guide.
When using the Database Authentication provider, ASI Authorization provider and ASI Role Mapping provider, refer to the following sections for important information:
If you want to protect a cluster of WebLogic Servers using AquaLogic Enterprise Security, you must make some addition changes to the security configuration and resource configuration. For information on how to protect cluster of WebLogic Servers, see the following topics:
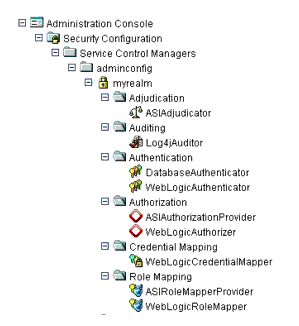
Figure 7-1 shows a Security Service Module configuration named myrealm, located under a Service Control Manager named adminconfig in the AquaLogic Enterprise Security Administration Console. Your actual Security Service Module configuration will vary from this example based on the needs of your WebLogic domain.

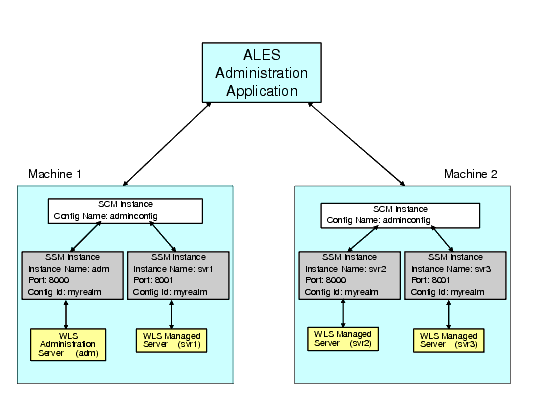
Figure 7-2 shows a configuration for a cluster of four WebLogic Servers: one administration server (adm) and three managed servers (svr1, svr2, svr3), with one Security Service Module instance for each server. The Service Control Manager on both machines must use the same Configuration Name (adminconfig). Each Security Service Module must have a unique Instance Name and Port number per machine, but always shares a common Configuration ID (myrealm) across all machines. Thus, each server uses the same security provider configuration and receives the same policy.

You must also create the following three resources shown in Figure 7-3, setting them each as virtual resources.
The myrealm/wl_management_internal1 resource is accessed on the cluster's administration server by the WebLogic Admin Console to view WebLogic Server related log files.
The myrealm/wl_management_internal2 resource is accessed on the cluster's administration server by a managed server during bootstrap and file distribution operations.
The myrealm/bea_wls_internal resource is accessed when one managed server is synchronizing with another managed server.
The myrealm/wl_management_internal1, myrealm/wl_management_internal2 and myrealm/bea_wls_internal resources must be configured to allow virtual resources.
You must create the policy listed in Table 7-1.
To create this policy in the ALES Administration Console:
myrealm in the Child Resources list box, select bea_wls_internal, and then click Add.allusers from the Groups List list box, click Add, and then click OK. Be sure that the selected identity store is alesusers.any in the Select Privileges from Group list box, and then click Add. myrealm in the Child Resources list box, select wl_management_internal1, and then click Add.wl_management_internal2 also and click Add.allusers from the Groups List list box, click Add, and then click OK. Be sure that the selected identity store is alesusers.


|