The PStore Tool - Command-line Version Locate
The PStoreTool provides BEA AquaLogic Service Registry Protected Store management from the command line. It provides functionality to:
Import and export trusted certificates locally to or from a file.
Create new security identities in the BEA AquaLogic Service Registry configuration file.
Copy identities between protected stores.
![[Note]](../images/note.gif) | Note |
|---|---|
Remote protected store management via SOAP is not supported with BEA AquaLogic Service Registry. | |
The general usage is:
PStoreTool [command [options]]
Commands Description Locate
The PStore tool has the following commands:
new - Creates a new security identity in the local protected store. The configuration file of the protected store can be specified using the -config parameter.
newServer - Creates a new security identity on BEA AquaLogic Service Registry. The location of the server is specified with the -url parameter.
copy - Copies the existing security identity from one protected source to another or to the BEA AquaLogic Service Registry protected store.
add - Adds a trusted X.509 certificate to the local protected store. The X.509 certificate can be supplied as a local file.
This command can also add mapping between the security identity alias and the X.509 certificate to the user store part of the protected store. (The certificate is needed only for the server-side protected store.) This can be requested by using -user with the -alias option.
addServer - Adds a trusted certificate to BEA AquaLogic Service Registry. This command also adds the mapping between the security identity alias and its X.509 certificate to the user store part of the BEA AquaLogic Service Registry protected store. The certificate can be given in the local file or can be fetched from the local protected store. The configuration file can be specified using the -config option.
remove - Removes the given alias from the local protected store. This command can also remove an alias from the user store part of the protected store using the -user option. When removing a mapping from the user store, the X.509 certificates mapped to the given alias are also removed from the key store.
removeServer - Removes a given alias from the protected store. The alias is removed from the user store part of the protected store if it is not found in the key store. When removing mapping from the user store part, the X.509 certificates mapped to the given alias are also removed from the key store.
lsTrusted - Displays a list of the trusted certificate's Subject-distinguished names from the local protected store.
lsTrustedServer - Displays a list of the trusted certificate's Subject distinguished names from the server.
list - Displays all aliases contained in the key store part of the local protected store.
listServer - Displays all aliases contained in the key store part of the BEA AquaLogic Service Registry protected store.
export - Exports the X.509 certificate chain stored in the key store or in the user store of the local protected store with the given alias.
exportServer - Exports the X.509 certificate chain stored in the key store or in the user store of the protected store with the given alias.
gui - Launches the graphical version of this tool.
The PStore tool has the following options:
-alias alias - Alias to be used for the command.
-keyPassword password - Password for encrypting/decrypting the security identity private key.
-subject subjectDN - Subject-distinguished name to be used in the generated X.509 certificate.
-config configPath - File and path to the configuration file to be used during command execution for the source of the local protected store.
-username username - Username for authentication process. Not required if the BEA AquaLogic Service Registry server is unsecured.
-password password - Password for authentication process. Not required if the server is unsecured.
-secprovider provider - Authentication mechanism used during the authentication process. Not required if the server is unsecured.
-certFile certPath - File and path to the X.509 certificate stored in a local file.
-user - Indicates that a command should be executed only with the contents of the user store of the protected store.
-config2 secondConfigPath - Path to the second configuration file. Used for the copy command, when copying an identity from one local protected store to another.
The PStore Tool - GUI Version Locate
You can add, edit, or remove any user properties in the user store. You can also add, edit, and remove certificates and identities in the key store. You can do all of this with a local file containing the protected store.
Running the GUI PStore Tool Locate
To run the graphical version of this tool, use gui as parameter with the PStoreTool command.
PStoreTool gui
Opening and Closing the Protected Store Locate
Opening Protected Store from a File Locate
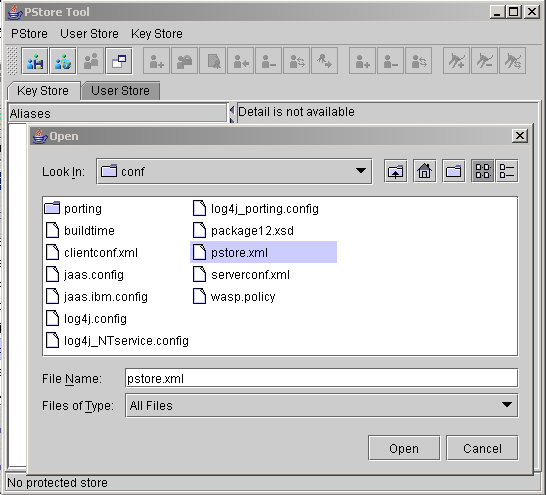
The GUI PStore Tool can manipulate every protected store in a file. To manipulate the client's protected store, open clientconf.xml. To open the server protected store, open pstore.xml.
To open protected store from file, select Open From File... from the PStore menu. This returns the file chooser dialog. Select the file you want to open as shown in Figure 37.
Closing Protected Store Locate
To close the protected store, select Close from the PStore menu.
Open Next Protected Store Locate
In some cases you need to work with more than one protected store at the same time. Typically you want to copy certificates from one protected store to another. To open another protected store, select the New Window from the PStore menu. New windows appear. Now you can open the protected store from a file.
Copy Data Between Protected Stores Locate
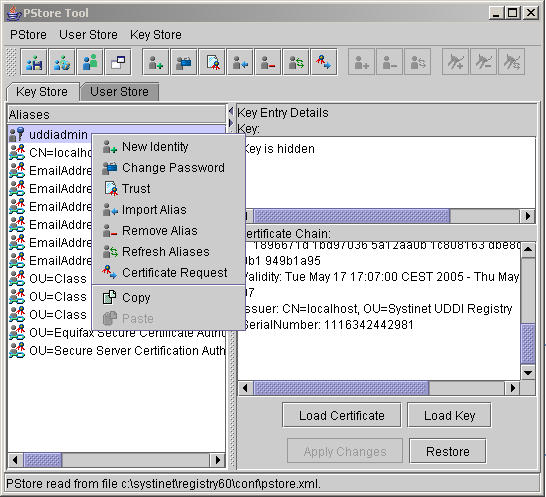
With the PStore Tool, you can manipulate more than one protected store at the same time. You can simply copy identities, certificates, users, and user properties from one protected store to another using the Copy and Paste actions located in context menus of the Aliases, Users, and Properties panels.
![[Note]](../images/note.gif) | Note |
|---|---|
When you copy data from one area to another, the Paste action is disabled for some categories of data. This means that data may be copied, but cannot be pasted to the selected area. For example, the password property from the user store cannot be pasted to the key store. | |
Key Store Locate
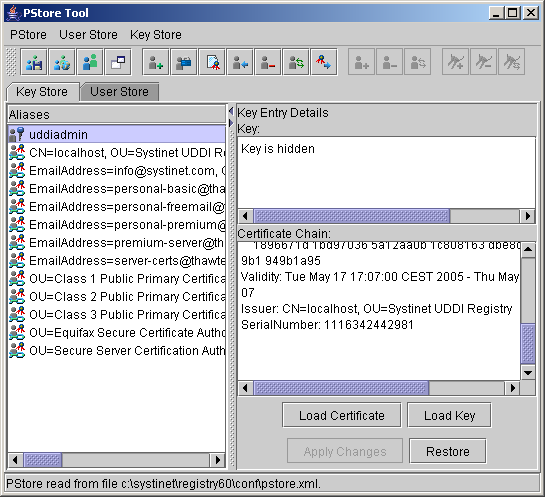
To work with the key store, select the Key Store tab. This tab has two panels. The left side has a list of all entries. The right has detailed information for the selected entry.
Create New Identity Locate
To create a new identity, select New Identity... from the Key Store menu. This opens a dialog for information such as Alias, Distinguished Name, and Password. (The Distinguished Name is not mandatory.) If the specified information is valid, the new identity will be added to the key store with the specified Alias. Otherwise an error dialog will be returned.
Key Store Trust Locate
If you want to trust a key entry, select Trust from the Key Store menu. This action is available only for the key entry type.
Import Alias Locate
To import a certificate from a file into the key store, select Import Alias from the Key Store menu. This opens a dialog in which you can specify Alias, Type, and value that depend on the entry type. In the current implementation, you can import only the certificate chain entry type.
Remove Alias Locate
To remove an alias from the key store, select the alias you want to remove and select Remove Alias from the Key Store menu. You can remove several aliases at once.
Refresh Aliases Locate
To synchronize information shown in this tool with the original key store source, perform a refresh by selecting Refresh Aliases from the Key Store menu.
Alias Details Panel Locate
It is not surprising that the Details panel has more details about the selected alias. This panel shows details that depend on the entry type. You can also change this value. If you want to store a new value, press the Apply Changes button. To return to the original value, press Restore.
User Store Locate
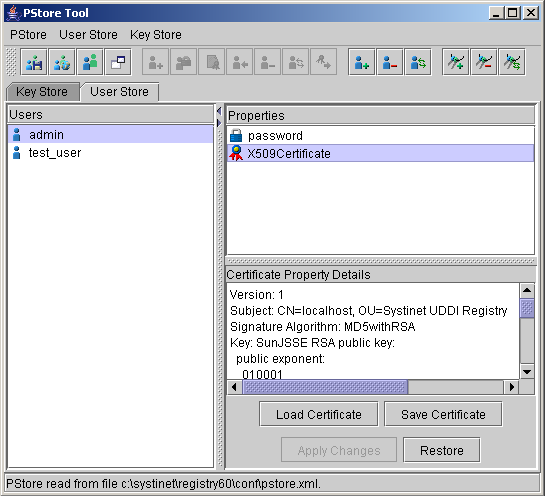
There are three panels on the User Store tab. The left side has a list of all entries. On the right top are properties available for the selected user. On the right bottom is detailed information for the selected user property.
Add User Locate
To add a new user, select Add User from the User Store menu. This opens a dialog for entering the Username. Press OK when done.
Remove User Locate
To remove a user from the user store, select the user you want to remove and choose Remove User from the User Store menu. You can remove several users at once.
Refresh Users Locate
Refresh synchronizes information shown in this tool with the original user store source. To refresh, select Refresh Users from the User Store menu.
Add Property Locate
To add a new user property, select Properties and Add Property from the User Store menu. This returns a dialog for the property you want to create and its value.
Remove Property Locate
To remove one or more user properties from the user store, select them and select Properties and Remove Property from the User Store menu.
Refresh Properties Locate
To synchronize information on the Properties panel with the original user store source, perform a refresh. Select Properties and Refresh Properties from the User Store menu.
User Properties Details Panel Locate
The Details panel has more information about user properties that depend on the property type. Select the property you want to see. You can also change this value. If you want to store a new value press Apply Changes.
To return to the original value, press Restore.


