|
|
The database may be set up during installation or by using the Setup tool after installation. Both of these scenarios use the same set of GUI panels shown in this section.
To run the Setup tool, execute the following script from the bin subdirectory of your installation:
Windows: setup.bat
UNIX: ./setup.sh
See Setup in Command Line Scripts.
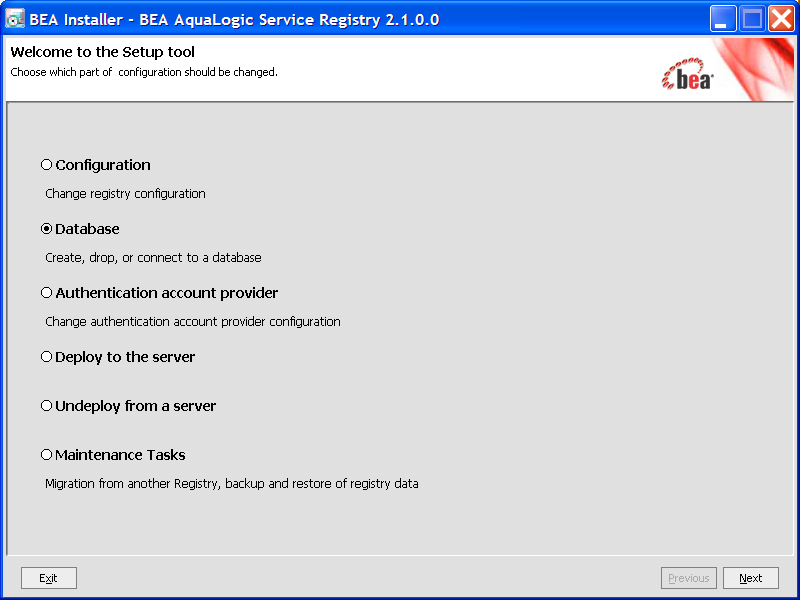
Select your database. For more information on the Setup tool, please see Reconfiguration After Installation.
The registry requires a database. During installation you can create a new database, create schema in an existing empty database or connect to an existing database with created schema. Using the Setup tool, you can also drop a database or database schema. Select your database operation on the following panel:
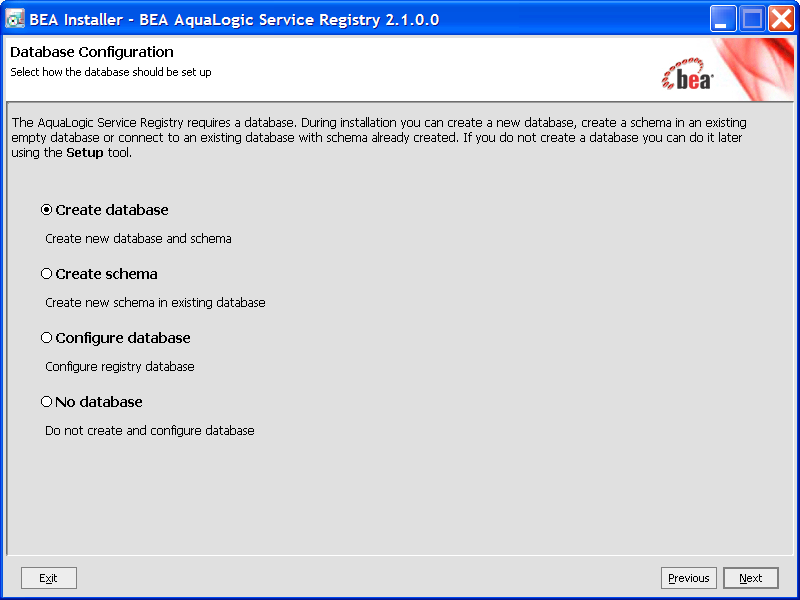
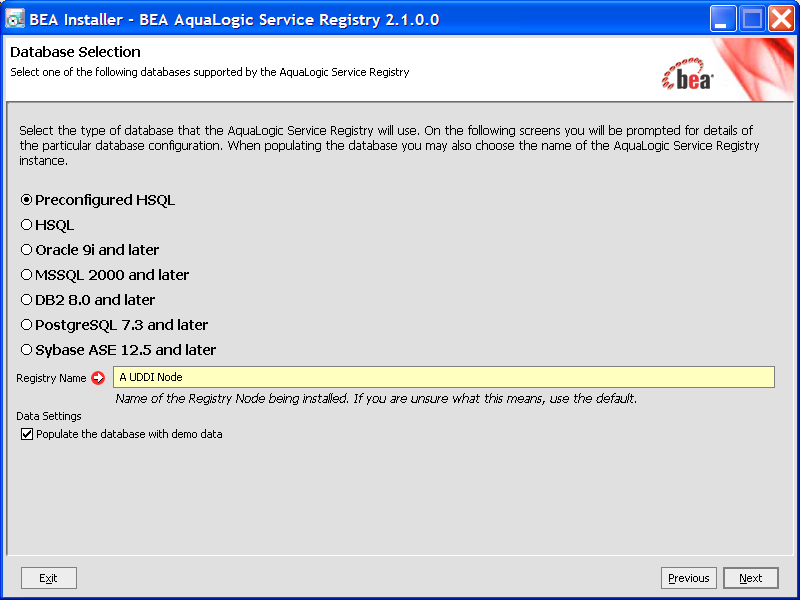
Select a method from those shown in Figure 9-2.
The following figure shows the supported database engines that can be prepared for BEA AquaLogic Service Registry. The panel may differ if another method was selected in the previous step.
Follow these links for the selected database.
The default database is the pre configured HSQL. The installer or Setup tool creates database named REGISTRY_HOME/hsqldb/uddinode and the user account uddiuser with the password uddi in the database. Note that all database files can be found in REGISTRY_HOME/hsqldb directory.
| Note: | This database is recommended for evaluation and testing purposes only. |
| Note: | If you use HSQL then user credentials are stored in the HSQL database files in plain text. So you must protect these files from unauthorized reading using appropriate file system access rights. The files are located in the directory REGISTRY_HOME/hsqldb/ by default. |
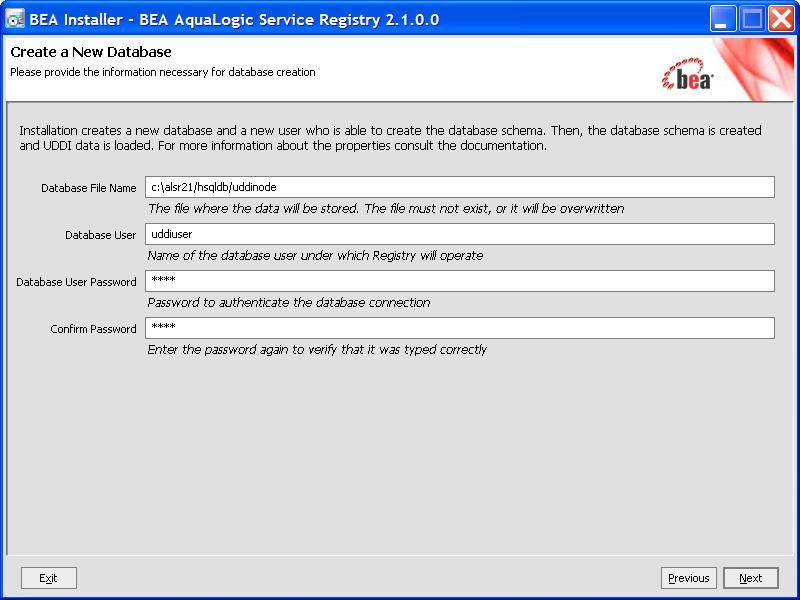
The installation process creates a new database and a user who is able to create schema/tables.
The HSQL database requires the following properties.
| Note: | If you use HSQL then user credentials are stored in the HSQL database files in plain text. So you must protect these files from unauthorized reading using appropriate fleshiest access rights. The files are located in the directory REGISTRY_HOME/hsqldb/ by default. |
The Create database option on the installer/Setup tool does not mean to create a new physical database. The installation process only creates a new tablespace in an existing database and a new user of the default tablespace is set up on the created one. Then a database schema is created and UDDI data are loaded. Because relational tables are created in the schema of the specified user, if you want to create more UDDI databases (such as databases for publication and discovery registries for the approval process), you must create UDDI databases with different database users.
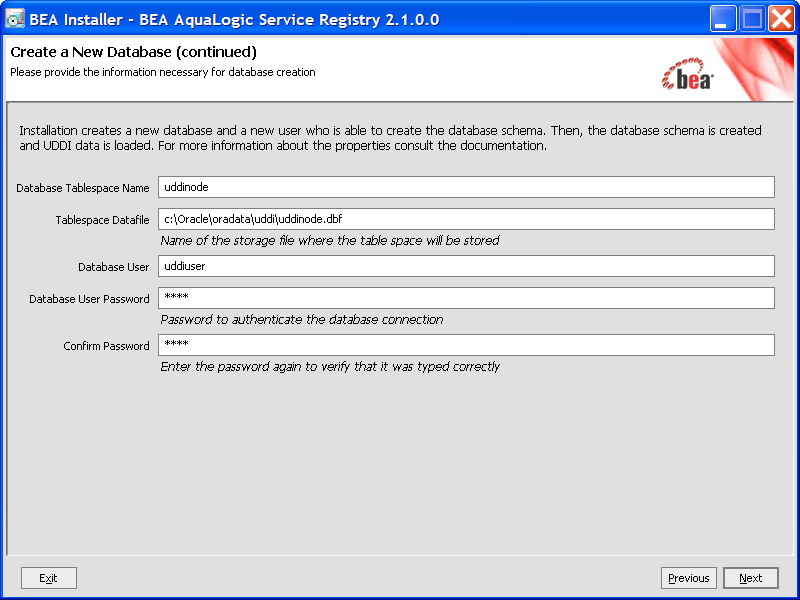
Oracle database creation requires the following properties. To connect or create a schema requires a subset of these properties. Please note that properties marked with an asterisk (*) must not collide with existing objects in the database.
Continue with JDBC Driver.
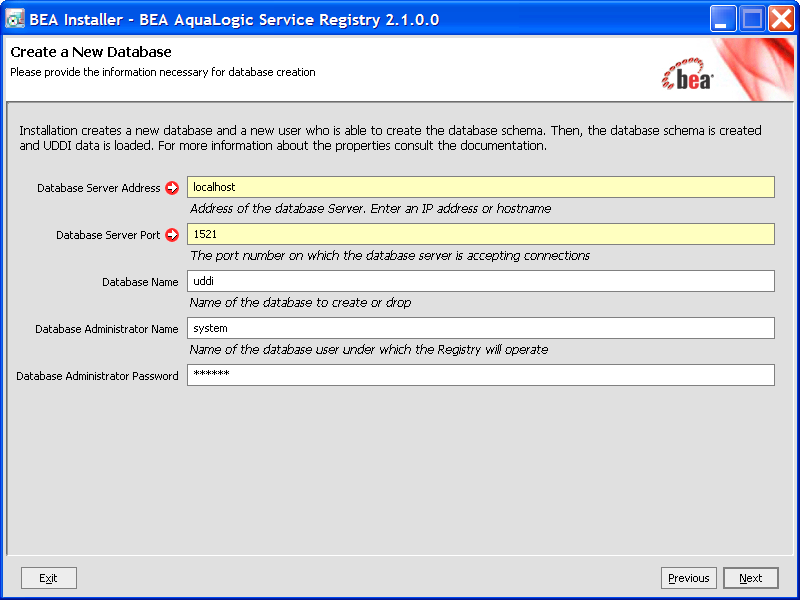
The installation process creates a new database on the database server under the given user name. The database schema is created and UDDI data are loaded. This user should have the Database Creators server role.
Make sure your database server has case-sensitive collation, otherwise all comparisons will be case insensitive, even if the caseSensitiveMatch findQualifier is set. Alternatively, you can create a database with case-sensitive collation manually and use the create schema option.
If you selected the option Create database in the installation/Setup panel shown in
Figure 9-2, Database Creation Method, on page 9-3, you need a database user account with the Database creators server role. To create such account, you can use the SQL Server Enterprise Manager:
 Microsoft SQL Servers SQL Server Groupserver name Security Logins.
MSSQL database creation requires the following properties. To connect or create schema requires a subset of these properties. Please note that properties marked with an asterisk (*) must not collide with existing objects in the database.
Continue with JDBC Driver.
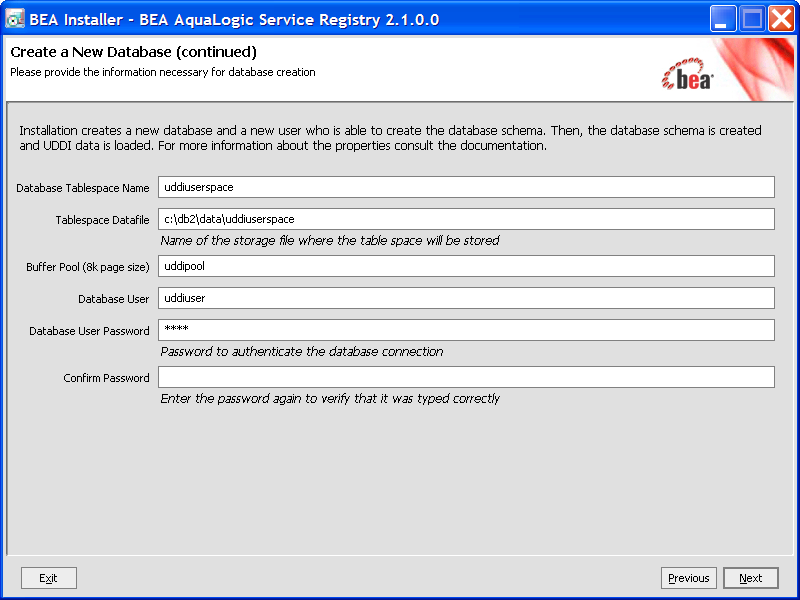
The Create database option from the installer/Setup tool does not create a new database physically. The installation process creates a new tablespace in an existing database with the given (existing) buffer pool and associates the tablespace with the given file. Permission to use the tablespace is given to the specified user. Then, a database schema is created and UDDI data are loaded.
Because relational tables are created in the implicit schema, if you want to create more UDDI databases (such as databases for publication and discovery registries for the approval process), you must create UDDI databases with different database users.
The Create database option requires a buffered with 8k page size and an database user account, that can use a temporary tablespace with such buffered.
All Databasesdatabase Table Spaces from the left side tree.C:\Db2\data\udditempspace, click Next 3 times and then click Finish. DB2 Control Center:All DatabasesdatabaseUser and Group ObjectsDBUsers from the left side tree.DB2 database creation requires the following properties. To connect or create schema requires a subset of these properties. Please note that properties marked with an asterisk (*) must not collide with existing objects in the database.
| Note: | You must have read and write permissions to this directory. |
connect database, create table and create schema implicitly.
| Note: | The user also must have access to a temporary tablespace with the associated 8k-length bufferpool to use for temporary tables. |
Specify the BEA AquaLogic Service Registry Administrator account which will be created in the database.
| Note: | Increase transaction log size (parameter logfilsiz) from default value 250 to 1000. You can use the Control Center tool to make this change. |
Continue with JDBC Driver.
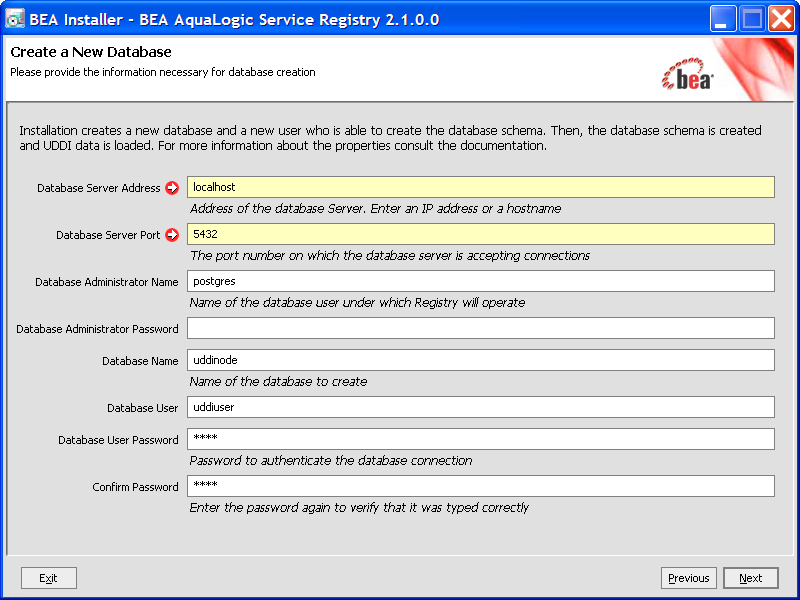
The installation process creates a new database and a user who is able to create schema/tables. Then the database schema is created and UDDI data are loaded.
PostgreSQL database creation requires the following properties. To connect or create a schema requires a subset of these properties. Please note that properties marked with an asterisk (*) must not collide with existing objects in the database.
Continue with JDBC Driver.
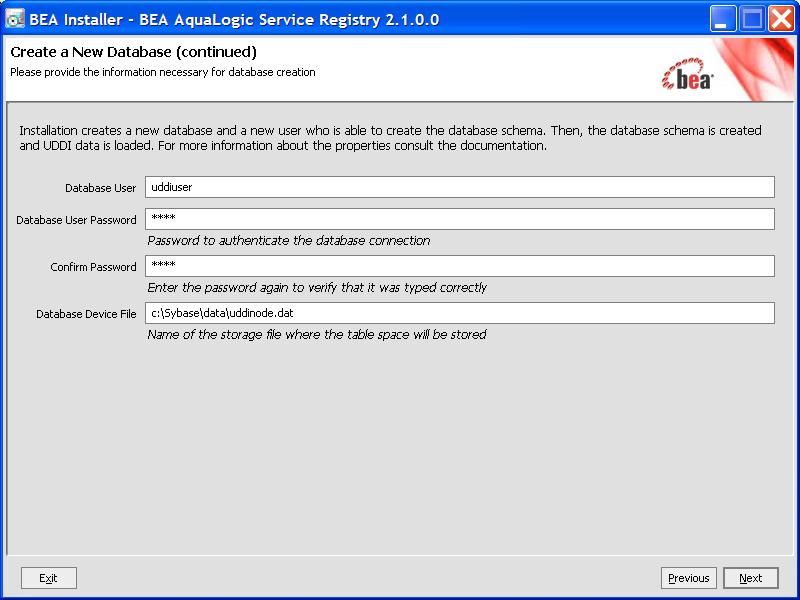
The installation process creates a new database and a new user who is able to create tables. Then database schema is created and UDDI data are loaded.
| Note: | You must configure the Sybase database server with at least 8K page size. Servers with a lesser page size may refuse some requests to store data. |
Sybase database creation requires the following properties. To connect or create a schema requires a subset of these properties. Please note that properties marked with an asterisk (*) must not collide with existing objects in the database.
Continue with JDBC Driver.
Select the JDBC Driver as shown in Figure 12. It is not necessary to configure this path for the HSQL and PostgreSQL databases as the JDBC drivers for these databases are installed in the distribution. It is also not necessary if you have already configured this path previously for the selected database. The JDBC drivers are usually supplied by database vendors.

If you created a database or schema, you can configure an authentication account provider.
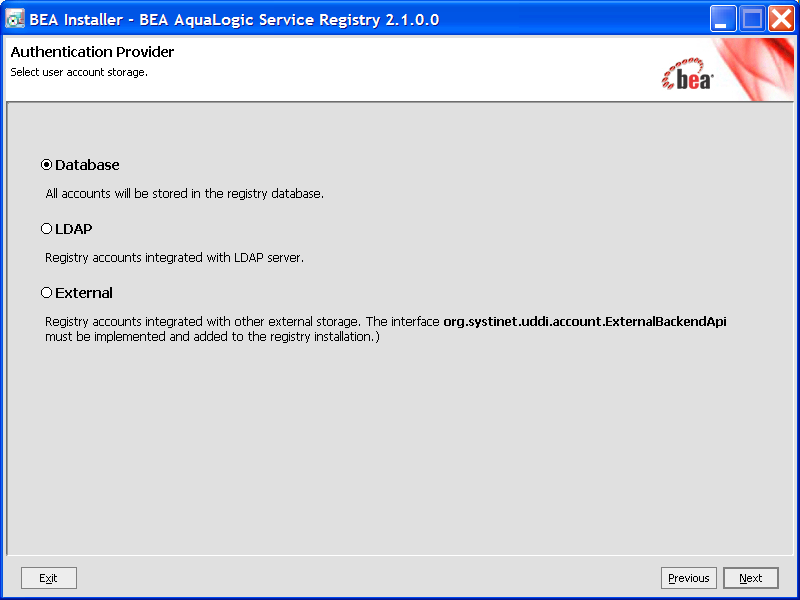
The preceding figure allows you to select the authentication account provider.
com.systinet.uddi.account.ExternalBackendApi and add it to the registry installation.
For more information about LDAP and External account backends, please see External Accounts Integration.


|