| SIP Servlet Engine© Documentations |
| Top > Reference > OKISoftphone Users Guide |
OKISoftphone Users Guide
Introduction
OKISoftPhone Features
OKISoftPhone (hereinafter referred to as Softphone) is an IP telephony application used to have a conversation among personal computers (PCs) through the Internet. This application provides the following features:
- Voice Call
- The Softphone's basic function for having a voice conversation among PCs.
- Text Chat
- The function for exchanging instant messages (text messages which can be sent and received quickly) with a target user.
- TV Phone
- The function for talking while monitoring each other's face. (This function requires to connect a Web camera sold separately to each computer.)
- Talk with Multiple Users
- The function for talking with up to four users (including your own) during a conference.
- Address Book
- The function for registering up to 1000 users information (including your own). You can register up to 32 users in your buddy list from your Address Book.
- Buddy List
- The function for making a call to your buddy after checking his/her state (presence: online, offline, etc).
- Per-user Customization
- The function for using Softphone in your own setting even when multiple users (with different user IDs) use one PC. Personalized information, such as display location of the screen and call history, is saved on a per-user basis.
Preparations before Using Softphone
This section describes the network environment and PC's operating environment required to use Softphone. After verifying these environments, proceed to the next sections, Preparations, Installation.
<Network Environment>
The network environmental conditions required to use Softphone are as follows:
- It connects to the Internet using a global IP address.
- If your PC makes connections to the Internet through fiber optic, or makes dial-up connections to an Internet provider through a modem or terminal adapter (TA) at a certain baud rate, you can use the Softphone call functions. However, to use the TV phone function smoothly, use a line that supports a rate of more than 1.5 Mbps. Even when your PC does not assigned a global IP address, you can use Softphone if the following conditions are met.
- It uses a UPnP-compliant broadband router.
- Softphone needs to be connected to the Internet through a UPnP-compliant broadband router.
Some UPnP-compliant broadband router models may not be able to be used.
- It connects without use of a proxy server.
- If your PC connects through a proxy server, you can not use Softphone because it can not identify users.
- It connects to the Internet without use of a firewall.
- Some corporate LANs may be set up firewalls to enhance security. If your environment have a firewall, you can not use Softphone in many cases. For more information, contact your network administrator.
When you use Windows XP, turn off its firewall function.
<PC's Operating Environment>
- OS
- One of the followings: Microsoft Windows 2000 Professional (SP4) / Windows XP Home Edition (SP1)/ Windows XP Professional (SP1)*1
- CPU
- Intel Pentium III 850MHz or higher
- Memory
- 256 MB or more
- Hard disk
- 100 MB free space or more
- Display (resolution)
- 1024x768 pixel or higher resolution, with High Color (16 bit) setting or more colors
- Sound card
- Full duplex-compliant sound card
- Others
- Microphone and Speaker (OKI recommends using a head set.)
Plug your microphone and speaker into the back of your PC and set them up so that they can input or output voices before start Softphone.
- Web camera (used when using the TV phone function) The specifications of a Web camera you can use with Softphone are as follows:
- It supports Windows.*2
- It supports QCIF (176x144 pixels).
Plug your Web camera into the back of your PC and set it up by referring to the product-specific document.
- Microsoft Internet Explorer 6.0 or later
- DirectX 8.1 or later (used when using the TV phone function)
When your OS is not Windows XP, install DirectX 8.1 (or later) in your PC. The latest DirectX can be downloaded from the following site.
http://www.microsoft.com/windows/directx/
When your OS is Windows XP, you do not need to install DirectX 8.1 (or later) because the OS comes equipped with this application. If you do not use the TV phone function, Softphone works correctly without DirectX 8.1.
Preparations
This section describes the some preparatory tasks before installing Softphone.
<Setting up Your Microphone and Speaker>
This task is necessary for using the voice call function. Plug your microphone and speaker (or your head set) into the back of your PC.
<Setting up Your Web Camera>
This task is necessary only for using the TV phone function. If you do not use the function, this task is not needed. Set up your Web camera (plugging into your PC, installing a driver, adjusting camera location, etc.) by referring to the product-specific document.
Do not connect and disconnect your Web camera from your PC when using Softphone, or Softphone may work incorrectly.
<Adjusting Sound>
You can also control the volume on the Softphone screen. This section describes how to use the Windows Volume Controller.
- Select the Start --> All Programs (or Programs) --> Accessories --> Entertainment --> Volume Control.
- Check the speaker's setting in the Wave Balance and change the setting as necessary.*3
- Then, adjust the volume of the microphone. Select the Options --> Properties from the menu bar. In the Properties screen, select the Microphone and click OK.
- Check the microphone's setting in the Volume Control and change the setting as necessary.*4
- Select the Options --> Exit from the menu bar to close the Volume Control.
Installation
This section describes how to install Softphone. Install it according to the following steps.
- Log in Windows XP/2000 with administrative privileges.
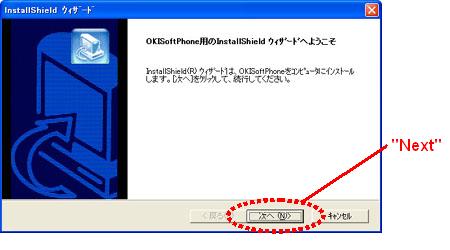
- Double-click the Setup.exe.
The Welcome to the InstallShield wizard for OKISoftPhone screen appears.
- After accepting the terms of the Software License Agreement, the Choose Installation Directory screen appears.
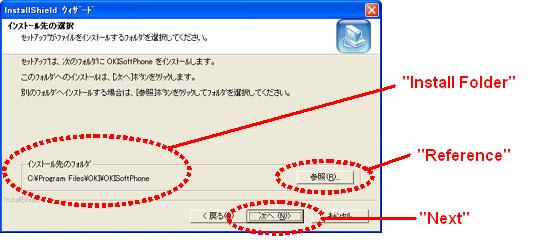
You do not need to change the default directory. But if you want to specify another directory, click the Browse button to choose the directory. Note that Softphone may not start if your installation directory name includes two-byte characters.
Do not specify a folder whose name includes two-byte characters for the installation directory. When you use the default installation directory, starting by restricted users is limited. If you want to specify another folder for the installation directory, set your access right for its upper directories to Full Control. Softphone may not start if you install it under a folder for which your access right is not set to Full Control.
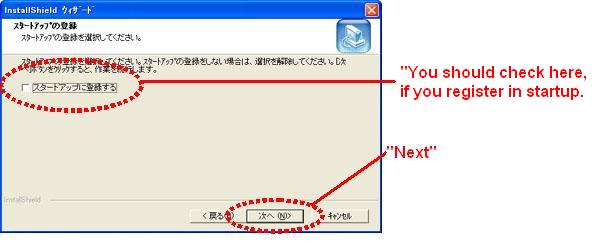
- When you click Next, the Register with Startup screen appears.
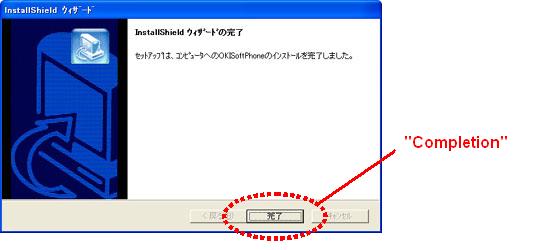
- Click Next to start the Softphone installation.
After the "The InstallShield wizard is complete." screen appears, click Done to exit the installation program.
- The OKISoftPhone icon has been created on the desktop screen.
And the Start --> All Programs (or Programs) --> OKISoftPhone menu has also been created. To start Softphone, double-click the OKISoftPhone icon on the desktop screen or select the Start --> All Programs (or Programs) --> OKISoftPhone --> OKISoftPhone.
Uninstallation
This section describes how to uninstall Softphone. When you no longer need this application, uninstall it according to the following steps.
- Select the Start --> Control Panel.
In Windows 2000, select the Start --> Setting --> Control Panel.
- Select the Add or Remove Programs (or Add or Remove Applications) from the Control Panel.
- Choose the OKISoftPhone from the list.
- Click the Change/Remove button. Continue the task following the instructions on the screen.
The data folder for history information is left after uninstallation. Remove it as necessary.
Legal Notice about Copyright and Trademarks
OKISoftPhone
Copyright (c) 2004 Oki Electric Industry Co.,Ltd. All rights reserved.
Oki Electric Industry Co.,Ltd. owns copyright in this software.
- Microsoft, Windows, and DirectX are trademarks or registered trademarks of Microsoft Corporation in the United States and other countries.
- Intel, Pentium, and MMX are trademarks or registered trademarks of Intel Corporation.
- The names of other companies, products, and services are trademarks or registered trademarks of their respective owners. In this document, the marks (TM), (R) are omitted.
* No part of this software and document may be used or reproduced without the prior consent.
* The specification of this software and the information in this document are subject to change in future without notice.
Basic Usage of Softphone
Startup and Login
This section describes how to use Softphone for the first time after preparation and installation.
1. Double-click the OKISoftPhone icon on the desktop screen or select the Start --> All Programs (or Programs) --> OKISoftPhone --> OKISoftPhone.
2. Softphone starts and the Login screen appears. Enter each item and click the Login button.
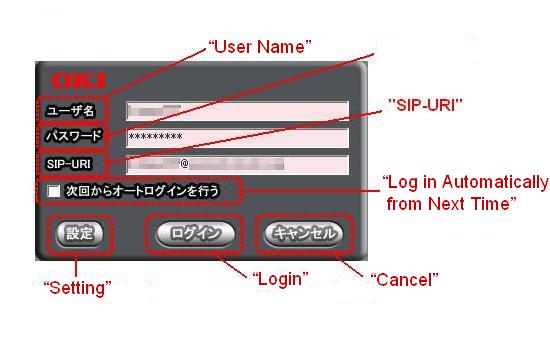
- User Name
- Enter the user name used to log in.
- Password
- Enter the password used to log in.
- SIP-URI
- Enter the SIP URI.
- Log in Automatically from Next Time
- Select if you want to skip this screen and log in automatically.*5
- Setting
- Click this button to change information about each server to be accessed.*6
You can cancel the auto-login setting in the Configure Environment screen.
3. After the login is completed, the Main screen appears. From this screen, you can handle outgoing and incoming calls and open the screens that show your buddy list, call history, etc. For more information, see Description of the Screens.
You can not start two Softphones at the same time in Windows XP (including when another user is using Softphone).
Configure Server Screen
In this screen, you can configure the settings for each server and your network.

Usually, you do not need to change these settings. Note that Softphone may not work correctly if wrong information is set.
- Location
- Enter the IP address or domain name of the location server.
- Proxy
- Enter the IP address or domain name of the proxy server.
- Presence
- Enter the IP address or domain name of the presence server.
- Application
- Enter the IP address or domain name and port number of the application server.
- Network Device
- Specify which network device (NIC) is used if you have multiple devices.
- Use UPnP Router
- Specify whether you use the specified UPnP router or not. If it is selected, Softphone searches the UPnP router on the network during login process. Even when it is not found, the login process continues.
Description of the Screens
<Screen Organization>
You can use the following screens to perform the various functions in Softphone.
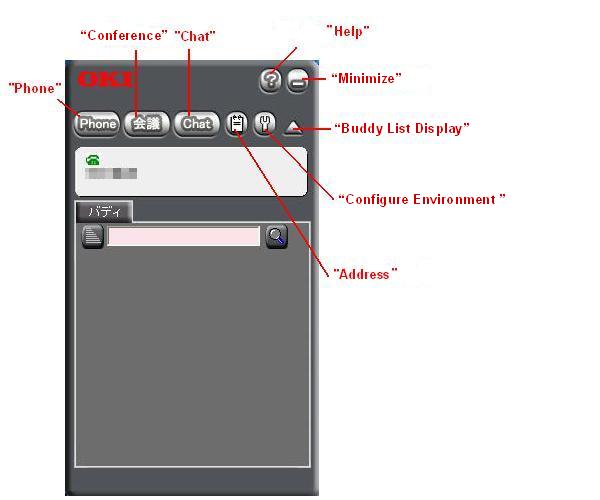
- Main Screen
- The screen that appears immediately after Softphone startup. From this screen, you can open the screens for calling, conferencing, etc.
For details, see Main Screen.
- Phone Screen
- The screen used to make a call. Click the Phone button in the Main screen to display this screen.
For details, see Phone Screen.
- Chat Screen
- The screen used to enter or display an instant message (text message which can be sent and received quickly). Click the Chat button in the Main screen to display this screen.
For details, see Chat Screen.
- Conference Screen
- The screen used to call or chat with up to four users (including your own). Click the Conference button in the Main screen to display this screen.
For details, see Conference Screen.
- Address Book Screen
- The screen used to register the users to who you frequently make a call. Click the Address button in the Main screen to display this screen.
For details, see Address Book Screen.
- Configure Environment Screen
- The screen used to configure and view behaviors and services provided by Softphone. Click the Configure Environment button in the Main screen to display this screen.
For details, see Configure Environment Screen.
- Help Screen
- The screen that describes how to use Softphone. Click the Help (?) button in the Main screen to display this screen.
- Version Information Screen
- The screen that shows the version of Softphone. Right-click the Help (?) button in the Main screen to display this screen.
<Screen Location>
To change display location of the screen, drag and drop the screen. The location of the screen is saved, therefore the next time you start Softphone, you can see it at the same location as when you close it last time.
<Screen Alignment>
To align the screens, right-click the Softphone icon in the task tray and select the Alignment Units (U).
Note that some screens are out of the target of this alignment function.
Exit
To exit Softphone, right-click the Softphone icon in the task tray and select the Exit OKISoftPhone from the menu.
Even when you click the Minimize (_) button in the Main screen, Softphone does not terminate.
Main Screen
How to Use the Main Screen
This screen appears immediately after Softphone startup. From this screen, you can open the screens for calling, conferencing, etc. and check your buddy list, messages, etc.
<Menu Launcher>
- Phone Button
- Use this button to make a call. For details, see Phone Screen.
- Conference Button
- Use this button to call or chat with up to four users (including your own). For details, see Conference Screen.
- Chat Button
- Use this button to exchange instant messages (text messages which can be sent and received quickly). For details, see Chat Screen.
- Address Button
- Use this button to check or edit your buddy list. For details, see Address Book Screen.
- Configure Environment Button
- Use this button to configure behaviors and services provided by Softphone. For details, see Configure Environment Screen.
- Buddy List Display Button
- Use this button to display or hide you buddy list.
- Help (?) Button
- Click this button to display the online help, and right-click this button to display the Version Information Screen.
- Minimize (_) Button
- Use this button to close the Main screen. To display the Main screen again, click the Softphone icon in the task tray.
<Buddy List>
This screen displays the current state of the users selected from your Address Book. You can register up to 32 users in your buddy list from your Address Book. For details, see Buddy List in "Main screen"
Buddy List
Buddy List displays the current state of the users selected from your Address Book. You can register up to 32 users in your buddy list from your Address Book.
- Your Own Information Field
- Use this field to display or edit your state and display name set in your Address Book. For details, see Buddy List: Your Own Information Field.
- Display Target Button
- Use this button to sort your buddies to be displayed by online, offline, or neither online nor offline. And you can sort them by group.
- Search Button
- Use this button to search the buddies who forward accord with the display name specified in the search field and display them in your buddy list.
- Buddies Information Field
- This field displays your buddy list. For details, see Buddy List: Buddies Information Field.
Buddy List: Your Own Information Field
This field displays your state and display name set in your Address Book.
- State Display Button
- Use this button to change your state. Select your state from the menu displayed by right-clicking (Online, Offline, On Phone, Busy, and Walkout). You can not change your state when you are on the phone, or opening the Conference or Configure Environment screen. Your state (presence) is notified to the users who are permitted to watch your presence in real time. For more information about state (presence), see State (Presence).
- Display Name
- This field displays your display name set in your Address Book. This display name is automatically updated by changing it in your Address Book.
Buddy List: Buddies Information Field
This field displays the state of your buddies.
- State Display Icon
- This icon displays the state of your buddies who permit you to watch his/her presence. One of the following states: Online, Offline, On Phone, Busy, and Walkout is displayed. Your buddies' states are updated in real time. For more information about state (presence), see State (Presence).
- Right-click Menu
- Select and right-click a buddy in your buddy list to display the menu for making a call to him/her, opening the Phone, Conference, or Chat screen, moving up or down his/her display location, and removing him/her from your buddy list.
State (Presence)
You can see the following five states (presences) in Softphone.
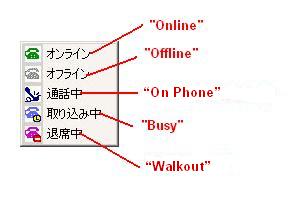
- Online
- This shows the state that the user has logged in. You can make and receive a call, participate in a TV conference, and chat in this state.
- Offline
- This shows the state that the user has logged out. If you want to hide your login, you can set your state Offline.
- On Phone
- This shows the state that the user is on the phone. When you are talking with Softphone users, your state is automatically set to On Phone and if your call terminates, your state is automatically returned to the previous state. You can not change your state when you are on the phone.
- Busy
- This shows the state that the user is opening the Configure Environment or Conference@ screen. You can not change your state when you are opening these screens. Note that you can not receive a call or message when you are opening these screens. When you close these screens, your state is automatically returned to the previous state. If you want to notify your buddies of your busy state (without using these screens), you can set your state Busy.
- Walkout
- This shows the state that the user is not using the PC for a certain time (the screen-saver is working). When you cancel the screen-saver, your state is automatically returned to the previous state. If you want to notify your buddies of your walkout state (without using screen-saver), you can set your state Walkout.
Phone Screen

How to Use the Phone Screen
This screen is used to make a call. Click the Phone button in the Main screen to display this screen.
- Making a Call
- You can make a call by entering a callee's SIP-URI in the enter field and clicking the Callout button. For details, see How to Make a Call and How to Receive a Call.
- Adjusting the Sound
- You can control the volume. For details, see How to Adjust the Sound.
- Holding On
- You can put a ongoing call on hold by clicking the Hold button. For details, see How to Put a Call on Hold.
- Using the TV Phone Function
- You can display the other-side user's face image in the TV screen by clicking the TV button. For details, see How to Use the TV Phone Function.
How to Make a Call
To make a call from the Phone screen displayed by clicking the Phone button in the Main screen, do the following:
1. Enter a callee's SIP-URI in the enter field. You can enter it directly or enter it more easily using the following methods:*8
- Select the callee in your buddy list in the Main screen and click the Phone button.
- Click the Destination button in the Phone screen and select the callee from the list.
- Select and right-click the callee in your buddy list in the Main screen and click the Display Phone Screen.
- Select and right-click the callee in your address list in the Address Book screen and click the Display Phone Screen.
- Select and right-click the callee from SIP-URI links in the Chat screen and click the Display Phone Screen.
You can not make a call to another user when you are configuring your environment, you are calling, or you are on the phone.
2. Click the Callout button. When the call starts, you can hear the ring.
3. You can begin a conversation with the callee when he/she answers.
You can not make a call in the following situations:
- The callee is offline. (He/she does not start Softphone.)
- The callee is on the phone, is calling, or is being called.
- The callee is participating in a conference (He/she is displaying the Conference screen.)
- The callee is configuring his/her environment (He/she is displaying the Configure Environment screen.)
- The callee rejects the call.
4. Click the Disconnect button to terminate the call.
Tips: You can also make a call from the following screens. For details, see the following sections.
How to Receive a Call
To receive a call, do the following:
- When you get a call, a popup window appears with the ring tone in the lower right portion of the desktop screen. The caller's display name or SIP-URI is displayed in the popup window.
- Click the Respond button to begin a conversation with the caller. Click the Reject button to cut off the call. In this case, the message that the callee could not respond to the call is displayed on the caller side.
- Click the Disconnect button to terminate the call.
You can not receive a call in the following situations:
- You are calling to another user.
- You are being called from another user.
- You are on the phone with another user.
- You are participating in a conference (You are displaying the Conference screen.)
- You are configuring your environment (You are displaying the Configure Environment screen.)
How to Reject a Call
Click the Reject button to cut off a ringing call. In this case, the message that the callee could not respond to the call is displayed on the caller side.
How to Adjust the Sound

- Controlling the volume of the speaker
- Drag the slider to control the volume. To turn down the volume, drag the slider left, and to turn up the volume, drag the slider right.
How to Put a Call on Hold
Click the Hold button to put the ongoing call on hold. The on-hold tone comes and each other's voice can no longer be heard. To restart a conversation, the user who clicked the @Hold@ button should click the Cancel button.
How to Use the TV Phone Function
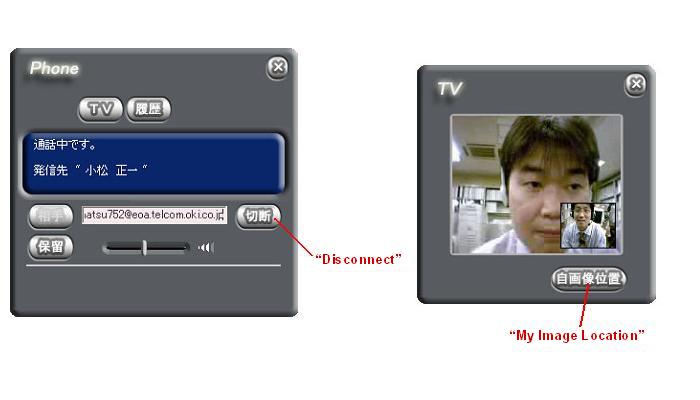
If Web cameras are connected on both sides, you can send and receive each other's face images on the phone.
- How to Display the TV Screen
- Click the TV button to display the TV screen and start to send and receive Web camera images.
- If you click the TV button when you are on the phone, the other side image appears. To display the other side image, the following conditions should be met:
- A Web camera is connected on the other side.
- The TV screen is displayed on the other side.
- The Send TV Screen Image checkbox is selected in the Video tab of the Configure Environment screen on the other side.
- If you click the TV button when you are not on the phone, your own image appears.
- How to Display the PinP Image (Your Own Image)
- If you click the My Image Location button when you are on the phone, your own image as well as the other side image appears. Every time you click the My Image Location button, the location of your own image is changed.
Chat Screen
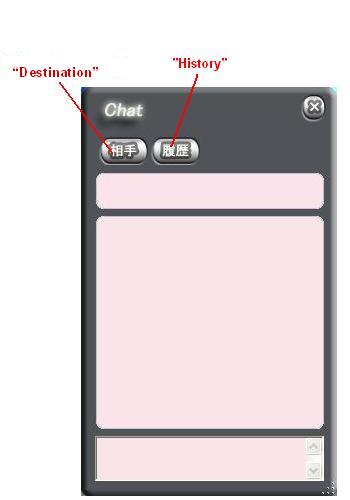
How to Use the Chat Screen
This screen is used to exchange instant messages (text messages which can be sent and received quickly). Click the Chat button in the Main screen to display this screen.
- Sending and Receiving a Message
- You can send a message to a callee by entering it and pressing Enter. The messages sent or received are displayed in the Chat screen. For details, see How to Send a Message and How to Receive a Message.
- Opening Multiple Chat Screens
- Even when you are chatting with someone, you can chat with other users. You can open up to four Chat screens.*10
How to Send a Message
1. Click the Destination button in the Chat screen and select a callee from the list. You can also select him/her using the following methods:
- Select the callee in your buddy list in the Main screen and click the Chat button.
- Select and right-click the callee in your buddy list in the Main screen and click the Display Chat Screen.
- Select and right-click the callee in your address list in the Address Book screen and click the Display Chat Screen.
- Select and right-click the callee from SIP-URI links in the Chat screen and click the Display Chat Screen.
You can not open the Chat screen when you are configuring your environment.
2. Enter characters in the enter field and press Enter to send them to the callee. The messages sent or received are displayed in the Message Display field.
You can enter up to 128 two-byte or 256 one-byte characters per a message.
Note on starting your mailer and Web browser automatically
When the Start Mailer Automatically and Start Browser Automatically are selected in the Configure Environment screen if you click a URL or mail address in the Message Display field, your related Web browser or mailer will start automatically. For example, only by clicking a URL, your browser starts and you can view the page, and only by clicking a mail address, your mailer starts and you can create a mail to the address. The behavior of these programs differs from PC to PC.
3. Click the x button in the Chat screen to terminate the chat. Even when you close the Chat screen, the other side Chat screen is not closed automatically. The screen needs to be closed individually.
You can not send a message in the following situations:
- The callee is offline. (He/she does not start Softphone.)
- The callee is configuring his/her environment (He/she is displaying the Configure Environment screen.)
- The callee rejects the chat.
- The callee has already opened four Chat screens.
How to Receive a Message
- When you get a first message, a popup window appears in the lower right portion of the desktop screen. The caller's display name or user name is displayed in the popup window.
- Click the Confirm button in the popup window to display the Chat screen.
- You can send and receive messages on the displayed Chat screen in the same way as described in How to Send a Message.
You can not receive a message in the following situations:
- You are configuring your environment (You are displaying the Configure Environment screen.)
- You have already opened four Chat screens.
Conference Screen
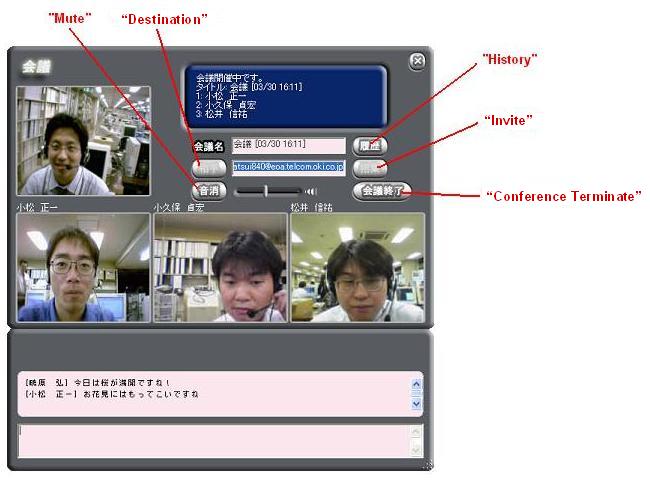
How to Use the Conference Screen
This screen is used to call or chat with up to four users (including your own). Click the Conference button in the Main screen to display this screen.
- Starting a Conference
- You can invite members to a conference by clicking the Invite button. For details, see How to Start a Conference (Invitation).
- Accepting an Invitation
- You can accept an invitation to have a conversation with multiple members. For details, see How to Accept an Invitation.
- Adjusting the Sound
- You can control the volume by dragging the slider. To turn down the volume, drag the slider left, and to turn up the volume, drag the slider right.
- Using the TV Phone Function
- You can talk while monitoring one another's faces. To display the members' images, the following conditions should be met:
- A Web camera is connected on each member's side.
- The Send TV Screen Image checkbox is selected in the Video tab of the Configure Environment screen on each member's side.
When you are not on the phone, only your own image appears.
- Chatting
- You can chat with conference members. Enter characters in the Conference Chat screen and press Enter to send them to all the conference members. You can used this function in the same way as the one-to-one chat function. For details, see Chat Screen.
- Muting
- You can keep your voice from being heard by other members. For details, see How to put your voice on mute.
How to Start a Conference (Invitation)
1. Enter members' SIP-URIs in the enter field. You can enter them directly or enter them more easily using the following methods:
- Select the member in your buddy list in the Main screen and click the Conference button. (Use this method only when selecting the first member.)
- Click the Destination button in the Conference screen and select the member from the list.
- Select and right-click the member in your buddy list in the Main screen and click the Display Conference Screen.
- Select and right-click the member in your address list in the Address Book screen and click the Display Conference Screen.
- Select and right-click the member from SIP-URI links in the Chat screen and click the Display Conference Screen.
You can not send a message to another user when you are configuring your environment, you are calling, or you are on the phone.
2. Enter an agenda in the Title. A title where the current time is embedded is displayed as the default value. You can enter up to 16 two-byte or 32 one-byte characters.
3. Click the Invite button to invite the selected members to this conference. To cancel the invitation, click the Cancel button before the members respond.
You can not invite the member in the following situations:
- The member is offline. (He/she does not start Softphone.)
- The member is participating in another conference (He/she is displaying the Conference screen.)
- The member is configuring his/her environment (He/she is displaying the Configure Environment screen.)
- The member is on the phone, is calling, or is being called.
4. You can begin the conference when one of the invited members answers.
5. Click the Conference Terminate button to terminate the conference.
How to Accept an Invitation
To accept an invitation, do the following:
- When you get a invitation, a popup window appears in the lower right portion of the desktop screen. The conference organizer's display name or SIP-URI is displayed in the popup window.
- Click the Respond button to begin the conference. Click the Reject button to refuse the invitation.
- To leave the conference, click the Exit button. The conference continues among the rest of the members.
You can not accept an invitation in the following situations:
- You are calling to another user.
- You are being called from another user.
- You are on the phone with another user.
- You are participating in another conference (He/she is displaying the Conference screen.)
- You are configuring your environment (You are displaying the Configure Environment screen.)
How to Put Your Voice on Mute
Click the Mute button in the Conference screen during a conference to mute your voice (that is, to prevent your voice from being heard by other members). To cancel muting, click the Cancel button.
Even if you put your voice on mute during a conference, your TV image continues to be displayed.
Address Book Screen
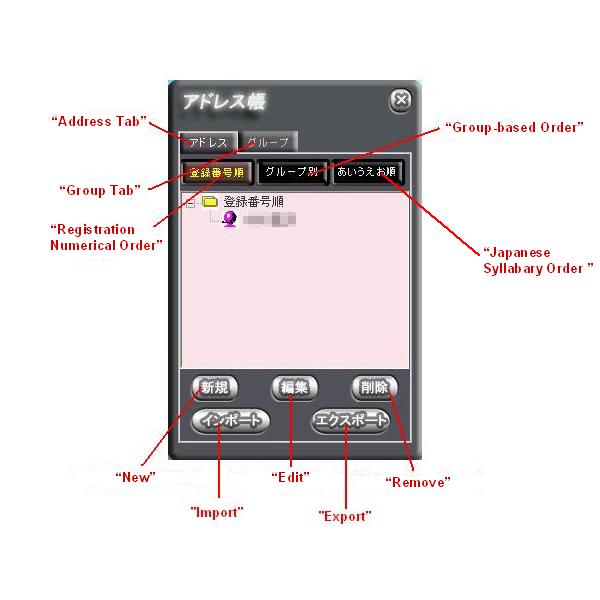
How to Use the Address Book Screen
This screen displays address information registered with the running PC.
You can display the Address Book screen by clicking the Address button in the Main screen.
- Displaying Your Address Book
- Users registered in their Personal Address Book lists in the tree view of the Address Book screen. You can switch the order in which the users are displayed to the registration numerical order, group-based order, or Japanese syllabary order. For details, see How to Display Your Address Book.
- Displaying a Personal Address Book
- By double-clicking a user listed in the tree view of the Address Book screen, you can open his/her Personal Address Book. For details, see How to Display a Personal Address Book.
- Registering a New User in a Personal Address Book
- You can open a new Personal Address Book by clicking the New button in the Address Book screen. In the new Personal Address Book you can register a new user. For details, see How to Register a New User in a Personal Address Book.
- Editing a Personal Address Book
- After opening a Personal Address Book, you can edit personal address information by clicking the Edit button in the Personal Address Book. And you can also move to the Personal Address Book's Edit screen by selecting the user listed in the tree view of the Address Book screen and clicking the Edit button. For details, see How to Edit a Personal Address Book.
- Removing a Personal Address Book
- You can remove a user from your Address Book by selecting the user listed in the tree view of the Address Book screen and clicking the Remove button. For details, see How to Remove a Personal Address Book.
- Editing Group Information
- You can edit group information in the group tree view listed by clicking the Group button in the Address Book screen. For details, see How to Edit Group Information.
- Registering or Removing a User in/from Your Buddy List
- You can register or remove a user in/from your buddy list by clicking the Register in Buddy List button or Remove from Buddy List button in his/her Personal Address Book. For details, see How to Register or Remove a User in/from Your Buddy List.
How to Display Your Address Book
- Address Tab
- To display this tab, click the Address button in the Main screen. This tab displays users in your address book in one of the following orders: Registration Numerical Order, Group-based Order, or Japanese Syllabary Order. You can switch the order by clicking the corresponding button.
- Registration Numerical Order
- Select if you want to display users in the order that you registered them. Your own address information is registered as No.0.
- Group-based Order
- Select if you want to display users in the group-based order. A user registered in your Address Book can be registered in up to five groups. Only groups marked in the group tree view are displayed here. For details, see How to Edit Group Information.
- Japanese Syllabary Order
- Select if you want to display users in the Japanese syllabary order of their registered names. Users whose name can not be sorted by this order, or users whose Kana field is empty are displayed in another field.
How to Display a Personal Address Book
- Personal Address Book
- To display this address book, double-click a user listed in the tree view of the Address Book screen.
And you can also move to this address book by selecting a user in your buddy list in the Main screen and clicking Address button. The following information is displayed in the Personal Address Book.
- Control Number
- Personal Information (Display Name, Real Name, Kana, SIP-URI)
- Phone Number (@Home@, @Office@, @Cellular Phone@)
- E-Mail (@Home@, @Office@, @Cellular Phone@)
- Group (up to five groups)
For more information about the items displayed in the Personal Address Book, see "Fields in the Personal Address Book" in How to Register a New User in a Personal Address Book.
How to Register a New User in a Personal Address Book
- How to Register a New User in a Personal Address Book
- 1. Click the New button in the Address Book screen to open a new Personal Address Book. Its given control number is the smallest available number. 2. After entering all fields, click the Confirm button to finish registration. Note that your registration information is not saved if you close this Address Book without clicking the Confirm button.
- Fields in the Personal Address Book
- Control Number
Each user registered in a Personal Address Book has a unique number. This number is given from No.1 in ascending order of registration. Your own address information is registered as No.0. - Personal Information (Display Name, Real Name, Kana, SIP-URI)
Enter the name and SIP-URI of the user. - Phone Number (@Home@, @Office@, @Cellular Phone@)
Enter the phone number of the user. Enter only one-byte numbers, (, ), -, and space, or else an error will occur. - E-Mail (@Home@, @Office@, @Cellular phone@)
Enter the mail address of the user. - Group (up to five groups)
Select the group to which the user belongs from the groups marked in the group tree view. A user can be registered in up to five groups. For details, see How to Edit Group Information.
How to Edit a Personal Address Book
- How to Edit a Personal Address Book
-
1. Open a Personal Address Book and click the Edit button in the Personal Address Book. 2. After editing, click the Confirm button to finish editing.
Note that your editing information is not saved if you close this Address Book without clicking the Confirm button.
For more information about the items displayed in the Personal Address Book, see "Fields in the Personal Address Book" in How to Register a New User in a Personal Address Book.
How to Remove a Personal Address Book
- How to Remove a Personal Address Book
- 1. Open the Address Book screen and select the user to be removed in the tree view. 2. Click the Remove button with the user selected. A confirmation message appears and click OK. To cancel the remove, click Cancel. 3. The tree view of the Address Book screen no longer shows the removed user.
How to Edit Group Information
- How to Edit Group Information
- 1. Click the Group button in the Address Book screen to display the group tree view. 2. Mark the group to be edited. 3. The initial group name is "Group 1, 2, 3...". Right-click and select the Edit Group Name to edit the group name. 4. After editing, click the Confirm button to finish editing.
How to Register or Remove a User in/from Your Buddy List
- How to Register or Remove a User in/from Your Buddy List
- To register or remove a user in/from your buddy list, do the following: 1. Open the Personal Address Book for the user to be registered or removed. 2. Click the Register in Buddy List button or Remove from Buddy List button to register or remove the user in/from your buddy list.
Configure Environment Screen
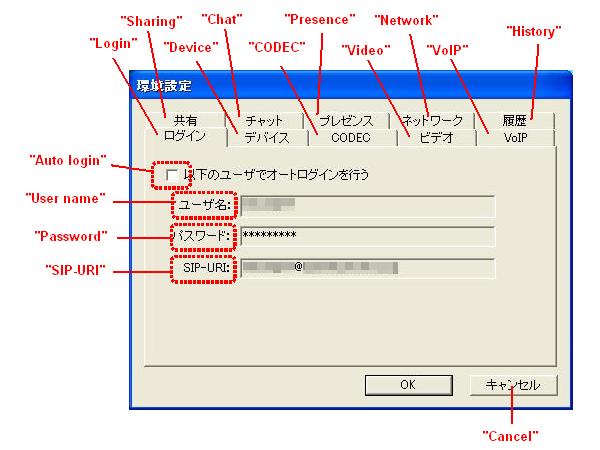
How to Use the Configure Environment Screen
This screen is used to configure and view behaviors and services provided by Softphone. Click the Configure Environment button in the Main screen to display this screen.
- Login Tab
- You can configure the auto-login setting in this tab. For details, see Login.
- Device Tab
- You can select the sound device and video device in this tab. For details, see Device.
- CODEC Tab
- You can set the priority of the used audio codec in this tab. For details, see CODEC.
- Video Tab
- You can configure the video setting, such as video quality, in this tab. For details, see Video.
- VoIP Tab
- You can set the ring tone and on-hold tone in this tab. For details, see VoIP.
- Chat Tab
- You can configure the chat setting in this tab. For details, see Chat.
- Presence Tab
- You can configure the presence setting in this tab. For details, see Presence.
- Network Tab
- You can view the settings for each server in this tab. For details, see Network.
Login
Use the Login tab in the Configure Environment screen to configure the auto-login setting, such as whether you will log in automatically at startup or not.
- Log in Automatically as This User
- Select if you want to log in automatically as the specified user at Softphone startup
Deselect if you want to cancel the auto-login setting. - User Name
- Enter the auto-login user name used when the Log in Automatically as This User checkbox is selected.
- Password
- Enter the auto-login password used when the Log in Automatically as This User checkbox is selected. (Entered password characters are displayed as "*", so you can not confirm.)
- SIP-URI
- Enter the auto-login SIP-URI used when the Log in Automatically as This User checkbox is selected.
Device
Use the Device tab in the Configure Environment screen to select the sound device and video device. You do not need to change the setting in this tab unless you use multiple devices.
- Audio In
- Select the input sound device used for the voice call function.
- Audio Out
- Select the output sound device used for the voice call function.
- Video
- Select the video device used for the TV phone function.
CODEC
Use the CODEC tab in the Configure Environment screen to set the priority of the used audio codec. A audio codec is a standard used to encode/decode voices when sending and receiving them. You do not need to change the setting in this tab.
- Raise Priority
- Select the audio codec name and click the Raise Priority button.
- Lower Priority
- Select the audio codec name and click the Lower Priority button.
Video
Use the Video tab in the Configure Environment screen to configure the video setting, such as video quality.
- Video Quality
- Select the quality of the TV screen images sent and received. When set to higher quality, the images become smoother and clearer but require broader communication band. Therefore, if the Highest Quality or High Quality is selected, the images may display quite slowly or the voices may interrupt in some environments.
The video quality is affected by the speed of the access line used on the other side. And when the specified video quality is different between the other side and you, the lower quality is applied to the TV screen. - PinP Display Location
- Select whether your own image is displayed in the TV screen or not, and where it is displayed (when specified that it is displayed).
- Send TV Screen Image
- Select if you want to start sending and receiving the video images at the start of a conversation.
VoIP
Use the VoIP tab in the Configure Environment screen to set the ring tone and on-hold tone.
- Select Ring Tone
- Select the type of the ring tone you want to use.
- Select On-hold Tone
- Select the type of the on-hold tone you want to use.
Chat
Use the Chat tab in the Configure Environment screen to configure the chat setting.
- Save Chat Content in Log File
- Select if you want to save the content of your chat in a text file. You can view the file by clicking the History button.
- Start Mailer Automatically
- Select if you want to start your mailer will start automatically when you click a mail address in the Message Display field.
- Start Browser Automatically
- Select if you want to start your Web browser will start automatically when you click a URL related to your Web browser (http://..., https://..., etc.) in the Message Display field.
- FONT Name
- Select the font type used in the Message Display field.
- FONT Size
- Select the font size used in the Message Display field.
- FONT Color
- Select the font color used in the Message Display field.
- Play Sound upon Receiving Chat
- Select if you want to play the sound file when receiving a chat.
- Keyword to be Highlighted
- Enter the keyword to be highlighted to highlight the word in the Message Display field. You can specify multiple keywords by separating the keywords with a comma (,).
Presence
Use the Presence tab in the Configure Environment screen to configure the presence setting.
- Notify Presence Change
- Select if you want to be notified your buddies' presence change. When the presence of a buddy in your buddy list has changed, a popup window appears. The buddy's display name or SIP-URI and his/her presence are displayed in the popup window. Specify the period that you want to keep the popup window displayed. After this period, the window is automatically closed. You can also close the popup window by clicking the Confirm button in it.
- Make Softphone Active upon Confirming
- Select if you want to make the Softphone window active by clicking the Confirm button in the popup window.
Network
Use the Network tab in the Configure Environment screen to view the settings for each server. You cannot change these information from this screen.
- Location Server
- This field shows access information on the location server.
- Proxy Server
- This field shows access information on the proxy server.
- Presence Server
- This field shows access information on the presence server.
- Application Server
- This field shows access information on the application server.
- Network Device
- This field shows information about the specified network device (NIC).
- UPnP Router
- This field shows whether you use the specified UPnP router or not. You can change the network setting information at login. For details, see Startup and Login in Basic Usage of Softphone.
Frequently Asked Questions
Problems When Startup and Login
- Question 1. I can not start OKISoftPhone. (The Login screen does not appear.)
- (Answer) Make sure that appropriate execute privileges have been assigned to you. Note that you should set your access right for the folder that contains the startup file (including its upper folders) to Full Control if you are a restricted user.
- Question 2. When I try to log in, the error message "The user name or password is wrong." appears.
- (Answer) Make sure again that your user name, password, and SIP-URI are correct. Note that Software distinguishes between one-byte and two-byte characters.
- Question 3. When I try to log in, the error message "The server could not be found." appears.
- (Answer) Make sure that your PC is properly connected to your network. And confirm the settings for the servers (location server, proxy server, presence server, and application server) are correct by clicking the Setting button in the Login screen. For more information, contact your network administrator.
- Question 4. When I try to log in, the error message "Initialization of the SIP protocol failed." appears.
- (Answer) Note that Softphone can not start if other SIP-based applications (such as Windows Messenger) are running. Stop other SIP-based applications before you start Softphone.
- Question 5. When I log in, the Main screen appears but after a few seconds Softphone terminates.
- (Answer) Make sure that the servers and the domain names set in the domain part of SIP-URIs are registered with the DNS server. For more information, contact your network administrator.
- Question 6. Sometimes I fails to log in when I use multiple network cards.
- (Answer) If you use multiple network cards, specify the network card used in Softphone. You can specify it by clicking the Setting button in the Login screen and select it in the Network Device field.
Problems When Talking
- Question 1. When the screen-saver is working, even if I get a call, the screen-saver is not cancelled. If I cancel the screen-saver manually, the call gets cut off.
- (Answer) Your PC works as described above when the On Resume, Display Welcome Screen checkbox is selected in the Windows XP's screen-saver setting. Deselect this checkbox.
-
*1: Softphone supports only Japanese version of these OSs.
*2: That is, your Web camera needs to be recognized as an imaging device in the Windows Device Manager.
*3: This screen differs from environment to environment.
*4: This screen differs from environment to environment.
*5: You can cancel the auto-login setting in the Configure Environment screen.
*6: Usually, you do not need to change these settings. Note that Softphone may not work correctly if wrong information is set.
*7: When you use a Web address book, the display name is not automatically updated.
*8: You can not make a call to another user when you are calling or you are on the phone.
*9: This flag works as an on/off switch to enable or disable this function.
*10: You can not open the Chat screen when you are configuring your environment.
*11: This flag works as an on/off switch to enable or disable this function.
*12: If the buddy's display name changes, the display name in the history will not change.
*13: An ongoing conversation's log can not be removed.
*14: An ongoing conversation's log can not be removed.
Last Modified:Thu Apr 08 13:42:29 JST 2004
| Copyright © 2003, 2004 Oki Electric Industry Co.,Ltd. All rights reserved. |