| SIP Servlet Engine© Documentations |
| Top > System Management > Installation > CenterStage-NS Configuration Guide |
CenterStage-NS Configuration Guide
1. Introduction
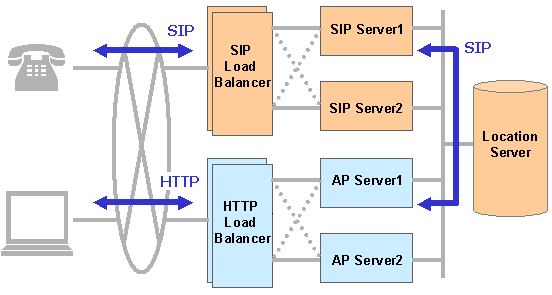
This document describes how to configure CenterStage-NS if SIP Servlet Engine works in collaboration with CenterStage-NS.

Figure 1. Linkage between SIP Servlet Engine and CenterStage-NS
2. File Configuration
| sql/ | SQL and the script files for setting DB. |
3. Preparations
In the following procedure it is assumed that CenterStage-NS is already installed and running.
4. Configuring the SIP Proxy (SIP Server)
a. Changing the numbermap.xml Configuration File
To perform the SIP Servlet Engine services triggered by receiving an SIP message, SIP requests and responses received by CenterStage-NS should be transferred to SIP Servlet Engine.
If there are no services (SIP servlets) triggered by receiving an SIP message in SIP Servlet Engine, the following task is not needed.
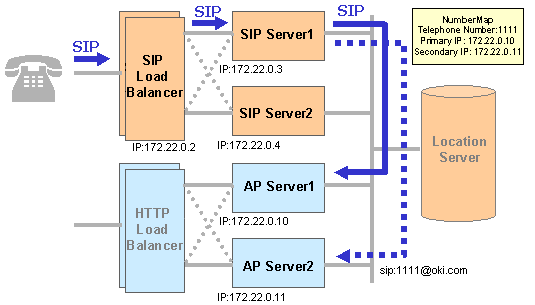
CenterStage-NS and SIP Servlet Engine are connected via SIP. Transferring an SIP message from CenterStage-NS to SIP Servlet Engine is provided through the Number Map function*1.

Figure 2. Transferring an SIP message through the Number Map
Describe the mapping the specified phone number to your SIP Servlet Engine IP address(es) in the numbermap.xml CenterStage-NS configuration file. When the phone number is set to 1111 in the numbermap.xml, messages sent not only to the phone number 1111 but also to all phone numbers that begin with 1111 are transferred to SIP Servlet Engine. Specify multiple IP addresses so that, if an error occurs one server, messages can be transferred to the other servers.
The numbermap.xml configuration file for the SIP Server-1 in the example configuration shown in Figure 2 is as follows:
 <configurationparameters>
   <scope>
     <name>NumberMappingRules</name>
     <Entry>
       <TelNumber>1111</TelNumber>
       <IPAddress>172.22.0.10,172.22.0.11</IPAddress>
     </Entry>
   </scope>
 </configurationparameters>
The numbermap.xml file is usually located under the /opt/sipns directory.
Note that you should specify the user part of SIP-URIs in the phone number format when using the Number Map function. SIP Servlet Engine that receives messages through the Number Map supports SIP-URIs whose user part is expressed by a phone number.
In this case, for example, assuming that the user part of SIP-URIs is eleven digits, you can specify his/her personal phone number by specifying all eleven numbers, or you can specify the part of his/her phone number. If you specify seven numbers, last four digits fit from 0000 to 9999.
b. Changing the trustedhost Configuration File
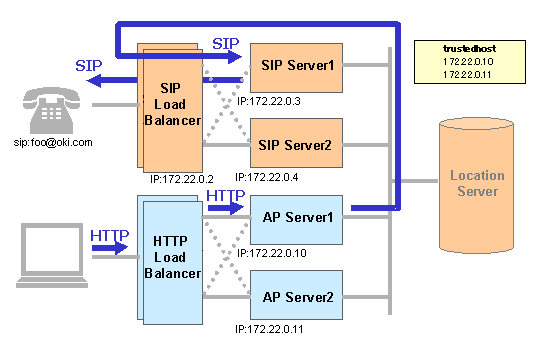
Web Collaboration Application (such as 3PCC) sends an SIP message via CenterStage-NS from SIP Servlet Engine. SIP Servlet Engine appears to CenterStage-NS to be just a UserAgent. To prevent each application from authenticating SIP Servlet Engine each time, SIP Servlet Engine should be registered as a trusted client with CenterStage-NS (SIP server) through the trustedhost function*2.

Figure 3. Web Collaboration Application
If you want to use the SIP demo applications provided with SIP Servlet Engine, the following task is needed. If you want each application to authenticate each time, the following task is not needed.
Describe your SIP Servlet Engine IP address(es) in the trustedhost CenterStage-NS configuration file. This file is placed on both the SIP Server-1 and SIP Server-2 in the example configuration shown in Figure 3. The trustedhost configuration file in this configuration is as follows:
172.22.0.10
172.22.0.11
The trustedhost file is usually located under the /opt/sipns directory.
c. Reloading the Changed Configuration File
Reload the CenterStage-NS configuration file for your change to take effect.*3
The following shows the steps required to reload.
 $ su ops                  [Change to the OpS user.]
 Password: ***             [Enter the OpS user's password.]
 % hltmon stop             [Stop monitoring health.]
 % cnf rld                 [Execute the reload command.]
 Start......
 Configuration Reloaded.
 End........
 % hltmon start            [Start to monitoring health.]
 % exit                    [Change from the OpS user.]
5. Configuring the SIP Load Balancer
a. Changing the lbconfig.xml Configuration File
If you want to use OkiSoftphone provided with SipAs on WebLogic, the following task is needed.
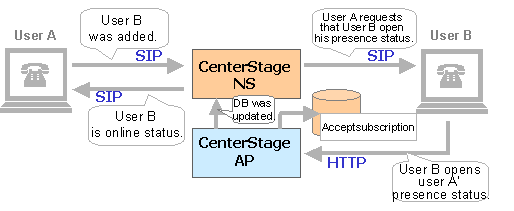
When User A adds User B to his/her buddy list and User B permits User A to watch his/her presence, Softphone updates the CenterStage-NS database (accept subscription) via SIP Servlet Engine. To notify CenterStage-NS of its database update so that CenterStage-NS sends a NOTIFY message to Softphone, SIP Servlet Engine should be registered as a managed proxy (ManagedProxies) with CenterStage-NS (because CenterStage-NS only allow SIP servers to notify it of its database update).

Figure 4. Permitting User A to watch User B's presence
Describe your SIP Servlet Engine IP address(es) in the lbconfig.xml CenterStage-NS configuration file. This file is placed on the SIP load balancer (both SIP Server-1 and SIP Server-2, if redundant configuration) in the example configuration shown in Figure 2 and 3. The lbconfig.xml configuration file in this configuration is as follows:
 <scope>
   <name>LoadBalancer</name>
         :
     <property>
       <name>ManagedProxies</name>
       <value>172.22.0.3:tls=5061;tcp=5060;udp=5060;pmsg=8899,
              172.22.0.4:tls=5061;tcp=5060;udp=5060;pmsg=8899,
              172.22.0.10,
              172.22.0.11
       </value>
     </property>
         :
     <property>
       <name>MaxProxy</name>
       <value> 4 </value>
     </property>
 </scope>
The lbconfig.xml file is usually located under the /opt/sipns/bin/HA/Config directory.
b. Reloading the Changed Configuration File
Reload the CenterStage-NS configuration file for your change to take effect.
The following shows the steps required to reload.
 $ su ops                  [Change to the OpS user.]
 Password: ***             [Enter the OpS user's password.]
 % cnf rld                 [Execute the reload command.]
 Start......
 Configuration Reloaded.
 End........
 % exit                    [Change from the OpS user.]
6. Configuring the Location Server
The Service Provider Interface(SPI) in SIP Servlet Engine refer to the CenterStage-NS database (Oracle) on the location server. This section describes how to initialize the database on the location server for SIP Servlet Engine.
The following information used for setting the CenterStage-NS database on the location server is required.
- The host name of the DB server used by CenterStage-NS
- The listener's port number of the DB server used by CenterStage-NS
- The ORACLE_SID value of the database used by CenterStage-NS
- The DB account/password of the DB administrator (system) for the database used by CenterStage-NS
a. Creating a UNIX Account
Create a user account with "user name: sipas", "user ID: 1002", and "group ID: 10" and set its password. Specify the home directory of this user in the system. This user account is an example and you can change these attributes, for example, if the user ID conflicts with that set for another user.
 # /usr/sbin/useradd -u 1002 -g 10 -d /export/home/sipap -m -s /usr/bin/bash sipap
 # passwd sipap
 New password: passwd
 New password reentry: passwd
 passwd(SYSTEM): The passwd of sipas has changed correctly.
Make a note of the password.
Log in as the new created user, sipas, and set the environment variables for sipas. If the ".bash_profile" file does not exist, create it using an editor (such as vi).
 # Get the aliases and functions
 if [ -f ~/.bashrc ]; then
   . ~/.bashrc
 fi
 # User specific environment and startup programs
 PATH=$PATH:$HOME/bin
 BASH_ENV=$HOME/.bashrc
 export BASH_ENV
 ### for oracle 920
 export ORACLE_HOME=/export/oracle/app/oracle/product/9.2.0
 export ORACLE_SID=okiPATH=$PATH:/usr/local/bin
 export ORAENV_ASK=NO
 source /usr/local/bin/oraenv
 unset ORAENV_ASK
Set the environment variables ORACLE_HOME and ORACLE_SID according to the setting on the location server.
b. Creating a Table Space
Run the script for creating a table space (crtTblspaces.sh).
 $ cd sipap-2.0.0/sql/oracle/              [Move to this directory.]
 $ ls /oracle/data1/oradata/${ORACLE_SID}  [Make sure that the directory for the DB exists.]
 $ sh crtTblspaces.sh system/manager /oracle/data1/oradata/${ORACLE_SID}
    [Specify the first argument: the login name/password of the DB administrator, and the second argument: the directory in which you create the table space.]
* The table space for SIP Servlet Engine should be placed in the same directory that contains the table space for CenterStage-NS(LS).
* The location of this directory may be changed depending on the CenterStage-NS(LS) configuration. This example describes on the assumption that the table space is placed on the shared disk (/oracle/data1) in the clustered servers. If the server is made up of a single server, the default location is ${ORACLE_HOME}/oradata/${ORACLE_SID}.
c. Creating a DB Account
Create a DB account for SIP Servlet Engine.
Run the script for creating a DB account (crtUser.sh).
 $ cd sipap/sipap-2.0.0/sql/oracle/ [Move to this directory.]
 $ sh crtUser.sh system/manager sipap1 passwd2
    [Specify the first argument: the login name/password of the DB administrator,
     the second argument: the DB account for CenterStage-AP,
     and the third argument: the password for CenterStage-AP.]
d. Creating a DB Object
Run the script for initializing the database for SIP Servlet Engine to perform the three tasks described above (initSIPAP_all.sh).
 $ cd sipap-2.0.0/sql/oracle/ [Move to this directory.]
 $ sh initSIPAP_all.sh sipns passwd sipap1 passwd2
    [Specify the first argument: the DB account for CenterStage-NS,
     the second argument: the password for CenterStage-NS,
     the third argument: the DB account for CenterStage-AP,
     and the fourth argument: the password for CenterStage-AP.]
The following task is not required. Perform this task only when you want to create a database used by the demo applications provided with SIP Servlet Engine on the location server.
Run the script for creating a table used by the demo applications provided with SIP Servlet Engine (initSIPAP_app.sh).
 $ cd sipap-2.0.0/sql/oracle/ [Move to this directory.]
 $ sh initSIPAP_app.sh sipap1/passwd2  [Specify the argument: the DB account/password for CenterStage-AP.]
Then, run the script for verifying (verify.sh) to check whether the initialization has completed successfully or not.
 $ cd sipap-2.0.0/sql/oracle/ [Move to this directory.]
 $ sh verify.sh sipap1/passwd2  [Specify the argument: the DB account/password for CenterStage-AP.]
You can see a list of the installed DB objects. Make sure that VALID appears in each STATUS field. This means the initialization's successful completion.
7. Configuring SIP Servlet Engine
If you do not want to transfer SIP messages through Number Map, the following task is not needed.
When CenterStage-NS is configured to transfer SIP messages through Number Map, CenterStage-NS starts to monitor the health of SIP Servlet Engine (or, send an OPTIONS message in 120-second periods to SIP Servlet Engine). If you use the sip-demo application, this application responds to health check.

Figure 5. Health check
After installing SIP Servlet Engine, edit the sipserver.xml in the directory in which SIP Servlet Engine is started to add the IP address(es) of the SIP proxy that sends an OPTIONS message to trustedHost.
 <!-- Define filter -->
 <filter classname="com.oki.sip.engine.security.BlockingFilter"/>
 <filter classname="com.oki.sip.engine.security.WLSSecurityManagerFilter">
   <filter-param>
     <param-name>trustedHost</param-name>
     <param-value>siplb.oki.co.jp,172.22.0.3,172.22.0.4</param-value>
   </filter-param>
 </filter>
If you do not use the sip-demo application, you should provide an SIP servlet to respond to health check (or, send back a 200 OK response to an OPTIONS message).
-
*1: Note 1: For more information about the Number Map function, see the Section 3.4 in the "CenterStage NS Maintenance and Operation Manual -Operational Data Volume -".
*2: Note 2: For more information about the trustedhost function, see the Section 3.5 in the "CenterStage NS Maintenance and Operation Manual -Operational Data Volume -".
*3: Note 3: For more information about reloading the configuration files, see the Chapter 5 "Expansion and Contraction Procedure" in the "CenterStage NS Maintenance Manual".
Last Modified:Thu Apr 08 15:31:13 JST 2004
| Copyright © 2003, 2004 Oki Electric Industry Co.,Ltd. All rights reserved. |