HOME | SEARCH | CONTACT | PDF FILES | WHAT'S NEW
TABLE OF CONTENTS | PREVIOUS TOPIC | NEXT TOPIC
|
|
BEA eLink Data Integration Option 1.2 Information Center | |
|
HOME | SEARCH | CONTACT | PDF FILES | WHAT'S NEW |
||
|
TABLE OF CONTENTS | PREVIOUS TOPIC | NEXT TOPIC |
||
Before starting the development of a map file that will define the rules for data conversion, the development environment must be set up. Preparing the development environment includes the following steps.
Preparing for Data Mapping Conversion
You must create source and destination files prior to the conversion process.
Creating Files for Conversion
For information about the copybook requirements, refer to the Mercator Help file.
For information about creating an FML Field Definition file, refer to the BEA TUXEDO Programmer's Guide and the BEA TUXEDO Reference Manual.
For information on the format and definition of the FML Group file, refer to the "Creating an FML Group Format File" section.
For information about the IDOC requirements, refer to the Mercator Help file.
The FML Group Format file (
Note:
The FML Group Format file is not used when you have specified the Listing 4-1 is the syntax for the FML Group Format file.
Creating an FML Group Format File
*.fgf) allows you to group information on top of the FML Field Definition file.
-NOMTI option in the CLOPT parameter.
Listing 4-1
Syntax for FML Group Format File
GROUP <
groupname> [OCCURS n]
field-type FML-field-nameEND
Note: The top GROUP (or root) cannot have an OCCURS clause.
groupname for the top GROUP.
Note: Group names and field names must be unique.
OCCURS n
Listing 4-2 is a sample FML Group Format file with nested groups and occurrences.
Listing 4-2 Sample FML Group Format File
GROUP fml_bufname
      GROUP payroll  OCCURS 10
            GROUP name OCCURS 3
                  string  FML_FNAME
                  string  FML_LNAME
                  string  FML_MIDDLE_INIT
            END
            long    HOURS WORKED OCCURS 10
      END
END
The BEA eLink Integrator component installs a utility that uses the Meta-Type Information file and transposes it to the original FML Group file format. In other words, you can take sample.mti and, using this utility, create sample.fgf. This utility is helpful if you have the Meta-Type Information file, but no longer have the source FML Group Format file. After using the utility, the resulting *.fgf file is sent to stdout and can be used in the eLink Integrator FML and View Importer.
To use the mti2fgf utility, issue the following command.
Listing 4-3 mti2fgf Utility
$ mti2fgffilename.mti
Using a file transfer tool, such as FTP, transfer the following files to the Windows NT development environment.
Note: Be sure to specify ASCII mode.
.fml) from an existing TUXEDO configuration
After you transfer the necessary files to the development environment, you can begin the process for building a Mercator map file. The map file will contain the specific mapping rules for the data being passed between a UNIX or Windows NT environment and a mainframe. The following tasks must be done in the development environment prior to the execution of a service request.
Developing Rules for Conversions Between FML Buffers and Other Applications
Before developing your data maps, you must put the Mercator Open Edition Client in your system path. Select Program>Settings>Control Panel>System Properties to access properties page. Select the Environment tab and enter the path for Mercator Open Edition Client under User Variables. The default installation directory is C:\mercator.
To create an FML type tree file, complete the following tasks.
.fgf) and FML Field Definition file (.fml).
For information on the FML Group Format file, refer to the "Creating an FML
Group Format File" section. For information on creating FML Field Definitions
file, refer to the BEA TUXEDO Programmer's Guide and the BEA TUXEDO
Reference Manual.
elinkimprt.exe.
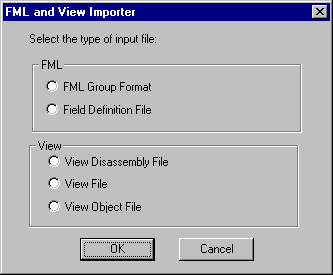
Browse to specify the following files on the FML Group Format File Selection.
FML Group Format File ( FML Field Definition File ( Type Tree File Name is the directory location and name of the FML type tree file to use for creating the Mercator Map file. If you reference only a file name and no directory path, the file will be created in the current directory.
MTI File Name is the directory path and file name for the metadata associated with the FML type tree file. If you reference only a file name and no directory path, the file will be created in the current directory.
Note:
Check the Include /Q header information box when using eLink Data Integration Option with the TUXEDO /Q feature. Do not check the Include /Q header information box when using the BEA eLink Mercator Integrator for DIO component with eLink for Mainframe.
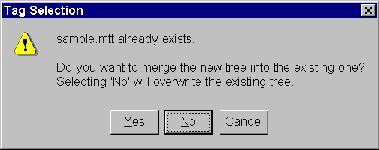
Click OK to validate the If the following screen displays, click No to overwrite the file. No is the default.
Note:
Do not click Yes. It will merge the existing tree with the new tree.

.fgf) specifies the FML Group Format file to use in the data mapping conversion. This file is used in conjunction with an FML Field Definition file for the conversion.
.fml) specifies the FML buffer to use in the data mapping conversion.
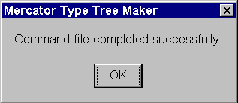
.fgf and .fml files and create the .mtt and .mti files.
In the Type Tree Filename, browse to the directory where the output file resides.
In the Root name of the Type Tree field, enter the base value of the type tree.
Select the Include /Q header information check box, if you intend to use TUXEDO queues.
In the display box, select the FML fields in the type tree.
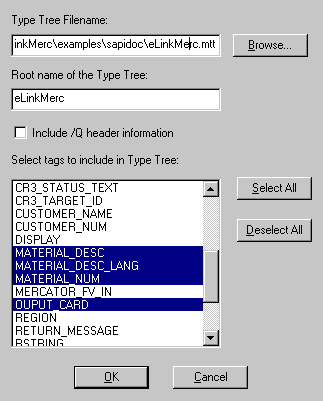

The FML type tree specifies the type definitions of the input and output files. There are four branches for the type tree file; Control, Field, Message, and SET. The SET line is not used.
From your source file, create a type tree file (*.mtt).
Create a non-FML Type Tree File Using Importers
.mmc).
Note:
If you are using the TUXEDO /Q feature, refer to the "Control Information for TUXEDO /Q" section.
Listing 4-4
Sample COBOL Type Tree Header Information
CONTROL
    FIELD
        FieldName
        Format
        Service
        View
The control information consists of the following elements.
An input card and an output card must be created prior to compiling a Mercator map file ( Create a Mercator Map File
*.mmc). Input cards contain a type tree and an adapter. Use both type tree files for the buffer types (for example FML and COBOL copybook) that are being mapped. For information on how to build a Mercator map file, refer to the Mercator Map Editor Reference Guide and the Mercator Functions & Expressions Reference Guide.
Enter a unique name for the new input card in the Card Name field.
In the Type section, click File to browse and select the input card type tree file ( In the Name field of the Type section, click the Browse button to display the contents of the type tree file ( Leave the default value, File, in the Data Source field.
In the File section, you can use the Name field as a comment box. Enter a description of the input card as your comment. Text must be entered in this field.
Note:
The value in this field is ignored and has no effect on the data mapping process; therefore, you can use this field as a comment field.
Click OK to create the input card.
*.mtt) for the File field.
.mtt). From the display, select the input record.
Enter a unique name for the new output card in the Card Name field.
In the Type section, click File to browse and select the output card type tree file ( In the Name field of the Type section, click the Browse button to display the contents of the type tree file ( Leave the default value, File, in the Data Source field.
In the File section, you can use the Name field as a comment box. Enter a description of the output card as your comment. Text must be entered in this field.
Note:
The value in this field is ignored and has no effect on the data mapping process; therefore, you can use this field as a comment field.
Click OK to create the output card.
*.mtt) for the File field.
.mtt). From the display, select the output record.
="C" as the rule in the Format field. If the output
record is an FML buffer, enter ="FML" as the rule in the Format field.
Map the remaining fields. For information on mapping rules and defining functional maps, refer to the Mercator Functions & Expressions Reference Guide.
*.mmc) by selecting the Build option from the Map
menu. If errors occur during the build process, access the building results for an
explanation of the error. Resolve the errors in the mappings and execute the build
process again until no errors occur.
After completing the development process, the following files must exist and be transferred to the execution environment.
*.fml - ASCII file)
To obtain this file, copy the FML Meta-Type Information (
Note:
This step must be done for all maps using this FML type tree.
Note:
No.mti) file and rename it using the file name of both map files. For example, the FML type tree file is sample.mti and the Mercator map file is FML2COB.mmc. Copy sample.mti and rename it FML2COB.mti. The other map file is COB2FML.mmc. Then copy the sample.mti file and rename it to the COB2FML.mti.
.mti file will exist if you are using the -NOMTI option in the CLOPT parameter when defining the server in the UBBCONFIG file.
fml.mtt - Binary file)
FML2COB.mmc - Binary file)
Note:
If you are executing on HP-UX, AIX, or SUN Solaris, the map files will have a platform-specific extension after the porting function. For example, after porting the FML2COB.mmc file to Sun Solaris, the file is named FML2COB.sun.
To set up the execution environment, complete the following tasks:
Executing a Service Request with Data Mapping
The client program requests the mainframe service advertised by the eLink for Mainframe gateway.
Note:
Leave logging on during execution of your map files to assist in diagnostics if errors occur. Logging will produce a large amount of output. The log file (.log) can be accessed directly in the directory where the compiled map file (*.mmc) is located.
Transfer the necessary files from the Windows NT development environment to the TUXEDO APPDIR directory in the execution environment. For information on required files for the execution environment, refer to the "Required Files for Conversion Process" section.
Note:
If you ported the map files for HP-UX, AIX, or SUN Solaris, after you transfer the binary map files to the execution environment, rename the file so that the extension is .mmc. For example, rename FML2COB.sun to FML2COB.mmc.
Be sure to set the following environment variables.
After transferring the necessary files to the execution environment, be sure that the BEA TUXEDO and other products such as BEA eLink for Mainframe are running. For information on how to start these products, refer to the related BEA TUXEDO documentation and the BEA eLink for Mainframe online documentation CD.
The client program should be a standard TUXEDO program that uses After starting these products, you can issue a service request for data mapping. For information on setting up TUXEDO service requests, refer to the BEA TUXEDO documentation. The service name to call is the mainframe service being advertised.
Start BEA TUXEDO and Other Remote Applications
Write a Client Program to Create FML Buffers
FML32. All data items and occurrences specified in the FML Group Format file must be added to the FML buffer or an error will occur. If the FML Group Format file specifies an array of 10, then 10 occurrences must be added using the Fadd32 function or another appropriate function.
Issue a Service Request for Data Mapping