


|

|
|
|
|
Installing the Software
This section provides information for installing the BEA Java Adapter for Mainframe (JAM) software. After completing the tasks included in the previous section, "Preparing for Installation," install the JAM and SNA Communications Resource Manager (SNACRM) components according to your configuration requirements:
Note: Refer to the BEA WebLogic Java Adapter for Mainframe Release Notes for information on hardware and software requirements. For additional operational and administrative information on the SNACRM, refer to the SNACRM Administration Guide.
Installation topics are grouped by platform, and by component (JAM or SNACRM) if the component installations differ for particular platforms.
This section includes the following topics:
Installing the Software on a Non-Mainframe Unix-based Platform
Both the JAM and the SNACRM components are installed on non-mainframe Unix-based platforms with the install.sh script. You will select which components to install based on your configuration requirements.
To install the software on a Unix-based platform, complete the following steps:
The following listings provide examples of running this script for each of the JAM components. You will supply the values in bold during installation. To accept default values at a prompt, press Enter.
Note: The platforms, stacks, and file names shown in the following listings are examples only. These values are dependent on platform and stack configurations for your system and may vary from the example.
Listing 4-1 Sample Script for JAM Component Installation on a Unix-based Platform
cmadm@dalhpw1:/cmhome/dist/fig-4> sh install.sh

01) hp/hpux11        02) ibm/aix43        03) sun5x/sol26
04) sun5x/sol7       05) sun5x/sol8

Install which platform's files? [01-5, q to quit, l for list]: 1

** You have chosen to install from hp/hpux11 **

BEA WebLogic Java Adapter for Mainframe Release 4.1

This directory contains the BEA WebLogic Java Adapter for Mainframe 4.1
for HP-UX 11.0 on 9000/800 series.


Is this correct? [y,n,q]: y

To terminate the installation at any time
press the interrupt key,
typically <del>, <break>, or <ctrl+c>.

The following packages are available:

  1     crm             SNA Communications Resource Manager
  2     jam             BEA WebLogic Java Adapter for Mainframe

Select the package(s) you wish to install (or 'all' to install
all packages) (default: all) [?,??,q]: 2

BEA WebLogic Java Adapter for Mainframe
(9000) Release 4.1
Copyright (c) 2000 BEA Systems, Inc.
All Rights Reserved.
Distributed under license by BEA Systems, Inc.
BEA eLink is a trademark of BEA Systems, Inc.


Directory where BEA WebLogic Java Adapter for Mainframe files are to be installed
(Enter your directory path) [?,q]: /work/cmadm

Using /work/cmadm as the BEA WebLogic Java Adapter for Mainframe base directory

Determining if sufficient space is available ...
7776 blocks are required
2156958 blocks are available to /work/cmadm

Unloading /cmhome/dist/fig-4/hp/hpux11/jam/JAMJA.Z ...
bin/jsnacrm.html
bin/jsnacrm.jar
bin/moncrm.jar
bin/moncrm.x509
classdocs/jamdoc.jar
examples/samples.jar
lib/ebase.jar
lib/jam.jar
7710 blocks
... finished

Changing file permissions...
... finished

Installation of BEA WebLogic Java Adapter for Mainframe was successful

The following packages are available:

  1     crm             SNA Communications Resource Manager
  2     jam             BEA WebLogic Java Adapter for Mainframe

Select the package(s) you wish to install (or 'all' to install
all packages) (default: all) [?,??,q]: q

Installation terminated
cmadm@dalhpw1:/cmhome/dist/fig-4>
Listing 4-2 Sample Script for SNACRM Component Installation on a Unix-Based Platform
cmadm@dalhpw1:/cmhome/dist/fig-4> sh install.sh

01) hp/hpux11        02) ibm/aix43        03) sun5x/sol26
04) sun5x/sol7       05) sun5x/sol8

Install which platform's files? [01-5, q to quit, l for list]: 1

** You have chosen to install from hp/hpux11 **

BEA WebLogic Java Adapter for Mainframe Release 4.1

This directory contains the BEA WebLogic Java Adapter for Mainframe 4.1
for HP-UX 11.0 on 9000/800 series.

Is this correct? [y,n,q]: y

To terminate the installation at any time
press the interrupt key,
typically <del>, <break>, or <ctrl+c>.

The following packages are available:

  1     crm             SNA Communications Resource Manager
  2     jam             BEA WebLogic Java Adapter for Mainframe

Select the package(s) you wish to install (or 'all' to install
all packages) (default: all) [?,??,q]: 1

SNA Communications Resource Manager
(9000) Release 1.2
Copyright (c) 2000 BEA Systems, Inc.
All Rights Reserved.
Distributed under license by BEA Systems, Inc.
BEA eLink is a trademark of BEA Systems, Inc.

Directory where SNA Communications Resource Manager files are to be installed
(Enter your directory path) [?,q]: /work/cmadm

Using /work/cmadm as the SNA Communications Resource Manager base directory

The following CRM stack support options are available:

  1     hp60            SNA plus2 v6.0

Select an option [?,??,q]: 1

Determining if sufficient space is available ...
21828 blocks are required
2156958 blocks are available to /work/cmadm

Unloading /cmhome/dist/fig-4/hp/hpux11/crm/CRMSA.Z ...
bin/CRMLOGS
bin/SNACRM
bin/bealogo.gif
bin/crmdown
bin/crmlkoff
bin/crmlkon
bin/hpux.env
lib/fmb.def
lib/libbuft.sl
lib/libcsxappc.sl
lib/libcsxcrm.sl
lib/libcsxgpw.sl
lib/libcsxscrm.sl
lib/libcsxxcrm.sl
lib/libcsxxfm.sl
lib/libcsxxmw.sl
lib/libctxdebugs_12.sl
lib/libctxmess_12.sl
lib/libctxos_12.sl
lib/libctxplat_12.sl
lib/libctxprim_12.sl
lib/libfml.sl
lib/libfml32.sl
lib/libgp.sl
lib/libgpnet.sl
lib/libtux.sl
lib/libtux2.sl
21370 blocks
... finished

Unloading /cmhome/dist/fig-4/hp/hpux11/crm/STKSA.Z ...
lib/libcsxhp60.sl
1610 blocks
... finished

Changing file permissions...
... finished

Installation of SNA Communications Resource Manager was successful

The following packages are available:

  1     crm             SNA Communications Resource Manager
  2     jam             BEA WebLogic Java Adapter for Mainframe

Select the package(s) you wish to install (or 'all' to install
all packages) (default: all) [?,??,q]: q

Installation terminated
cmadm@dalhpw1:/cmhome/dist/fig-4>
Installing the SNACRM Component on an OS/390 Unix Platform
The following steps install the SNACRM on an OS/390 Unix platform. This installation is for a distributed configuration where the SNACRM resides on the mainframe in an OS/390 environment.
Note: This procedure assumes the installer is familiar with File Transfer Protocol (FTP) functions.
tar xvfo os390.tar
Executing the tar command extracts the install.sh script and subdirectories containing the software to be installed from the tar file.
sh install.sh
The installation script prompts you for responses. Listing 4-3 is a sample installation. It shows the installation of the SNACRM only in a distributed configuration on an OS/390 mainframe platform. User responses are in bold.
Listing 4-3 Sample Script for SNACRM Component Installation on an OS/390 Unix Platform
igor:/bea/loads/dist/fig-4: >sh install.sh

01) os390/os390r8

Install which platform's files? [01-      1 , q to quit, l for list]: 1

** You have chosen to install from os390/os390r8 **

BEA eLink SNA Communications Resource Manager Release 1.2

This directory contains the BEA eLink SNA Communications Resource Manager 1.2
for IBM OS/390 Unix R8 on IBM OS/390.

Is this correct? [y,n,q]: y

To terminate the installation at any time
press the interrupt key,
typically <del>, <break>, or <ctrl+c>.

The following packages are available:

  1     crm             SNA Communications Resource Manager

Select the package(s) you wish to install (or 'all' to install
all packages) (default: all) [?,??,q]:

SNA Communications Resource Manager
(OS390) Release 1.2
Copyright (c) 2000 BEA Systems, Inc.
All Rights Reserved.
Distributed under license by BEA Systems, Inc.
BEA eLink is a trademark of BEA Systems, Inc.

Directory where SNA Communications Resource Manager files are to be installed
(Enter your directory path) [?,q]: /u/igor

Using /u/igor as the SNA Communications Resource Manager base directory
Usage: expr expression

The following CRM stack support options are available:

  1     vtm28 OpenEdition MVS 390               vtm28 OpenEdition MVS 390

Select an option [?,??,q]: 1

Determining if sufficient space is available ...
68000 blocks are required
270552 blocks are available to /u/igor

Unloading /bea/loads/dist/fig-4/os390/os390r8/crm/CRMSA.Z ...
6800 blocks
x bin/CRMLOGS
x bin/SNACRM
x bin/crmdown
x bin/crmlkoff
x bin/crmlkon
x bin/uss.env
x lib/csxappc.dll
x lib/csxcrm.dll
x lib/csxgpw.dll
x lib/csxscrm.dll
x lib/csxxcrm.dll
x lib/csxxfm.dll
x lib/csxxmw.dll
x lib/ctxdebugs_12.dll
x lib/ctxmess_12.dll
x lib/ctxos_12.dll
x lib/ctxplat_12.dll
x lib/ctxprim_12.dll
x lib/fmb.def
x lib/libbuft.dll
x lib/libfml.dll
x lib/libfml32.dll
x lib/libgp40.dll
x lib/libgpnet.dll
x lib/libtux.dll
x lib/libtux2.dll
... finished

Unloading /bea/loads/dist/fig-4/os390/os390r8/crm/STKSA.Z ...
241 blocks
x lib/csxvtm28.dll
... finished

Changing file permissions...
... finished

Installation of SNA Communications Resource Manager was successful

Please don't forget to fill out and send in your registration card
igor:/bea/loads/dist/fig-4: >
Installing the SNACRM Component on an OS/390 MVS Platform
This section explains how to install the SNACRM component on an OS/390 Multiple Virtual Storage (MVS) platform. This installation is for a distributed configuration where the SNACRM resides on the mainframe in an OS/390 MVS environment.
Summary of Installation Tasks
The following list is a summary of the tasks detailed in "Installation Procedure":
Note: The installation process assumes the installer is familiar with Job Control Language (JCL) job operations and File Transfer Protocol (FTP) functions.
The installation for this environment is semi-automated. Two JCL files are provided to facilitate prerequisites for allocating data sets in the MVS environment and to unload JAM product software into the allocated data sets.
The product CD-ROM contains the following files relating to this installation procedure:
Perform the following steps to install the SNACRM component on an OS/390 MVS platform:
README
dsupload.jcl
install.jcl
Use the SET statements in the DSUPLOAD job to set the high-level qualifiers of the receiving datasets.
SET BEAHLQ=[QUALIFIER]
Where [DATASET] is a high-level qualifier used to create the data sets.
The DSUPLOAD job has the following steps:
DELOLD
Deletes any existing data sets previously created so you can run this JCL multiple times, if necessary. To run this step, remove the RESTART parameter in the job information.
CREATE
Allocates the initial data sets needed to receive the product software files.
Table 4-1 MVS Installation Product Files and DD Name Data Sets
|
Product File |
Set Statement |
Your Dataset Name |
|---|---|---|
|
JAM41.LOAD |
BEAHLQ |
.LOAD |
|
JAM41.DATA |
BEAHLQ |
.DATA |
|
JAM41.SAMPLE |
BEAHLQ |
.SAMPLE |
Example of a PUT command:
PUT JAM41.LOAD 'BEA.JAM41.LOAD'
Transfer the data sets using the put command.
Use the SET statements to alter the job for your environment.
SET SMSHLQ=[QUALIFIER]
Where [QUALIFIER] is the high-level qualifier for the SNACRM Load Library. The load library containing the JAM41.LOAD program objects must be a Partitioned Data Set with Extended attributes (PDSE). The PDSE minimally must have storage class SMS declaration for OS/390 v2.8.
SET HLQ=[QUALIFIER]
Where [QUALIFIER] is the high-level qualifier for the sample and data datasets. These are standard PDS.
SET SCLASS=[CLASS NAME]
Where [CLASS NAME] is the storage class name of the PDSE. This is required for OS/390 v2.8.
The INSTALL job has the following steps:
DELOLD
Deletes any existing data sets created by the INSTALL job so you can run this JCL multiple times, if necessary. To run this step, remove the RESTART parameter in the job information.
CREATE
Creates the MVS data sets for you.
This step includes the minimal JCL needed to create the data sets for OS/390 v2.8. You may change the JCL to reflect your own environment.
Use the following table as a worksheet to fill out the names of the datasets created in this step.
Table 4-2 Set Statements and Corresponding Datasets
|
Set Statement |
Your Dataset Name |
|---|---|
|
SMSHLQ |
.LOAD |
|
BEAHLQ |
.DATA |
|
BEAHLQ |
.SAMPLE |
TSO RECEIVE INDS(`xxx')
When prompted, enter:
DA("yyy")where:
Installing the Software on a Windows NT Platform
Complete the following steps to install the JAM software on a Windows NT system.
Figure 4-1 Welcome Screen

Figure 4-2 BEA Software License Agreement
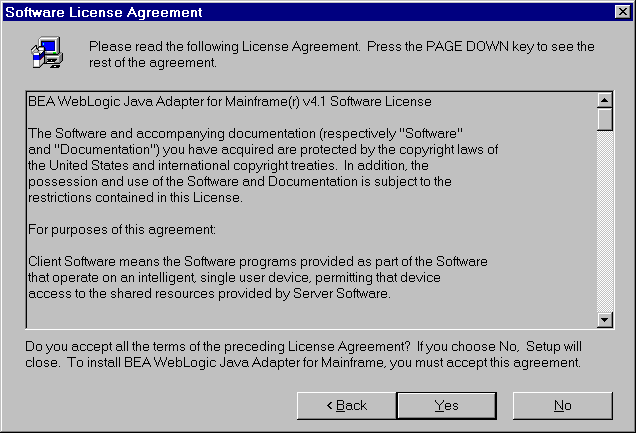
Figure 4-3 User Information Screen

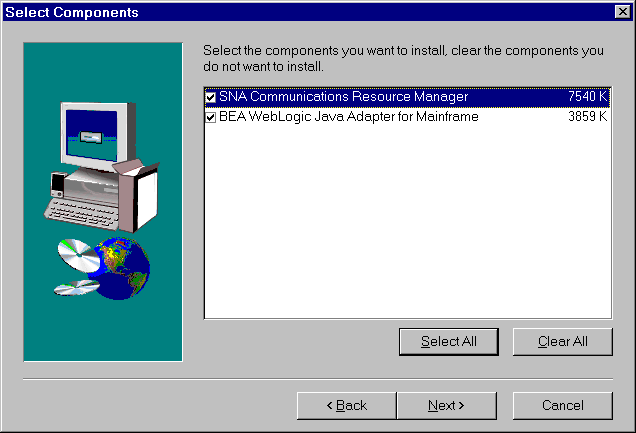
Figure 4-4 Select Components Screen
Note: The Choose Destination Location screen will display for each component you select to install.
Figure 4-5 Choose Destination Location Screen
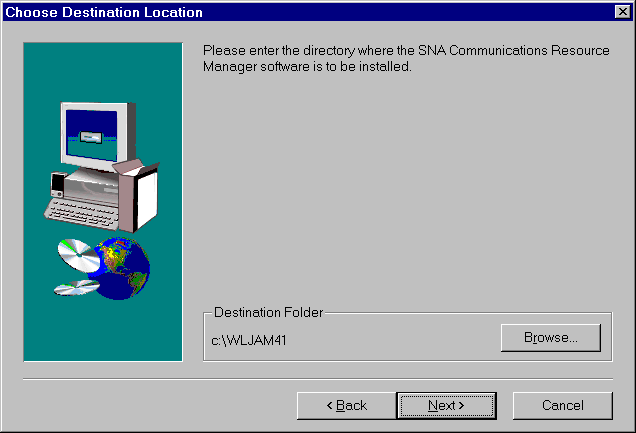
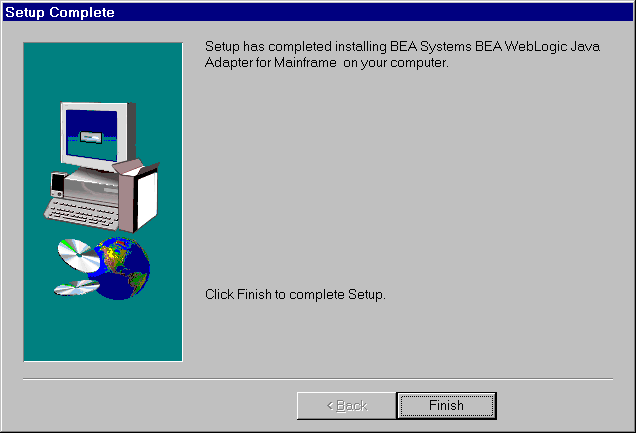
Figure 4-6 Setup Complete Screen
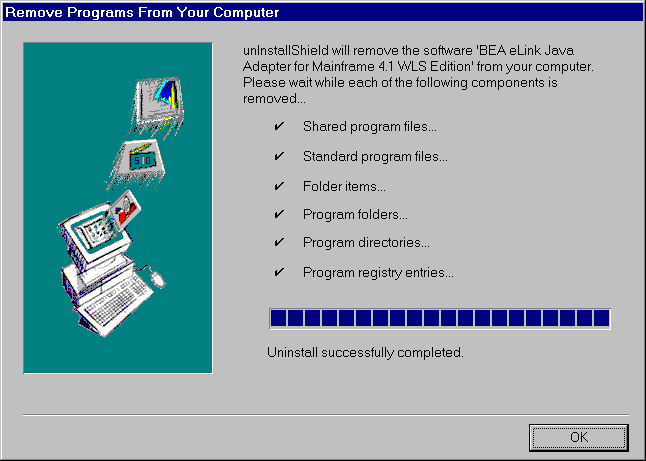
Uninstalling Java Adapter for Mainframe on Windows NT
Complete the following steps to uninstall JAM on a Windows NT system.
Figure 4-7 Remove Programs From Your Computer Screen
Verifying Installation Files and Directories
The JAM CD-ROM contains the following libraries and executable programs for each of the following installation scenarios and their supported platforms. After installing the JAM software, verify that these libraries and programs are installed on your system.
JAM Installation
All directories are relative to the installation directory. Platform specific stack abstraction libraries are included in these tables as well.
Solaris
Verify that the following JAM files are installed by the JAM software:
Table 4-3 Solaris Installation Files and Directories
|
Directory |
Files |
|---|---|
|
bin |
jsnacrm.html |
|
lib |
jam.jar |
|
classdocs |
jamdocs.jar |
|
examples |
samples.jar |
Verify that the following JAM files are installed by the JAM software:
Table 4-4 HP-UX Installation Files and Directories
|
Directory |
Files |
|---|---|
|
bin |
jsnacrm.html |
|
lib |
jam.jar |
|
classdocs |
jamdocs.jar |
Verify that the following JAM files are installed by the JAM software:
Table 4-5 HP-UX Installation Files and Directories
|
Directory |
Files |
|---|---|
|
bin |
jsnacrm.html |
|
lib |
jam.jar |
|
classdocs |
jamdocs.jar |
Verify that the following JAM files are installed by the JAM software:
Table 4-6 Windows NT Installation Files and Directories
|
Directory |
Files |
|---|---|
|
bin |
jsnacrm.html |
|
lib |
jam.jar |
|
classdocs |
jamdocs.jar |
Examples Directories and Files
The following directories and files are included in the examples installation directory. These files are used in examples described in the BEA WebLogic Java Adapter for Mainframe User Guide.
|
Directory |
Files |
|---|---|
|
examples/common |
CICS.RDO |
|
examples/servlet |
README |
|
examples/ejb |
README |
|
examples/standalone |
README |
|
examples/inbound/loopback |
README |
|
examples/inbound/TDQueue |
README |
Distributed SNACRM Installation
Verify that the following SNACRM platform files are installed on your system.
All directories are relative to the specified installation directory. Also included are the eLink Platform libraries that will ship with the standalone SNACRM. For encryption purposes, the libgp that is shipped will be the one enabled for 40-bit encryption.
Solaris
Verify that the following SNACRM platform files are installed by the JAM software:.
|
Directory |
Files |
|---|---|
|
bin |
CRMLOGS |
|
lib |
fmb.def |
HP-UX
Verify that the following SNACRM platform files are installed by the JAM software.
|
Directory |
Files |
|---|---|
|
bin |
CRMLOGS |
|
lib |
fmb.def |
OS/390 Unix
Verify that the following SNACRM platform files are installed by the JAM software.
|
Directory |
Files |
|---|---|
|
bin |
crmlkoff |
|
lib |
fmb.def |
OS/390 MVS
Verify that the following SNACRM platform files are installed by the JAM software.
|
Directory |
Files |
|---|---|
|
misc |
README |
|
load library |
CRMLOGS |
|
data library |
FMB |
|
sample library |
SNACRM |
Windows NT
Verify that the following SNACRM platform files are installed by the JAM software
.
|
Directory |
Files |
|---|---|
|
bin |
bealogo.gif |
|
lib |
fmb.def |
Setting Up the License Key
After you install the JAM software, you need to set up your license key. As a prerequisite for using the JAM license key, WebLogic Server and the WebLogic Process Integrator must be installed and operational. The license files for WebLogic Server and WebLogic Process Integrator are XML-based and reside in the server/license directory in your WebLogic Process Integrator installation. The WebLogic Server license file is WebLogicLicense.xml. You must append the license key for the JAM software to the BEA license file, license.bea, to enable the connection capabilities for your system. Refer to your BEA WebLogic Server and BEA WebLogic Process Integrator documentation for more information about their respective license files.
Note: If you are not integrating with WebLogic Process Integrator, disregard instructions and examples pertaining to WebLogic Process Integrator.
The directory where the BEA license file resides is specified by one of the following:
java.system.property.bea.home=<directory containing license.bea file>
In addition to appending the JAM license key, you must place a set of JAM jar files in your CLASSPATH so that the JAM software can be used.
Appending the License Key to the BEA License File
To enable the JAM license key, you must append the license key file provided with the JAM product software to the BEA license file (license.bea). This can be done automatically by answering a query at JAM installation time, or it can be done manually as shown in the steps below.
Caution: Do not alter any information within sections of the license key files. This is a violation of the BEA Systems licensing agreement. Doing so may disable JAM and/or additional components.
Perform the following steps to use the license key.
Listing 13 Sample BEA License File
<!--
! license.bea
!BEA product software license file.
!-->

<bea-licenses>

   <license-group
   format="1.0"
   product="wlpi"
   release="1.0">

        <license
        component="WebLogic Process Integrator"
        expiraton="2001-12-31"
        id="001-0001-02A
        licensee="Sally GoodUser"
        type="normal"
        users="200"
        cpus="10"
        ip="*"
        signature="MCwC88hbwQK9aANkMvdkworeigNr"
        />

    </license-group>
</bea-licenses>
Listing 14 Sample BEA License File with JAM License Key Appended
<!--
! license.bea
!BEA product software license file.
!-->

<bea-licenses>

   <license-group
   format="1.0"
   product="wlpi"
   release="1.0">

        <license
        component="WebLogic Process Integrator"
        expiraton="2001-12-31"
        id="001-0001-02A
        licensee="Sally GoodUer"
        type="normal"
        users="200"
        cpus="10"
        ip="*"
        signature="MCwC88hbwQK9aANkMvdkworeigNr"
        />

   </license-group>
   <license-group
   format="1.0"
   product="jam"
   release="4.1">

        <license
        component="JAM CRM Gateway"
        expiraton="2001-12-31"
        id="001-0001-01A
        licensee="Sally GoodUer"
        type="normal"
        users="200"
        cpus="10"
        ip="*"
        signature="ABCQ6d9AhRd4dTUYHuLM72"
        />

   </license-group>
</bea-licenses>
Setting the CLASSPATH
The following JAM jar files should be placed on the CLASSPATH in order for the JAM license key and JAM to work:

|

|
|
|
|
Copyright © 2000 BEA Systems, Inc. All rights reserved.
|