


|

|
|
|
|
Integrating JAM with Crossplex
This section contains a scenario that shows how to develop a single service servlet-based application that invokes a CrossPlex script on the mainframe. Similar techniques may be used to interface to other third-party products. Because CrossPlex requires the use of a record header that should not be presented on a browser page, some DataView manipulation will be required.
This scenario is based on the general procedures presented in Developing Java Applications, It gives practical examples for using JAM tools, presented as tasks with step-by-step procedures. This scenario depicts the development of a new application. All discussions are from the application developer's point of view, presume a properly installed and configured environment, and presume an appropriate mainframe application is available.
Note: Although the sample code in this section represents typical applications, it is intended for example only and is not supported for actual use.
The following tasks are required to invoke a CrossPlex script on the mainframe:
Task 1: Create a CrossPlex Script
A CrossPlex script provides the business logic to execute one or more 3270 transactions running on the mainframe. Transactions in any VTAM system, such as CICS or IMS, can be accessed. When a script executes in CrossPlex, it usually requires some input data, such as customer number, part number, etc. This inbound data is passed from your application in a container called a record definition.
During execution, a script will select and optionally reformat data from the screen displays of the executed 3270 transactions. This selected data will be returned to your application in an outbound record definition.
Note: Record definitions do not necessarily conform to any known data record in a file. A record definition is simply a description of a series of data fields being passed to and from a script.
Record definitions are created with the CrossPlex development system. An online editor is used to define each field in the record, along with its length and type (alpha, numeric, binary, packed). A single record definition may be used for both inbound and outbound data, or two definitions may be used.
Another of the CrossPlex development tools will create a COBOL copybook, using a record definition as input. The generated copybook is stored in a PDS member, where it can be copied into your application program as needed.
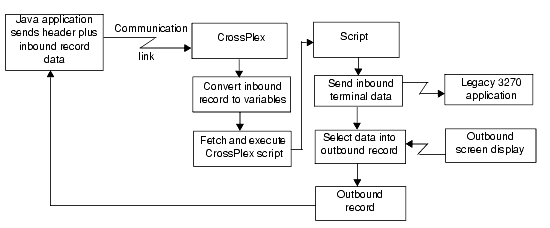
Figure 12-1 illustrates the processing flow from the JAM front end to retrieve data from one or more mainframe transactions.
Figure 12-1 Processing Flow from JAM to Mainframe Transactions
Step 1: Prepare Inbound Record Definition
Assign a record name and description, then define each data field to be passed to the CrossPlex script. The process of defining a record definition is described in detail in the CrossPlex Middleware Programmer's Guide.
To illustrate, assume the mainframe application is a simple name/address display, which requires a customer number and company number as input. For this example, the inbound and outbound record definition will be different, though the same record definition can be used for both. Figure 12-2 shows how the inbound record would appear.
Figure 12-2 Inbound record illustration
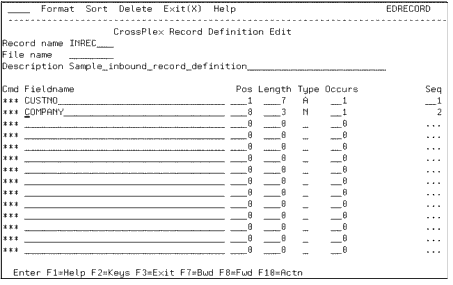
The inbound data required by the mainframe transaction is CUSTNO, a seven-byte alphanumeric field beginning in position one of the record, and COMPANY, a three-byte numeric field beginning in position eight.
Step 2: Create a Copybook of the Inbound Record Definition
Store the generated copybook in a PDS member where you can easily copy it to your development system. For a complete description of the process of creating a COBOL Copybook from a record definition, refer to the CrossPlex Middleware Programmer's Guide.
Continuing with the same example, a COBOL copybook generated from the previously illustrated record definition, INREC, would appear as follows:
*****************************************************************
*	INREC		- Sample inbound record definition		*
*****************************************************************
  01	INREC-START.
	05	INREC-CUSTNO		PIC X(007).
	05	INREC-COMPANY		PIC 9(003).
Step 3: Create an Outbound Record Definition and Copybook
If the outbound data is to use a different record format from the inbound, repeat steps 1 and 2 to prepare the outbound record definition and copybook.
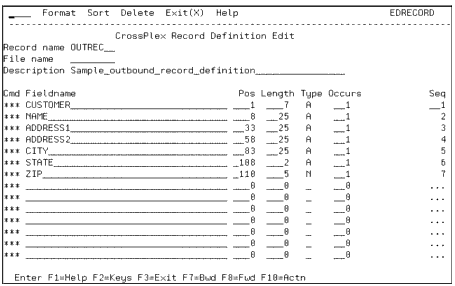
For this example, the outbound record definition and copybook would appear as in Figure 12-3.
Figure 12-3 Outbound Record Definition
*****************************************************************
*	OUTREC		- Sample outbound record definition		*
*****************************************************************
  01	OUTREC-START.
	05	OUTREC-CUSTOMER		PIC X(007).
	05	OUTREC-NAME		PIC X(025).
	05	OUTREC-ADDRESS1		PIC X(025).
	05	OUTREC-ADDRESS2		PIC X(025).
	05	OUTREC-CITY		PIC X(025).
	05	OUTREC-STATE		PIC X(002).
	05	OUTREC-ZIP		PIC 9(005).
Step 4: Prepare the CrossPlex Script
Scripts can be coded using the CrossPlex script editor, or they may be coded on any external editor and imported into the CrossPlex control file. The CrossPlex script language and the process of creating a script are described in the CrossPlex Middleware Programmer's Guide.
Note: In the CrossPlex documentation, scripts are also known as command streams and stream objects.
Prepare a script that will navigate through a series of 3270 transactions in the same manner as a terminal operator. The script acts as a virtual operator, performing a log-on to the OLTP system, sending inbound terminal data as if keyed on a keyboard, examining the returned screen display for correct execution, and selecting data from the screen if needed. Any number of transactions may be executed. The script language also provides a method of linking to a user program on the mainframe in order to perform direct retrieval of data that may not be available in a 3270 transaction display.
Continuing with the example of name/address data retrieval, the script might appear as Listing 12-1.
Listing 12-1 CrossPlex Script
        CALLCPX MSGAREA(NMAD)	Initiate transaction NMAD.
    CALLCPX ROWCOL(05023) DATA(&CUSTNO)	Send CUSTNO to row 5 col 23.
        IF ROWCOL(24021) EQ DATA(NOT ON FILE)-	Verify customer record found
            GOTO(NOTFOUND)
        SELECT RECORD(OUTREC) -	Select data from outbound
            ROWCOL(05023) RFIELD(CUSTNO) -	screen into remaining
            ROWCOL(06023) RFIELD(NAME) -	record fields.
            ROWCOL(07023) RFIELD(ADDR1) -
            ROWCOL(08023) RFIELD(ADDR2) -
            ROWCOL(09023) RFIELD(CITY) -
            ROWCOL(10023) RFIELD(STATE) -
            ROWCOL(11023) RFIELD(ZIP)
        GOTO(ENDJOB)	Skip following error routine
NOTFOUND	Enter if customer not found
        SELECT RECORD(OUTREC) -	Move zeros to customer number
            DATA(0000000) RFIELD(CUSTNO)
ENDJOB	Enter or fall through
        CALLCPX AID(PF3)	Terminate NMAD transaction
Note: This example illustrates row/column addressing of screen data. CrossPlex also provides a method of assigning screen field names to avoid specific row/column references
Step 5: Test and Debug the Script
You can fully test and debug the script that will execute on the mainframe without connecting it to your front-end application. CrossPlex provides a variety of execution and debugging tools to ensure the back-end portion of your application is operating properly.
Once you are satisfied that the script is doing what you want and the returned data is correct, proceed to prepare the front-end of your application and connect the two together.
The process of testing and debugging a script is described in the CrossPlex Middleware Programmer's Guide.
Handling the Mainframe Sign-on
Most VTAM systems require the user to sign-on in the target region when first connecting. This is also true when connecting to a target region with CrossPlex. This sign-on requirement can be handled in any one of the following ways:
The most common situation, especially for CICS, requires that your script handle the sign-on. Many users have CICS configured so that upon the first connection, the terminal is presented with a sign-on panel that may have been customized for the installation. If this is the case, the first CALLCPX command of the script returns the sign-on screen to the script and a subsequent CALLCPX must send a valid user ID and password. The mainframe sign-in is discussed in the CrossPlex Middleware Programmer's Guide.
Supplying a valid user ID and password in the CrossPlex header will cause CrossPlex to perform a short-form sign-on before sending the first transaction data from the script.
Note: This is valid for CICS systems only, and is installation dependent.
The short-form CICS sign-on may be disabled, depending on the user's CICS configuration. This is discussed in the CrossPlex Middleware Programmer's Guide.
With this technique, several FEPI virtual terminals are logged-on when CICS is first started and they remain active until CICS is recycled. If this is done, scripts do not need to be concerned with doing a sign-on at all. This is discussed in the CrossPlex Web Enabling Guide.
Task 2: Use eGen COBOL to Create a Base Application
Copy the CrossPlex COBOL copybooks to your development system. This includes the copybook for the CrossPlex header (CSMF), the script invocation record definition (in this case INREC), and the script result record definition (in this case OUTREC). This scenario requires that you generate four DataView classes from these three copybooks, by merging them in the correct pattern. Table 12-1 lists the four DataView classes created from the three copybooks.
Table 12-1 Merge Pattern for DataView Classes
|
Purpose |
Copybook(s) used |
Combined Copybook Name |
|---|---|---|
|
Initial form for presentation on browser |
INREC |
INREC |
|
Record sent to mainframe |
CSMF + INREC |
INREC-H |
|
Result returned from mainframe |
CSMF + OUTREC |
OUTREC-H |
|
Result presented to user |
OUTREC |
OUTREC |
When your application calls CrossPlex to retrieve data from the mainframe, it must pass a 256-byte header (CSMF), followed by the inbound record area (INREC). The data selected in the script will be returned in the outbound record area (OUTREC), which occupies the same memory address as the inbound record, immediately following the header.
The CrossPlex header is described in the CrossPlex Middleware Programmer's Guide. Three copybooks are distributed to describe this area. A COBOL version called XPLXCBL is available, as well as a C version (XPLXC) and an Assembler version (XPLXASM).
In addition to the required fields listed in Standardized Message Format, two additional fields must be supplied by your application. These are:
|
XP-EXECUTING-SCRIPT |
The name of the CrossPlex script to execute. |
|
XP-INBOUND-RECORD |
The name of the inbound record definition. |
|
XP-MODE |
Operating mode. Must contain CMDR to execute a script with a record definition as input. |
The outbound record definition is named in a SELECT statement within the script.
Immediately following the header, the inbound and outbound record area must be defined. Since they occupy the same position, the outbound record area should redefine the inbound. The area must appear at field XP-MESSAGE-AREA in the header copybook.
Listing 12-2 shows the COBOL version of the header copybook.
Listing 12-2 COBOL Version of Header Copybook
*****************************************************************
*                                                               *
*         XPLXCBL - CROSSPLEX STANDARDIZED MESSAGE FORMAT       *
*                      COBOL VERSION                           *
*                                                               *
*****************************************************************
 01  XP-COMMAREA.
     05  XP-COMMAND                PIC X(4).
     05  XP-RESPONSE               PIC S9(8).
     05  XP-EXCEP-DATA.
         10  XP-EXECP-ROWCOL       PIC S9(4) COMP.
         10  XP-EXCEP-LENGTH       PIC S9(4) COMP.
         10  XP-FLD-ERR            PIC S9(4) COMP.
         10  XP-EXCEP-MSG-FIELD    PIC S9(4) COMP.
         10  XP-EXCEP-FEPI         PIC X(4).
         10  XP-EXCEP-EIBRESP      PIC S9(8) COMP.
         10  XP-EXCEP-EIBRESP2     PIC S9(8) COMP.
     05  XP-OPTIONAL-PARMLIST      PIC S9(8) COMP.
     05  XP-TARGET                 PIC X(8).
     05  XP-POOL                   PIC X(8).
     05  XP-AIDBYTE                PIC X(6).
     05  XP-INSCREEN               PIC X(8).
     05  XP-OUTSCREN               PIC X(8).
     05  XP-CURSOR.
         10  XP-CURSOR-ROW         PIC S9(4).
         10  XP-CURSOR-COL         PIC S9(4).
     05  XP-SIGNON-USERID          PIC X(8).
     05  XP-SIGNON-PASSWORD        PIC X(8).
     05  XP-NODENAME               PIC X(8).
     05  XP-FEPI-CONVID            PIC X(8).
     05  XP-DEBUG-QUEUE            PIC X(8).
     05  XP-ASSOC-NAME             PIC X(8).
     05  XP-MODE                   PIC X(4).
         88  XP-HTML               VALUE 'HTML'.
         88  XP-HTQS               VALUE 'HTQS'.
         88  XP-3270               VALUE '3270'.
         88  XP-CMDS               VALUE 'CMDS'.
         88  XP-CMDR               VALUE 'CMDR'.
     05  XP-TRANSLATION-SCREEN     PIC X(8).
     05  XP-IN-LENGTH              PIC S9(4).
     05  XP-AREA-LENGTH            PIC S9(4).
     05  XP-OUT-LENGTH             PIC S9(4).
     05  XP-TERM-OPTION            PIC X(1).
         88  XP-NOTERM             VALUE 'N'.
     05  XP-USD-OPTION            PIC X(1).
         88  UNSOLICITED-DATA-EXPECTED  VALUE 'N'.
     05  XP-USD-WAIT-TIME         PIC S9(4) COMP.
     05  FILLER                   PIC X(36).
     05  XP-EXECUTING-SCRIPT      PIC X(8).
     05  XP-FEPI-TIMEOUT          PIC S9(4) COMP.
     05  FILLER                   PIC X(15).
     05  XP-INBOUND-RECORD        PIC X(8).
     05  FILLER                   PIC X(41).
     05  XP-MESSAGE-AREA.
Step 1: Prepare eGen COBOL Script
In Listing 12-3, the DataViews are generated from the combined copybooks.
Listing 12-3 Basic eGen COBOL Script
view InrecRecord from INREC.cbl
view InrecHdrRecord from INREC-H.cbl
view OutrecRecord from OUTREC.cbl
view OutrecHdrRecord from OUTREC-H.cbl
Step 2: Add Service Entry
Add the single line service entry in Listing 12-4 for the CrossPlex operation. This will specify the DataView.
Listing 12-4 Service Names Associated with Input and Output Views
service DoIt accepts InrecHdrRecord returns OutrecHdrRecord
Step 3: Add Page Declarations in eGen COBOL Script
This application requires two pages: one to invoke the operation and another to present the results. Note that the full records (with header) are mentioned, even though these are not displayed. This is corrected in the custom code written later in the scenario.
Listing 12-5 Page Declaration Associating Display Buttons with Services
page page1 "Invoke Operation" {
view InrecHdrRecord
	buttons {
		"doit" service(DoIt) shows resultPage
	}
}
page resultPage "Results of Operation" {
	view OutrecHdrRecord
	buttons {
             // No buttons on this page.
	}
}
Step 4: Add Servlet Name
As shown in Listing 12-6, BaseServlet is the servlet name to be registered as a URL in the WebLogic Server properties file. (Every servlet requires a URL to be registered this way. Refer to WebLogic Server documentation about deploying servlets for more specific information.) Here, the page "page1" is to be displayed when the servlet "BaseServlet" is invoked.
Listing 12-6 Add Servlet Name
servlet BaseServlet shows page1
The script is then saved as crossplex.egen.
Step 5: Generate the Java Source Code
In Listing 12-7, invoke the eGen COBOL code generator to create the base application that is then compiled. This makes class files (*.class) available for servlet customizing. CLASSPATH should include the WebLogic Server subdirectories and the jam.jar file; otherwise, the compile fails. You can create a script file containing the eGen COBOL command line, along with the javac command to make the invocation easier.
Listing 12-7 Generating the Java Source Code
java com.bea.jam.egen.EgenCobol emprec.egen
ls *.java
	InrecRecord.java BarHdrRecord.java	 QuxRecord.java
	OutrecHdrRecord.java BaseServlet.java
Task 3: Create Your Custom Application from the Base Application
The preferred customizing method is to derive a custom class from the generated base application. In this case, we will subclass the generated servlet code to both change record formats and manipulate CrossPlex header fields.
Step 1: Start with Imports
In Listing 12-8, BigDecimal supports COMP-3 packed data. HttpSession is available for saving limited state. DataView is the base for all generated data records.
Listing 12-8 Using Imports to Start Creating the Custom Application
import java.util.Hashtable;
import javax.servlet.http.HttpSession;
import bea.dmd.dataview.DataView;
import InrecRecord;
import InrecHdrRecord;
import OutrecRecord
import OutrecHdrRecord;
Step 2: Declare the New Custom Class
Listing 12-9 shows how to extend the generated servlet. This enables regeneration of the base application without destroying customized code. Fields can be added to the copybook without disrupting the customized code.
Listing 12-9 Declaring the New Custom Class
public class customServlet
	extends BaseServlet
{
:
:
Step 3: Add Implementation for doGetSetup
In Listing 12-10, the doGetSetup ( ) function is used to ensure that the user is presented with a form reflecting the INREC record.
Listing 12-10 Add Implementation for doGetSetup
public DataView doGetSetup(DataView dv, HttpSession s){
return new InrecRecord ();
}
Step 4: Create Implementation for doPostSetup
The doPostSetup method performs operations after a button has been pressed on the form, prior to the mainframe call. In Listing 12-11, the data view passed in contains values entered into the form by the application user. This code moves the specified data into an InrecHdrRecord; then sets the header fields for the operation you wish to perform.
Listing 12-11 Create Implementation for doPostSetup
public DataView doPostSetup(DataView dv, HttpSession s)
{
	InrecHdrRecord bhr = new InrecHdrRecord();
	// Move the contents, by using a Hashtable as an intermediate holder.
	Hashtable h = new HashtableUnloader().unload(dv);
	new HashtableLoader.load(bhr);
	// Load header fields.
	bhr.getXpCommarea().setXpCommand("EXEC");
	bhr.getXpCommarea().setXpTarget("THISCICS");
	bhr.getXpCommarea().setXpPool("POOLM2");
	bhr.getXpCommarea().setXpFepiConvid(0L);
	bhr.getXpCommarea().setXpMode("CMDR");
	bhr.getXpCommarea().setXpAreaLength((short) 300);
	bhr.getXpCommarea().setXpExecutingScript("MYSCRIPT");
	bhr.getXpCommarea().setXpInboundRecord("INRECRECRD");
	return bhr;
}
The meaning of each field in the CrossPlex header is described in the CrossPlex Middleware Programmer's Guide. For most executions, the following fields must contain meaningful data:
|
COMMAND |
Contains "EXEC" to execute a script, or "TERM" to terminate a session. |
|
TARGET |
Contains the FEPI target name of the VTAM region where transactions are to be executed. |
|
POOL |
Contains the FEPI pool name for this session. |
|
ASSOC |
Instead of TARGET and POOL, a CrossPlex Association can be named, which defines the target, pool and connection type (FEPI or BRIDGE). |
|
MODE |
Must contain "CMDR" if an inbound record definition is used and a script is to be executed. |
|
AREA-LENGTH |
Contains the maximum length of MESSAGEAREA. |
|
EXECUTING-SCRIPT |
The name of the script to be executed. |
|
INBOUND-RECORD |
The name of the inbound record definition. |
|
MESSAGEAREA |
Contains the inbound record when CrossPlex is called and the outbound record upon return. |
|
USERID |
To perform a short sign-on to the target region using FEPI, supply a valid user ID in this field. |
|
PASSWORD |
Valid password if USERID is present. |
|
DEBUGQ |
Name of a debug queue where execution trace records are to be written. |
|
Upon return from CrossPlex, the following fields are supplied: |
|
|
NODENAME |
The FEPI node name used by the mainframe session. |
|
CONVID |
The FEPI conversation ID assigned to the mainframe session. |
On the first call to CrossPlex, all fields of the CSMF header must be completely initialized to their default values or filled with user data. The generated Dataview code initializes with default values. Upon return, the header contains some fields provided by CrossPlex, such as the FEPI conversation ID. If subsequent calls to CrossPlex are made for the same session, these fields must not be re-initialized, since CrossPlex needs the FEPI conversation ID to continue the same session
Step 5: Create Implementation for doPostFinal
In Listing 12-12, the doPostFinal occurs after mainframe transmission, but prior to re-display in the browser. This example moves the result OutrecHdrRecord into an OutrecRecord prior to display.
Listing 12-12 Create Implementation for doPostFinal
public DataView doPostFinal(DataView dv, HttpSession s)
{
    OutrecHdrRecord qhr = (OutrecHdrRecord) dv;
    int resp = qhr.getCommarea().getXpCommarea().getXpResponse();
    if (resp != 0  &&  resp != 12)
        throw new Error("Bad xp-response: " + resp);
OutrecRecord qr = new OutrecRecord();
	// Move the contents, by using a Hashtable as an intermediate holder.
	Hashtable h = new HashtableUnloader().unload(dv);
	new HashtableLoader.load(qr);
return qr;
}
Task 4: Update the JAM Configurations and Update WebLogic Server Properties
Update the jcrmgw.cfg file with the remote service entries shown in Listing 12-13. The Java gateway must be restarted for new services. The entries are used when the corresponding form button is pushed. The doit button triggers DoIt, which invokes XPLXSBEA. The service name must match values in the eGen COBOL script. In this example, the RNAME must match an actual CICS program name.
Listing 12-13 Remote Service Entries for Create/Read/Update/Delete
DoIt			RDOM="CICS410"
			RNAME="XPLXSBEA"
Update the weblogic.properties file with the entries shown in Listing 12-14.
Listing 12-14 Update WebLogic Server Properties File
weblogic.httpd.register.crossplex=customServlet
Task 5: Deploy Your Application
At this point, you have a basic form capable of receiving data entry, along with some static HTML code for display. The following are standard WebLogic Server servlet deployment steps:
Task 6: Use the Application
Figure 12-4 shows the default servlet with customized code displayed in an HTML facade. This type of servlet is useful for presentation, proof-of-concept, and as a test bed for development.
Figure 12-4 New Data Entry Servlet Display
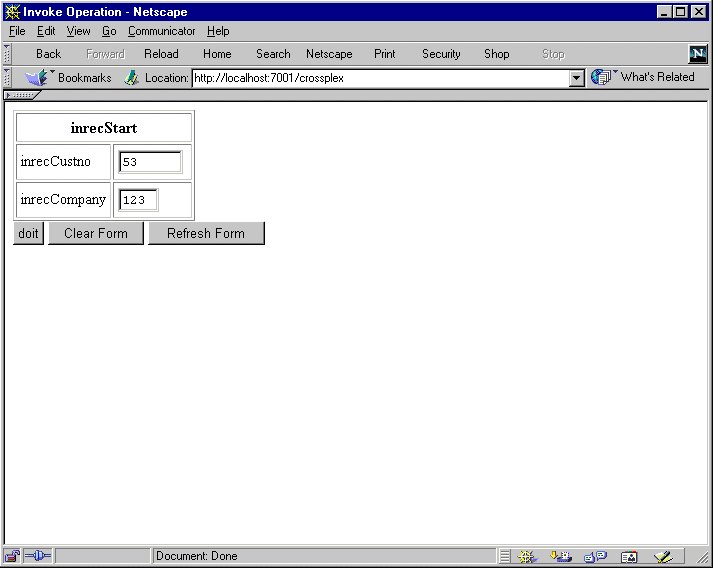
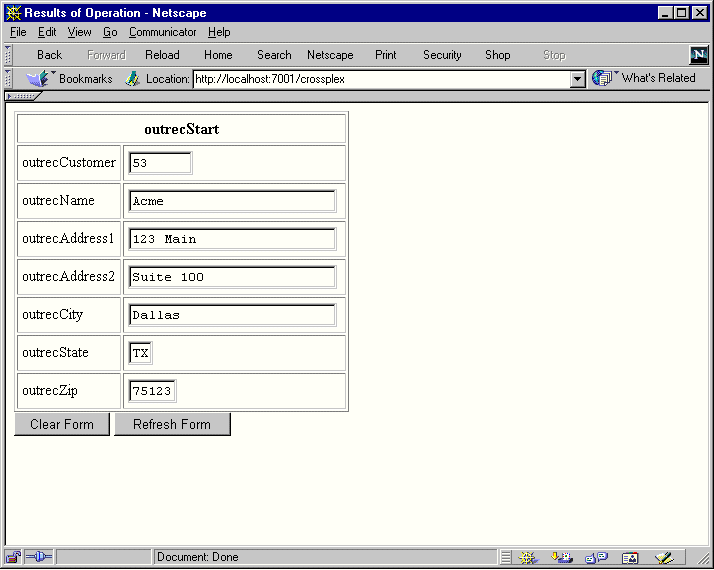
Figure 12-5 is an example of the page used for the front end of the new custom servlet.
Figure 12-5 New Data Entry Servlet Front End Page
|
|
|
Copyright © 2000 BEA Systems, Inc. All rights reserved.
|