


|

|
|
|
|
BEA WebLogic JAM JCA Adapter Guide
BEA WebLogic JAM 5.0
Date: April 2002
The WebLogic JAM JCA Adapter 5.0 is a JCA 1.0 compliant adapter which installs into the Connector Container of WebLogic Server 6.1 and provides a standard API interface to WebLogic JAM services.
The WebLogic JAM JCA Adapter implements all functionality documented in the J2EE Connector Architecture Specification Version 1.0 (JSR 016) including support for:
In addition, the following extensions are supported:
Pre-requisites
The following software must be installed prior to installing the WebLogic JAM JCA Adapter:
Installation
The WebLogic JAM JCA Adapter is delivered from the BEA Download site. The following files are installed:
This file is installed into the <JAM_INSTALL_DIR>/lib directory and must be defined in the WebLogic CLASSPATH. This file contains the classes required to run the JCA Adapter functionality with WebLogic JAM.
This file is the Resource Adapter Archive file and is installed in <JAM_INSTALL_DIR>/lib. This is the file that is deployed via the WebLogic Administration Console.
Installation of the WebLogic JAM JCA Adapter is accomplished by running the installation script using one of the following methods:
Running the GUI-Mode Installation
wljamjca_Win.exe
wljamjca_Unix.bin
Running the Console-Mode Installation
sh wljamjca_Unix.bin -i console
Install and Define the jamjca.jar
The jamjca.jar file must be defined in the WebLogic system CLASSPATH so that WebLogic JAM JCA clients running under the control of the WebLogic Connector Container have access to the classes which are not defined by standard J2EE JCA interfaces.
In addition, many of the features of the WebLogic JAM JCA Adapter require access to DataViews generated using the eGen utility. These DataViews describe the contents of a mainframe data record. It is recommended that a new directory be created in the <JAM_INSTALL_DIR> to contain these classes and that this directory be added to the system CLASSPATH.
For Windows Systems
To accomplish these changes edit the startWebLogic.cmd and make the following changes:
set JAM_HOME=<Install Directory for WebLogic JAM 5.0>
set DATAVIEW_DIR=%JAM_HOME%/DataView
set JAMJCA_JAR=%JAM_HOME%/lib/jamjca.jar
set CLASSPATH=.;.\lib\weblogic_sp.jar;.\lib\weblogic.jar;<JAM_INSTALL_DIR>\lib\jamjca.jar
Append this line of code to it.
set CLASSPATH=%CLASSPATH%;%JAMJCA_JAR%;%DATAVIEW_DIR%
For Unix Systems
To accomplish these changes edit the startWebLogic.sh and make the following changes:
export JAM_HOME=<JAM_INSTALL_DIR>
export DATAVIEW_DIR=$JAM_HOME/DataView
export JAMJCA_JAR=$JAM_HOME/lib/jamjca.jar
CLASSPATH=.:./lib/weblogic_sp.jar:./lib/weblogic.jar;<JAM_INSTALL_DIR>/lib/jamjca.jar
Append this line of code to it.
CLASSPATH=$CLASSPATH:$JAMJCA_JAR:$DATAVIEW_DIR
Deploying the WebLogic JAM JCA Adapter via the WebLogic Console
Deployment of the WebLogic JAM JCA Adapter via the WebLogic Administration Console is accomplished as follows:
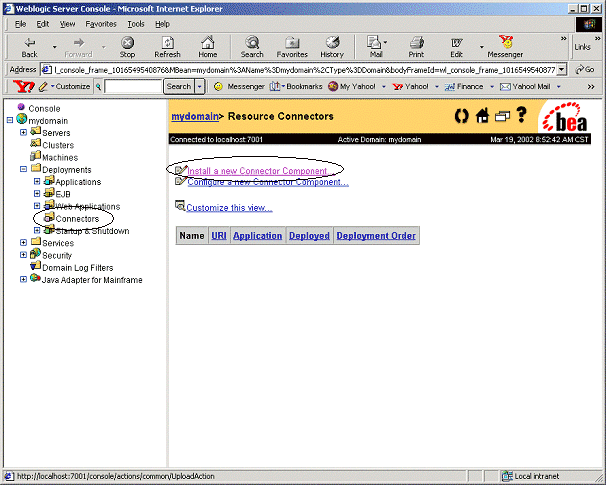
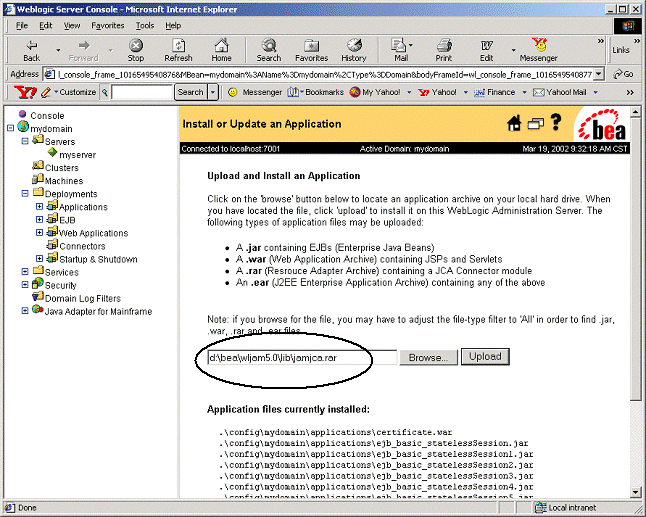
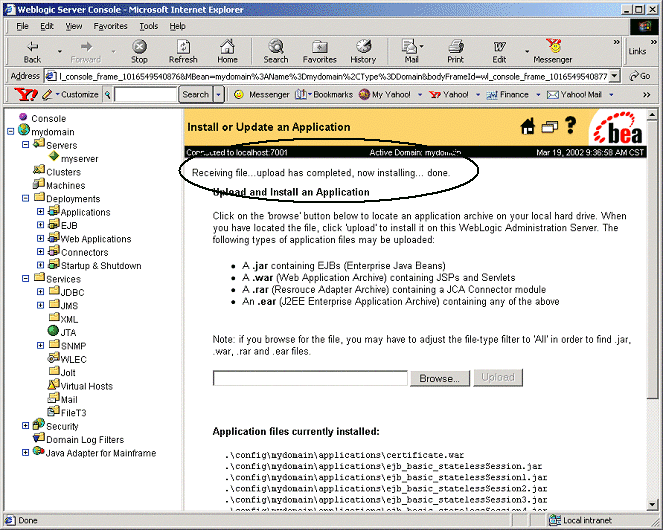
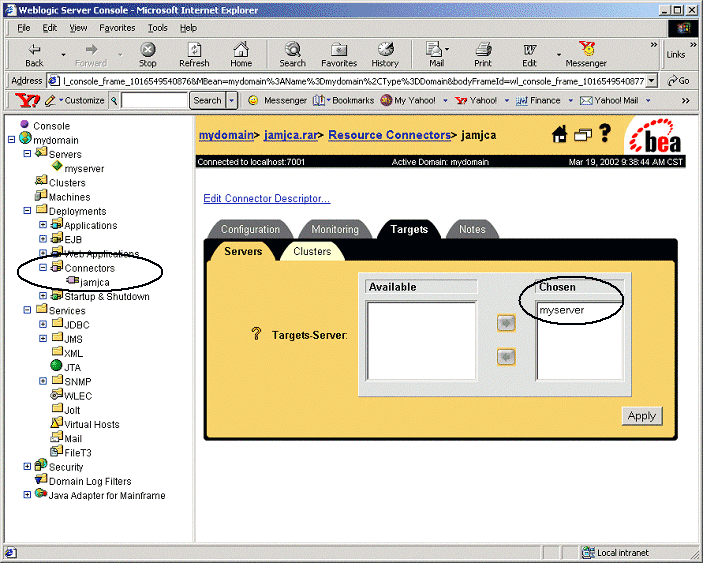
Using the WebLogic JAM JCA Adapter
WebLogic JAM JCA Adapter provides a client interface using standard JCA system contracts to access WebLogic JAM services. The following sections provide guidelines for configuration and programming with the WebLogic JAM JCA Adapter.
Configuring the JCA Adapter
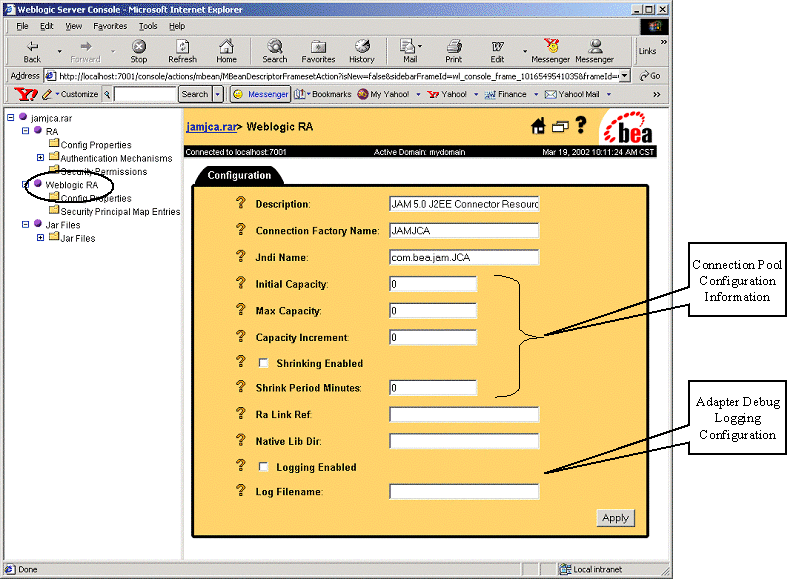
After installing the WebLogic JAM JCA Adapter, you may configure it using the Edit Connector Descriptor link of the WebLogic Administration Console. For more information on the Connector Container options in WebLogic Server, refer to the WebLogic Server documentation.
Programming Client Applications
Creating client applications which make use of the WebLogic JAM JCA Adapter follows the standard practices for all Connector clients. The general steps are:
Example Code
The following listing is simple example code which outlines the previous programming steps for a non-managed (standalone) invocation:
Listing 1 Example Programming Code
1. import javax.resource.cci.*;
2. import com.bea.jam.jca.*;
3. String url = "t3://localhost:7001";
4. ConnectionFactory fact = new ConnectionfactoryImpl(url);
5. Connection conn = fact.getConnection();
6. Interaction action = conn.createInteraction();
7. InteractionSpecImpl actionSpec = new InteractionSpecImpl();
8. actionSpec.setFunctionName("sampleRead");
9. actionSpec.setInteractionVerb(InteractionSpec.SYNC_SEND_RECEIVE);
10. RecordFactory rfact = fact.getRecordFactory();
11. XmlRecord input = new XmlRecord("EmployeeRecord");
12. MappedRecord output = rfact.createMappedRecord("EmployeeRecord");
13. String xml = "<?xml version='1.0'?><empRecord><empName><empLastName>Smith
</empLastName></empName></empRecord>";
14. input.setData(xml);
15. action.execute(actionSpec, input, output);
16. conn.close();
Record Types
The WebLogic JAM JCA Adapter supports four types of records for input and/or output when executing mainframe services:
Samples
The WebLogic JAM JCA Adapter provides two samples: a container-managed connection sample and a non-managed connection sample. These samples are in the following locations:
<JAM_INSTALL_DIR>/samples/jca/managed
<JAM_INSTALL_DIR>/samples/jca/nonmanaged
Container Managed Connections
The Container Managed sample is a simple JSP page that accesses the readSample mainframe service using the EmployeeRecord which ships as a WebLogic JAM 5.0 sample.
Building the Sample
To build the Container Managed sample using ant:
ant -DWLSDIR=d:/bea/wlserver6.1
copy EmployeeRecord*.class d:\bea\wljam5.0\DataView\.
Running the Sample
After installing the managedjca.war file, use the following HTTP URL to launch the JSP in a browser:
http://localhost:7001/managedjca/DisplayEmployee.jsp
The following page displays.

Enter a name in the Last Name field and click Submit to access the mainframe and display the returned data.
Non-Managed Connections
The non-managed JCA sample is a command line application, which runs the readSample service and displays results in various formats.
Building the Sample
To build this sample using ant:
ant -DWLSDIR=d:/bea/wlserver6.1
copy EmployeeRecord*.class d:\bea\wljam5.0\DataView\.
Running the Sample
Run the sample with the following command line format:
java DisplayEmployee <URL of WLS> <Last Name of Employee>
Running this sample does the following:
1. Obtains the JAM JCA metadata classes and displays product name, version, etc.
2. Executes the readSample service returning a MappedRecord. The first and last names are displayed from this response.
3. Executes the readSample service returning an XmlRecord. The resulting XML document displays.
Listing 2 Running Non-managed Connection Sample
java DisplayEmployee t3://localhost:7001 Last-1

Product Name: WebLogic Java Adapter for Mainframe
Product Version: 5.0
Support for J2EE Connector Version 1.0

First Name:   New-First
Last Name:    Last-1

<?xml version="1.0"?>
<empRecord>
<empSsn>1</empSsn>
<empName>
<empNameLast>Last-1</empNameLast>
<empNameFirst>New-First</empNameFirst>
<empNameMi>M</empNameMi>
</empName>
<empAddr>
<empAddrStreet>123 Main St.</empAddrStreet>
<empAddrSt>TX</empAddrSt>
<empAddrZip>775550000</empAddrZip>
</empAddr>
</empRecord>
|
|
|
Copyright © 2001 BEA Systems, Inc. All rights reserved.
|