The Kodo Management Console is used for local and remote management of MBeans. It can be used to connect to a local MBean server or multiple remote MBean servers. To connect to a local server, see Section 12.1, “Configuration”.
To start the Kodo Management Console for remote management, run the
remotejmxtool command.
The remotejmxtool accepts the
following arguments:
-connect/-c: Whether to attempt an initial connection to the remote JMX adaptor. Defaults to false.-type/-t: The type of the remote JMX adaptor. Current supported types aremx4j1,jmx2,weblogic81andjboss. Defaults tomx4j1. Integration with other JMX server implementations that support remote connectivity can be accomplished by creating a class that implements theRemoteMBeanServerFactoryinterface. In this case, thetypeshould be the fully qualified name of the implementing class.-host/-h: Hostname of the JNDI service provider where the remote JMX adaptor is registered. Defaults tolocalhost. When attempting an initial connection to WebLogic, this must be set to a hostname of the formusername:password@hostname. This is optional for JSR 160 connectors, as it may not be necessary for some connectors, and may be encoded in the JMX service URL for others.-port/-p: Port of the JNDI service provider where the remote JMX adaptor is registered. Defaults to1099when connecting to MX4J. Defaults to7001when connecting to WebLogic. This is optional for JSR 160 connectors, as it may not be necessary for some connectors, and may be encoded in the JMX service URL for others.-name/-n: For non-JSR 160 connectors, the JNDI name of the remote JMX adaptor. Defaults to a special valuedefaultwhich yields the default JNDI name appropriate for the chosen remote JMX adaptor type. For MX4J, the default isjrmp, and for JBoss, the default is the first available JMX adaptor at the specified JNDI service provider. For WebLogic, this parameter is ignored. For JSR 160 connectors, this is the JMX service URL, and defaults toservice:jmx:rmi://localhost/jndi/jmxservice. Note that this can also encode thehostandportparameters, if desired. For example, the default JMX Connector Server could be referenced byservice:jmx:rmi://localhost/jndi/rmi://localhost:1099/jmxservice. In that case, theHostandPortparameters will be ignored.
For example, to automatically connect to the MX4J remote JMX
adaptor on host myhost.mydomain.com, use the
following command:
remotejmxtool -c true -host myhost.mydomain.com
Once remotejmxtool is up, you can connect to
multiple remote JMX adaptors.
To connect to Kodo with MX4J v. 1.1.x, select
Connect to Kodo JMX... from the
File menu.
To connect to Kodo with a JSR 160 connector, select
Connect to Kodo JMX 1.2... from the
File menu.
To connect to Kodo running under WebLogic, select
Connect to Kodo via WebLogic JMX... from the
File menu.
To connect to Kodo running under JBoss, select
Connect to Kodo via JBossMX... from the
File menu.
In order to connect to WebLogic 8.1 with
remotejmxtool,
the following requirements must be met:
remotejmxtoolmust be run with theweblogic.jar(found in theweblogic81/server/lib/directory of the WebLogic 8.1 distribution) in yourCLASSPATH. Note that this library should appear before themx4j-jmx.jar(included with the Kodo distribution) library in yourCLASSPATH.The
remotejmxtoolmust be run with JDK 1.4.x.The jar
kodo-wl81manage.jarmust be put in the WebLogic systemCLASSPATH. You can accomplish this by editingstartWebLogic.sh/startWebLogic.cmd.
In order to connect to JBossMX 3.2, remotejmxtool
must be run with the following libraries from the
JBoss distribution in your CLASSPATH.
jboss-common-client.jar: Found in theclient/directory of the JBoss 3.2 distribution.jboss-jmx.jar: Found in thelib/directory of the JBoss 3.2 distribution.jmx-adaptor-plugin.jar: Found in theserver/all/lib/directory of the JBoss 3.2 distribution.jnp-client.jar: Found in theclient/directory of the JBoss 3.2 distribution.jboss-system.jar: Found in thelib/directory of the JBoss 3.2 distribution.jnet.jar: Found in theclient/directory of the JBoss 3.2 distribution. Alternately,remotejmxtoolcan be run under JDK 1.4 or higher.concurrent.jar: Found in theclient/directory of the JBoss 3.2 distribution.jbossall-client.jar: Found in theclient/directory of the JBoss 3.2 distribution.
Note that these libraries should appear
before
the mx4j-jmx.jar (included with the Kodo
distribution) library in your CLASSPATH.
In order to connect to JBossMX 4, remotejmxtool
must be run with the following libraries from the
JBoss distribution in your CLASSPATH.
jboss-common-client.jar: Found in theclient/directory of the JBoss 4 distribution.jboss-jmx.jar: Found in thelib/directory of the JBoss 4 distribution.jmx-adaptor-plugin.jar: Found in theserver/all/lib/directory of the JBoss 4 distribution.jnp-client.jar: Found in theclient/directory of the JBoss 4 distribution.jboss-system.jar: Found in thelib/directory of the JBoss 4 distribution.concurrent.jar: Found in theclient/directory of the JBoss 4 distribution.jbossall-client.jar: Found in theclient/directory of the JBoss 4 distribution.dom4j.jar: Found in thelib/directory of the JBoss 4 distribution.
Note that these libraries should appear before
the mx4j-jmx.jar (included with
the Kodo distribution) library in your
CLASSPATH.
Additionally, the following requirements must be met:
The
remotejmxtoolmust be run with JDK 1.5.x.The jar
kodo-jboss4manage.jarmust be put in the JBoss 4 systemCLASSPATH. You can accomplish this by placing the jar in the server'slib/directory (e.g. >JBoss 4 install</server/default/lib/).
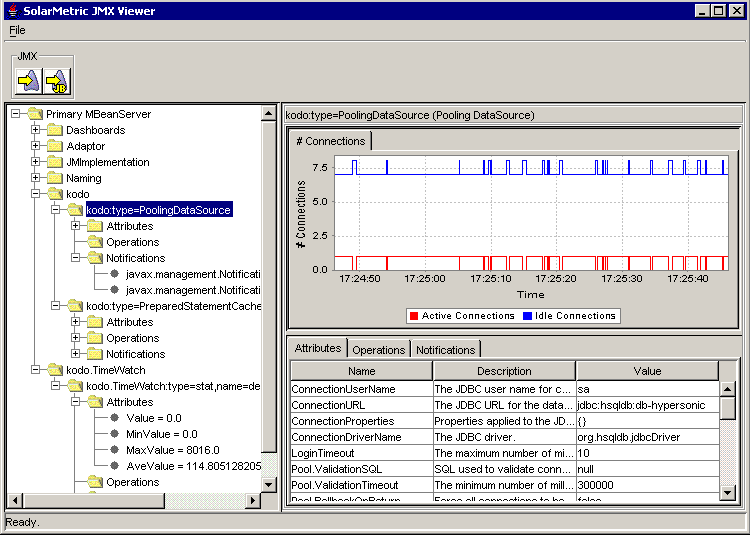
The above diagram shows the Kodo Management Console window.
The Kodo Management Console window
is divided into two main parts, the JMX Explorer
on the left, and the MBean Panel on the right.
The JMX Explorer provides a tree view of the
connected MBean servers. Under each MBean server are the JMX
domains handled by that server. Under each domain are the
MBeans within that domain. Under each MBean are the
attributes,
operations and
notifications provided by that MBean.
In order to execute an operation of an MBean, right click on
the operation, and select "Execute..." from the context
menu. A dialog box will come up asking for values for each
of the arguments to the managed operation. Fill in each of
the values and hit the OK button to
execute the operation.
![[Note]](img/note.gif) | Note |
|---|---|
Currently, only primitive types, primitive wrapper types, and classes with a string constructor can be entered. |
If the operation returns a non-null value, the string representation of the return value is shown.
When an MBean is selected in the
JMX Explorer,
the Kodo Management Console automatically listens to all
notifications. To stop listening to all
notifications for a given MBean, right click on the
Notifications node and select
Stop Listening All. To stop listening
to a single notification, right click on the individual
notification and select Stop Listening.
In order to listen to all notifications provided by an
MBean, right click on the Notifications
node under the MBean and select Listen
All. To listen to a single notification, right
click on the individual notification and select
Listen.
You can see the available notifications in the
MBean Panel to the right of the JMX
Explorer.
You can view the attributes, operations and notifications of
an MBean in the MBean Panel.
The top half of the panel shows notifications and statistics,
while the bottom half allows for viewing / editing attributes,
viewing available operations, and viewing available
notifications.
The top half of the MBean Panel
shows the notifications emitted by the selected MBean.
Note that you must listen to a notification (see
Section 12.2.2.1.2, “Listening to Notifications”)
in order to view it in the MBean Panel.
There is one tab per notification. Certain notifications
represent statistics. These notifications are grouped
under tabs based on their ordinate description.
Statistic notifications are represented in charts.
Dragging a rectangle across a chart causes the chart to
zoom in on the selected area. Right clicking on a chart
brings up a context menu with a number of options:
Properties...: Edit chart properties, such as colors and labels.
Save as...: Save the chart to disk.
Print...: Print the chart.
Zoom In / Zoom Out: Zoom in and out on either or both axes.
Auto Range: Set the either or both the abscissa and ordinate range to see all of the values.
The Attributes tab in the bottom half
of the MBean Panel allows for viewing /
editing of attributes. Not all attributes are editable.
Selecting an editable attribute allows you to set the value.
| Note |
|---|---|
Currently, you can only enter primitive types, primitive wrapper types, and classes with a string constructor. |