
Administration Guide
|
|
Before a BEA Liquid Data for WebLogic query can access data in a relational database, the relational database must be configured as a Liquid Data data source. Once configured according to the instructions in this chapter, relational databases with data source descriptions will show up as data sources in any Liquid Data EJB client, such as the Data View Builder, that connects to this Liquid Data server.
Configuring a relational database source description for Liquid Data consists of several discrete tasks: configuring a WebLogic Server (WLS) JDBC connection pool, then configuring the relational database as a WLS JDBC data source that uses that JDBC connection pool, and finally adding a Liquid Data source description for the relational database that uses the JDBC resources.
The following sections are included:
To configure JDBC connection pools for your data sources, you need to provide the URL to your database in the appropriate format for the database type and the full package name of the JDBC driver used by the database. Formats for the database URL and driver class name vary depending on the type of database you are using.
The following table provides URL formats and driver class names for supported databases.
|
jdbc:informix-sqli://<hostname> |
For complete information on how to create Java Database Connectivity (JDBC) Connection Pools in WebLogic Server, see JDBC (http://download.oracle.com/docs/cd/E13222_01/wls/docs81/ConsoleHelp/jdbc.html) in the WebLogic Server documentation.
In order to add a relational database data source description to Liquid Data, you first need to create a JDBC connection pool in WLS for the data source to use. Creating a JDBC connection pool consists of first creating the pool and then deploying it on a target server.
To create and deploy a JDBC connection pool:
|
Name of the JDBC connection pool. This can be any name by which you choose to identify the pool. JDBC Data Source that uses this pool must use the exact pool name used here. For example, we can create a connection pool name for a Wireless data source called |
|
|
URL for the database where your data source resides. The URL is passed to the driver to create the physical database connections. For our example Oracle database, we use the following URL:
Note: The required URL format varies depending on database type. See Connection Pool URLs and Driver Names for JDBC Data Sources for a complete list of URL formats and drivers for each supported database type. |
|
|
Full package name of the JDBC 2-tier driver class used to create the physical connections between the WebLogic Server and the DBMS for this Connection Pool. For our Oracle example, we use the following Oracle driver classname:
Note: Driver class names vary depending on database type. See Connection Pool URLs and Driver Names for JDBC Data Sources for a complete list of URL formats and drivers for each supported database type. |
|
|
Sets the list of properties passed to the 2-tier JDBC Driver to use when creating physical database connections. The list consists of attribute=value tags, separated by semi-colons. WLS Administration Console view will automatically reformat properties and add other details about the specified database when you click Create. The following examples are based on our Broadband, CRM, and Wireless scenario: (You can add these as comma separated attribute=value pairs as shown above or one per attribute=value pair per line separated by a return.) |
|
|
Optional—use only if you are implementing security. Password attribute passed to the tier-2 JDBC driver when creating physical database connections; If set, this value overrides any password defined in Properties. The value is stored in an encrypted form in the |
Note: This is not a required step, but to facilitate running and testing the data sources, we recommend re-setting Maximum Capacity on the connection pool to some number greater than 1. For complete information on how to create Java Database Connectivity (JDBC) Connection Pools in WebLogic Server, see JDBC in the WebLogic Server documentation.
For complete information on how to create a JDBC data source in WebLogic Server, see JDBC in the WebLogic Server documentation.
Once you have created a JDBC connection pool, the next step in configuring a Liquid Data relational database data source is to create a JDBC data source in WLS using the JDBC connection pool that you just configured.
Creating a JDBC data source consists of first creating the data source and then deploying it on a target server. You will need to configure this new data source to use the JDBC connection pool you just created.
|
Name of the data source. This can be any name you choose to use for the data source, such as |
|
|
JNDI path to where this data source is bound. Applications that look up the JNDI path will get a This can be any name you choose to use for the data source, such as |
|
|
Name of the connection pool the data source is associated with. The pool name you provide here must match exactly the name of the connection pool you created in the previous task (Creating a JDBC Connection Pool). |
To create and deploy a JDBC data source:
Once you have created a JDBC connection pool and JDBC data source for the relational database, you can create a data source description that tells Liquid Data how to connect to the relational database.
Note: You must log in with modify access before you can add a data source description. For more information, see Defining Liquid Data Roles and Groups.
To create a data source description for a relational database:
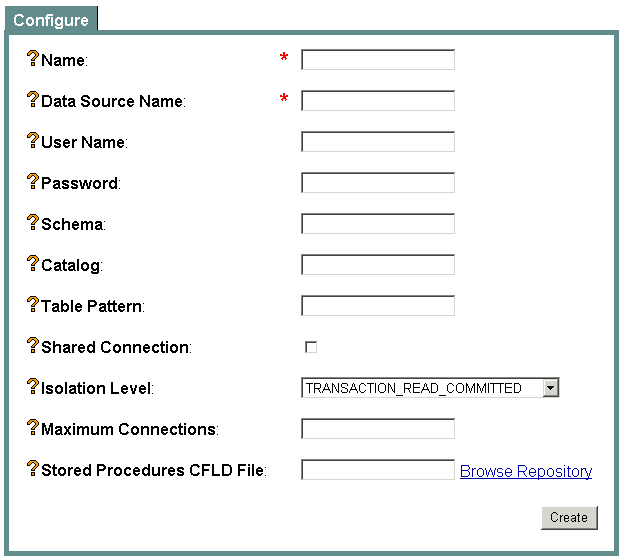
The configuration tab for creating a new relational database Liquid Data source description is displayed.
Figure 7-4 Configuring a Liquid Data Source Description for a Relational Database
 " title="Configuring a Liquid Data Source Description for a Relational Database" width="628" height="564" align="middle" border="0" hspace="0" vspace="0">
Note: All names and values that you provide are case-sensitive.
|
Logical name of the database—it is a Liquid Data source description used to register the relational database data source with the Liquid Data server. You can choose any meaningful name. |
|
|
Data source name, which must match the JNDI name for the JDBC data source created in Creating a JDBC Data Source. |
|
|
An optional field specifying a WebLogic user name. When this field is blank, the WebLogic user name authenticated in the application (for example, a web application that uses Liquid Data to access data) is passed down to the JDBC connection pool. When you specify a WebLogic user name in this field, the specified name is passed down to the JDBC connection pool instead of the application user name. This is useful if the JDBC connection pool has a security policy associated with it and you do not want to configure your JDBC connection pool security policies with your application user name credentials. When you use this field, only the specified WebLogic user needs access to the JDBC connection pool for database query access. |
|
|
An optional field specifying the WebLogic password corresponding to the user name specified in the Liquid Data Relational Data Source User Name field. |
|
|
Name of the schema (or schemas) you want to use for this Liquid Data data source. While this field is not required, BEA recommends that you specify a schema for your databases. The schema will limit the scope of the schema elements available to liquid data. On some databases, if you do not specify a schema, you might also run into JDBC or database limits such as the maximum number of open cursors. If you run into those types of limit, you must either specify a schema or increase the number of cursors for the JDBC and/or database configuration. You can specify multiple schemas by entering comma-separated schema names, as in the following example which specifies both the
Specifying multiple schema names allows you to join across those schema (or select from tables in both schema) in a single query. For example, if you create a data source referencing both the The requirements for setting the schema name vary depending on the relational database you are using:
|
|
|
Optional or required (depending on the RDBMS you are using)—Name of the catalog you want to use for this Liquid Data data source. Leave blank to use all catalogs or if the RDBMS system you are using does not support the notion of catalogs. The requirements for setting the catalog name vary depending on the RDBMS you are using:
The user name specified in the JDBC Connection Pool must have sufficient privileges in the RDBMS to use this catalog. (See Creating a JDBC Connection Pool.) |
|
|
Optional—A pattern used to filter the tables by name. You can also enter a comma separated list to specify multiple filter patterns. For example, the following list:
would match the following tables:
but would not match the following tables:
|
|
|
Toggle to set shared connection on (checked) or off (cleared). |
|
|
Sets the transaction isolation level.
For information on JDBC transaction isolation levels, see "transaction-isolation" and "isolation-level" in weblogic-ejb-jar.xml Document Type Definitions (under the subheading "5.1 weblogic-ejb-jar.xml Deployment Descriptor Elements") in the WebLogic Server documentation. |
|
|
Optional—Specifies maximum number of connections the Liquid Data server can use to access this data source. The default is 0, which indicates that you are not limiting the number of connections. Has no effect if the value of Shared Connections is set to on (checked). Note: If the number of concurrent queries to the RDBMS data source exceeds the value in Maximum Connections (unless the value is 0, specifying no maximum), additional query executions will fail with a "No Connection Available" response. |
|
|
If you have stored procedures or you want to configure your own SQL queries as data sources you can access through Liquid Data, you must create and specify a SQL Call Description File (SCDF) that defines the stored procedures and/or SQL query. The SCDF file must reside in the |
Note: You must configure access to this data source description, as described in Configuring Secure Access to Data Source Descriptions.
The summary table shows a list of configured data sources of a particular type and a subset of configuration information for quick scanning. From the summary list, you can do the following:
Note: You can also view all data sources from the All Data Sources configuration tab on the Liquid Data node in the Administration Console, as described in Viewing and Accessing All Configured Data Sources.
You can changed the configured settings in a data source description for a relational database. For example, you might want to make a simple change to the row prefetch settings, or you might want to make more fundamental changes, such as changing the JDBC connection pool and data source used by the Liquid Data source, or changing the target servers or clusters in which the data source is deployed.
For most configuration changes, you will need to verify the operation of any queries that depend on the changed data source configuration. To make fundamental changes in underlying JDBC connection pools and data sources, you will also need to ensure that you set up the new JDBC connection pools and data sources first, before you re-assign the existing Liquid Data sources to them. For more information, see Creating a JDBC Connection Pool and Creating a JDBC Data Source.
Note: You must log in with modify access before you can modify a data source description. For more information, see Defining Liquid Data Roles and Groups.
To make simple changes to the data source description settings for a relational database, such as the row prefetch settings:
If you are making changes to JDBC connection pools or JDBC data sources:
You can remove a data source description that you no longer need. Removing a data source description does not remove the actual relational database to which it refers, nor does it remove the associated WebLogic Server JDBC Data Source or JDBC connection pool.
Note: You must log in with modify access before you can remove a data source description. For more information, see Defining Liquid Data Roles and Groups.
To remove a data source description for a relational database:
|
|
|