The MIB defines the data types and access permissions for the various managed objects that can be accessed through the Agent Connection. It also defines the event notifications that can be generated by the Agent Connection. The MIB thus provides the management system with information it requires to manage TUXEDO and M3 resources.
By default, this file is installed in the installation_directory/etc directory. This MIB must be imported into the management database of your management platform. Some management platforms refer to this process as loading a MIB. Refer to the BEA Manager Release Notes for a list of management platforms tested with the TUXEDO Agent Connection.
For example, are there particular attributes of the resources you are managing that you want to monitor? Do you want to be notified when certain TUXEDO system events occur?
This is described in the next section, "Integrating M3 and TUXEDO Event Notifications."
Periodic collection of values of pertinent objects is valuable for analysis of trends. This is valuable for capacity-planning and load-balancing. Polling can also be used to generate alarms which is useful for fault management.
If you are using the Agent Connection as a subagent with the Agent Integrator, you may want to offload some threshold checking to the Agent Integrator. The Agent Integrator generates enterprise-specific traps when the user-defined threshold is crossed. Offloading checking of selective thresholds to the Agent Integrator reduces the network bandwidth consumed by the management station's polling activities.
The procedure for configuring and starting the SNMP agents is described in Chapter 2, "Setting Up the Agents."
To integrate the M3 and TUXEDO system event traps with your management platform, perform the following actions:
TMSYSEVT) is running for the
domain being managed.
The Agent Connection will not receive event notifications unless the Event Broker server (TMSYSEVT) is running. Information on the TUXEDO Event Broker can be found in Section 5 of the BEA TUXEDO Reference Manual.
beamgr.conf) to specify the location of the management machine that is to be
the destination for traps generated by the agent.
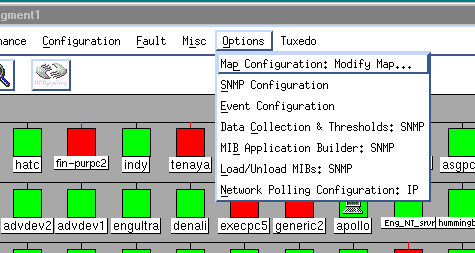
For example, on HP OpenView Network Node Manager, do the following:
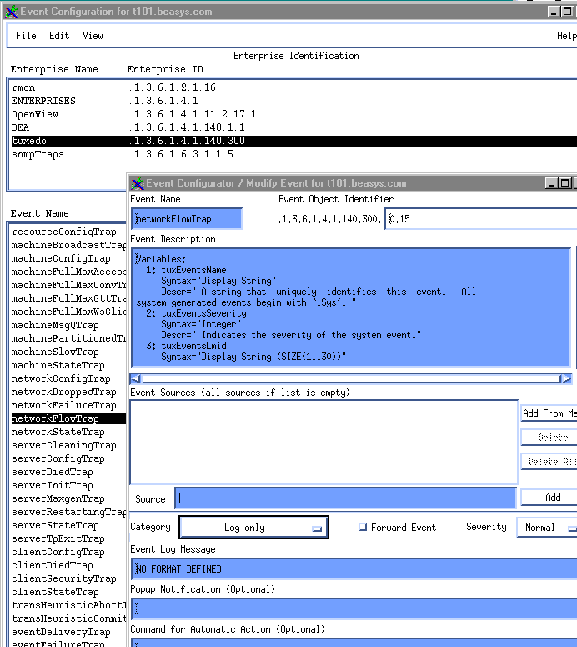
In Figure 3-2,
networkFlowTrap is the selected event type.
Figure 3-2 OpenView Event Configuration
Monitoring of multiple domains is done by running a separate TUXEDO or M3 agent for each domain being monitored. These agents must be run as subagents under the Agent Integrator.
When more than one M3 or TUXEDO SMP agent is running on a node, then SNMP manager GET or SET requests to an agent must be addressed using a community of the form:
community@logical_agent_name
For example:
public@payrollagent
In this example payrollagent is a logical agent name that identifies the agent to which the request is to be forwarded by the Agent Connection.
Agent Integrator can be used to poll TUXEDO or M3 objects, or other managed resources. To integrate the Agent Integrator threshold-checking activity with the management system, do the following:
A polling rule is defined by a RULE_ACTION entry in the BEA Manager configuration file (beamgr.conf). This is described in the Agent Integrator Reference Manual.
For example, in HP OpenView, you can add a new event type by doing the following:
In the window that is invoked you would use the following as the event number:
.1.3.6.1.4.1.140.1.1.0.specific_trap_number
This involves essentially the same process as described in Step 4 in the previous section.
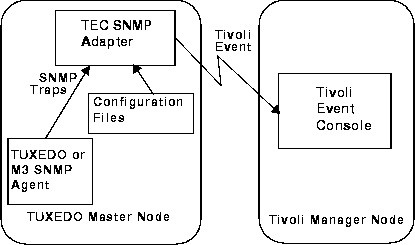
The Agent Connection for TUXEDO and M3 has the ability to translate TUXEDO system event notifications into SNMP trap notifications. These traps can be sent to the Tivoli Event Console (TEC) using the TEC SNMP Adapter. The TEC SNMP Adapter must be installed on the TUXEDO master node along with the Agent Connection, as illustrated in Figure 3-4.
Figure 3-4 Integrating Agent Connection with the Tivoli Event Console
To integrate the Agent Connection with the Tivoli Event Console, do the following:
The Tivoli Event Console SNMP Adapter needs to be installed - preferably on the TUXEDO master node.
bea2tiv.baroc, provided with Agent Connection, to the file
tecad_snmp.baroc of the TEC SNMP Adapter.
TEC_CLASS :
     Tux_Event ISA  Specific_SNMP_Trap
       DEFINES {
               severity: default = WARNING;
               class: STRING;
               ulogcat: STRING;
               ulogmsgnum: INTEGER;
               };
ENDbea2tiv.cds, provided with Agent Connection, to the file
tecad_snmp.cds of the TEC SNMP Adapter:
CLASS Tux_Event
   SELECT
      1: ATTR(=, "tuxEventsName" ) ;
      2: ATTR(=, "tuxEventsLmid" ) ;
      3: ATTR(=, "tuxEventsTime" ) ;
      4: ATTR(=, "tuxEventsDescription" ) ;
      5: ATTR(=, "tuxEventsClass" ) ;
      6: ATTR(=, "tuxEventsUlogCat" ) ;
      7: ATTR(=, "tuxEventsUlogMsgNum" ) ;
   MAP
      source = "TUXEDO";
      enterprise = "tuxedo";
      sub_source = $V1;
      hostname = $V2;
      date = $V3;
      msg = $V4;
      class = $V5;
      ulogcat = $V6
      ulogmsgnum = $V7;
ENDbea2tiv.oid, provided with Agent Connection,
to the file tecad_snmp.oid of the TEC SNMP Adapter:
Ensure that the TRAP_HOST entry in the BEA Manager configuration file (beamgr.conf) points to the host where the Tivoli Event Console SNMP Adapter is running.
Refer to Chapter 2, "Setting Up the Agents," for more information.
Set up the rules on the Tivoli management system that are to be applied to incoming TUXEDO system events. This is essentially the same process as described in Step 4 under "Integrating M3 and TUXEDO Event Notifications."
Tivoli has the ability to distribute polling or data collecting to distributed Tivoli agents. The following steps are an example of how to implement distributed monitoring of TUXEDO or M3 MIB objects on the Tivoli platform:
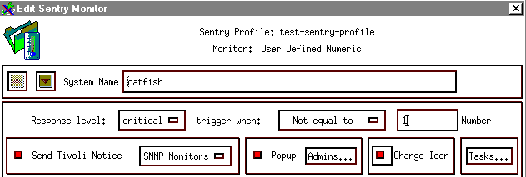
The Profiles Property window lists the monitors which you have configured to do threshold-checking. Select Add Monitor from the Profile Properties window.
UserSNMP monitoring collection, as shown in Figure 3-5.
You can define the frequency of polling, the SNMP community, and the object that you wish to monitor. The object must be specified using the absolute object identifier (OID). In the example we have used .1.3.6.1.4.1.140.305.1.6.0, which is the OID for In the case of columnar objects, you need to know which instance to monitor. For information on how to specify an instance using an object identifier, refer to the "Polling" chapter in the Agent Integrator Reference Manual.
Figure 3-5 Adding a New Monitor to a Tivoli Profile

beaDomainStatus. In this case we are setting up a monitor to check whether a TUXEDO domain is active.
Select Add Empty to invoke the Monitor window. This allows you to specify the polling threshold, and other properties of the monitor, such as the severity of the Tivoli event that is generated when the threshold is crossed. In Figure 3-6, we specify a threshold of
Not equal to 1 because we want to know when the domain is not active.
Figure 3-6 Defining a Polling Threshold