

This chapter contains the following topics that describe how to configure MessageQ message queuing buses and groups:
If you have not already adjusted your system resources to support MessageQ software, use the information in Chapter 2 to configure your system resources, then rebuild and reboot the kernel.
Before applications can exchange information, you must configure the MessageQ environment by defining the default values and parameter settings for the following components:
Overview of MessageQ Configuration
Figure 3-1 shows a sample MessageQ configuration. The configuration shows a message queuing bus that contains two message queuing groups, one on a Digital UNIX system and the other on a Windows NT system. Both groups are able to exchange messages using a cross-group connection. Each application is associated with at least one primary message queue and utilizes the services of several MessageQ Server such as recoverable messaging (MRS), message broadcasting (SBS), journaling (JRN), and Client Library support (CLS).
The following topics describe the standard components of a MessageQ configuration.
The MessageQ message queuing bus is the backbone of MessageQ because it forms the interprocess communication highway that applications use to send and receive messages. The message queuing bus is made up of one or more message queuing groups that are configured to communicate with each other.
Note:
Aside from assigning a bus ID when you configure each message queuing group, there are no configuration steps you need to perform to configure the message queuing bus. MessageQ for UNIX automatically creates the bus when you enter the A MessageQ message queuing group is a collection of related processes that share system resources. A single group must reside on a single system; however, a single system can support multiple groups. Applications that manage common resources or have frequent or high-volume communications with each other should be placed in the same group.
A group connects related applications or components of the same application. Communication between groups on the same system occurs through interprocess communications and shared memory. Communication between applications running in different message queuing groups on different systems requires that a computer network be configured (see the Configuring the Network topic in Chapter 1 for more information).
Groups are labeled with a four-digit bus ID and a five-digit group ID. Groups with the same bus ID form a message queuing bus; only groups that share a bus ID can communicate. The MessageQ startup procedure ( A message queue provides an area for an application to store and retrieve messages. Message queues can be thought of as attachment points on the message queuing bus. Each message queue is identified by a queue address. The group ID and a unique queue number form the queue address for each message queuing group.
MessageQ offers two types of queues: temporary and permanent:
Figure 3-1 Sample MessageQ Configuration

Message Queuing Bus
dmqstartup command to start a message queuing group (see the Starting a Message Queuing Group topic in Chapter 4 for more information).
Message Queuing Groups
dmqstartup) automatically creates the resources required for a group using the values and settings in the group initialization file. Message queuing groups are started by the startup procedure.
Message Queues
pams_attach_q function. Applications use temporary queues when the need for the queue is short-lived.
Each process that attaches to the MessageQ message queuing bus must have a primary queue assigned to it. This queue functions as the "main mailbox" for receiving messages from other processes using MessageQ. In addition, MessageQ applications can use secondary queues as a means of exchanging information among application components without interrupting the flow of messages taking place in the primary queue. In this way, secondary queues are used by application processes as alternate "mailboxes" for selected application messages.
Applications can be designed to read messages from one or more queues. Queues defined to be read by a single program are called single reader queues. When a process attaches to a single reader queue, it owns the queue and is the only process that can read from the queue. Queues that are designed to be read by multiple applications are called multireader queues (MRQs). MRQs are used to store messages that can be read by many simultaneous readers, creating a central "mailbox" for several applications or application components to receive messages. Only permanent queues can be defined as MRQs. In addition, MRQs must have the attribute permanently active.
When defining permanent queues in the group initialization file, you have the choice of determining whether the queue becomes active when a process attaches to the queue or if the queue is active when the group starts up regardless of whether any process is attached. Permanently active queues provide the maximum data persistence for messaging data.
Applications must be associated with at least one message queue to receive MessageQ messages. For example, a system designer may designate queue 3 in group number 1 to receive temperature readings from a semiconductor furnace. After the bus, group, and queue have been configured and the group is started, the sender program must know the queue address to direct messages containing temperature readings. The receiver program must know the queue address from which to read messages about temperature changes in the furnace.
Applications also can send and receive messages from message queues in one or more message queuing groups. The application designer decides how to distribute messaging based on the requirements of the application.
Naming is a MessageQ capability that enables applications to refer to queues by name instead of using their physical address in the MessageQ configuration. Using names separates applications from the specifics of the network environment and enables system managers to make configuration changes without requiring developers to change the applications. Developers use the Names can be defined to have a local or global scope. Local names are visible only to applications running in a particular group. Global names are available for use by any application attached to the message queuing bus.
Also, names can be defined using a static or dynamic approach. Static definition means that the definition of the name-to-queue address translation is provided in the Global Name Table (%GNT) section (see the Defining Name to Queue Translations in the Group Name Section topic for more information) of the MessageQ configuration file for the group. Dynamic definition means that an application has created a name-to-queue address translation using the The MessageQ process that supports the naming capability is called the Naming Agent. The Naming Agent stores the name-to-queue address translations that were created using a static or dynamic approach. In addition, the Naming Agent provides the run-time lookup capability for name-to-queue address translations requested using the When you configure a group, you must decide the message queuing group in which the naming agent will run. You can also define a backup naming agent group in the event that the first group becomes unavailable. This definition is set in the %NAM section (see the Configuring Global Naming topic for more information) of the group initialization file. The group that is assigned to run the naming agent starts the naming agent process at group startup.
Communication between groups on different systems requires the use of a network protocol. MessageQ for UNIX supports the following network protocols:
Naming
pams_locate_q function to locate the queue address for a queue name at runtime. Currently, the MessageQ naming capability applies only to queue names. There is no ability to assign a name to other MessageQ entities such as groups or buses.
pams_bind_q function and that MessageQ must look up the definition that has been created.
pams_locate_q function.
Cross-Group Connections
There are two types of cross-group connections: direct and indirect. Groups that share a physical network connection can be configured directly in the %XGROUP section of the group initialization file. Groups that do not share a physical network connection can be configured indirectly in the %ROUTE section of the group initialization file.
See the Enabling Network Connections in the Cross-Group Section topic and the Defining the Message Routing Database in the Route Section topic for instructions on how to configure direct and indirect cross-group connections.
You can also specify timeout intervals for testing cross-group connections. See the Defining Timeout Intervals for Link Drivers topic in Chapter 4 for more information.
MessageQ for UNIX provides several server processes that provide key features of MessageQ such as recoverable messaging, message broadcasting, cross-group communication, and message queuing support for MessageQ Clients. Figure 3-2 shows the server processes and other components of a MessageQ message queuing group.
The server processes can be enabled by setting values in the %PROFILE section of the group initialization file. Table 3-1 describes the server processes that are available to MessageQ for UNIX. Server Processes
Figure 3-2 Components of a MessageQ Message Queuing Group

For a complete description of MessageQ concepts and components, refer to the Introduction to Message Queuing documentation.
When configuring a message queuing group, you have two options:
dmqsetup utility configure the group for you by creating a standard group.
For new MessageQ users or users who are configuring a new installation, the dmqsetup utility will help you quickly create a minimum message queuing group configuration to get MessageQ software up and running on your system in the shortest amount of time. For more information about the dmqsetup utility, see the Creating a Standard Group Configuration topic.
For users who want to create a custom configuration and understand the individual components of the group initialization file, see the Creating a Custom Group Configuration topic.
The The The main menu of the To create a standard group configuration, follow these steps:
Creating a Standard Group Configuration
dmqsetup utility lets you configure a standard group configuration and begin running MessageQ software on your system in the shortest time possible. The dmqsetup utility creates a standard, minimum configuration that uses default values and recommended parameter settings. This utility is ideal for users who have never performed a MessageQ group configuration, or for users who are considerably expanding an existing group configuration. The dmqsetup utility is installed with the product and can be found at the following location: /usr/kits/DM*400/util.
dmqsetup utility is a write-only utility. That is, after you exit from the utility and write the group initialization file, you cannot later use dmqsetup to make changes to that file. However, you can make changes to the group configuration file using a text editor.
dmqsetup utility contains the following options:
1.   Profile
2.   Links
3.   Routes
4.   Queues
5.   Names
6.   Create standard group initialization
7.   Save
8.   Help
9.   Exit
dmqsetup utility:
# dmqsetup

MessageQ for UNIX: Setup

1.   Profile

2.   Links

3.   Routes

4.   Queues

5.   Names

6.   Create standard group initialization

7.   Save

8.   Help

9.   Exit
* Enter selection (1-9) [6]
A standard group has the following attributes:
A standard group will not have Message Recovery Services (MRS) enabled, nor will it exchange messages with groups on nodes that do not share a network link. However, Selective Broadcast Services (SBS) will be enabled.
To enable you to configure groups to meet your specific messaging needs, MessageQ for UNIX systems provides a group initialization file template for each supported UNIX system. The system-specific templates can be found at the following location:
where Creating a Custom Group Configuration
/usr/kits/DM
x400/templates/group.initDMx is one of the following:
|
|
Digital UNIX |
|
|
Other UNIX systems |
Table 3-2 gives an overview of the sections of the group initialization file.
You define parameters in the group initialization file by providing numeric values within a specified range or enabling settings to be YES or NO. The group initialization file is a typical ASCII text file that can be created and modified using any text editor. To create a custom group initialization file, make a copy of the template file and edit the copy. Do not edit the actual template file.
MessageQ also lets you modify a subset of parameters in the group initialization file at runtime. You can then use the Loader utility to dynamically reload the group initialization file without having to stop and restart MessageQ. See the Changing Group Characteristics at Runtime topic in Chapter 4 for instructions on how to run the Loader utility.
Several of the modifiable parameters can only be changed if certain conditions exist. These conditions are noted in the parameter description. The following topics describe the parameters, values, and settings in the group initialization file.
The %VERSION (file version) section consists of a single line identifying the group initialization file version. MessageQ for UNIX systems accepts group initialization files with version numbers of 1.0, 2.0, 3.0, 3.1, 3.2, or 4.0. MessageQ uses the version number to be able to correctly parse configuration information for the message queuing group at startup.
Listing 3-1 shows a sample %VERSION section.
Listing 3-1 Sample %VERSION Section
%VERSION 4.0
The %PROFILE section is used to configure the primary characteristics (default values and parameter settings) of a group. This section is also enables MessageQ Server processes such as MRS, JRN, SBS, and CLS. Each server process is dedicated to a specific task or set of tasks.
You can start the following server processes by indicating "YES" for each server entry in the %PROFILE section:
Listing 3-2 shows a sample %PROFILE section:
Table 3-3 describes the parameters of the %PROFILE section.
Listing 3-2
Sample %PROFILE Section
%PROFILE
!
ACCEPT_KILL_COMMAND YES ! accept kill commands from DMQ Monitor
ENABLE_XGROUP NO ! allow cross-group communications
XGROUP_VERIFY NO ! do not verify cross group links
FIRST_TEMP_QUEUE 200 ! minimum is 101, maximum is 850
XGROUP_TABLE_SIZE 20 ! size of the group link table
GROUP_BYTE_QUOTA 8388608 ! maximum number of bytes on all queues
GROUP_MAX_MESSAGE_SIZE 32000 ! largest message size permitted in
! this group
ATTACH_TMO 600 ! timeout in seconds for locates
ENABLE_MRS NO ! start recoverable messaging servers
ENABLE_JRN YES ! enable PCJ journaling when MRS is
! enabled
ENABLE_SBS YES ! start selective broadcast and AVAIL/UNAVAIL
DEFAULT_NAMESPACE_PATH /u/mydir ! default namespace path for naming
! agent
%EOS
If the group you have defined will use resources such as message recovery services, CLS, group connections, permanent queues, or name-to-queue translations, you must define them next.
The %MRS section lets you enable MessageQ Message Recovery Services (MRS), which provide a mechanism for guaranteed message delivery by storing messages on disk and automatically attempting redelivery until the message is received by the target system. On MessageQ for UNIX systems, message recovery is provided by the dmqjourn journal process.
The server process that handles recoverable messaging is the MRS Server. In MessageQ, the MessageQ startup procedure starts up the MRS Server only if the ENABLE_MRS parameter is set to YES in the Profile section; then dmqjourn is started. The server process that handles journal files is the Journal Server. It is started by setting the ENABLE_JRN parameter in the Profile section to YES. When choosing a common directory where the journal files will be written, you should consider other files used by your programs (such as databases and logs) and the amount of available disk space. For a complete description of MRS, refer to the Programmer's Guide.
MessageQ for UNIX provides the following types of recovery journals:
Listing 3-3 shows a sample %MRS section and Table 3-4 describes the parameters of the %MRS section.
Listing 3-3 Sample %MRS Section
%MRS
CACHE_PERCENTAGE 90 ! %rcv msg quota for MRS msgs
MRS_JOURNAL_PATH /my/rj_path ! recovery journal path
MRS_POST_CONFIRMATION_PATH /my/pcj_path ! post confirmation journal path
MRS_DEAD_LETTER_PATH /my/dlj_path ! dead-letter journal path
MAX_CACHE_BYTES 4194304 ! maximum number of unwritten bytes
%EOS
The %CLS section lets you configure the MessageQ Client Library Server. The CLS provides MessageQ applications running on a supported MessageQ client system with access to message queuing. Applications can communicate with other distributed applications anywhere in the MessageQ network using a single connection to a CLS process connected to the bus. For detailed information about the CLS, refer to the MessageQ Client for UNIX User's Guide.
Listing 3-4 shows a sample %CLS section.
Listing 3-4 Sample %CLS Section
%CLS
!
!                             Max      Security
!   Endpoint     Transport    Clients  File

    12345        TCPIP        25       /my/dmqclsec.txt
    67890        DECNET       50
%EOS
Table 3-5 describes the parameters of the %CLS section:
To enable message queuing between different systems in a network, you must create MessageQ message queuing groups on each system and establish cross-group connections between them. Messages can be exchanged between groups using two methods:
Your configuration will probably use both methods, so it is important to understand that if a group is defined in the %XGROUP section, it cannot be designated as a target group in the %ROUTE section (as described in the "Defining the Message Routing Database in the Route Section" topic). It can, however, be designated as a route-through group.
The %XGROUP section lets you define cross-group communication connections among groups that share a physical network link. Each line in the %XGROUP section defines a single cross-group connection, which creates two new link drivers for each unique group number. The %XGROUP section provides the link drivers with the information needed to connect to other MessageQ message queuing groups through DECnet or TCP/IP networks.
Listing 3-5
Sample %XGROUP Section
%XGROUP
!
!Group Group  Node/ Init Thresh- Buffer Recon-    Window      Trans-  End-
!Name  Number Host       old     Pool   nect   Delay  Size    port    point
GROUP1 1 delius Y 2000000 . 30 10 25000 TCPIP 10001
GROUP2 2 bizet N 4000000 . 30 10 25000 TCPIP 10002
GROUP3 3 bartok N 8000000 . 30 10 25000 TCPIP 10003
GROUP4 4 boehm N 4000000 . 30 10 250 TCPIP 10004
GROUP4 4 rameau N 4000000 . 30 10 250 TCPIP 10004
GROUP4 4 rameau N 4000000 . 30 10 250 DECNET%EOS
Table 3-6 describes the parameters of the %XGROUP section.
MessageQ uses routing entries to allow messaging between groups that are not directly attached to the local group by way of a physical network link. MessageQ software allows an arbitrary number of intermediate MessageQ groups between the message source and the target queue. The intermediate groups are specified in the %ROUTE section of the group initialization file. The %ROUTE section specifies the next hop (next group to route through) for a message to reach the target destination queue. Groups defined in the %XGROUP section do not need to be defined in the %ROUTE section, and vice versa.
The %ROUTE section lets you define the MessageQ static routing database. The routing database determines where to send messages that are addressed to non-adjacent nodes; that is, nodes that do not appear in the %XGROUP section. All parameters for a given routing entry must appear on the same line.
Listing 3-6 shows a sample %ROUTE section.
Listing 3-6 Sample %ROUTE Section
%ROUTE
!Target Routethrough
!Group     Group

  7        1
  10       2
%EOS
Table 3-7 describes the parameters of the %ROUTE section.
Note: If a group is defined in the %XGROUP section, it cannot be designated as a target group in the %ROUTE section. It can, however, be designated as a route-through group.
In Listing 3-7, the %XGROUP and %ROUTE sections are correctly defined. Group1 and Group2 are not defined as target groups in the %ROUTE section, and they are correctly defined as route-through groups.
In Listing 3-8, the %ROUTE section is incorrectly defined. Group1 cannot be designated as a target group in the %ROUTE section because it was previously defined as an adjacent group in the %XGROUP section. However, Group2 is correctly designated as a route-through group.
The user-specified %ROUTE section is automatically updated by the process of route discovery. As a message hops along the message route, the MessageQ link drivers automatically load the return address into the routing table so that a message can be returned. Route discovery has the advantage of allowing groups to acquire information about other groups with which they might communicate.
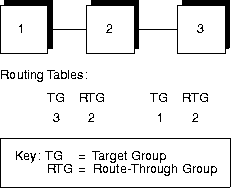
Figure 3-3 provides an example of how route discovery allows a group to acquire routing information about other groups.
In the example, Group 2 is connected to Groups 1 and 3, and Group 1's %ROUTE section was loaded at startup. When Group 1 sends a message to Group 3, the link driver loads the return address of the message into Group 3's %ROUTE section. Through route discovery, Group 3 is now able to send a message to Group 1.
Messages with circular routing paths could be endlessly passed from system to system. To prevent this, full message routing uses a visit count, which is a system-determined limit on the number of groups through which a message can hop. The visit count is placed into the message header when the message is created. As a message is written to the link sender, the visit count is decremented. When the visit count reaches zero, the message can no longer be forwarded to another system and the Undeliverable Message Action (UMA) for the message is taken.
Full message routing rules followed by the MessageQ server are as follows:
Listing 3-7
Correctly Defined %XGROUP and %ROUTE Sections
%XGROUP
!
!Group Group Node/ Init Thresh- Buffer Recon- Window Window Trans- End-
!Name Number Host old Pool nect Delay Size port pointGROUP2 2 node2 Y 5 75 10 10 250 TCPIP 10002
GROUP7 7 node7 N 5 75 10 10 250 TCPIP 10007
%EOS
!
!Target Routethrough!Group Group
10 7
1 2
%EOS
Listing 3-8
Incorrectly Defined %XGROUP and %ROUTE Sections
%XGROUP
!Group Group  Node/ Init Thresh- Buffer Recon- Window Window  Trans-  End-
!Name Number Host old Pool nect Delay Size port pointGROUP1 001 node1 Y 5 75 10 10 250 TCPIP 10001
GROUP2 002 node N 5 75 10 10 250 TCPIP 10002
%EOS
%ROUTE
!
!Target Routethrough!Group Group
1 2
7 2
%EOS Route Discovery
Figure 3-3 Route Discovery
Visit Counts
Full message routing is based on the model of a server group ring surrounded by a client ring, as shown in Figure 3-4. Each server can route messages to other groups without requiring clients to be directly connected to the target group of the message.
In full message routing, a client group has cross-group entries for itself and the adjacent server group. A client group can attach to different server groups, one at a time. The server groups subsequently update the routing table by using route discovery.
A server group has entries in the %XGROUP section of the initialization file for itself and all other server groups. A server group does not have entries for clients; instead, it uses route discovery to learn the return route from server back to client.
The %QCT section lets you define the permanent queues. Each line in the %QCT section defines a single queue. All parameters for a given queue must appear on the same line. Parameters that do not apply must be given a placeholder value.
Note:
On VMS systems, queues numbered 90 to 100 and 150 to 199 are reserved exclusively for MessageQ. On UNIX systems, queues numbered 90 to 100 are reserved exclusively for MessageQ.
Listing 3-9 shows a sample %QCT section.
Table 3-8 describes the parameters of the %QCT section. Client/Server Message Routing
Figure 3-4 Client and Server Full Message Routing

Defining Queues in the Queue Configuration Section
Listing 3-9
Sample %QCT Section
%QCT
!
!Queue Queue Byte Msg Quota UCB Queue Owner Conf Perm Name Security
!Name Number Quota Quota Enbl Send Type Queue Style Active ScopeTEMPLATE 0 262144 NONE . P 0 II N L N
QUEUE1 1 . NONE . P 0 II N L N
QUEUE2 2 . NONE . P 0 II N L N
QUEUE3 3 . NONE . P 0 II N L N
QUEUE4 4 . ALL . M 0 II Y L N
QUEUE5 5 . . . S 3 II Y L N
QUEUE6 6 . . . S 3 II Y L N
QUEUE7 7 . . . S 0 II N L N! queues that specify ACL security files exist and should be
! checked each time a process attaches one of these queues
QUEUE10 10 . . . P 0 II N L Y
QUEUE11 11 . MSG . S 10 II N L Y
QUEUE12 12 . BYTE . S 10 II N L Y! queues with differing quotas. Quotas also can be turned on using
! the monitor programs (dmqmonc and dmqmonm)
QUEUE13 13 8192 32 ALL . P 0 II N L N
QUEUE14 14 131072 64 MSG . P 0 II N L N
QUEUE15 15 32768 . BYTE . . 0 II N L N! queues that require explicit confirmation and allow out of
! order confirmation
QUEUE16 16 . None . P 0 EI N L N
QUEUE17 17 . . . P 0 EO N L N
! the example_q_n queues are used by the example programs
! provided in the MessageQ Example Programs subset
example q_1 193          .   .      .   P    0      .   N      L     N
example q_2 194 . . . P 0 . N L N
example q_3 195 . . . P 0 . N L N
example q_4 196 . . . P 0 . N L N
example q_5 197 . . . P 0 . N L N
! The DEAD_LETTER_QUEUE is the target for UMA modes.of
! xx_DLQ A user process may attach this queue to collect un-
! deliverable messages for application-specific processing
DEAD_LETTER_QUEUE 96 64000 500 None .   P    0    II    Y      L     N
%EOS
The Flush Timer and Flush Depth parameters must be manually added to the file as the last two columns in the QCT group. Listing 3-10 shows the addition of these parameters:
Listing 3-10 Sample %GNT Section
%QCT
!
!Queue      Queue    Byte	...    Name   Security   Flush      Flush
!Name       Number   Quota	...    Scope             Timer      Depth
TEMPLATE    0     262144	...    L       N      1000       10
QUEUE1      1       .  	...     L       N      1000       10
QUEUE2      2       .  	...     L       N      1000       10
The %GNT section lets you define the generic queue names and their address for queues that do not necessarily appear in the %QCT section. Each line in the %GNT section defines a single name-to-queue translation.
Listing 3-11 shows a sample %GNT section where INVENTORY_IN is statically defined in the bus-wide namespace, while ACCOUNTS_PAY allows dynamic binding using pams_bind_q.
Listing 3-11 Sample %GNT Section
%GNT
!
!Name           Group.Queue     Scope
INVENTORY_IN 9.10 G
ACCOUNTS_PAY 0.0 G
%EOS
Table 3-9 describes the parameters in the %GNT section.
To use local (group-wide) naming, configure queue names in the Queue Configuration Table (%QCT) or the Group Name Table (%GNT) section of the group initialization file. When the group starts up, MessageQ automatically creates the group namespace. It creates the process name space when an application attaches to the message queuing bus.
To enable your applications to use global (bus-wide) naming, you must perform additional configuration steps. First, you must decide the group or groups in which the naming agent will run. MessageQ allows you to specify a main group and an alternate group to run the Naming Agent. To configure a group to run the Naming Agent follow the steps outlined in the topic "Configure Groups to Run or Use the Naming Agent."
The MessageQ Naming Agent is the MessageQ Server that maintains the namespace for name-to-queue address translations and performs the runtime queue lookup when an application refers to a queue by name. The %NAM section of the group initialization file enables you define the group or groups in which the Naming Agent process will run. MessageQ allows the definition of two naming agents for each message queuing bus.
When MessageQ starts each group, it looks in this section of the initialization file to decide whether to start a naming agent for the group. For groups that do not run a Naming Agent, MessageQ uses the information in the %NAM section to direct requests to the Naming Agent. Groups must have a cross-group connection to the group in which the Naming Agent runs.
Listing 3-12 shows a sample %NAM section.
Listing 3-12 Sample %NAM Section
%NAM
NA_GROUP 10
NA_GROUP 28
%EOS
%END
Valid ranges for the NA_GROUP parameter are 0 to 32,000. The default value is 0, meaning that a naming agent should be started in the local group.
MessageQ for UNIX supports only the creation of a "lightweight" name space that is included with MessageQ. It does not support any add-on naming products such as CDS or DECdns. To create the global name space, MessageQ for UNIX users use a flat file system by creating the directory in which the MessageQ Naming Agent will maintain the name space.
To use global naming, you must create a namespace on the nodes on which the Naming Agents will run. MessageQ enables users to configure two Naming Agents to support global messaging for the environment. In order to allow the second Naming Agent to form a backup for the first, both Naming Agents must be configured to use the same name space. Therefore, when you configure your name space for use by two Naming Agents that run on different systems, it must use a shared file system that is accessible to both Naming Agents.
After you create the name space, you must set the DMQNS_DEVICE environment variable to specify a device name for the name space because access to the MessageQ lightweight name space for global naming is system dependent. Therefore, when a naming agent is configured, it must be told what device name to use when it accesses this name space. This is done by setting the environment variable DMQNS_DEVICE as follows:
\\machine\share)
/ or /usr or /mnt/dmqns)
Note that this environment variable need only be set for the group or groups in which the Naming Agent is running. Only the Naming Agent process is designed to use this environment variable setting to resolve the location of the name space.
For environments which use two naming agents, it is critically important to ensure that the device name set using the DMQNS_DEVICE environment variable on both systems points to the same device that stores the shared file system containing the MessageQ namespace.
In addition to specifying the DMQNS_DEVICE environment variable, MessageQ also provides another environment variable called DMQNS_DEFAULTPATH that provides path information for the name space. Using this environment variable to specify path information can be used to add a layer of path information to that specified in the group initialization file DEFAULT_NAMESPACE_PATH parameter or by the application.
To use a global name, at least some portion of the path name must be specified. Path information can be supplied by the application, or you can use the DEFAULT_NAMESPACE_PATH parameter in the %PROFILE section of the group initialization file in order to create and maintain path information for global names. For global naming to function properly, this parameter must be set to the same value for all groups in which applications are designed to access the same name space. The following syntax shows how to set the default namespace to be created and maintained in the directory called For example, for testing purposes, you might set this parameter to look at a copy of the production name space that you store in your own development directory. However, when the application is deployed into production, the application will reference the common name space shared by all production systems.
Use the Queue Configuration Table (%QCT) or the Group Name Table (%GNT) of the group initialization file to create static or dynamic definitions for global names as follows:
Define global static names in the %QCT or %GNT by providing the name, the queue address, and setting the name scope identifier to "G" for global names.
Define global dynamic names by supplying the name, "0.0" as the address, and the "G" identifier for global names. Names defined with a 0.0 address can be dynamically bound to a queue address at runtime using the Listing 3-13 shows static and dynamic global name definitions in the GNT section of the initialization file.
Configure a Default Namespace Path for Each Group
/u/mydir.
DEFAULT_NAMESPACE_PATH /u/mydir
Define the Queue Names in the Group Initialization File
pams_bind_q function.
Listing 3-13
Sample Group Name Table for Global Naming
%GNT
!Name           Group.Queue     Scope
widgets 9.10 G
red_widgets 0.0 G
%EOS
When an application refers to a queue by name using the pams_locate_q or the pams_bind_q functions, it can specify the name as one of the following:
unqualified name-The application uses only the queue name such as "widgets" and does not specify the path. The Naming Agent automatically prefixes the name with the value of the environment variable DMQNS_DEVICE. Further, it prepends the value of the environment variable DMQNS_DEFAULT_PATH unless the path name specified by the DEFAULT_NAMESPACE_PATH begins with a "/". For example, if the DMQNS_DEVICE environment variable is set to "c:" and the DEFAULT_NAMESPACE_PATH is set to "/inventory", the Naming Agent would search for the name "widgets" in:
c:/inventory/widgets
partially qualified name - The application specifies the queue name and a portion of the path name. The Naming Agent automatically prefixes the pathname and queue name with the device specified as the DMQNS_DEVICE environment variable and the setting of the DEFAULT_NAMESPACE_PATH parameter or the DMQNS_DEFAULT_PATH environment variable. For example, if the DMQNS_DEVICE environment variable were set to "c:" and the DEFAULT_NAMESPACE_PATH were set to "/inventory", the Naming Agent would search for the name "test/widgets" in:
c:/inventory/test/widgets
fully qualified name-The application specifies that the name is a fully qualified name using "/" as the first character of the name. When the first character of a name begins with "/", the Naming Agent does not prepend any information to the name other than the device name specified by the DMQNS_DEVICE environment variable. This means that a fully qualified name includes the full path name and queue name. For example, if the DMQNS_DEVICE environment variable is set to "C:" and the DEFAULT_NAMESPACE_PATH is set to "/inventory", the Naming Agent would search for the name "/production/test/widgets" in:
c:/production/test/widgets
The use of unqualified, partially qualified, and fully qualified names gives application developers significant flexibility in using global name references. provides several more examples of how global names are resolved. In Listing 3-14, the DMQNS_DEVICE environment variable is set to "C:" and the DMQNS_DEFAULT_PATH is set to "/dmq/dmqns".
Listing 3-14 Sample Global Names and Their Resolution
Name Used in API DEFAULT_NAMESPACE_PATH Name Searched
toto                    bus1        C:/dmq/dmqns/bus1/toto
mypath/toto             bus1        C:/dmq/dmqns/bus1/mypath/toto
/anotherpath/toto       bus1        C:/anotherpath/toto
toto                    /bus1       C:/bus1/toto
/mypath/toto            /bus        C:/bus1/mypath/toto
/anotherpath/toto       /bus        C:/anotherpath/toto
Refer to the MessageQ Programmer's Guide for more information on designing applications to use the MessageQ global naming feature.
The Test utility allows application developers to send and receive messages between applications to:
The MessageQ Test utility enables application developers to interactively attach to a permanent or temporary queue, read messages from a script file or available interprocess messages, and pass messages to a defined target queue. The Test utility can be invoked by way of the Motif user interface or a character-cell user interface on UNIX systems.
To invoke the Test utility using the Motif user interface, set the environment variables for the bus and group ID and enter the following command:
To invoke the Test utility using the character-cell interface, set the environment variables for the bus and group ID and enter the following command:
Listing 3-15 shows the character-cell Test Utility main menu options.
dmqtestm
dmqtestc
Listing 3-15
Test Utility Main Menu
Main Menu
1 Parameters
2 Actions
3 Exit
Enter Menu Selection >> 1
Refer to Table 3-10 for the Test Utility Parameters and Actions menu Options.
The examples in the following section show how to use the Test Utility to perform various tasks such as:
Listing 3-16 shows how to specify a temporary queue.
Listing 3-17 shows how to set the Specifying a Temporary Queue
Listing 3-16
Specify a Temporary Queue
Main Menu
1 Parameters
2 Actions
3 Exit
Enter Menu Selection >> 1
Parameters Menu
 1 Attach Parameters
 2 Bind Parameters
 3 Detach Parameters
 4 Locate Parameters
 5 Put Parameters
 6 Get Parameters
 7 Set Timer Parameters
 8 Cancel Timer Parameters
 9 View Current Parameters
10 Previous Menu
Enter Menu Selection >> 1
SELECT ATTACH TYPE
	1) Attach Primary
	2) Attach Secondary
Select attach type [1] ?
SELECT ATTACH_MODE
1) Attach by name
2) Attach by number
3) Attach temporary
Select attach mode [3] ? Setting the PAMS_PUT_MESSAGE Parameters
pams_put_message parameters.
Listing 3-17
Set the Put Parameters
Parameters Menu
 1 Attach Parameters
 2 Bind Parameters
 3 Detach Parameters
 4 Locate Parameters
 5 Put Parameters
 6 Get Parameters
 7 Set Timer Parameters
 8 Cancel Timer Parameters
 9 View Current Parameters
10 Previous Menu
Enter Menu Selection >> 5
SELECT PRIORITY
	1) Standard Priority
	2) High Priority
Select priority [1] ?
SELECT DELIVERY MODE
1) PDEL_MODE_AK_xxx
2) PDEL_MODE_NN_xxx
3) PDEL_MODE_WF_xxx
Select deliver mode [2] ? 3SELECT DELIVERY MODE
1) PDEL_MODE_xx_ACK
2) PDEL_MODE_xx_CONF
3) PDEL_MODE_xx_DEQ
4) PDEL_MODE_xx_DQF
5) PDEL_MODE_xx_MEM
6) PDEL_MODE_xx_SAF
Select delivery mode [5] ? 5SELECT UMA
1) PDEL_UMA_DISC
2) PDEL_UMA_RTS
3) PDEL_UMA_SAF
4) PDEL_UMA_DLQ
5) PDEL_UMA_DLJSelect UMA [1] ? 1
Enter target group [9] ? 9
Enter target queue [205] ?
Enter response queue [0] ?
Enter timeout in seconds [30] ?
Enter message class [1] ? 12
Enter message type [-100] ? 34
Enter message text ? This is a test message.
Listing 3-18 shows how to attach to a queue.
Listing 3-18 Attach to Queue 206 in Group 9
Main Menu
1 Parameters
2 Actions
3 Exit
Enter Menu Selection >> 2
Actions Menu
 1 Attach Queue
 2 Bind Queue
 3 Detach Queue
 4 Locate Queue
 5 Put Message
 6 Get Message
 7 Set Timer
 8 Cancel Timer
 9 View Current Parameters
10 Previous Menu
Enter Menu Selection >> 1
attached to queue 9.206
If your MessageQ message queing group is properly configured, the Test utility returns a success message indicating that the attach operation was successful. However, if your MessageQ message queing group is not properly configured, an error message is displayed indicating the source of the problem as shown in Listing 3-19.
Listing 3-19 Common Errors
Actions Menu
 1 Attach Queue
 2 Bind Queue
 3 Detach Queue
 4 Locate Queue
 5 Put Message
 6 Get Message
 7 Set Timer
 8 Cancel Timer
 9 View Current Parameters
10 Previous Menu
Enter Menu Selection >> 1
PAMS_RESRCFAIL, Failed to allocate resources.
Refer to the Troubleshooting chapter for additional information.
Listing 3-20 shows how to send a message.
Listing 3-20 Put the Message to Queue 205 in Group 9
Actions Menu
 1 Attach Queue
 2 Bind Queue
 3 Detach Queue
 4 Locate Queue
 5 Put Message
 6 Get Message
 7 Set Timer
 8 Cancel Timer
 9 View Current Parameters
10 Previous Menu
Enter Menu Selection >> 5
put message to queue 9.205
Listing 3-21 shows how to detach from the temporary queue.
Listing 3-21 Detach from Temporary Queue 205
Main Menu
1 Parameters
2 Actions
3 Exit
Enter Menu Selection >> 2
Actions Menu
 1 Attach Queue
 2 Bind Queue
 3 Detach Queue
 4 Locate Queue
 5 Put Message
 6 Get Message
 7 Set Timer
 8 Cancel Timer
 9 View Current Parameters
10 Previous Menu
Enter Menu Selection >> 3
detached from queue 9.205
Listing 3-22 shows how to set the pams_get_msg parameters.
Listing 3-22 Set the PAMS_GET_MSG Parameters
Main Menu
1 Parameters
2 Actions
3 Exit
Enter Menu Selection >> 1
Parameters Menu
 1 Attach Parameters
 2 Bind Parameters
 3 Detach Parameters
 4 Locate Parameters
 5 Put Parameters
 6 Get Parameters
 7 Set Timer Parameters
 8 Cancel Timer Parameters
 9 View Current Parameters
10 Previous Menu
Enter Menu Selection >>
SELECT INPUT QUEUE
	1) FIFO : default queue
	2) FIFO : alternate queue ?
Select input queue [1] ?
SELECT PRIORITY
	1) Standard Priority
	2) High Priority
Select priority [1] ?
SELECT WAIT OPTION
	1) PAMS_GET_MSG
	2) PAMS_GET_MSGW
Select wait option [1] ?
Listing 3-23 shows how to receive a message.
Listing 3-23 Receiving a Message
Main Menu
1 Parameters
2 Actions
3 Exit
Enter Menu Selection >> 2
Actions Menu
 1 Attach Queue
 2 Bind Queue
 3 Detach Queue
 4 Locate Queue
 5 Put Message
 6 Get Message
 7 Set Timer
 8 Cancel Timer
 9 View Current Parameters
10 Previous Menu
Enter Menu Selection >> 6
received message from 9.205, class:12, type:34, : This is a test message from dmq
Listing 3-24 shows how to set the detach parameters.
Listing 3-24 Setting Detach Parameters
Main Menu
1 Parameters
2 Actions
3 Exit
Enter Menu Selection >> 1
Parameters Menu
 1 Attach Parameters
 2 Bind Parameters
 3 Detach Parameters
 4 Locate Parameters
 5 Put Parameters
 6 Get Parameters
 7 Set Timer Parameters
 8 Cancel Timer Parameters
 9 View Current Parameters
10 Previous Menu
Enter Menu Selection >> 3
Detach all [0] ?
Flush on detach [1] ?
Enter queue number [205] ?
Listing 3-25 shows how to exit from the Test Utility.
Listing 3-25 Exit from the Test Utility
Main Menu
1 Parameters
2 Actions
3 Exit
Enter Menu Selection >> 3