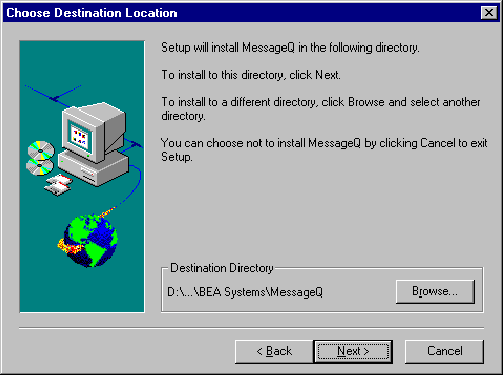
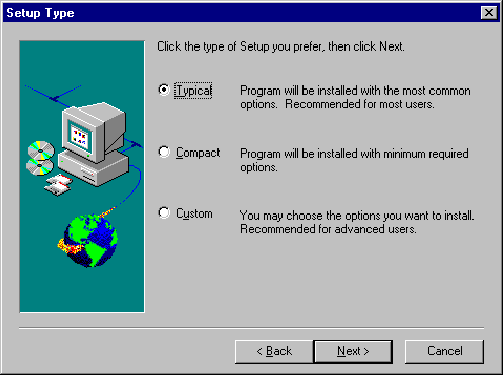
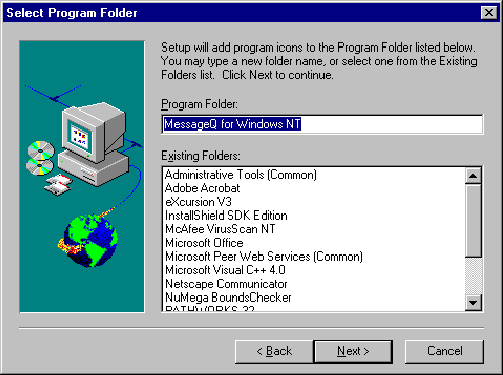
setup.exe to start the installation.


This chapter contains the following topics that describe how to install MessageQ software on Windows NT systems:
Before you install MessageQ, there are several installation requirements you should perform to ensure that the installation runs smoothly and the software is installed correctly, as follows:
Preparing to Install the MessageQ Software
Use the bill of materials (BOM) to check the contents of your software distribution kit. The kit contains the following:
Your distribution kit includes a letter, Read Before Installing MessageQ for Windows NT, Version 4.0A. This letter tells you how to access the release notes, which provide late-breaking information you should read before installing, configuring, or using MessageQ software.
Your kit contains a CD-ROM for industry-standard CD readers, labeled MessageQ for Windows NT, Version 4.0A. This CD-ROM contains both Digital Alpha© and Intel® versions.
The MessageQ for Windows NT documentation set contains the following manuals in Winhelp, HTML, and hardcopy formats:
As part of your software distribution kit, MessageQ provides this online documentation in HTML format which you can read using any World Wide Web browser. For more information on how to access the online documentation, refer to the section on Using the Online User Documentation.
Before you install MessageQ software you must have access to an account with Administrator privileges on the system where you are installing MessageQ. Also, your system must meet the hardware, software, and disk space requirements listed in the Read Before Installing MessageQ for Windows NT letter.
We recommend that you back up your system disk before installing any software. For details on performing a system disk backup, see your Windows NT system documentation.
This topic describes the tasks for installing the MessageQ software on Windows NT systems, as follows:
Complying with the Installation Prerequisites
Backing up the System Disk
Installing the MessageQ Software on Windows NT Systems
The length of a MessageQ installation can vary, depending on the type of media from which you are installing and your system configuration. You can stop the installation procedure any time by clicking Exit or Cancel in the currently active dialog. When you interrupt the installation, files created up to that point are not deleted automatically; you must delete these files manually.
Appendix A lists the files installed on your system during the installation procedure.
The MessageQ installation dialogue displays a list of options that let you choose the type of MessageQ installation for your system. If you choose an installation option and then decide you don't want to install it, you can cancel your selection to redisplay the list of available options.
Table 1-1 describes the types of installations available and the subsets installed for each installation type. Choosing Which Subsets to Install
Note: The Development Environment and Example Programs are not included in the Runtime Media Kit.
We recommend that you install Version 4.0A software in the default installation directory called C:\Program Files\BEA Systems\MessageQ. If you have a previous version of MessageQ for Windows NT installed on your system and choose to install into the same directory, the previous version of the software will be completely overwritten. Regardless of the directory in which the product is installed, the icons for the Program Manager are overwritten to point to the new installation. If a previous version is installed, you will not be able to access it from the Program Manager using the icons.
Note: Before you can run your existing applications under MessageQ Version 4.0A, you must convert your group configuration data to use the Version 4.0A format. Refer to the last section in this chapter entitled Performing Postinstallation Tasks for more information on how to convert existing group configuration data.
The following procedure describes how to install MessageQ software for Windows NT.
Note: You can stop the installation procedure at any time by clicking Exit in the Installation Options dialog. You can also return to the previous dialog by clicking Back.
setup.exe to start the installation.


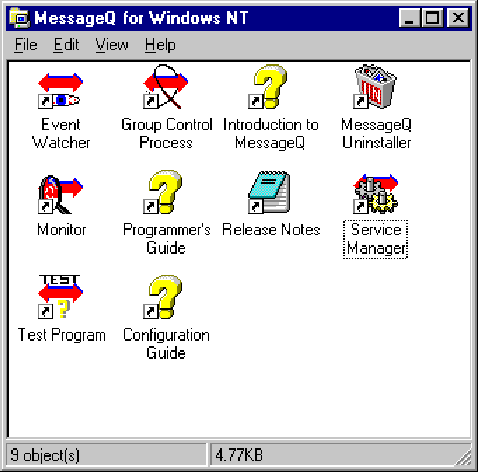
Figure 1-1 shows the MessageQ program group created after the server installation is complete.
Figure 1-1 MessageQ Program Group Server Icons

Table 1-2 describes the program group utility icons.
If errors occur during the MessageQ installation procedure for Windows NT, be sure you have met all of the system software and hardware requirements as outlined in the Read Before Installing MessageQ for Windows NT letter.
If the installation fails, SETUP displays a dialog indicating that the installation was not successful. Installation failures can occur if the following conditions exist:
If you encounter a problem while using MessageQ and you believe the error is caused by a problem with MessageQ, call BEA technical support. See How to Get Technical Support in the Preface for additional information.
MessageQ includes online documentation in HTML format that can be read using a World Wide Web browser. To use the HTML-based online documentation, invoke a World Wide Web browser, and use the "Open File" option to open the following file:
Where: Using the Online User Documentation
drive:\
installation directory\books\bookshelf.html
Begin navigating the online documentation using the hyperlinks. Note that each book in the online documentation set is listed and accessible on the bookshelf.html page. The first page in each book is the table of contents. Hyperlinks can be used to navigate through the information contained within a single book. To view information in a different book, you must return to the contents page of the book you are reading and then jump to the bookshelf page to select another book.
For those sites with a corporate intranet, MessageQ documentation can be copied to a single node and linked into the corporate information base contained on an internal Web site. Copying the online documentation to an intranet server limits the use of disk space to a single system while making it accessible to everyone on the corporate intranet. After the documentation is copied to the corporate Intranet server, users must be given a URL to access the documentation or a description of the page from which the documentation can be accessed.
After completing the installation procedure, you can perform the required and optional postinstallation tasks. MessageQ does not require you to perform the postinstallation tasks in a particular order.
The postinstallation tasks are as follows:
|
Configure the network |
Required |
|
Start the MessageQ Service for Windows NT |
Optional |
|
Add the MessageQ drive and directory to your Path |
Required |
|
Converting Group Configuration Data |
Required |
To configure MessageQ for Windows NT to communicate with remote systems, you must have configured TCP/IP networking and started the TCP/IP service. The remote systems that you intend to communicate must have their names and Internet Protocol (IP) addresses entered in the \winnt\system32\drivers\etc\hosts file. Note that the local system must have an entry in this file as well, if MessageQ is to operate properly. Enter the local system name using uppercase letters.
It is important to note that the node names are case sensitive. Your Windows NT system name, which was defined when Windows NT was installed or when you used the Network applet in the Control Panel, is in uppercase. To use MessageQ for Windows NT to communicate with other networked systems by way of TCP/IP, we recommend that your TCP/IP host name be the same as your Windows NT system name, and should be defined in uppercase letters.
For example, if your Windows NT system is ANTARES, your TCP/IP host name, as defined in the Network applet and the \winnt\system32\drivers\etc\hosts file should also be defined as ANTARES. Your Windows NT system name is the name that will be presented to remote MessageQ systems when initiating connections.
MessageQ for Windows NT provides a service that starts buses and groups on demand. The MessageQ Service for Windows NT is installed as part of the Run-Time Environment during the installation, and runs in the background when no one is logged on to the system. By default, the MessageQ service for Windows NT is not started when it is installed.
To use the MessageQ Service, you must begin by using the MessageQ Service Manager to configure the message queuing groups that you would like to be automatically started and stopped by the MessageQ Service. You can run this utility by double clicking the MessageQ Service Manager icon in the main MessageQ window.
To start the MessageQ service, select the Services applet in the Control Panel and choosing Start. When the service starts up, it will in turn start all message queuing groups configured for automatic startup. You can also change the default configuration of the MessageQ Service using the Services applet in the Control Panel to enable the MessageQ Service to start automatically when the system boots.
The MessageQ executable images must be located in the user's default path to operate properly. Add the MessageQ drive and directory to your Path as follows:
where:drive:\
installation directory\bin
If a path variable is present, do not delete it. Add a semicolon (;) to the end of the existing Path specification and then add the MessageQ Path variable as described above.
MessageQ for Windows NT provides a conversion utility that lets you quickly convert your existing group configuration data so that it is compatible with the Version 4.0A software. This section describes how to use the conversion utility called dmqconvert.
MessageQ for Windows NT, Version 4.0A no longer provides the Configuration Editor for configuring message queuing groups. This release now uses an initialization file to store all group configuration data making the Windows NT environment compatible with all other MessageQ Server environments. Due to this change, MessageQ configuration data is no longer stored in the NT Registry. When you convert your existing groups to Version 4.0A, the MessageQ conversion utility copies the existing data from the NT Registry to the file that you specify using a common group initialization file format.
Note that the conversion utility does not update the group initialization file to include the new Version 4.0A sections and parameters. To update your initialization file to use new Version 4.0 features, refer to the information in this chapter, which describes all the sections and parameters in the group initialization file. Using a text editor, you can add to or change the existing initialization files to incorporate Version 4.0A parameters and their associated settings.
To convert your existing group initialization file, follow these steps:
cd \Program Files\BEA Systems\MessageQ
Where:dmqconvert -b
x -g y -f myfile.init

