This chapter describes how to manage MessageQ software on your system by performing the following tasks:
The Monitor utility is a MessageQ application that allows you to monitor and control the performance of your MessageQ NT system.
This chapter describes how the Monitor utility lets you manage MessageQ functions such as:
Using the Monitor Utility
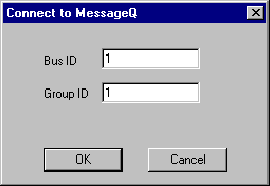
Before running a program that uses MessageQ, you must set the environment to identify the message queuing bus and the message queuing group with which the program will be associated. Connecting to the MessageQ environment can be accomplished from the command line, or from the Monitor utility.
A MessageQ program associates itself with a specified bus ID and group ID at run time by obtaining the values of the DMQ_BUS_ID and DMQ_GROUP_ID environment variables.
These values can be set from the command line, as follows:
where: Connecting to the MessageQ Environment
Connecting to a Group from the Command Line
SET DMQ_BUS_ID=
bus_idSET DMQ_GROUP_ID=
group_id
|
|
Numeric bus ID; 1 to 9999 |
|
|
Numeric group ID; 1 to 32000 |
You can establish default values for these symbols by adding these environment variables to your profile with the System applet in the Control Panel. You can also add code to your MessageQ application that sets these environment variables using the WIN32 call SetEnvironment variable. See your Windows NT programmer's documentation for more information.
To use the Monitor Utility, you must have at least one group running in order to connect to the MessageQ environment. You can connect to a running group from the MessageQ Monitor utility using the following procedure:

There are several ways you can start a MessageQ for Windows NT message queuing group. You can start it from:
To start MessageQ you must invoke the MessageQ startup procedure ( The MessageQ startup procedure executable image is Where: Starting a Group from the Command Line
dmqstartup) to start each referenced group in the group initialization file.
dmqstartup, and is run interactively by entering the following command:
dmqstartup -b
bus_id -g group_id -f filespec -n group_name [-l logfile_name]
MessageQ for Windows NT uses the bus ID and group ID to locate configuration information in the Windows NT Registry. Note that when you start a group from the command line, the default log file dmqlog.log is placed in the current directory.
You can start a group from the MessageQ Monitor utility using the following procedure:
Follow this procedure to create a custom Group Startup icon to start a message queuing group under MessageQ for Windows NT:
Click the Next button to proceed to the next screen.
c:\...\bin\dmqgcp.exe -b 1 -g 9 -f init.txt -n group9
Follow this procedure to add the message queuing group to the startup menu to be started automatically when you log in to your Windows NT user account.
Click the Next button to proceed to the next screen.
c:\...\bin\dmqgcp.exe -b 1 -g 9 -f init.txt -n group9
MessageQ offers a shutdown procedure to shut down a running group from the command line, the Monitor Utility, or from the Group Control Process system menu.
The MessageQ shutdown procedure executable image is dmqshutdown, and is run interactively by entering the following command:
dmqshutdown -bbus_id-ggroup_id
Where:
|
-b bus_id |
Numeric bus ID; maximum of four digits |
|
-g group_id |
Numeric group ID; maximum of five digits |
The group shutdown procedure stops all queues immediately without draining the messages in the queues. Further, it stops all links immediately and provides an orderly shutdown of all MessageQ processes.
Use the following procedure to shutdown a group from the Monitor Utility:
If you select Stop, MessageQ stops all queues in the group, allowing them to be emptied. Applications can continue to read messages from the queues until all are empty. However, applications cannot place messages in the queues. After all the queues are empty, the MessageQ processes in the group will terminate.
If you select Stop Fast, MessageQ terminates all MessageQ processes in the group immediately. When the group is stopped, messages can no longer be delivered to the queues and all pending messages in the queues are lost.
Use the following procedure to stop a message queuing group from the Group Control Process system menu:
Icons for other processes in the group will disapper after approximately 5 seconds.
Note:
The Event Watcher is not closed by a GCP shutdown; it can be closed by choosing Close from its own System menu when it is no longer needed. All MessageQ processes can be closed by selecting Close from their respective system menus. However, this should only be done if the GCP shutdown fails to terminate a process normally.
You can start a cross-group connection, also called a link, using the MessageQ Monitor utility.
The following procedure describes how to start a Cross-Group connection:
You can stop a cross-group connection using the MessageQ Monitor utility.
The following procedure describes how to stop a cross-group connection:.
You can restart a queue that has been previously stopped using the MessageQ Monitor utility.
The following procedures describe how to start a queue:
You can stop a queue using the MessageQ Monitor utility.
The following procedure describes how to stop a queue:
If you select Stop, MessageQ stops all queues in the group, allowing them to be emptied. Applications can continue to read messages from the queues until all are empty. However, applications cannot place messages in the queues. After all the queues are empty, the MessageQ processes in the group will terminate.
If you select Stop Fast, MessageQ terminates all MessageQ processes in the group immediately. When the group is stopped, messages can no longer be delivered to the queues and all pending messages in the queues are lost.
The Client Library Server (CLS) runs as a Windows NT application program that uses MessageQ for Windows NT. It is important to define the environment variables described in Connecting to the MessageQ Environment earlier in this chapter, because they identify the MessageQ Server group where the Windows clients connect. Additionally, the message queues used by Windows clients must be defined in the MessageQ for Windows NT group configuration.
The CLS creates a thread for each client connection from a MessageQ Windows Client. The CLS window displays a count of the number of clients currently connected, and for each client displays the server thread ID, client host name, client task ID, and queue number attached.
For convenience and ease of application management, CLS servers are normally started when a MessageQ group starts, and are stopped when the MessageQ group is shut down. Once the MessageQ group is started ou can start a CLS server from the Monitor utility.
Use the following procedure to start the CLS:
Use the following procedure to stop the CLS:
The CLS security file is a text file containing a table of client entries. Each client entry contains a list of endpoints and queues which the client may use. CLS uses the security file to restrict access by remote clients to those endpoints and queues. MessageQ groups can have their own separate security files, or can share one file jointly.
You can create a security file in one of two ways:
For LIBRARY client servers on NT systems, a template security file is available at the following location:
Begin by making a copy of the template security file. Then, edit the copy to remove the sample entries and add entries for the client systems in your environment. Copy the file to its target location and then associate the security file with the message queuing group.
When a CLS is started, it loads the security file specified in the %CLS section of the group initialization file. If no security file is specified, CLS will not restrict access by remote clients. Each CLS can have a separate security file, or a security file can be shared by multiple CLS processes.
For information about the CLS Security Utility, refer to the MessageQ Client for Windows User's Guide.
MessageQ Message Recovery Services (MRS) provide a mechanism for guaranteed message delivery by storing messages on disk and automatically attempting redelivery until the message is received by the target system.
If you enabled MRS as part of your group configuration, you can replay the contents of postconfirmation or dead letter journals using the Journal Replay utility. You may also print the contents of postconfirmation, dead letter, destination queue, or store and forward journals using the Journal Dump utility.
All journal file names are 16 characters long. Each journal file name contains a 12-digit filename, a dot, and a 3-character extension that identifies the journal type. Note that journal file names are unique within a group, but not between groups. Therefore, message queuing environments running more than one message queuing bus must ensure that journal files are not accidentally shared by groups running on different message queuing buses.
Valid journal filenames are of the format:Program Files\BEA Systems\MessageQ\TEMPLATES\dmqclsec.txt
Managing Message Recovery Services
| Format | Journal Type |
|---|---|
|
|
Destination Queue File |
|
|
Store and Forward |
|
|
Postconfirmation Journal |
|
|
Dead Letter Journal |
Where:
|
|
Four-digit local group number in hexadecimal |
|
|
Four-digit queue number in hexadecimal |
|
|
Four-digit remote group number in hexadecimal |
|
|
File sequence number in hexadecimal within a set of files |
The Journal Replay utility lets you resend the contents of postconfirmation or dead letter journals. The Journal Replay utility can use live recovery journals; however, if the journal file is currently in use, you must make a copy of the file before you can replay it. The Journal Replay utility can resend the entire journal file.
Messages sent from the postconfirmation or dead letter journal will be sent using the same source address, target address, delivery mode, and user notification. If the original message requested notification, the notification message is directed to the journal replay process instead of the original sender program.
To invoke the Journal Replay utility, enter the following command syntax. Switches enclosed in parentheses indicate optional command qualifiers.
dmqjplay -bbus-ggroup-mmode-tjournal_type-jjournal_path[-llog_path]
Table 3-1 describes the command options for dmqjplay.
The Journal Dump utility lets you produce a formatted report of the contents of a dead letter journal, postconfirmation journal, destination queue file, or a store and forward file. The Journal Dump utility can be used to print a live journal file if it is not in use. If the journal file is in use, you must halt the message recovery system for the group, and then use the Journal Dump utility to print the contents of the journal file.
To run the Journal Dump utility, enter the following command syntax (switches enclosed in parentheses indicate optional command qualifiers):
dmqjdump -b bus -g group -q queue -t journal_type -h header_type -m message_format -j journal_path [-d] [-l log_path] [-o output_file] [-n number]
Table 3-2 describes the command options for dmqjdump.
You can use the Loader utility to dynamically reload the group initialization file without having to shutdown and restart MessageQ. The Loader utility lets you enter modified settings or parameter values into a running group initialization file.
To run the Loader utility, enter the following command format:
dmqloader -b n -g n -f init_file_path [-l logfile]
Where:
Table 3-3 describes the parameters in the group initialization file that can be modified at runtime.
The MessageQ Monitor utility lets you enable or disable quotas on permanent queues that you previously defined in the %QCT section of the group initialization file. You can enforce quotas on the maximum number of collected messages and bytes that can reside in a given queue.
If you are not concerned whether your application exceeds quotas, you should disable quotas to increase performance and reduce screen clutter.
Use the following procedure to enable or disable quotas:
Queue numbers with a number greater than Temporary Queue (FIRST_TEMP_QUEUE) are dynamically assigned. The BYTE_QUOTA and MSG_QUOTA values for dynamically assigned queues are set from the TEMPLATE entry in the %QCT section. Do not change any other value in the TEMPLATE queue entry.
Previous versions of MessageQ required you to enable or disable queue quotas for an entire message queuing group. However, you can now enable queue quotas on a per queue basis on UNIX systems. You can enable or disable message and byte quotas for a selected queue at startup by setting the Quota Enable field for each entry in the %QCT section of the group initialization file. Table 2-9 contains the values that you can specify for the QUOTA_ENABLED attribute.
You can use the Monitor utility to enable or disable message and byte quotas for a selected queue at runtime. (See the Enabling or Disabling Quotas topic for more information.)
The MessageQ link drivers provide parameters that let you define timeout intervals for testing the state of a cross-group connection, or aborting a connection with a cross-group link. These parameters are implemented as the following environment variables:
If you must use a value other than the default, set both environment variables before starting your group.