[Top] [Prev] [Next] [Bottom]

2. Using the BEA TUXEDO System on UNIX and AS/400 Platforms


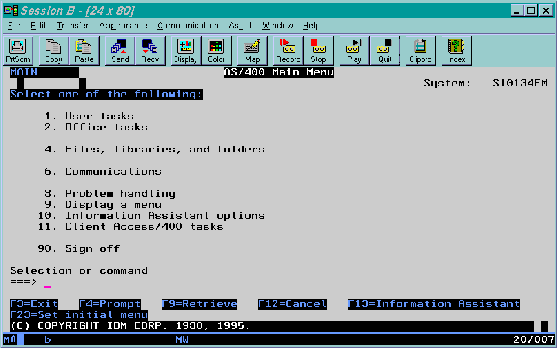
User Interface and AS/400 Concepts

The user interface on an AS/400 system is completely menu-driven; there is no shell. The interface makes extensive use of function keys F1-F24.

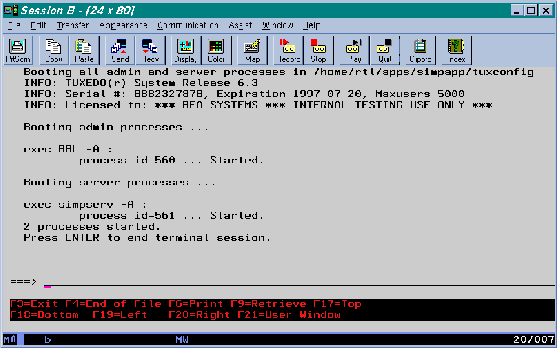
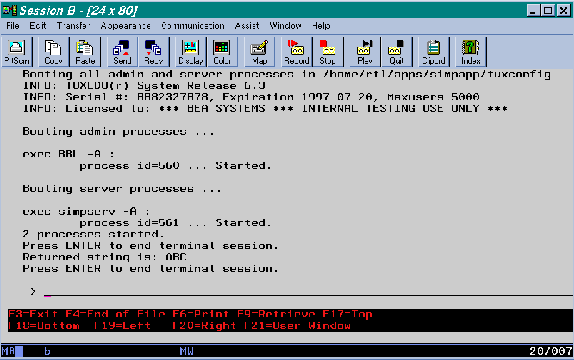
Note: Although some screens in this chapter contain references to Release 6.3, all other information is them is accurate for Release 6.5.

Figure 2-1 Main Menu of Tasks for an AS/400 Platform

Invoking Programs from the Command Line

Virtually every action performed via the menu has a command-line equivalent. Application executables, such as BEA TUXEDO utilities, can be invoked from the command line using the call command. The call command has the following syntax:

call pgm parm(arg1 arg2 .  .  .  )

The notion of the PATH and LD_LIBRARY_PATH environment variables in the UNIX shell is replaced by the library list. For example, the following command:

call hello parm('world')

is a request to search in the library list for the hello program. The first library in the library list that contains this program becomes the current library and the hello program is activated.

During this activation, if a service program (the AS/400 equivalent of a DLL or shared object) is needed, then the library list is searched again. The library list can be displayed with the dsplible command, and manipulated with the addlible and rmvlible commands.

Interactive and Batch Jobs

Jobs define execution context (roughly equivalent to a process). There are two kinds of jobs: interactive and batch. When a user signs on to a system, an interactive job is assigned to the new session. All call commands are executed inside this job. The wrkactjob command lists all active jobs on the system. (It is equivalent to the ps command on a UNIX system.) A batch job can be submitted via the sbmjob command. The wrksbmjob command lists all submitted batch jobs.

HFS and IFS File Systems

This section describes the two file systems that are important on an AS/400 platform: HFS and IFS.

HFS

HFS is the traditional flat file system. At the highest level it contains libraries. Each library may contain files, e.g., module files, program files, and physical files. A physical file, in turn, may contain members. All text files (including C program source code files) are stored as members of a physical file.

Executables may reside only in HFS, but symbolic links can be created from IFS to HFS via the addlnk command.

Filenames

HFS filenames are limited to ten characters and are not case-sensitive.

IFS

IFS is a directory-oriented file system designed to support PC file-serving. IFS (especially /QOpenSys) closely resembles a UNIX file system.

Executables may reside only in HFS, but symbolic links can be created from IFS to HFS via the addlnk command.

Filenames

With one exception (/QOpenSys) filenames in IFS are case sensitive.

Editors

Because there are no native editors for IFS files, we recommend using Client Access to view and edit these files on a PC. In addition to providing a 5250 emulator, Client Access allows IFS files to be mapped as network drives on the PC. All PC Client Access users must be enrolled on the AS/400 first.

Commands for HFS and IFS Files

Separate commands must be used for HFS and IFS files:

Character Set Conversion

Because the character sets on the AS/400 and the PC do not match, we also recommend turning on automatic EBCDIC/ASCII conversion for all files. To do so on a platform such as WIN95 or NT, complete the following procedure.

  1. Open the Control Panel window.

  2. Select Client Access.

  3. Select Network Drive.

  4. Add "*" to File extension.

Redirection of Standard IO and Standard Error

When you are working with ILE/C programs in an HFS file system, you may redirect standard input, standard output, and standard error (the stdin, stdout, and stderr files, respectively) by using the ovrdbf command. See the CL Reference Manual for details.

There is no simple way to redirect standard IO and standard error messages to and from IFS files.

Workarounds

Examples

Development Environment

The make, lex, and yacc utilities are not available on the AS/400. The native character set is EBCDIC, not ASCII.

Two BEA TUXEDO commands, buildclient and buildserver, have been renamed buildclt and buildsrvr, respectively, in order to conform to the 10-character maximum.

The buildclt and buildsrvr commands accept input only for module files (*MODULE) and service program files (*SRVPGM), and produce output program files (*PGM). The ILE/C modules must be produced by crtcmod. Likewise, ILE/COBOL modules must be produced by crtcblmod.

The following example command lines show how to compile a C source file in member cx of a file called tuxsrc in a library called apps. The object module is created in a file called cx in a library called apps.

crtcmod module(apps/cx) srcfile(apps/tuxsrc) srcmbr(cx) +
sysifcopt(*ifsio) dbgview(*all) define('DEF=1')

Note that the special system interface option sysifcopt(*ifsio) is specified here. This option allows the C runtime library to access IFS files. Because the BEA TUXEDO system is compiled with this option, we strongly recommend using it for compatibility.

Note also that debugging has been turned on by dbgview(*all) and the preprocessor defined for DEF has been set to 1. This is equivalent to specifying -DDEF=1 -g on a cc command line (on a UNIX platform).

Currently you cannot specify a C source file on the buildclt or buildsrvr command line.

The -f and -l options to the buildclt and buildsrvr commands also mean something slightly different from the same options to the equivalent commands (buildclient and buildserver) on a UNIX system.

On a UNIX platform, the -f (first) option allows you to specify a list of items to be passed to the cc command such that the objects produced by running cc on these items are linked before the BEA TUXEDO libraries are linked.

The -l (last) option allows you to specify a list of items to be passed to the cc command such that the objects produced by running cc on these items are linked after the BEA TUXEDO libraries are linked.

On an AS/400 platform the -f option accepts object modules (that is, files of type *MODULE) only, and the -l option accepts service programs (that is, files of type *SVRPGM) only.

buildclt Example

Consider the following example command line.

buildclt ('-fapps/cx' '-fapps/cy' '-oapps/client')

This command accomplishes two tasks:

buildsrvr Example

Consider the following example command line:

buildsrvr ('-fapps/sx' '-fapps/sy' '-oapps/server' '-sSVC')

This command accomplishes two tasks:

If the -k option of buildsrvr is used, then the server main code is generated in member BSpid of the tuxsrc file in the qtemp library, where the value of pid is the process ID of the buildsrvr process. Because the qtemp library is removed at the end of each job, you must make a copy of it in a permanent directory before signing off, if you want to keep it.

Both mkfldhdr and viewc generate header files in IFS, usually in the current directory. You must copy these .h files into an HFS h file so the C compiler will be able to find them.

viewc also generates the binary output file with a .VV (instead of a .V) suffix.

Runtime Environment

The BEA TUXEDO system is distributed with a set of tools for manipulating the environment: getenv, putenv, setenv, and env.

Table 2-1 Command Syntax for Runtime Tools

Syntax Function

getenv var

Displays the value of the specified environment variable (var)

putenv 'var=value'

Sets the specified environment variable (var) to the specified value (value)

setenv file

Calls putenv on every line of the specified file (file)

env

Displays the values of all variables in your environment

V4R1 provides a single command, wrkenvvar, that offers functionality similar to that available through getenv, putenv, setenv, and env. The wrkenvvar command differs from the BEA TUXEDO commands, however, in several aspects. First, unlike the distributed tools delivered with the BEA TUXEDO system, wrkenvvar cannot handle the expansion of variable names marked with a $ prefix (similar to shell variable expansion).

In addition, the hostname and id utilities are distributed only with the BEA TUXEDO system:

All BEA TUXEDO executables and header files are packaged in an HFS library (see tuxlib during installation). Other data files (such as udataobj/* and locale/C/*) are placed in $TUXDIR in IFS. $TUXDIR/bin has symbolic links to HFS executables. $APPDIR should also reside in IFS. You must add the HFS library to the library list before invoking any BEA TUXEDO commands.

Sample Application

Let's use simpapp as an example. Assume tuxdir is installed in /QOpenSys/tuxedo, tuxlib is installed as tuxedo, and APPDIR is set to /home/apps/simpapp.

Begin by building the simpcl and simpserv programs (in Steps 1-9).

  1. Create an HFS library called apps.

    crtlib apps

  2. Create a physical source file called tuxsrc.

    crtsrcpf apps/tuxsrc rcdlen (120)

  3. Copy simpcl.c from /qopensys/tuxedo/apps/simpapp to member simpcl or tuxsrc.

    cpyfrmstmf fromstmf('/qopensys/tuxedo/apps/simpapp/simpcl.mbr') +
    tombr('/qsys.lib/apps.lib/tuxsrc.file/simpcl.mbr') +
    mbropt(*replace)

  4. Generate a client object module by running the ILE/C compiler.

    crtcmod module(apps/simpcl) srcfile(apps/tuxsrc) +
    srcmbr(simpcl) sysifcopt(*ifsio)

  5. Generate a client program by running buildclt.

    call buildclt ('-fapps/simpcl' '-oapps/simpcl')

  6. Copy simpserv.c from /qopensys/tuxedo/apps/simpapp to member simpserv of tuxsrc.

    cpyfrmstmf fromstmf('/qopensys/tuxedo/apps/simpapp/simpserv.c') +
    tombr('/qsys.lib/apps.lib/tuxsrc.file/simpserv.mbr') +
    mbropt(*replace)

  7. Generate a server object module by running the ILE/C compiler.

    crtcmod module(apps/simpserv) srcfile(apps/tuxsrc) +
    srcmbr(simpserv) sysifcopt(*ifsio)

  8. Generate a server program by running the buildsrvr command.

    call buildsrvr ('-sTOUPPER' '-fapps/simpserv' '-oapps/simpserv')

  9. Create a symbolic link from /home/apps/simpapp/simpserv to apps/simpserv.

    addlnk obj('/qsys.lib/apps.lib/simpserv.pgm') +
    newlink('/home/apps/simpapp/simpserv')

  10. Add tuxlib to the library list.

    addlible tuxedo

  11. Set the necessary environment variables as follows.

    call putenv 'TUXDIR=/QOpenSys/tuxedo'
    call putenv 'APPDIR=/home/apps/simpapp'

  12. Create the TUXCONFIG file from the UBBCONFIG configuration file UBBCONFIG.

    call putenv 'TUXCONFIG=$APPDIR/tuxconfig'
    call tmloadcf ('-y' 'UBB')

  13. Run wrklnk to verify that the file tuxconfig has been created in /home/apps/simpapp.

  14. Boot the application.

    call tmboot '-y'
    Messages similar to those shown in Figure 2-2 are displayed.

    Figure 2-2 Messages Displayed at Boot Time

  15. Now run the client by entering a command such as the following.

    call apps/simpcl 'abc'

    Figure 2-3 shows the messages that are displayed.

    Figure 2-3 Messages Displayed after the Client Is Called

  16. To view the userlog file (which was created in $APPDIR in IFS) on a Win95 PC, use the Windows Explorer utility to map the AS/400/home/apps IFS directory to a network drive (such as F). Then use WordPad to open the userlog file in that drive, as shown in Figure 2-4.

    Figure 2-4 Viewing the Userlog File with WordPad

Shutting Down the Application

To shut down an application, enter the following command.

call tmshutdown '-y'

Figure 2-5 shows the messages displayed during the shutdown process.

Figure 2-5 Messages Displayed during Shutdown

IPC Resources

IBM ships a set of IPC tools as a PTF. These tools provide the functionality available on a UNIX system through the ipcs and ipcrm commands. There are some differences, however, the IBM tools have different names and produce output in a different manner.

To view the IPC resources consumed by all your applications, enter the following command.

call qp0zipcs

The output of qp0zipcs is generated in *QPRINT which means that it can be viewed as a spool file with the wrksplf command.

To remove a particular IPC resource, such as a message queue ID (qid), enter the following command.

call qp0zipcr ('-qqid')

When an error occurs while you are running qp0zipcr, a message is generated in the joblog. Use the dspjoblog command to view it.

Configuration Issues

/Q

The threshold command parameter specified on the qmadmin qcreate command line (such as the server RCMD), must refer to a symbolic link to an executable program in HFS. The link must be included in $PATH; typically it is found in $APPDIR.

UNIX shell scripts will not work here.

TxRPC

By default, the tidl compiler does not run the C preprocessor. This means that if you have #define statements or any other pre-processor constructs in the input file, then you will need to specify the -cpp_cmd option:

call tidl ('-cpp_cmd' 'crtcmod' . . . )

By default, the tidl command also produces server and client stub files in the current IFS directory. The stub files are named x_cstub.c and x_sstub.c. It is also possible to generate stub files in HFS by using the -out option to specify a library in the directory /qsys.lib, as in the following example:

call tidl ('-out' '/qsys.lib/tuxedo.lib' . . . )

In this case, the stub files will be generated in the physical file idl with members named x_cs and x_ss for client and server stubs, respectively. The tidl command also generates a header file in the current working directory of IFS. For example, if the idl compiler is run on input file x.idl as follows:

call tidl ('-cpp_cmd' 'crtcmod' '-keep' 'c_source' x.idl)

then tidl will generate the following three files in the current working directory of IFS:

In addition, the tidl compiler will copy the header file to member x belonging to file h in the qtemp library.

If the -keep option is not specified, then the C compiler will be invoked on the stub files to produce object modules x_cs and x_ss in library qtemp. (qtemp is the default output library which can be overridden by the -out option, as described earlier.)

/COBOL

The BEA TUXEDO system supports clients and servers written in the ILE/COBOL language. The major differences between MicroFocus COBOL and ILE/COBOL are listed below.

Web GUI

With Release 6.5, you can administer a BEA TUXEDO application through any Web browser (such as Netscape or Internet Explorer) by using the Web-based GUI for administration. This section provides some tips for running the Web GUI on an AS/400 platform.

Two programs, tuxwsvr and wlisten, need to be run in the background. This can be accomplished by running a CL script using sbmdbjob. For example, the following CL script could be used to start tuxwsvr.

//BCHJOB JOB(WEBSERVER) JOBD(TUXADM/JOBD)
addlible tuxlib
cd '/home/tuxadm/web'
call setenv env
call tuxwsvr ('-l//lc400b.beasys.com:3184' '-iwinput.ini')

The first line should begin with //BCHJOB which allows a number of parameters to be set. (See the CL Programming Manual.) The JOB parameter, for example, sets the name of the job such that it appears on a WRKACTJOB screen. A customized Job Description is needed here also so that the job can be run in batch. The default Job Description for interactive sessions (QDFTJOBD) cannot be used here. To create a new one, use WRKJOBD to copy QDFTJOBD to TUXADM/JOBD, and then add a USER name to TUXADM/JOB.

Several environment variables, such as TUXDIR, also need to be set. To set an environment variable, list all necessary environment settings in an env file and then run the setenv command, specifying the env file on the command line. Set any other application-specific variables (such as APPDIR) as well.

One additional input file that tuxwsvr expects is an initialization or ini file. The ini file tells the server where to find HTML pages and Java images. For example:

CGI /cgi-bin tuxdir/bin
HTML /java/images tuxdir/web/gui/java/bea/tuxadm/images
JAVA /java tuxdir/web/gui/java
HTML /docs tuxdir/docs
HTML / tuxdir/udataobj/webgui

For example, suppose the BEA TUXEDO system has been installed in /qopensys/tuxr65 and you are now creating an ini file called winput.ini. If you substitute the root directory of the BEA TUXEDO system for the word tuxdir in the lines shown above, your ini file will look like the following.

CGI /cgi-bin /qopensys/tuxr65/bin
HTML /java/images /qopensys/tuxr65/web/gui/java/bea/tuxadm/images
JAVA /java /qopensys/tuxr65/web/gui/java
HTML /docs /qopensys/tuxr65/docs
HTML / /qopensys/tuxr65/udataobj/webgui

For more detailed information on creating an ini file for tuxwsvr, see tuxwsvr(1) in the BEA TUXEDO Reference Manual.

Current implementation also requires that for all user CGI programs, the HFS library in which they reside be added to the library list.

The procedure for setting up a batch job with wlisten is similar to the one you follow to set up a batch job for tuxwsvr.

All wlisten options are taken from an ini file that is specified with the -i option. This ini file must be created; IT IS NOT GENERATED WHEN YOU INSTALL BEA TUXEDO ON THE AS/400. For detailed information on creating an ini file for wlisten, see the wlisten(1) in the BEA TUXEDO Reference Manual. The following is an example.

TUXDIR=/qopensys/tuxr65
NADDR=0x00020c71c604a68d
CODEBASE=/jav
DOCBASE=http://lc400b:3184/docs

To start the Web GUI for BEA TUXEDO administration on the AS/400, enter the following URL.

http://machine_name:port/cgi-bin/tuxadm?TUXDIR=tuxdir&INIFILE=ini_file

where:

For additional information on preparing to use the Web GUI, refer to the BEA w Installation Guide.


[Top] [Prev] [Next] [Bottom]