This chapter provides procedures for
Introduction
A description of the directory structure after installation is also included.
This section provides procedures for installing the following:
Installing the BEA TUXEDO System v6.5
To install the BEA TUXEDO system on a UNIX platform, complete the following procedure. Make sure you install the software in the file system in which the BEA TUXEDO system executables will run.
Note:
It will take approximately 5 minutes to install each package on a local disk; installation on a remote disk may require as much as 10 minutes.
Installing the BEA TUXEDO System on UNIX Platforms
Note:
If your system does not have a directly-connected CD-ROM reader, you can mount the CD-ROM on a remote system, share (export) the CD-ROM file system, and then mount the remote file system. See Appendix A for detailed instructions for each platform. Alternatively, you can mount the CD-ROM on a remote system, copy the contents of the CD-ROM directory for your platform to the system in which you plan to install the BEA TUXEDO system, and continue with the rest of the installation procedure.
Table 2-1 CD-ROM Directory Names for UNIX System Platforms
sh install.sh
To install the BEA TUXEDO system on a Windows platform, complete the following procedure.
Note: It will take approximately 5 minutes to install the BEA TUXEDO system.
Note:
Diskette images are provided on the CD-ROM to make it easy for you to distribute the /WS platform software within your organization.
Table 2-2 CD-ROM Directory Names for Windows Platforms
To install BEA TUXEDO/WS on a Macintosh machine, complete the following procedure.
Note: It will take approximately 15 minutes to install BEA TUXEDO System /WS.
.sea file.
The BEA TUXEDO Administrator's Guide to the Web-based GUI is installed (in the same directory) only when you install the Web-based GUI for BEA TUXEDO system application administration.
Your product license was delivered on the floppy diskette that you received in the box with the software CD-ROM.
Note:
The floppy diskette cannot be read on a computer running the UNIX system. If you are using a UNIX platform, read the floppy onto a Windows machine and transfer the license file to the UNIX machine. To verify that the UNIX system has accepted the file, run the tmadmin -v command.
$TUXDIR/udataobj/lic.txt.
$TUXDIR/udataobj/lic.txt
To verify that you have successfully installed the BEA TUXEDO system software on a server platform, check the directory structure added to your system for the BEA TUXEDO system files, and try configuring and executing the sample application provided. This section describes the directory structure and provides instructions for running the sample application.
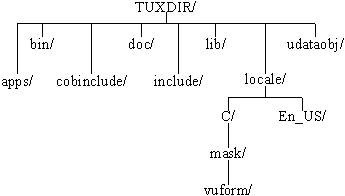
When the BEA TUXEDO system is installed, the directories shown in Figure 2-1 are created. This diagram reflects the directory structure after all packages in the BEA TUXEDO system development environment have been installed.
Figure 2-1 BEA TUXEDO System directory structure
The contents of each directory are described below. TUXDIR is the base directory for the BEA TUXEDO system software. TUXDIR must be an empty directory for which you have read, write, and search (execute) permissions. (In previous releases it was referred to as ROOTDIR.)
$TUXDIR/apps
$TUXDIR/bin
$TUXDIR/cobinclude
$TUXDIR/doc
$TUXDIR/include
rpc, depending on the platform.
$TUXDIR/lib
$TUXDIR/locale
$TUXDIR/locale/C
$TUXDIR/locale/En_US
En_Us is a SCO alias for C.
$TUXDIR/locale/C/mask
$TUXDIR/locale/C/mask/vuform
vuform(1).
$TUXDIR/udataobj
To verify that you have successfully installed the BEA TUXEDO system software on a server platform, you can try configuring and executing the sample application found in the directory $TUXDIR/apps/simpapp.
Note:
Instructions for setting up and running a simpapp through the Web GUI are provided in the "Tutorial" section (in Chapter 1) of the BEA TUXEDO Administrator's Guide to the Web-based GUI.
simpapp is a non-distributed application consisting of a server, client, and configuration file. The server simpserv offers a single service called TOUPPER. The client simpcl is invoked with a single argument, which is a string to be converted to upper case. The server returns the converted string to the client, which prints it out.
For example, the invocation
simpcl "hello world"
results in the output
Returned string is: HELLO WORLD
To configure and run simpapp, follow these steps. This procedure is also described in the README file in $TUXDIR/apps/simpapp.
$TUXDIR/tux.env shows you how to do this.
MYDIR=/home/me/simpapp
mkdir $MYDIR
cd $MYDIR
cp $TUXDIR/apps/simpapp/* .
chmod 755 simpserv simpcl
chmod 644 ubbsimpleubbsimple to replace the bracketed items with
values appropriate to your BEA TUXEDO system installation. Follow the
comments in ubbsimple, which show you exactly how to customize the file.
APPDIR (in the file) should be the same as MYDIR, and TUXCONFIG (in the file)
should be set to the literal pathname corresponding to $MYDIR/tuxconfig (in
our example, /home/me/simpapp/tuxconfig). The machine name should be
set to the name of your system. To determine the name of your system on a
UNIX machine run the command:
If you are using an NT platform and you do not know the name of your system, see your system administrator.
uname -n
TUXCONFIG environment variable, which is used by
several BEA TUXEDO system commands.
TUXCONFIG=$MYDIR/tuxconfig
export TUXCONFIGtmloadcf(1), which produces a file named tuxconfig. This file, referenced by
the TUXCONFIG environment variable, is used by the BEA TUXEDO system at
runtime to describe the application configuration.
If the boot succeeds, you will see output such as the following:
Listing 2-1 Output produced bytmboot -y
Booting all admin and server processes in /home/me/simpapp/tuxconfig
INFO: BEA TUXEDO(r) System Release 6.5
INFO: Serial #: 000102-9125503751, Maxusers 25
Booting admin processes ...
exec BBL -A:
     process id=24180 ... Started.
Booting server processes ...
exec simpserv -A :
     process id=24181 ... Started.
2 processes started.
ULOG.mmddyy in your application directory ($MYDIR), where mmddyy are digits corresponding to the current month, day, and year. If you see a message like the following towards the end of the log
can't create enough semaphores for BB
then the Interprocess Communication (IPC) resources configured in your operating system are not adequate for running simpapp.tmloadcf(1) and specify the name of your configuration file. For example:
If the current value of any IPC parameter configured in your operating system is less than a minimum (either variable or fixed) listed in the tmloadcf -c $MYDIR/ubbsimple
tmloadcf output, you must increase the value of that parameter. For instructions on determining and changing the current IPC values for your platform, see the data sheet for your platform in Appendix A.
simpcl "hello world"
simpapp with the following command:
where rm -rf $TUXDIR
TUXDIR is set to the BEA TUXEDO system base directory.