Using Tuxedo ATMI on Windows
|
|
|
Using the Visual C++.Net IDE To Develop BEA Tuxedo ATMI Applications
The following sections describe how to develop ATMI application clients and/or servers in the Microsoft Visual C++ Integrated Development Environment (msdev) on a Windows XP, or Windows Server 2003 system:
- Before You Start
- Using Development Tools
- Using the buildserver and buildclient Commands
- Adding BuildTuxedo to the MSDEV Tools Menu
- Creating BEA Tuxedo ATMI Project Files
- Setting Up Your Environment
- Debugging a BEA Tuxedo ATMI Server Application
- Developing an ATMI Application Using the Command Line Instead of the Visual C++.Net IDE GUI
- Using the Tuxdev Application
- Using the BEA Tuxedo ATMI Editors
Before You Start
Because BEA Tuxedo ATMI client but not server components can be installed on Windows XP, you can use the Microsoft Visual C++ IDE on these platforms to develop only ATMI application clients. In contrast, because both BEA Tuxedo ATMI client and server components can be installed on Windows Server 2003, you can use the Microsoft Visual C++.Net IDE on the Windows Server 2003 platform to develop both ATMI application clients and servers.
Using Development Tools
BEA Tuxedo ATMI integrates into the Microsoft Visual C++.Net IDE (msdev) and emulates the functionality of msdev when integration is not possible. This integration makes it easier for you to develop BEA Tuxedo ATMI applications for 16-bit and 32-bit Windows operating systems.
The coding required to create BEA Tuxedo ATMI service requests, send requests, set up conversational connections, and get replies is fundamentally the same in both UNIX and Windows Server 2003 environments. BuildTuxedo and TUXDEV are tools that help you in your development environment.
BuildTuxedois a single tool, tightly integrated with themsdevbuild environment, that developers can use instead of thebuildserver,buildclient, andbuildcltcommands. (Of course, these commands are still available for those who prefer to use them.) TheBuildTuxedosystem operates seamlessly on all currently supported Windows environments.TUXDEVallows you to create, edit, and compile multiple 16/32-bit FML tables and multiple 16/32-bit VIEW files. It also uses Multiple Document Interface (MDI) architecture so that you can use multiple views of these file types simultaneously.
Using the buildserver and buildclient Commands
Both the buildclient() and buildserver() commands are available to Windows Server 2003 but not to Windows XP. Only the buildclient() command is available to Windows XP, meaning that only Tuxedo application clients can be built on a Windows XP system. For more information about the build commands, see buildclient(1)and buildserver(1)in BEA Tuxedo Command Reference.
There are differences between how the options to the buildclient() and buildserver() commands work on non-integrated development environments and on integrated development environments, as indicated in the following table.
To modify the build environment in an integrated development environment, follow these steps:
Note: CC and CFLAGS are no longer needed.
To specify the library and include paths in an integrated development environment, follow these steps:
Adding BuildTuxedo to the MSDEV Tools Menu
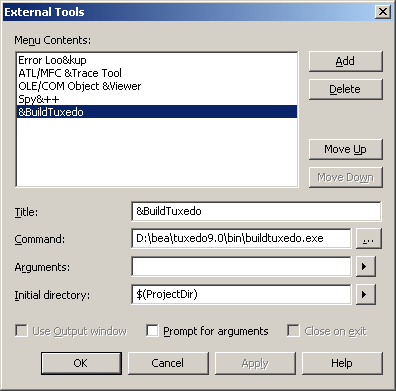
To add BuildTuxedo to the MSDEV Tools menu, follow these steps:
- In the Microsoft Visual C++.Net IDE (
msdev) graphical user interface (GUI), choose Tools—> External Tools. The External Tools window displays. - Type the full pathname of
BuildTuxedo(%TUXDIR%\bin\BuildTuxedo). - To the right of the Command field, click the ellipsis button
 , browse to the desired directory, select
 buildtuxedo.exe, and click Open. The selected pathname appears in the External Tools window. - In the Initial directory field of the External Tools page, click the right arrow button to display a pop-up menu. In the pop-up menu, choose Project Directory (
$(ProjectDir)).
Figure 3-1 External Tools Window
Note: To enable a letter key as a hot key, put an ampersand (&) before the appropriate letter.
Note: To modify an item, highlight it and type over it. To move any item, highlight it and select the up or down arrow at the top of the Menu Contents box.
BuildTuxedo is now part of the MSDEV Tools menu.
Creating BEA Tuxedo ATMI Project Files
BuildTuxedo maintains a separate project file in the current directory for each BEA Tuxedo ATMI application using it. When BuildTuxedo begins, it searches for a valid project file in the current directory. If one is found, the various dialog controls are set to the values stored in the file and the dialog is displayed. The title bar displays the following information:
BuildTuxedoproject_name
Because your BuildTuxedo project is closely associated with the msdev project in the current directory, BuildTuxedo also searches for two other files:
- A valid
msdevmakefile (filename.mak) - An
msdevproject file (filename.mdp,filename.dsw, orfilename.dsp)
If BuildTuxedo cannot find either of these files, it displays a warning and/or fails to activate. If the directory contains multiple BuildTuxedo project files, or multiple msdev project files or make files, menu items that contain appropriate target names are added to the System menu.
To save the current project file, select OK or Apply. To cancel any changes that you make to the project file or any file maintained by the BEA Tuxedo system, click Cancel or Esc.
Setting Up Your Environment
Before you can build your BEA Tuxedo ATMI application in an IDE, you must set the following fundamental parameters in your environment:
- Build type
- Header file
- Filename of the C or C++ file to be created and maintained by
BuildTuxedo - Function names
- Service names
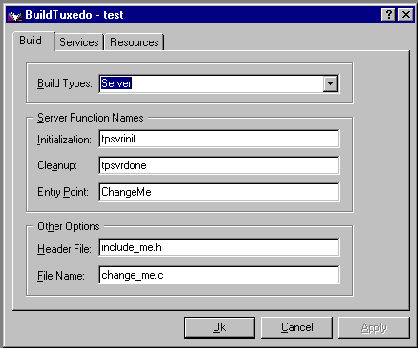
To provide this information, access the BuildTuxedo project_name dialog box in the msdev GUI.
Specifying the Build Type, Header File, and Filename
To specify the build type, header file, and filename, follow these steps:
Note: Windows XP users can select only Workstation Client type.
The Initialization and Cleanup options allow you to override the default init/exit functions by specifying valid function names. The Entry Point option allows you to specify the name of the function generated by
BuildTuxedo. After specifying its name, you can call the function from anywhere in the application.
How BuildTuxedo Uses the Header File
In the header file, BuildTuxedo adds the necessary pragma statements to build the current BEA Tuxedo ATMI project correctly. BuildTuxedo opens the file specified in the Header File field of the Build page, if the file is present; otherwise, it creates a new one. A section starting with:
//Begin Tuxedo Section*****DO NOT EDIT*****
//End Tuxedo Section
designates the area in the header file in which pragma statements are written. This area is maintained by BuildTuxedo. If BuildTuxedo does not locate this section in the file, it appends it to the end of the header file. Because all other text within the file remains unchanged, you can specify stdafx.h as the header file.
Note: If your project is new, and you select OK or Apply, you must select Files into Project from the MSDEV Insert menu. You then add the file generated by BuildTuxedo to the current project. You need to do this only for a new project or when you change the name of the C/C++ output file.
Specifying Function and Service Names
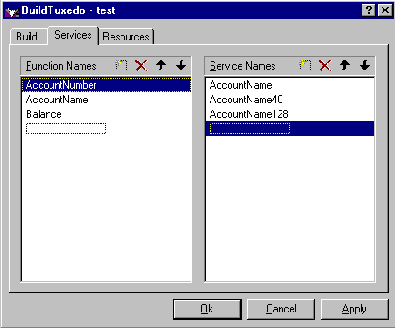
Select the Services tab to display the Services page, in which you specify function and service names.
In the Services page, two lists are used to maintain the service dispatch table:
- Function Names is a user-maintained list of functions that you can associate with a service.
- Service Names is a user-maintained list of the associated services.
Note: To scroll up and down either list, use the arrow keys.
Generally, the service and the function that performs the service are represented by the same name. For example, function x performs service x. In some cases, the function may have a different name from the service it performs. For example, in one case, function abc performs services x, y, and z. In another case, the service name may not be known until run time.
You must specify any function associated with a service when you build the server. For any function associated with a service, you must specify the service, the appropriate prototype, a C linkage, a void return, and a single TPSVCINFO pointer parameter. To specify a function to which a service name can be mapped, you must add the function to the Function Name list. This information is required for the service dispatch table.
Note: If you are using the buildserver(1)command, you can provide this information with the -s option. For more information about the -s option, see Programming a BEA Tuxedo ATMI Application Using C or Programming a BEA Tuxedo ATMI Application Using COBOL.
To add or edit names on the Function Names list, follow these steps:
Specifying a Resource Manager
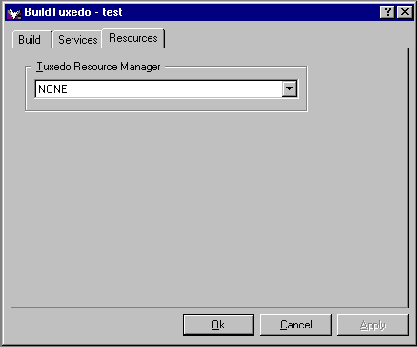
To specify a resource manager, follow these steps:
Note: The Tuxedo Resource Manager field contains a list of BEA Tuxedo resource managers available on the system, as defined in the %TUXDIR%\udataobj\RM file. If the file is not present, a default (NONE) is displayed.
Debugging a BEA Tuxedo ATMI Server Application
You should use the following procedure only if you have built the ATMI server application using the Debug configuration for your project.
To debug a server that has not been booted, follow these steps.
- At any Windows command prompt, type
tmboot -n -d 1 -sservernameto display the command-line options used by tmboot(1)to startservername. - Execute the
tmboot -Mcommand to boot the BBL. (If necessary, boot additional application servers or machines.)
Note: Because BEA Tuxedo libraries are not built with debugging information and source code is not provided, you cannot access the BEA Tuxedo code directly.
Note: To debug a server that is already running, type msdev -p nnn at any Windows command prompt, replacing nnn with the server's process ID (represented by a decimal number).
Developing an ATMI Application Using the Command Line Instead of the Visual C++.Net IDE GUI
If you must develop a BEA Tuxedo ATMI application using the command line instead of the Microsoft Visual C++ IDE GUI, use the buildserver(1)and buildclient(1)commands. To do this, specify the compiler and link options necessary to build a BEA Tuxedo ATMI application. For information about using these tools, see the following documents:
- BEA Tuxedo Command Reference
- Tutorials for Developing BEA Tuxedo ATMI Applications
- One of the following language-specific guides:
To build a debug version of your ATMI application using buildserver or buildclient, you must compile all source files with the /Zi and /Od options. The /Zi option enables debugging; the /Od option disables optimization. In addition, you may need to define the _DEBUG preprocessor directive. To complete the process, indicate the link option as follows:
-l"/link/debug:full /debugtype:both"
Using the Tuxdev Application
To install the Tuxdev application, follow these steps:
- In the Microsoft Visual C++.Net IDE (
msdev) graphical user interface (GUI), choose Tools—> External Tools. The External Tools window displays. - Type the full pathname of
BuildTuxedo(%TUXDIR%\bin\tuxdev.exe). - To the right of the Command field, click the ellipsis button
 , browse to the desired directory, select
 tuxdev.exe, and click Open. The selected pathname appears in the External Tools window. - To change the item displayed on the External Tools menu, change the entry in the Menu Contents field.
- In the Initial directory field of the External Tools page, click the right arrow button to display a pop-up menu. In the pop-up menu, choose Project Directory (
$(ProjectDir)).
Note: To enable a letter key as a hot key, put an ampersand (&) before the appropriate letter.
Note: To create a hot key for a tool, put an ampersand (&) before any letter in the tool name. This enables you to invoke the tool at any time simply by typing that letter.
Note: To modify an item, highlight it and type over it. To move any item, highlight it and select the up or down arrow at the top of the Menu Contents box.
Tuxdev is now part of the MSDEV Tools menu.
Using the BEA Tuxedo ATMI Editors
Two editors are available in this environment: the FML Table Editor and the VIEW Table Editor. The user interface for both editors is similar to a workbook in which you can work on multiple views (that is, documents) simultaneously. You can also edit multiple files of various types at the same time. Both editors are similar to a Microsoft Excel spreadsheet:
- FML Table Editor enables you to create and/or edit an FML field table easily, and to generate user-selectable 16- or 32-bit field header files.
- VIEW Table Editor enables you to create and/or edit a VIEW Table file easily, and to generate user-selectable 16- or 32-bit VIEWS and header files.
Using the FML Table Editor
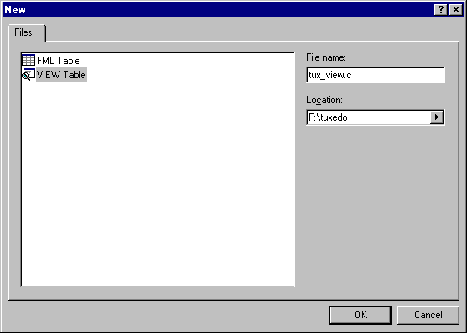
To invoke the FML Table Editor, follow these steps:
|
1. In the BEA Tuxedo Developer window, choose File |
|
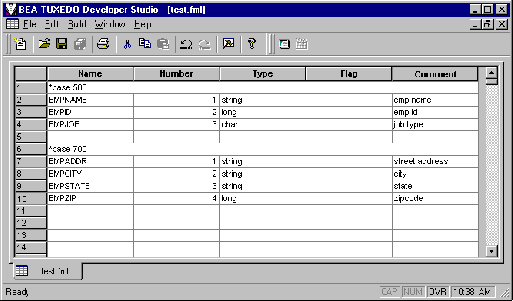
As shown in the preceding figure, the FML Table Editor contains five columns—Name, Number, Type, Flag, and Comment—and an unlimited number of rows.
The following table describes the purpose of each column in the FML Table Editor.
You can open new (unnamed) FML tables. A blank grid is created for the table named FML Tablex, where x is a value tracked by the MDI and incremented by one each time a new table is created. You can specify a name if and when the table is saved. You can also open an existing text file for editing. Unless otherwise specified, files are saved in the directory in which the file was opened in tabbed delimited format, with .fml appended to the end of the filename when applicable. You can compile this file to produce either a 16-bit or 32-bit FML header file.
Using the VIEW Table Editor
To invoke the VIEW Table Editor, follow these steps:
|
1. In the BEA Tuxedo Developer window select File |
|
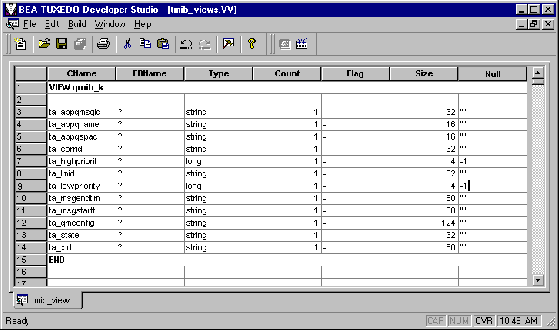
As shown in the preceding figure, the VIEW Table Editor contains seven columns— CName, FBName, Type, Count, Flag, Size, and Null—and an unlimited number of rows.
You can enter comments in the CName column, as long as the required pound sign (#) is shown at the beginning of each comment. Blank lines are also allowed. When a CName entry is not preceded by a pound sign and is not NULL, the line is assumed to be an active table entry.
The following table describes the purpose of each column in the VIEW Table Editor.
Note: You must specify the following information to denote the start and end of the view information:
The information must appear in the CName column in a row by itself. You can enter multiple views within the same file, provided that each table entry is preceded by VIEW table_name and followed by END.
You can open new (unnamed) view files in which a blank grid is created for the view, Viewx, where x is a value tracked by the MDI and incremented by one each time you create a new view. You can specify a name if and when you save the view file. You can also edit an existing view file (either text or binary). Unless otherwise specified, files are saved in the directory in which the file was opened in tabbed delimited format, with .v appended to the filename when applicable. You can compile this file to produce either 16- or 32-bit binary VIEW and header files.
Working in Multiple Documents Simultaneously
The MDI, as part of the basic framework, provides a multiple-document architecture in which you can open documents and views, regardless of type, at the same time. Examples of this design are msdev, Excel, and Word. In BEA Tuxedo terms, you can open x number of FML tables and y number of VIEW Table files at any time, and then use any one of them. Each document looks and feels like a workbook that contains tabs for each open document.
How the Editors Validate Entries
The following table describes the information that is validated in each column of the FML Table Editor.
|
Numbers only. (The range is determined by a 16/32-bit user mode.) |
|
|
Valid FML flags. Extra checking is done for mutually exclusive flags. |
|
The following table describes the information that is validated in each column of the VIEW Table Editor.
See Also
For information about the BEA Tuxedo ATMI, see the following documents:
- Programming a BEA Tuxedo ATMI Application Using C
- Programming a BEA Tuxedo ATMI Application Using COBOL
- Programming a BEA Tuxedo ATMI Application Using FML
- BEA Tuxedo Command Reference
- BEA Tuxedo ATMI C Function Reference
- BEA Tuxedo ATMI COBOL Function Reference
- BEA Tuxedo File Formats, Data Descriptions, MIBs, and System Processes Reference
 \
\