


This chapter explains how to install the Jolt 1.1 software and its online documentation. Readers of this chapter are assumed to be system administrators and/or application developers who have experience with the operating platforms on which they are going to install BEA TUXEDO and Jolt software.
This chapter includes the following sections:
The following hardware and software components are required before installing BEA Jolt.
Installation Requirements
Server Requirements
Note:
Jolt 1.1 server platform support is dependent on the TUXEDO version support. For example, Jolt 1.1 will only run on Solaris 2.4 and 2.5 if TUXEDO 6.1 or 6.2 is running on the same machine as the Jolt 1.1 server.
The Jolt Relay supports the following platforms running on the Web server:
Jolt Relay Requirements
You can install the Jolt 1.1 package from a CD-ROM for UNIX and Windows NT platforms. Your CD-ROM contains all of the necessary files for installing and running your Jolt product, including the Jolt Internet Relay. The Jolt Relay Front-End is installed on the Web server machine. For the Jolt 1.1 release, this machine may be different from the TUXEDO/Jolt machine. You may be required to run the installation program a second time, using the machine that will run the Jolt Relay Front-End.
Online documentation, in the form of HTML files, is also available on the CD-ROM.
The CD-ROM contains an installation script for UNIX systems and a separate GUI-based installer for Windows NT users. To install Jolt 1.1, follow the instructions for your respective platform.
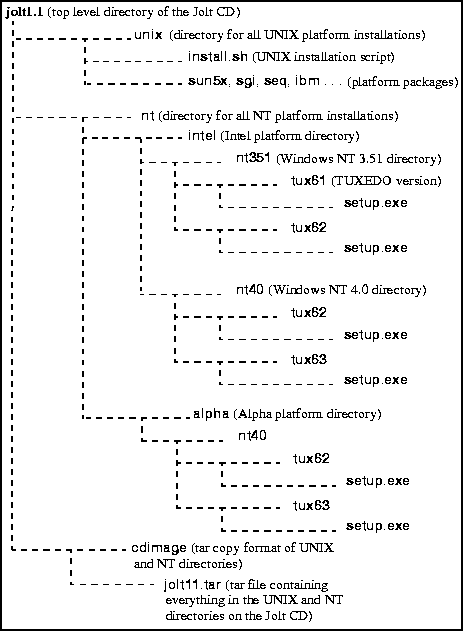
Figure 2-1 shows the directory structure for UNIX and NT systems.
Before installing:
BEA Jolt 1.1 Installation
Directory Structure
Figure 2-1 Sample Directory Structure
Before You Begin
The Jolt 1.1 installation shell script for UNIX systems includes all components necessary for installing the Jolt 1.1 system, the Jolt Repository, the Jolt Server, and the Jolt Class Library code. Refer to Figure 2-1 for an example of the Jolt directory structure.
When installing, ensure that all necessary hardware and software has been installed.
UNIX System Installation Instructions
If you are not running on Solaris or cd /cdrom/jolt/unix
vold is not running, consult your UNIX administration documentation to mount the CD-ROM.
ls
The directory contents should look similar to the following sample. If not, verify that you are installing the correct CD-ROM.
alpha/		hp/		ibm/
install.sh
seq/		sgi/		sun5x/			 uw/
The UNIX system installation script provides a set of step-by-step instructions to help you quickly install your Jolt product. This script lets you specify your platform, operating system, and other installation details. The installation script prompts you through the entire installation process. You can cancel the installation at any time by pressing CTRL-C simultaneously.
Note: The script used to show the UNIX installation is taken from Jolt 1.1 for TUXEDO 6.1/6.2. There are variations of the UNIX installation script for Jolt 1.1 for TUXEDO 6.3.
22). Press
Enter.
01) alpha/dux40/6.2  02) alpha/dux40/6.3  03) hp/hp1010/6.1
04) hp/hp1010/6.2    05) hp/hp1010/6.3    06) hp/hp1020/6.1
07) hp/hp1020/6.2    08) hp/hp1020/6.3    09) ibm/aix414/6.1
10) ibm/aix414/6.2   11) ibm/aix414/6.3   12) ibm/aix42/6.1
13) ibm/aix42/6.2    14) ibm/aix42/6.3    15) seq/dynix42/6.1
16) seq/dynix42/6.2  17) seq/dynix42/6.3  18) sgi/irix62/6.1
19) sgi/irix62/6.2   20) sgi/irix62/6.3   21) sun5x/sol24/6.1
22) sun5x/sol24/6.2  23) sun5x/sol25/6.1  24) sun5x/sol25/6.2
25) sun5x/sol251/6.1 26) sun5x/sol251/6.2 27) sun5x/sol251/6.3
28) uw/uw21/6.1      29) uw/uw21/6.2      30) uw/uw21/6.3
Install which platform's files? [01-30, q to quit, l for list]: 22
** You have chosen to install from sun5x/sol24/6.2 **y for "yes," or n for "no" or q to "quit." Press Enter.
BEA Jolt Release 1.1
This directory contains the BEA Jolt System for
Solaris 2.4 on SPARC
Is this correct? [y,n,q]: y
To terminate the installation at any time
press the interrupt key,
typically <del>, <break>, or <ctrl+c>.BEA Jolt to install the BEA Jolt package. Press Enter.
The following packages are available:
  1	jolt		BEA Jolt
Select the package(s) you wish to install (or 'all' to install
all packages) (default: all) [?,??,q]: 1
BEA Jolt
(sparc) Release 1.1
Copyright (c) 1997 BEA Systems, Inc.
Portions * Copyright 1986-1997 RSA Data Security, Inc.
All Rights Reserved.
Distributed under license by BEA Systems, Inc.
TUXEDO is a registered trademark.
BEA Jolt is a trademark of BEA Systems, Inc.
The following installation options are available:
  1	all		Install the full Jolt System
  2	server		Install the server only
  3	client		Install the client only
  4	rad		Install the relay back-end only
  5	doc		Install the documentation
Select an option (default: all) [?,??,q]: 1
Note that the jolt server will be installed into an existing
TUXEDO directory.  You MUST have previously installed TUXEDO
version 6.1, 6.2, or 6.3 to attempt this installation.
Base directory of existing TUXEDO installation [?,q]: /usr/jolt/T6.2
Determining if sufficient space is available ...
1118 blocks are required
167860 blocks are available to /usr/jolt/T6.2
Using /usr/jolt/T6.2 as the TUXEDO base directory
The client software should be installed either on your web
server machine, or a machine easily accessible to your web
server machine, as the class files must be downloaded.
JOLTDIR below refers to the directory in which your java
related files are stored.  It is the directory which contains
the directory 'classes', not the classes directory itself!
JOLTDIR (default: /usr/jolt/T6.2/udataobj/jolt) [?,q]:
Determining if sufficient space is available ...
1118 blocks are required
167860 blocks are available to /usr/jolt/T6.2/udataobj/jolt
Using /usr/jolt/T6.2/udataobj/jolt as the Jolt client tree
Unloading /host/sansei/cdrom/sun5x/sol24/6.2/jolt/joltall.Z ...
bin/JREPSVR
bin/JSL
bin/JSH
bin/joutil
bin/JRAD
udataobj/jrep.f16
udataobj/jwsladmin.f32
udataobj/jrepository
udataobj/jolt/client/Atm.html
udataobj/jolt/client/RE.html
udataobj/jolt/client/jolt.zip
udataobj/jolt/client/audio/dot.au
udataobj/jolt/client/audio/ring.au
udataobj/jolt/client/audio/splat.au
udataobj/jolt/client/images/beaLogo.gif
.
.
.
udataobj/jolt/relay/jrly
udataobj/jolt/relay/jrly.config
locale/C/JOLT_CAT
locale/C/JOLT.text
locale/C/JRAD_CAT
locale/C/JRAD.text
lib/libjconv.so
lib/libjnwi.so
include/jotypes.h
2280 blocks
... finished
Serial number [?,q]: <enter BEA-provided serial number>
License token [?,q]: <enter BEA-provided license token>
LICUTIL is /usr/jolt/T6.2/bin/joutil
users=0
pbtype=SDK
expdate=9801
serial=<BEA serial number displays>
token=<BEA license token displays>
lictype=a
Activating the license for software in /usr/jolt/T6.2 ...
... finished
Changing file permissions...
... finished
Installation of BEA Jolt was successfulq to quit.
The following packages are available:
  1	jolt		BEA Jolt
Select the package(s) you wish to install (or 'all' to install
all packages) (default: all) [?,??,q]: q
Please don't forget to fill out and send in your registration card
The installation is now complete.
The Jolt NT Installer provides a set of step-by-step installation windows to help you quickly install your Jolt product. These windows automate the details of your installation process and prompt you through the entire installation. You can cancel the installation at any time.
If you are installing the Jolt package from a CD-ROM, use Windows Explorer or a similar utility. Select the setup.exe program in the NT directory that matches your platform and TUXEDO version when you insert the CD-ROM. Refer to Figure 2-1 for additional information on the directory structure.
Figure 2-2 Jolt Welcome Window

Figure 2-3 Software License Agreement
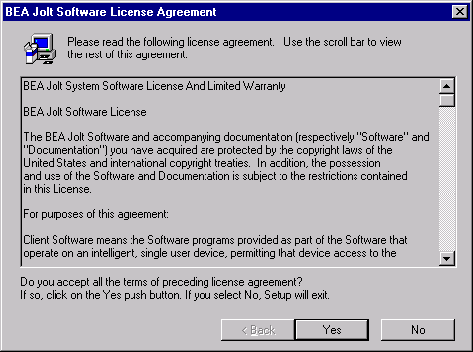
Figure 2-4 User Registration Window
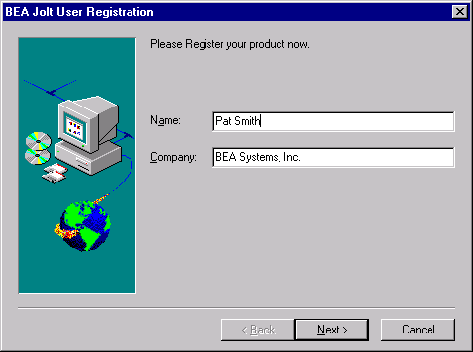
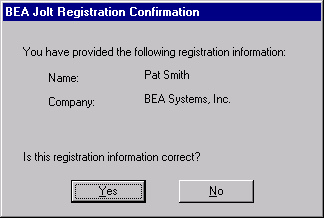
Figure 2-5 Registration Confirmation
This window also allow you to choose a destination directory. To do this, select Browse and choose a distention path. To continue with the installation, select Next.
Figure 2-6 Installation Selection Window
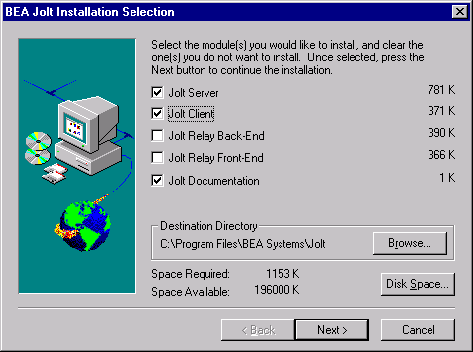
To deselect a component, click on the checkmark to the left of your choice and the checkmark is removed.
Figure 2-7 Available Disk Space
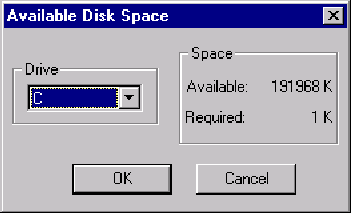
Figure 2-8 Choose Destination Location Window for Jolt Server
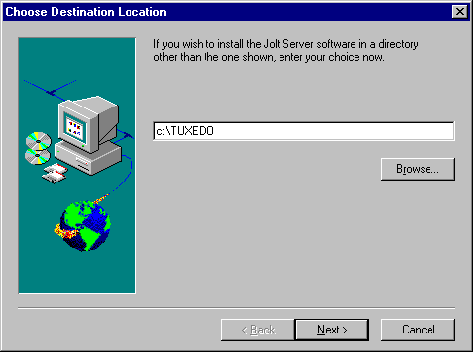
Figure 2-9 Choose Destination Location Window for Client Software

Figure 2-10 Choose Destination Location Window for Jolt Documentation

Figure 2-11 Install License Window
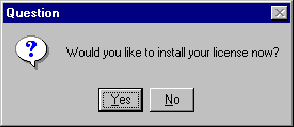
Figure 2-12 Insert License Disk Window

The licensing scheme used by Jolt 1.1 depends on the version of TUXEDO used with Jolt. Know the following information before running this command:
Jolt 1.1 for TUXEDO 6.1 and 6.2 uses a combination of a serial number and a token number (or license key) to enable a license. This information is included with the Jolt software when it is shipped to you. The installation programs ( Enter the serial number and token number exactly as they are displayed on the license provided by BEA.
Jolt 1.1 for TUXEDO 6.3 uses a digitally signed license file to enable a license. This file is provided on a floppy disk that is shipped with your Jolt software. The UNIX installation program ( Licensing Jolt 1.1 for TUXEDO 6.1 and 6.2
install.sh for UNIX or setup.exe for NT) prompt you for the serial number and token at installation time. Refer to "UNIX System Installation Script" and "Windows NT Installation Instructions" for additional information.
Licensing Jolt 1.1 for TUXEDO 6.3
install.sh) does not install the license automatically. The NT installation program (setup.exe) prompts you for the location of the Jolt license file. If you provide the necessary information, the installation program installs the license file for you. If you do not install the license file during installation, follow the steps to install Jolt manually.
UNIX Licensing Instructions
TUXDIR/udataobj/lic.txt.
cd $TUXDIR/udataobj
cp lic.txt lic.txt.bak
diff on UNIX systems).
%TUXDIR%\udataobj\lic.txt.
cd %TUXDIR%\udataobj
copy lic.txt lic.txt.bak
A text editor can be used to copy and paste the contents of the Jolt license file into the TUXEDO license file.
Note:
The digital signature is 64 characters long. Every character must match exactly or the license is not valid.
copy lic.txt + a:\joltlic.txt
If you do not complete the steps for licensing the Jolt software during installation, you can license the software at any time by following the steps in the "Licensing Upgrades Instructions."
If you are using Jolt 1.1 on TUXEDO 6.1 or 6.2, and you need to upgrade your license, follow these step.
Note: These instructions are for NT. Use the UNIX equivalents for UNIX platforms.
For example, if TUXEDO is installed in the directory,
Note:
The "
SET TUXDIR=<the name of your TUXEDO directory>
SET SERNUM=<your serial number>
SET LICENSE=<your license key>
CD %TUXDIR%
CD BIN
JOUTIL -r %TUXDIR% -b -l %LICENSE% -s %SERNUM% -T SDK/opt/BEAItuxedo, your serial number is 0123456789, and your license key is 0A1B2C3D4E5F9999, execute the following commands:
SET TUXDIR=/opt/BEAItuxedo
SET SERNUM=0123456789
SET LICENSE=0A1B2C3D4E5F9999
CD %TUXDIR%
CD BIN
JOUTIL -r %TUXDIR% -b -l %LICENSE% -s %SERNUM% -T SDK-l" above is a lowercase "L" not the numeral "1" (one).
Accompanying your Jolt software is an online, HTML-based, documentation set to assist you with using BEA Jolt 1.1. The Jolt product CD-ROM contains the HTML version of the Jolt User's Guide.
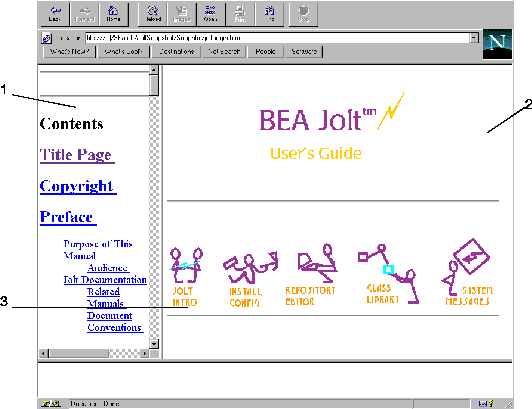
Figure 2-13 is an example of the Jolt online documentation window. Table 2-2 describes the online documentation browser application components shown in Figure 2-13.
Figure 2-13 Jolt User's Guide Online Documentation Window
To open the Jolt online documentation, your browser must support:
The recommended browsers for use with the Jolt 1.1 HTML documentation release are:
Follow these instructions for opening the documentation files with a specific browser.
Using Netscape Navigator, access the documentation using the following instructions:
Opening the Documentation Files
Netscape Navigator
joltbegin.htm (NT) or joltbegin.html (UNIX) file and select
Open.
Using Microsoft Internet Explorer, access the documentation using the following instructions:
joltbegin.htm (NT) or joltbegin.html (UNIX) file.
Follow these instructions for printing the documentation files with a specific browser.
Using Netscape Navigator for Windows, print the documentation using the following instructions:
Using Netscape Navigator for UNIX, print the documentation using the following instructions:
Using Microsoft Internet Explorer, print the documentation using the following instructions: