

|
|
|
|
|
|
Setting Up the WebLogic Process Integrator Environment
The following sections explain how to set up the WebLogic Process Integrator environment, so that you can run WebLogic Process Integrator Studio:
Before beginning the procedures in this chapter, run the WebLogic Collaborate installation verification application, verifier, described in the BEA WebLogic Collaborate Installation Guide.
Configuring WebLogic Collaborate for WebLogic Process Integrator
To configure your WebLogic Collaborate environment so that it operates with WebLogic Process Integrator, you need to verify WebLogic Process Integrator Studio and Weblogic Server run-time requirements, as described in this section.
Windows
%WLC_HOME%\enabler
UNIX
$WLC_HOME/enabler
The proper repository pool should be uncommented and configured to the database you selected at install time. The weblogic.ejb.deploy property and the weblogic.jdbc.connectionPool.wlpiPool property configurations should match your environment. Verify the configurations as follows:
weblogic.ejb.deploy=\
	D:/bea/wlcollaborate1.0/lib/wlpi-ejb.jar,\
	D:/bea/wlcollaborate1.0/lib/wlpi-wlc-ejb.jar,\
	D:/bea/wlcollaborate1.0/lib/wlpi-cc-ejb.jar
Ensure that the pathname is correct for the WebLogic Collaborate lib directory on your system. For this example, the WebLogic Collaborate software is installed in D:/bea/wlcollaborate1.0.
Note: The weblogic.properties file uses forward slash format in pathnames, on UNIX and NT systems.
The following extract from the file shows the property settings for the supported databases:
##Oracle##
##Oracle##weblogic.jdbc.connectionPool.wlpiPool=\
##Oracle##	url=jdbc:weblogic:oracle,\
##Oracle##	driver=weblogic.jdbc.oci.Driver,\
##Oracle##	loginDelaySecs=1,\
##Oracle##	initialCapacity=1,\
##Oracle##	maxCapacity=10,\
##Oracle##	capacityIncrement=1,\
##Oracle##	allowShrinking=true,\
##Oracle##	shrinkPeriodMins=15,\
##Oracle##	refreshTestMinutes=10,\
##Oracle##props=user=<ORACLE_USER>;password=<ORACLE_PASSWORD>;
server=<ORACLE_SERVICENAME>
### Cloudscape settings ###
weblogic.jdbc.connectionPool.wlpiPool=\
    url=jdbc:cloudscape:wlpidb,\
    driver=COM.cloudscape.core.JDBCDriver,\
    loginDelaySecs=1,\
    initialCapacity=1,\
    maxCapacity=10,\
    capacityIncrement=1,\
    allowShrinking=true,\
    shrinkPeriodMins=15,\
    refreshTestMinutes=10
### SQL Server settings (MSSQL) ###
##MSSQL##weblogic.jdbc.connectionPool.wlpiPool=\
##MSSQL##	url=jdbc:weblogic:mssqlserver4,\
##MSSQL##	driver=weblogic.jdbc.mssqlserver4.Driver,\
##MSSQL##	loginDelaySecs=1,\
##MSSQL##	initialCapacity=1,\
##MSSQL##	maxCapacity=10,\
##MSSQL##	capacityIncrement=1,\
##MSSQL##	allowShrinking=true,\
##MSSQL##	shrinkPeriodMins=15,\
##MSSQL##	refreshTestMinutes=10, \
##MSSQL## 	testTable=dual,\
##MSSQL##props=user=<MSSQL_USER>;password=<MSSQL_PASSWORD>;
server=<MSSQL_HOSTNAME>
The preceding extract shows that during installation this weblogic.properties file was configured for the Cloudscape database (the Cloudscape weblogic.jdbc.connectionPool.wlpiPool property is uncommented). Confirm that the property corresponding to the database you are using is uncommented, and that the other database properties are commented.
Within the weblogic.jdbc.connectionPool.wlpiPool property, confirm that the configuration is correct for the database you are using:
Note: The Cloudscape database is a single-user database and requires no user ID and password configurations in the weblogic.jdbc.connectionPool.wlpiPool property.
Windows
%WLC_HOME%\wlpi
UNIX
$WLC_HOME/wlpi
Windows
prompt> createOracle.cmd
UNIX
prompt> . ./createOracle.sh
Windows
prompt> createCloud.cmd
UNIX
prompt> . ./createcloud.sh
prompt> createMSSQL.cmd
Note: These scripts use DDL files (wlpi_oracle.ddl, wlpi_cloud.ddl, or wlpi_mssql.ddl). By default, the createdatabase.xx scripts do not drop tables. If you have existing tables that you wish to drop, edit the appropriate DDL file.
After you execute these scripts, you may see the SQL prompt. Exit from SQL before proceeding to the next step.
Windows
%WLC_HOME%
UNIX
$WLC_HOME
Windows
prompt> setEnv.cmd
UNIX
prompt> . ./setenv.sh
Windows
prompt> cd enabler
prompt> startweblogic.cmd
UNIX
prompt> cd enabler
prompt> ./startwebLogic.sh
Note: WebLogic Server must be running when you start WebLogic Process Integrator Studio (refer to Starting WebLogic Process Integrator Studio).
Troubleshooting Your WebLogic Process Integrator Configuration
If you observe binding errors on the listening port, make sure another instance of WebLogic Server is not running using the same port (that is, another command window with the startwebLogic script running).
If WebLogic Server is unable to create a connection pool, as indicated by exceptions displayed in the command window, check that the connection pool property, weblogic.jdbc.connectionPool.wlpiPool, is specified correctly.
If you continue to have a problem, make sure that the database server is running and accessible, and that you have the appropriate permissions.
Starting WebLogic Process Integrator Studio
WebLogic Process Integrator Studio is the workflow editing component of the WebLogic Process Integrator software, and can be used to create the workflows for conversations and business processes in the WebLogic Collaborate environment.
Before using WebLogic Process Integrator in your WebLogic Collaborate environment, complete the following procedure to verify that you can start WebLogic Process Integrator Studio and connect to WebLogic Server.
Windows
prompt> cd %WLC_HOME%
prompt> setEnv.cmd
UNIX
prompt> cd $WLC_HOME
prompt> . ./setenv.sh
Windows
%WLC_HOME%\wlpi
UNIX
$WLC_HOME/wlpi
Windows
prompt> Studio.cmd
UNIX
prompt> . ./studio.sh
The WebLogic Process Integrator Studio login dialog box is displayed.
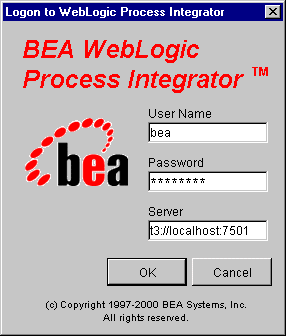
t3://localhost:7501
where localhost represents the name of your machine.
If you are unable to log in:

|

|

|
|
|
|
Copyright © 2000 BEA Systems, Inc. All rights reserved.
|