

|
|
|
|
|
|
Understanding WebLogic Process Integrator Events and XML Documents
The following sections discuss XML (extensible markup language) events and XML document handling within WebLogic Process Integrator:
XML Overview
XML is a system for defining, validating, and sharing document formats. Like HTML, XML is a markup language derived from SGML (Standard Generalized Markup Language). However, unlike HTML, which was created to allow cross-platform formatting of information for display, XML is best suited for organizing data. While HTML specifies how a document should be displayed, it does not describe what type of information is contained in the document or how it is organized. XML fills this void, allowing document authors to organize information in a standard manner.
The development of XML is a public project headed by the World Wide Web Consortium and is not owned by any one company. In a recommendation on February 10, 1998, the World Wide Web Consortium (W3C) accepted version 1.0 of the XML specification. However, XML is still evolving. Specifics on the XML standard and syntax can be found at the W3C site (http://www.w3.org/xml).
XML allows information exchange across different and potentially incompatible systems and platforms. Because XML is a text based, non-binary format and uses syntax rather than binary markers to organize data, it can be deployed on just about any platform.
Although XML specific editors are now available, because XML is just text, any editor or program that can generate text files can be used to create XML documents.
XML is license-free, platform independent, and well-supported. It is rapidly being adopted by software companies as a standard means of sending and receiving data.
XML Elements and Attributes
XML uses tags to distinguish document structures and uses attributes to encode extra document information.
XML tags usually surround an identified object in the data stream. A start-tag and an end-tag, together with the data enclosed by them, constitute an element. For example:
<OrderType>New</OrderType>
The element OrderType is assigned the value "New".
XML elements can contain other, embedded elements, and the entire document must be enclosed by a single document element. The following example shows an XML document with a root element Order and three subelements: OrderId, OrderType, and WorkflowStatus.
<Order>
<OrderId>1</OrderId>
<OrderType>New</OrderType>
<WorkflowStatus>New</WorkflowStatus>
</Order>
It is possible for an element to hold information about its content beyond just its name. This "information about information," or metadata, is stored in an attribute. When a document type definition (DTD) is not in use, the attribute value is simply considered to be a unit of text and no type distinction is made. But when a DTD is in use, more control can be exerted over the range of values allowed for each attribute. An attribute is associated with a particular element by the DTD, and is assigned an attribute type.
Document Type Definition (DTD)
It is possible to predefine which elements are allowed within other elements. An optional document type definition (DTD) contains rules for each element allowed within a specific class of documents so that the placement of elements and their attributes can be controlled and validated.
The DTD establishes formal document structure rules. It defines the elements that can be used and the relationships between them. In a way, the DTD defines a document structure tree.
Some XML editors can read the DTD and use it to build the document model. The editor can then identify errors in the XML document if the data contained in the document does not conform to the DTD structure.
The WebLogic Process Integrator DTDs are provided on the documentation CD at:
Drive:/docs/wlpi/v1_2/classdocs/com/bea/wlpi/common/doc-files
Processing Events and Handling XML Documents
The following diagram illustrates the XML event processing scheme within the WebLogic Process Integrator server.
Figure 9-1 XML Event Processing Scheme
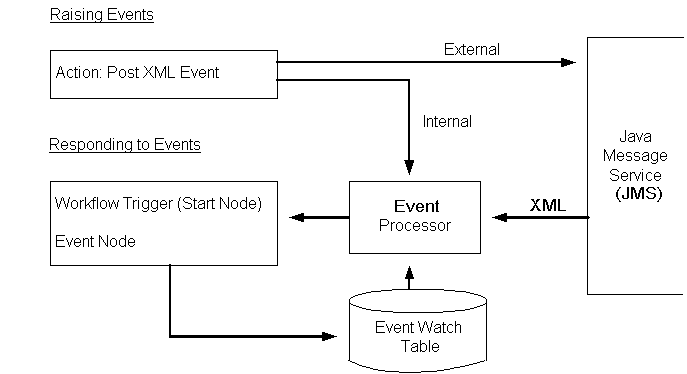
Notifications to the WebLogic Process Integrator server and automatic workflow triggering are event driven. You can set up workflow events to wait for a notification and perform actions or start workflows upon the event being triggered. You define events in XML format by using the Start node for workflow triggering. Event definitions are then registered automatically in the Event Watch table.
Events are triggered and processed upon receipt of XML messages that match the criteria stored in the event definitions. These XML documents can either be internal to the WebLogic Process Integrator environment (raised by the Post XML Event action within tasks of workflows), or they can be received from applications or other external sources. In the latter case, the XML documents are received from the Java Message Service (JMS) and placed in the event handler request queue for processing.
The Post XML Event action can be used to raise external events (for processing by other applications) by posting the XML message to a Java Message Service (JMS) topic.
Defining a Workflow Event Trigger
A workflow can be triggered automatically, in which case it responds to a particular action or condition taking place. Custom triggers such as database events can be defined in order to start workflows. The workflow event trigger is already defined in WebLogic Process Integrator and is delivered as part of the standard software. When this trigger is set up, the workflow is responding to an incoming XML document.
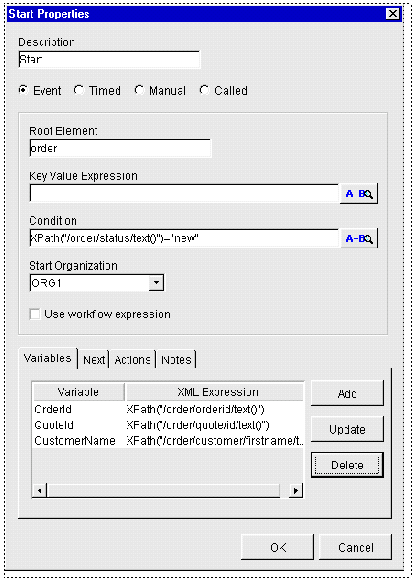
A workflow event trigger is defined in the Start Properties dialog box. See the section entitled Defining Start in Working with Workflow Components, for instructions on accessing this dialog box. The Start dialog box allows you to specify the root element of the XML field, the condition under which the trigger should activate, and the variable assignments, if any.
To define a workflow event trigger:
Note: Expressions are built using WebLogic Process Integrator expression syntax and typically use the syntax of XPath function to extract values out of XML documents. If you know the syntax of the expression you want to use, you can type the expression directly in the field. Alternatively, click the A+B button to display the Expression Builder dialog box. The Expression Builder helps you construct an expression, which is made up of functions, operators, literals, and variables. For more information on constructing expressions, see Using Expressions and Conditions.
Figure 9-2 Start Properties Dialog Box

Note: Expressions are built using WebLogic Process Integrator expression syntax and typically use the syntax of XPath function to extract values out of XML documents. If you know the syntax of the expression you want to use, you can type the expression directly in the field. Alternatively, click the A+B button to display the Expression Builder dialog box. The Expression Builder helps you construct an expression, which is made up of functions, operators, literals, and variables. For more information on constructing expressions, see Using Expressions and Conditions.
Figure 9-3 Add Action Dialog Box

Figure 9-4 Workflow Variable Assignment Dialog Box

Note: Expressions are built using WebLogic Process Integrator expression syntax and typically use the syntax of XPath function to extract values out of XML documents. If you know the syntax of the expression you want to use, you can type the expression directly in the field. Alternatively, click the A+B button to display the Expression Builder dialog box. The Expression Builder helps you construct an expression, which is made up of functions, operators, literals, and variables. For more information on constructing expressions, see Using Expressions and Conditions.
Workflow Examples
The following example shows a workflow that is triggered by the XML document containing the root element order if the workflowstatus element of the XML document is "new".
The following workflow variables are populated with the values contained in the XML document:
Figure 9-5 Start Properties Dialog Box
The corresponding XML document is as follows:
Listing 9-1 XML Document
<Order>
<OrderId>1</OrderId>
<OrderType>New</OrderType>
<WorkflowStatus>New</WorkflowStatus>
<Status />
<LEC>
<VendorId>ABC</VendorId>
</LEC>
<SalesPerson>
<UserId>Mark</UserId>
<Email>Mark@ABC</Email>
</SalesPerson>
<Quote>
<Id>1</Id>
</Quote>
<Customer>
<FirstName>Joe</FirstName>
<LastName>Customer</LastName>
<Address>
<Street>123 Main Street</Street>
<City>Boston</City>
<State>MA</State>
</Address>
</Customer>
</Order>
The root element is order.
The XML expression is XPath("/Order/Customer/FirstName/text()") + XPath("/Order/Customer/LastName/text()")
The customer element has three subelements: FirstName, LastName, and Address. Values from the XML document are extracted using the XPath language.
Figure 9-6 Workflow Variable Assignment Dialog Box

Using the XML Notification: The WebLogic Process Integrator Event
A workflow event represents a notification node. Any time an event is defined, the workflow waits for an XML message to trigger the event. Upon that trigger, various subactions defined within the event can be executed and/or workflow variables can be set.
To define a WebLogic Process Integrator notification event:
Figure 9-7 Event Properties Dialog Box
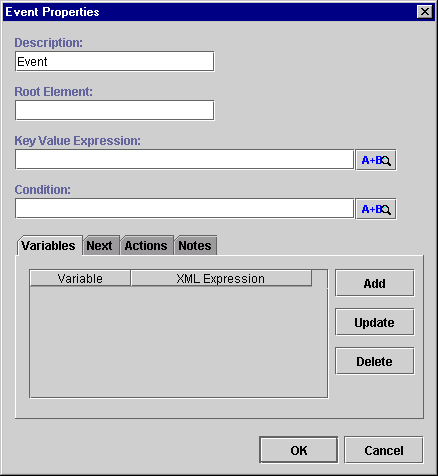
Note: It is possible to define a key value for each XML root in order to speed up the search for a specific XML trigger. For instructions, see Setting Up a Key Value for Each XML Root.
Note: Expressions are built using WebLogic Process Integrator expression syntax and typically use the syntax of XPath function to extract values out of XML documents. If you know the syntax of the expression you want to use, you can type the expression directly in the field. Alternatively, click the A+B button to display the Expression Builder dialog box. The Expression Builder helps you construct an expression, which is made up of functions, operators, literals, and variables. For more information on constructing expressions, see Using Expressions and Conditions.
Figure 9-8 Workflow Variable Assignment Dialog Box
Note: Expressions are built using WebLogic Process Integrator expression syntax and typically use the syntax of XPath function to extract values out of XML documents. If you know the syntax of the expression you want to use, you can type the expression directly in the field. Alternatively, click the A+B button to display the Expression Builder dialog box. The Expression Builder helps you construct an expression, which is made up of functions, operators, literals, and variables. For more information on constructing expressions, see Using Expressions and Conditions.
Figure 9-9 Add Action Dialog Box
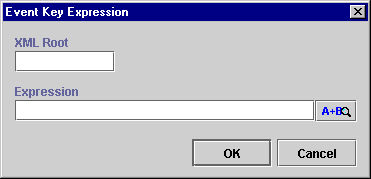
Setting Up a Key Value for Each XML Root
A key value acts as a filter for locating the correct trigger position to a specific root element. A key value can be set to a variable, for instance OrderId. At run time, the XML processor looks for a trigger with the root element Order and the specified OrderId that will be the value of that variable at the time the workflow is run. This avoids a sequential search of all triggers in order to find the right one.
To set up a key value for each XML root, proceed as follows:
Figure 9-10 Event Key Expressions Dialog Box
Note: Expressions are built using WebLogic Process Integrator expression syntax and typically use the syntax of XPath function to extract values out of XML documents. If you know the syntax of the expression you want to use, you can type the expression directly in the field. Alternatively, click the A+B button to display the Expression Builder dialog box. The Expression Builder helps you construct an expression, which is made up of functions, operators, literals, and variables. For more information on constructing expressions, see Using Expressions and Conditions.
Using XML Actions
This section introduces you to the following XML-related actions within WebLogic Process Integrator:
Post XML Event
Post an XML event from the current workflow that can be used to trigger another workflow or an event that is contained within this workflow or another workflow. You can post the XML document as either an external document or as internal messages to the WebLogic Process Integrator server.
To post an XML event, proceed as follows:
Figure 9-11 Task Properties Dialog Box

Figure 9-12 Add Action Dialog Box
Figure 9-13 Post XML Event Dialog Box
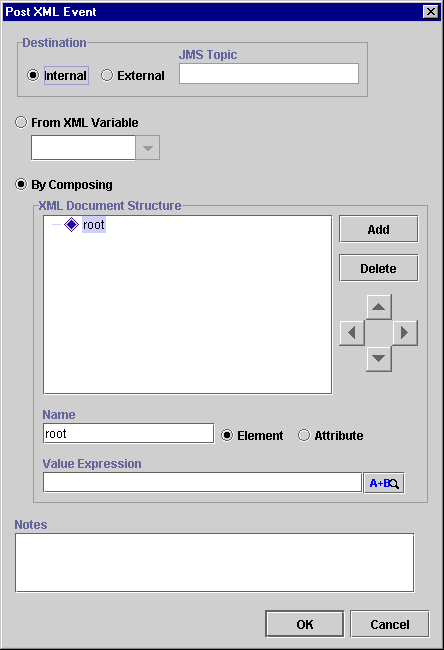
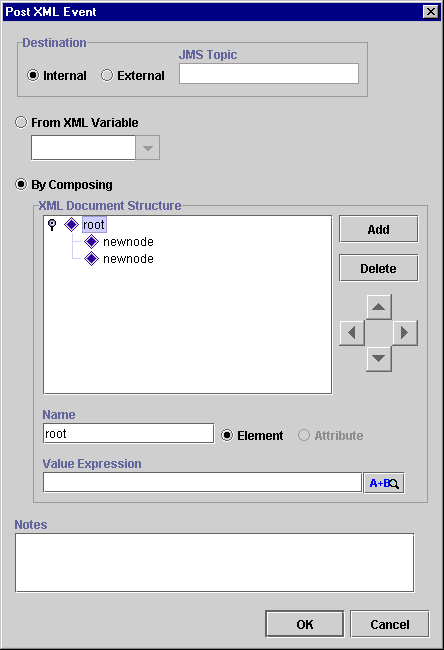
Figure 9-14 Subelement
Note: Expressions are built using WebLogic Process Integrator expression syntax and typically use the syntax of XPath function to extract values out of XML documents. If you know the syntax of the expression you want to use, you can type the expression directly in the field. Alternatively, click the A+B button to display the Expression Builder dialog box. The Expression Builder helps you construct an expression, which is made up of functions, operators, literals, and variables. For more information on constructing expressions, see Using Expressions and Conditions.
Figure 9-15 Post XML Event Dialog Box

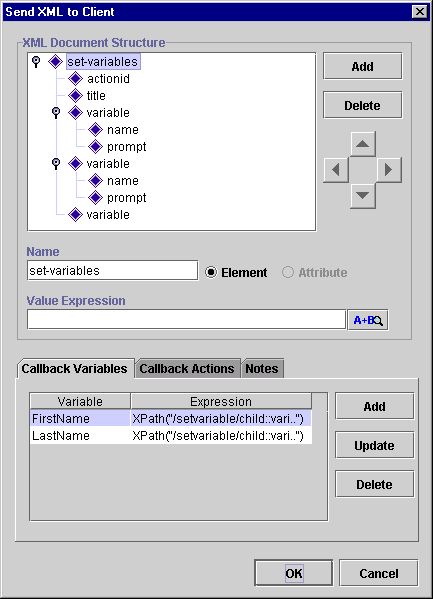
Send XML to Client
This action allows communication between the WebLogic Process Integrator server and a client program by way of an XML message. The Send XML to Client action expects a response back from the client. The WebLogic Process Integrator Worklist client application is a good example of use for this action.
To send an XML document to a client, proceed as follows:
Figure 9-16 Task Properties Dialog Box
Figure 9-17 Add Action Dialog Box
Note: The instructions for creating an XML document structure in Post XML Event can be applied here.
Note: Expressions are built using WebLogic Process Integrator expression syntax and typically use the syntax of XPath function to extract values out of XML documents. If you know the syntax of the expression you want to use, you can type the expression directly in the field. Alternatively, click the A+B button to display the Expression Builder dialog box. The Expression Builder helps you construct an expression, which is made up of functions, operators, literals, and variables. For more information on constructing expressions, see Using Expressions and Conditions.
Figure 9-18 Send XML to Client Dialog Box

XML Root Element Names
The name of the root element in the XML message format defines the processing performed by the client as follows:
Table 9-1 XML Root Elements
Default Settings for Send XML to Client Action For users who are using the WebLogic Process Integrator Worklist application, you can set up two default settings, which allow you to:
Dialog Box Prompt
Set up the dialog box prompt default setting shown in the following dialog box and procedure.
Figure 9-19 Send XML to Client Dialog Box
To set up the dialog box prompt default setting:
Note: actionid cannot be edited.
Variable
Name
Prompt
Variable
Name
Prompt
This configuration displays the Enter Your Name dialog box upon execution of a task in the WebLogic Process Integrator Worklist.
Figure 9-20 Enter Your Name Dialog Box
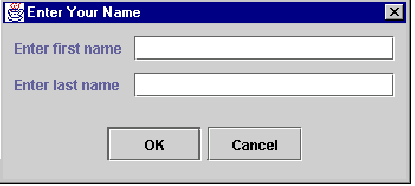
After the user enters the values for the first name and last name, the two variables (set up in step 3) are populated by the callback XML document.
Display Message-Box
The default message-box can be set up as one of the following:
Figure 9-21 Send XML to Client Dialog Box
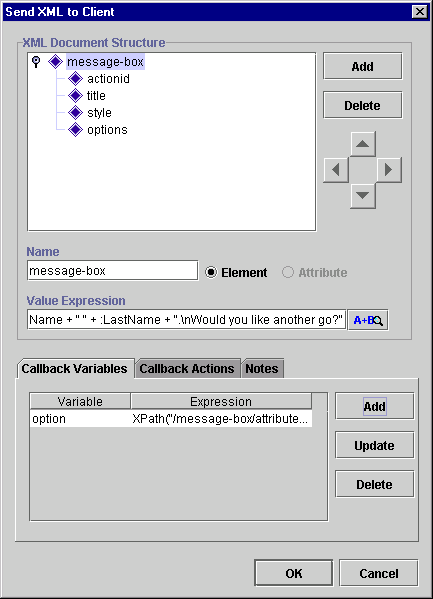
To display a message-box, send the following XML:
Listing 9-2 Message-Box XML
<message-box title="title" style="style" options="options">message
<actionid>959395846210</actionid>
</message-box>
where
style ::= { plain | information | question | warning | error } options :: { ok | ok_cancel | yes_no | yes_no_cancel }The message-box returns the following XML:
<message-box option="option"></message-box>
where
"option" is one of: "ok", "cancel", "yes", "no"
Use the XPath function to extract the value:
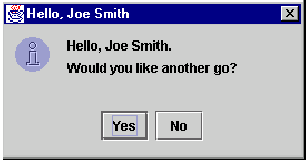
XPath("/message-box/attribute::option")The following is an example of a resulting message-box:
Figure 9-22 Example Message-Box
Invoke Exception Handler
Use this action to allow the invocation of a specific exception handler within the workflow. Upon execution of the Invoke Exception Handler action, WebLogic Process Integrator sends the user-defined XML document to the exception processor and invokes the specified exception handler.
To invoke an exception handler, proceed as follows:
Figure 9-23 Add Action Dialog Box
Note: You cannot invoke an exception handler from within another exception handler. Therefore, if you access the Add Action dialog box from within an exception handler, the Invoke Exception Handler action is not available.
Figure 9-24 Invoke Exception Handler Dialog Box
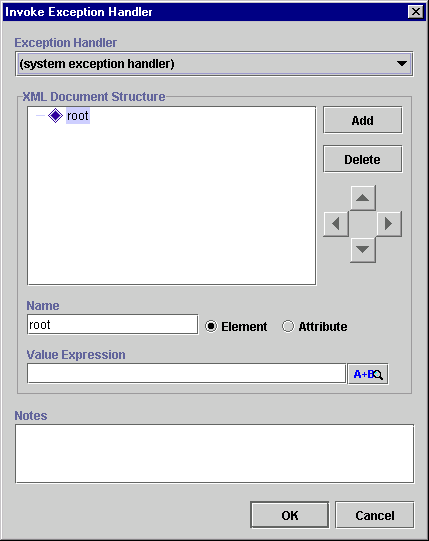
Note: The instructions for creating an XML document structure in Post XML Event can be applied here.
Note: Expressions are built using WebLogic Process Integrator expression syntax and typically use the syntax of XPath function to extract values out of XML documents. If you know the syntax of the expression you want to use, you can type the expression directly in the field. Alternatively, click the A+B button to display the Expression Builder dialog box. The Expression Builder helps you construct an expression, which is made up of functions, operators, literals, and variables. For more information on constructing expressions, see Using Expressions and Conditions.
Understanding Workflow Interaction
To better understand workflows and how the various components defined within workflows interact, refer to the WebLogic Process Integrator Tutorial.

|

|
|
|
|
Copyright © 2001 BEA Systems, Inc. All rights reserved.
|