


|
|
This chapter provides a high level description of the process of installing and configuring WebLogic Network Gatekeeper. Subsequent chapters describe the specific steps required to use each type of installation and configuration tools in detail.
Setting up Network Gatekeeper is a four step process. You must:
Before you can install Network Gatekeeper, you must gather a certain amount of information about your system. You need to know:
The files in the BEA Home directory are essential to ensuring that BEA software operates correctly on your system. They:
<BEA home>\wlng400.
Installing WebLogic Network Gatekeeper generally requires that three separate components be copied to your hardware:
Each of these components is copied to its appropriate places when you run the Network Gatekeeper installer. There are three main installer modes available:
| Note: | If you want to run graphical-mode installation, the console attached to the machine on which you are installing the software must support a Java-based GUI. All consoles for Windows systems support Java-based GUIs, but not all consoles for UNIX/Linux systems do. If you attempt to start the installation program in graphical mode on a system that cannot support a graphical display, the installation program automatically starts console-mode installation. |
The specifics of each of these installers are covered in Installing Network Gatekeeper. You need to do this for each machine in your installation.
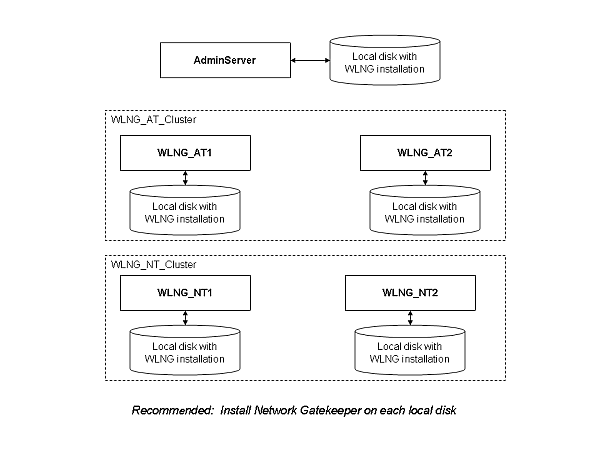
| Note: | It is recommended that you install Network Gatekeeper on the local disk of each server in your setup, as in Figure 5-1. |
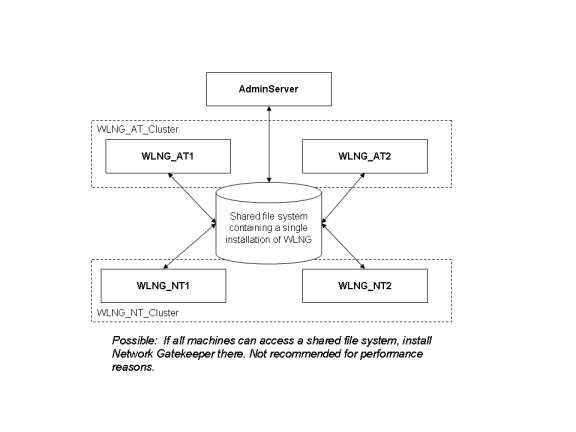
If all of your servers can access a shared file system, it is possible to install Network Gatekeeper only there (seeFigure 5-2), but this is not recommended, for performance reasons.
Configuring the domain for WebLogic Server for use in Network Gatekeeper can be accomplished using one of two available tools:
| Note: | If you want to run graphical-mode configuration, the console attached to the machine on which you are configuring the domain must support a Java-based GUI. All consoles for Windows systems support Java-based GUIs, but not all consoles for UNIX/Linux systems do. If you attempt to start the installation program in graphical mode on a system that cannot support a graphical display, the installation program automatically starts console-mode installation. |
| Note: | The WebLogic Scripting Tool (WLST) is a command-line scripting interface that system administrators and operators use to monitor and manage WebLogic Server instances and domains. The WLST scripting environment is based on the Java scripting interpreter, Jython. For more information on WLST, see WebLogic Scripting Tool, part of the WebLogic Server documentation set. |
Network Gatekeeper ships with six default configuration templates:
These templates contain the basic information for setting up various common installation selections. However in all cases, some aspects of the domain may need to be adjusted during the domain configuring process. The entire process is covered in Configuring the Domain for Network Gatekeeper.
Once installation is complete and your domain has been set up, you must:
These are covered in Completing Post-Installation.
To learn more about installing WebLogic Server products in general, and about the installer program in particular in regard to WebLogic Server, see the WLS Installation Guide, a separate document in the WebLogic Server set.


|