

|
|
|
|
|
|
Upgrading Oracle Database Schemas from Prior Releases
If you are upgrading your WebLogic Commerce Server and Personalization Server installation from a prior release, you must also upgrade your database to the corresponding schema. This chapter describes the following tasks:
Note: For information on upgrading a WebLogic Commerce Server 2.0.1 database to the WebLogic Commerce Server 3.1.1 database schema, contact BEA Customer Support.
You must upgrade databases in the sequence of the preceding list; you cannot skip a Release in the migration path.
Upgrading WebLogic Personalization Server Database Schemas from 2.0.1 to 3.1.1
In WebLogic Personalization Server Release 3.1, a new column called PROFILE_TYPE was added to the WLCS_USER table. This column contains the name of the Unified Profile Type of which the User is an instance. (For more information about Unified Profile Types, see "Creating and Managing Users" in the WebLogic Personalization Server User's Guide.)
Note: In this document, $WL_COMMERCE_HOME refers to the directory into which you installed WebLogic Commerce Server and/or WebLogic Personalization Server and database-type refers to the type and version of RDBMS that you installed.
To upgrade a WebLogic Personalization Server database from release 2.0.1 to release 3.1:
ALTER TABLE WLCS_USER ADD (
PROFILE_TYPE VARCHAR2(100)
);
UPDATE WLCS_USER SET PROFILE_TYPE = '<profile-type>' WHERE IDENTIFIER = '<user-name>';
For example:
UPDATE WLCS_USER SET PROFILE_TYPE = 'Unified Profile Example' WHERE IDENTIFIER = 'unifieduser_bob';
@ $WL_COMMERCE_HOME/db/database-type/update-to-310.sql
For example, if you installed WebLogic Commerce Server in ~/WebLogicCommerceServer3.2, enter the following from SQL*Plus:
@ ~/WebLogicCommerceServer3.2/db/database-type/update-to-310.sql
When the command successfully completes upgrading the database, it prints the following message:
************ SCRIPT HAS FINISHED EXECUTING *************
****** PLEASE REVIEW UPDATE-TO-310.LOG FILE *****
Upgrading Database Schemas
from 3.1.1 to 3.2
Release 3.2 of WebLogic Commerce Server and Personalization Server introduces schema changes and restrictions for the length of data allowed in various columns. To upgrade databases from Release 3.1.1 to Release 3.2, complete the following tasks:
Upgrade the WebLogic Personalization Server Schema
If you are upgrading WebLogic Personalization Server from Release 3.1.1 to Release 3.2, complete the tasks described in this section. The following diagram illustrates the process for upgrading the WebLogic Personalization Server schema, and subsequent topics provide more information about the process.
Figure 1-1 Upgrading the Personalization Server Schema from 3.1.1 to 3.2
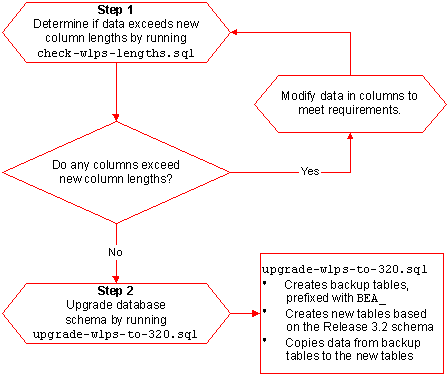
Step 1: Determine if Data Exceeds New Column Lengths
and Modify When Necessary
Start the migration process by finding and correcting any columns in your existing databases that contain data exceeding the new column length in Release 3.2.
To start the migration, do the following:
@ $WL_COMMERCE_HOME/db/database-type/check-wlps-lengths.sql
For example, if you installed WebLogic Commerce Server in ~/WebLogicCommerceServer3.2, enter the following command in SQL*Plus:
@ ~/WebLogicCommerceServer3.2/db/database-type/check-wlps-lengths.sql
The log file lists each table for which the maximum number of characters has changed. As Listing 1-1 illustrates, the log file states no rows selected for tables that meet the new maximum-length requirements. For tables that exceed requirements, the log file lists each row and describes the error condition.
Listing 1-1 Output of check-wlps-lengths.sql
*****  WLCS_DOCUMENT.ID  *****
no rows selected
*****  WLCS_DOCUMENT_METADATA.ID  *****
no rows selected
Step 2: Upgrade the Database Schema
After correcting any rows that do not conform to new column length requirements, you must upgrade the Release 3.1.1 schema to the Release 3.2 schema by doing the following:
$WL_COMMERCE_HOME/db/database-type/upgrade-wlps-to-320.sql
define DATA_TABLESPACE=WLCS_DATA
define INDEX_TABLESPACE=WLCS_INDEX
By default, WebLogic Commerce Server and Personalization Server place data in WLCS_DATA and indexes in WLCS_INDEX. If you are using other tablespaces, you must modify upgrade-wlps-to-320.sql to specify your tablespaces instead.
@ $WL_COMMERCE_HOME/db/database-type/upgrade-wlps-to-320.sql
Note: Enter this command only once and only after you have modified all rows that contain data exceeding new length requirements.
When the command successfully completes updating tables, it prints the following message:
************ SCRIPT HAS FINISHED EXECUTING *************
****** PLEASE REVIEW UPDATE-TO-320.LOG FILE *****
Upgrade the WebLogic Commerce Server Schema
To upgrade WebLogic Commerce Server from Release 3.1.1 to Release 3.2, complete the tasks described in this section. The following diagram illustrates the process for upgrading the WebLogic Commerce Server schema, and subsequent topics provide more information about the process.
Figure 1-2 Upgrading the Commerce Server Schema from 3.1.1 to 3.2
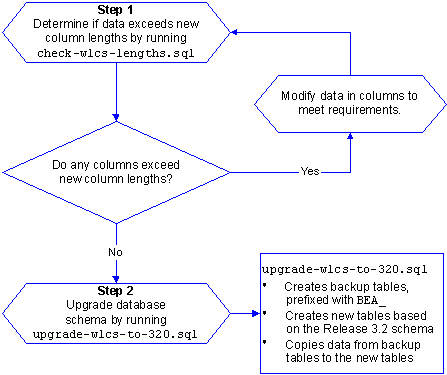
Step 1: Determine if Data Exceeds New Column Lengths
and Modify When Necessary
Start the migration process by finding and correcting any columns in your existing databases that contain data exceeding the new column length in Release 3.2.
To start the migration, do the following:
@ $WL_COMMERCE_HOME/db/database-type/check-wlcs-lengths.sql
The log file lists each table for which the maximum number of characters has changed. As Listing 1-2 illustrates, the log file states no rows selected for tables that meet the new maximum-length requirements. For tables that exceed requirements, the log file lists each row and describes the error condition.
Listing 1-2 Output of check-wlcs-lengths.sql
*****  WLCS_CATEGORY  *****
no rows selected
*****  WLCS_PRODUCT  *****
no rows selected
Step 2: Upgrade the Database Schema
After correcting any rows that do not conform to new column length requirements, you must upgrade the Release 3.1.1 schema to the Release 3.2 schema by doing the following:
$WL_COMMERCE_HOME/db/database-type/upgrade-wlcs-to-320.sql
define DATA_TABLESPACE=WLCS_DATA
define INDEX_TABLESPACE=WLCS_INDEX
By default, WebLogic Commerce Server and Personalization Server place data in WLCS_DATA and indexes in WLCS_INDEX. If you are using other tablespaces, you must modify upgrade-wlps-to-320.sql to specify your tablespaces instead.
@ $WL_COMMERCE_HOME/db/database-type/upgrade-wlcs-to-320.sql
Note: Enter this command only once and only after you have modified all rows that contain data exceeding new length requirements.
When the command successfully completes updating tables, it prints the following message:
************ SCRIPT HAS FINISHED EXECUTING *************
****** PLEASE REVIEW UPDATE-TO-320.LOG FILE *****
Verify the Upgrade
After you upgrade the schema for each server that you are using, verify the upgrade by starting the server and Administration Tool and testing the application. For example, if you use both WebLogic Commerce Server and WebLogic Personalization Server, open the Administration Tool to verify that the users and groups you upgraded are available under User Administration, and all items and categories that you upgraded are available under Catalog Administration. Then access the server through a Web browser to verify that data transferred successfully.
To Start the Server
To start WebLogic Commerce Server and/or WebLogic Personalization Server on UNIX, enter the following command from a WebLogic Commerce Server and Personalization Server host:
$WL_COMMERCE_HOME/StartCommerce.sh
To start WebLogic Commerce Server and/or WebLogic Personalization Server on Windows, on a WebLogic Commerce Server and Personalization Server host, do one of the following:
%WL_COMMERCE_HOME%\StartCommerce.bat
Note: Do not complete this step until you have successfully upgraded the schema for both servers (if you use both servers) to Release 3.2 and started the application and verified the data migration.
After you have verified that WebLogic Commerce Server and Personalization Server function properly with the imported data, remove the temporary BEA_table-name tables by running the following SQL command:
@ $WL_COMMERCE_HOME/db/database-type/drop_bea_tables.sql
When the command successfully completes removing BEA_ tables, it prints the following message:
************ SCRIPT HAS FINISHED EXECUTING *************
****** PLEASE REVIEW DROP_BEA_TABLES.LOG FILE *****

|

|
|
|
|
Copyright © 2000 BEA Systems, Inc. All rights reserved.
|