Using the Webflow and Pipeline Editor
The Webflow and Pipeline Editor is a JSP-based administration tool specifically designed to help you modify and validate the webflow.properties and pipeline.properties configuration files. This topic describes how to access the Webflow and Pipeline Editor, and provides instructions for its use.
This topic includes the following sections:
About the Webflow and Pipeline Editor
The following list contains useful information for site administrators who are about to use the Webflow and Pipeline Editor:
- The Webflow and Pipeline features are available if you have downloaded or purchased the full WebLogic Commerce Server license. This full license allows you to use all the WebLogic Commerce Server and Personalization Server features. The Webflow and Pipeline features are not available if you are using the license for WebLogic Personalization Server only.
- The Webflow and Pipeline Editor is designed to help you modify and validate either the webflow.properties or pipeline.properties files. It does not support the editing of arbitrary files or other WebLogic Commerce Server properties files (such as weblogic.properties and weblogiccommerce.properties).
- The Webflow and Pipeline properties files are located in the root directory of the server where WebLogic Commerce Server is installed. For example, if WL_COMMERCE_HOME is the directory where you installed the WebLogic Commerce Server, this is where you will find the webflow.properties and pipeline.properties files.
- The Webflow and Pipeline Editor should not be used when properties files are also modified by hand (that is, using a text editor such as Notepad). The preferred editing method for these files is through the Webflow and Pipeline Editor. If you create invalid entries outside of the Webflow and Pipeline Editor, the behavior of the editor may be unpredictable. The Webflow and Pipeline Editor will only work with a valid Webflow or Pipeline properties file.
- The Webflow and Pipeline Editor does not support multiple users, and will not detect this behavior. Therefore, your organization must ensure that only one site administrator is using the Webflow and Pipeline Editor at any given time. Failure to do so can result in loss of changes or invalid Webflows.
- The Webflow and Pipeline Editor does not support role-based security. Any user with access to other Administration Tools can access the Webflow and Pipeline Editor tool and vice versa.
- If you are using a cluster without a shared file system, the Webflow and Pipeline Editor will only update the property files associated with the server you are currently logged into. In such cases, BEA recommends editing the Webflow on a staging server and hand-copying the files to other servers as necessary.
- By default, changes made to the Webflow and Pipeline configurations while the server is running will not take effect until a server restart. To override this behavior, you must turn on Webflow's hot-deploy feature. This can be done in the weblogiccommerce.properties file with the webflow.hotdeploy.enable and pipeline.hotdeploy.enable properties.
Starting the WebLogic Commerce Server Administration Tools
Before you can use the Webflow and Pipeline Editor, you need to start the server and load the WebLogic Commerce Server Administration Tools page in your Web browser.
To start the server on a Windows system, you can either:
- Run StartCommerce.bat from the command line in the WL_COMMERCE_HOME directory, where WL_COMMERCE_HOME is the directory where you installed the WebLogic Commerce Server.
- From the Start menu, select Programs --> WebLogic Commerce Server 3.2 --> Start WebLogic Commerce Server.
To start the server on a UNIX system, run StartCommerce.sh from the command line in the WL_COMMERCE_HOME directory, where WL_COMMERCE_HOME is the directory where you installed the WebLogic Commerce Server.
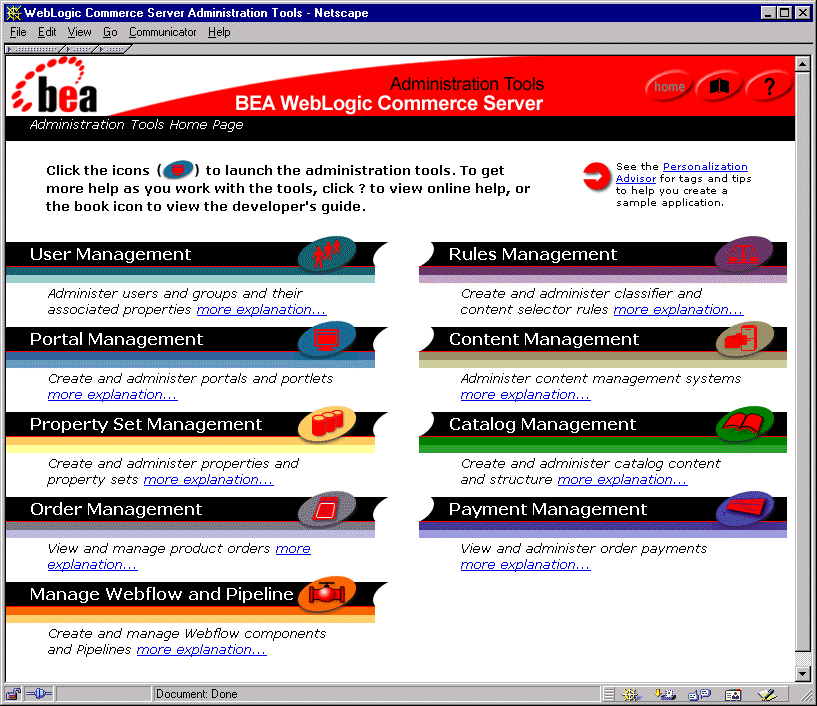
The Administration Tools page (shown in Figure 3-1) is an entry page into all of the available WebLogic Commerce Server Administration Tools, including the Webflow and Pipeline Editor. To load this page, use one of the following methods:
- Specify the URL for the page (http://localhost:7501/tools/application/admin) in your Web browser.
Note: If you need to perform an administrative task on another node in the cluster, specify the machine such as http://elvis:7501/tools/application/admin.
- From the Start menu on a Windows system, select Programs --> WebLogic Commerce Server 3.2 --> Administration Tools.
You will be asked to supply the username and password for the Administration Tools home page, which will provide you with access to all the administration tools, including the Webflow and Pipeline Editor.
Figure 3-1 WebLogic Commerce Server Administration Tools
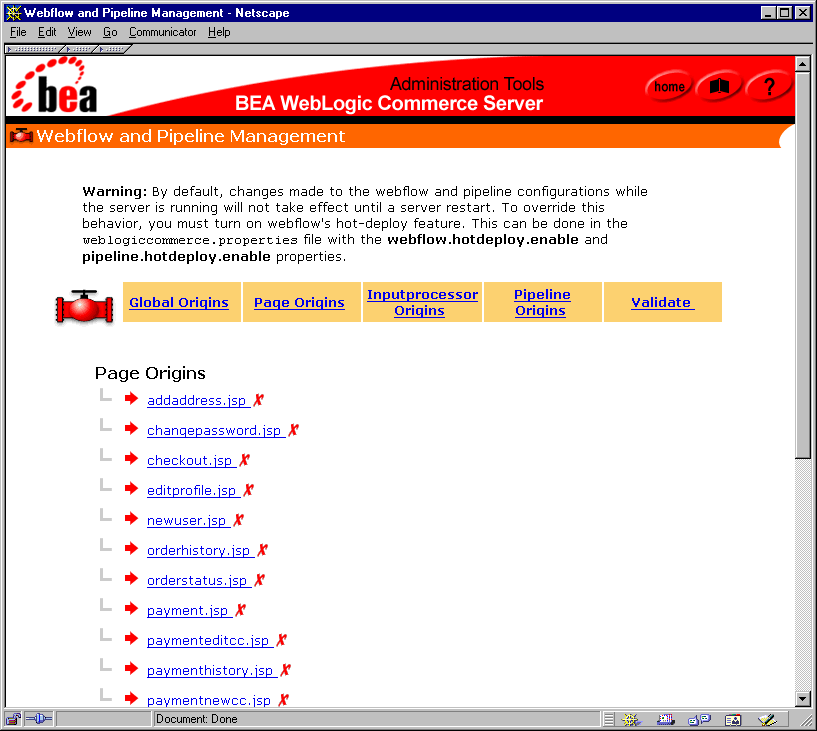
To load the Editor, click the pipe icon shown on the Manage Webflow and Pipeline title bar. The Webflow and Pipeline Management page appears, as shown in Figure 3-2.
Figure 3-2 Webflow and Pipeline Management
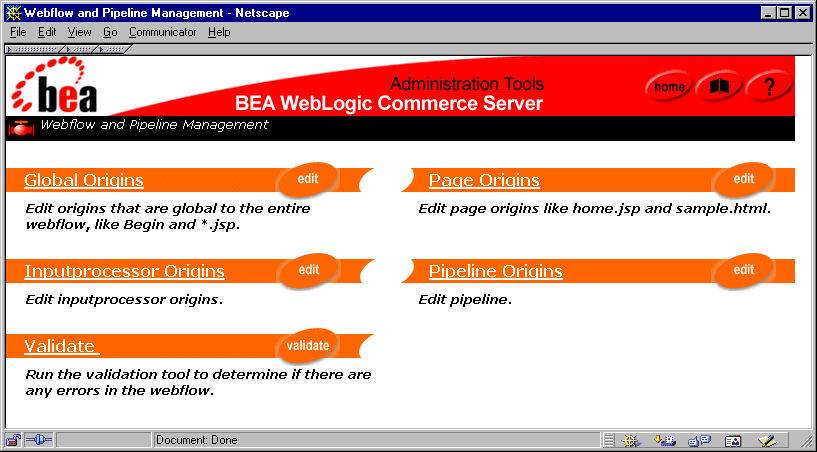
From the Webflow and Pipeline Management page, you can create, modify, and remove global origins, page origins, inputprocessor origins, and Pipeline origins. Or, you can choose to validate your Webflow.
Subsequent sections of this document provide instructions about how to perform these tasks using the Webflow and Pipeline Editor.
Global Origins
Recall from Customizing Webflow and Pipelines, that each transition in the webflow.properties file contains a current state and a result state separated by an equal sign. The current state is considered an origin, because it represents the page, input processor, or Pipeline where the transition originated. A global origin is an origin that can be used throughout the entire Webflow.
There are seven global origins that may be present in a Webflow. They are:
- *.htm
- *.html
- *.inputprocessor
- *.jsp
- *.pipeline
- begin
- configurationerrorpage
Five of the seven global origins make use of the wildcard character, which indicates that its associated transition is to be performed regardless of the current page, input processor, or Pipeline. For more information about using the wildcard character in the Webflow, see Using the Wildcard Character.
The begin origin, which specifies the initial state for the Webflow, is also considered a global origin. For more information about the begin origin, see Syntax of the webflow.properties File.
The configuration error page (configurationerrorpage.jsp), which is displayed if a transition is missing and the Webflow search order cannot rectify it, is the last global origin. For more information about the configuration error page, see Webflow Search Order.
To work with global origins, click the Global Origins link (or its corresponding Edit button). The Global Origins page appears, as shown in Figure 3-3.
Figure 3-3 Global Origins
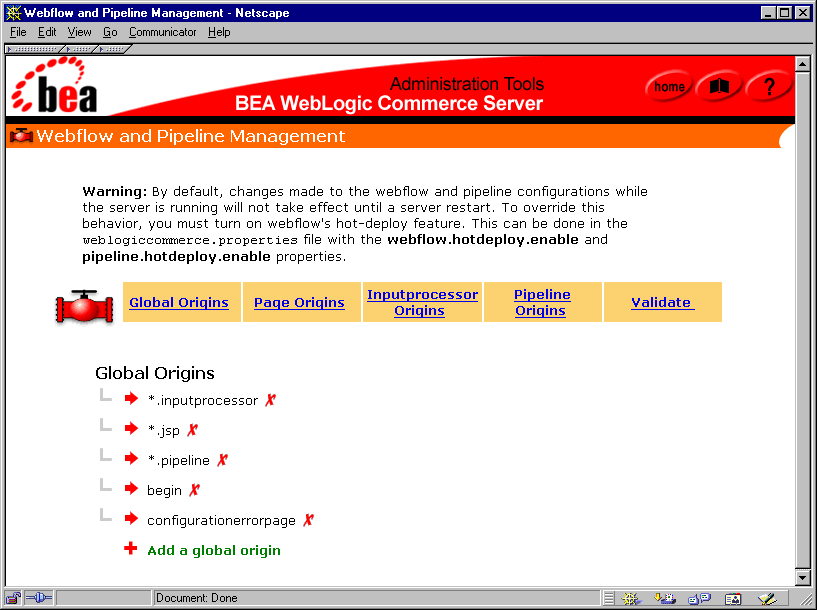
From this page, you can view, add, and delete global origins. You can also edit global origins by modifying their associated events or by associating new events.
Viewing Global Origins
Before working with global origins, you may first want to see what global origins are currently in the Webflow. When the Global Origins page is first loaded into your browser, you will see a list of the current global origins, but no details about them. To view a global origin's associated events, click the solid arrow located to the left of the global origin. The arrow changes to an open arrow, and the events currently associated with the global origin appear with an open diamond, as shown in Figure 3-4.
Figure 3-4 Viewing Events for the Inputprocessor Global Origin
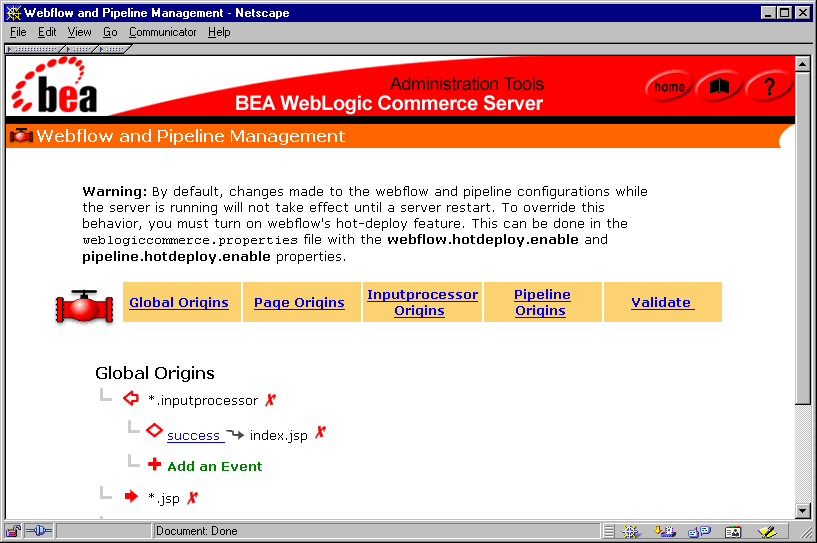
Note: The arrows to the left of each global origin are solid and point toward the origin if it can be expanded to show associated events. If the event information associated with a global origin can be collapsed, the arrow is open and points away from the origin. The *.jsp global origin in Figure 3-4 is an example of an origin that can be expanded; the *.inputprocessor global origin is an example of an origin that can be collapsed. Events are always represented by open diamonds.
Adding a Global Origin
To add a global origin, follow these steps:
- Click the plus (+) symbol located to the left of Add a Global Origin. (If the list of
global origins is long, you may need to use the scrollbar.) The Add Global Origin
page appears, as shown in Figure 3-5.
Figure 3-5 Add Global Origin
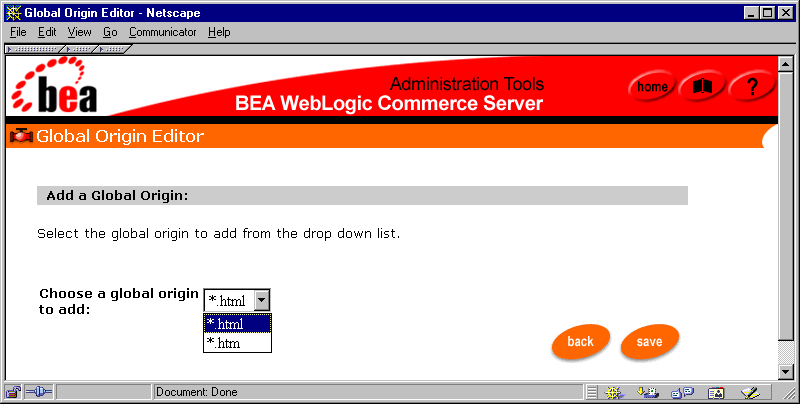
- Select the type of origin (*.jsp, *.htm, *.html, begin,
configurationerrorpage) you want to add from the Global Origin pull-down
menu.
Note: You can only have one global origin per type (that is, one *.htm, *.html, *.inputprocessor, *.jsp, begin, and configurationerrorpage) in a webflow.properties file. If there are already some global origins present in the Webflow, only the remaining options will appear in the Global Origin pull-down menu.
- Click the Save button to save the new global origin. You are returned to the
Global Origins page, and your new origin appears alphabetically in the list.
- Click the solid arrow located to the right of the new global origin to view its
associated events. The arrow changes to an open arrow pointing in the opposite
direction. A default event (marked by an open diamond) and an option to Add an
Event are shown.
Note: For Web pages (*.htm, *.html, and *.jsp), the default event of
link(home)-->index.jsp is shown; For input processors and Pipelines, the default event is success()-->index.jsp.
- If you want to add a different event to the global origin, modify the default event,
or delete the default event, proceed to the appropriate section in Editing a Global
Origin below.
Editing a Global Origin
Editing a global origin is synonymous with modifying its associated events. You can add, edit, or delete the events associated with a global origin as described in the following sections.
Adding an Event
Note: For the begin and configurationerrorpage global origins, you can only have one event.
To add a new event to a global origin, follow these steps:
- Verify that the global origin to which you want to add the event is expanded (that
is, an open arrow is shown to the left of the global origin, and the Add an Event
option is shown). If the global origin is not expanded, click the solid arrow located
to the left of the global origin to expand it.
- Click the plus (+) sign located next to Add an Event. (If the list of events is long,
you may need to use the scrollbar.) The New Event page appears, as shown in
Figure 3-6.
Figure 3-6 Global Origin: New Event
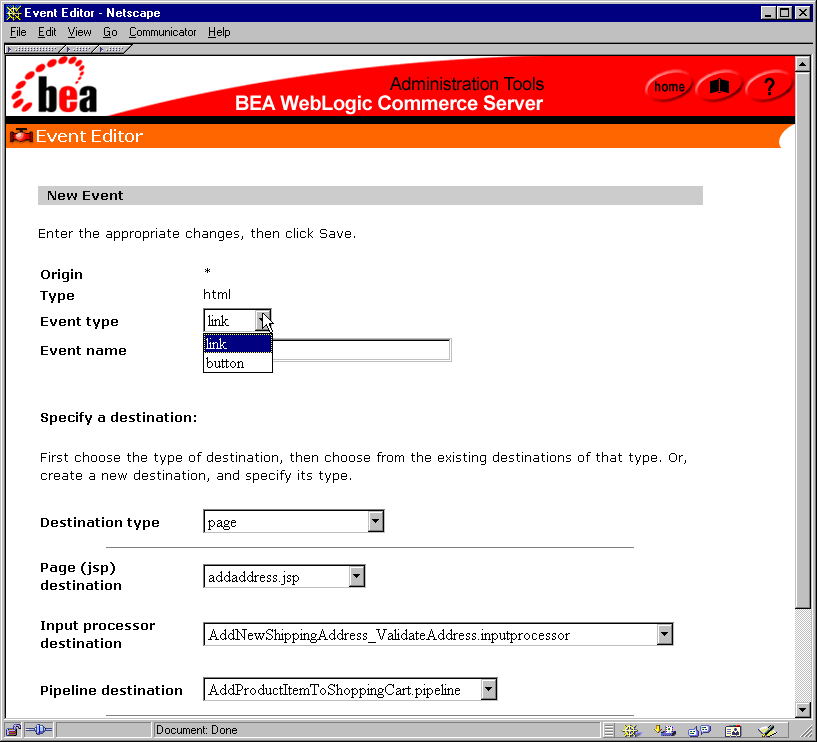
- Select the appropriate Event Type from the pull-down menu, and enter a name for
the event in the Event Name text field.
Note: For more information about event types and event names, see Syntax of the webflow.properties File and About Event Names, respectively.
- Next, you need to specify a destination for the event. The destination could be an
existing page (.htm, .html, or .jsp), input processor, or Pipeline, or the
destination could be an entirely new page, input processor, or Pipeline. To
specify the destination, follow these steps:
- Select the destination type from the Destination Type pull-down menu (one of
Page, Input Processor, Pipeline, or Specify New Destination).
Note: Selecting a destination type in this menu disables form fields that are not required for the chosen destination type. To enable unavailable form fields, choose a different destination type.
- If you selected Page from the Destination Type pull-down menu, select an
existing page (.htm, .html, or .jsp) from the Page (JSP) Destination
pull-down menu. If you selected Input Processor, select an existing input
processor from the Input Processor Destination pull-down menu. If you
selected Pipeline, select an existing Pipeline from the Pipeline Destination
pull-down menu. If you selected Specify New Destination from the
Destination Type pull-down menu, enter the name of the destination in the
Specify New Destination text field, and select the destination type from the Of
Type pull-down menu (jsp, htm, html, inputprocessor, or pipeline).
- Click the Save button to save the new event. You are returned to the Global
Origins page, and the new event (marked by an open diamond) appears beneath
the appropriate global origin in an alphabetic list.
Editing an Event
To edit an event already associated with a global origin, follow these steps:
- Verify that the global origin for which you want to edit an event is expanded (that
is, an open arrow is shown to the left of the global origin, and the event you want
to modify is shown). If the global origin is not expanded, click the solid arrow
located to the left of the global origin to expand it.
- Click a hyperlinked event to edit it (for example, click link(home) -->index.jsp). The Edit Event page appears, containing the original values for
each field, as shown in Figure 3-7.
Figure 3-7 Global Origin: Edit Event
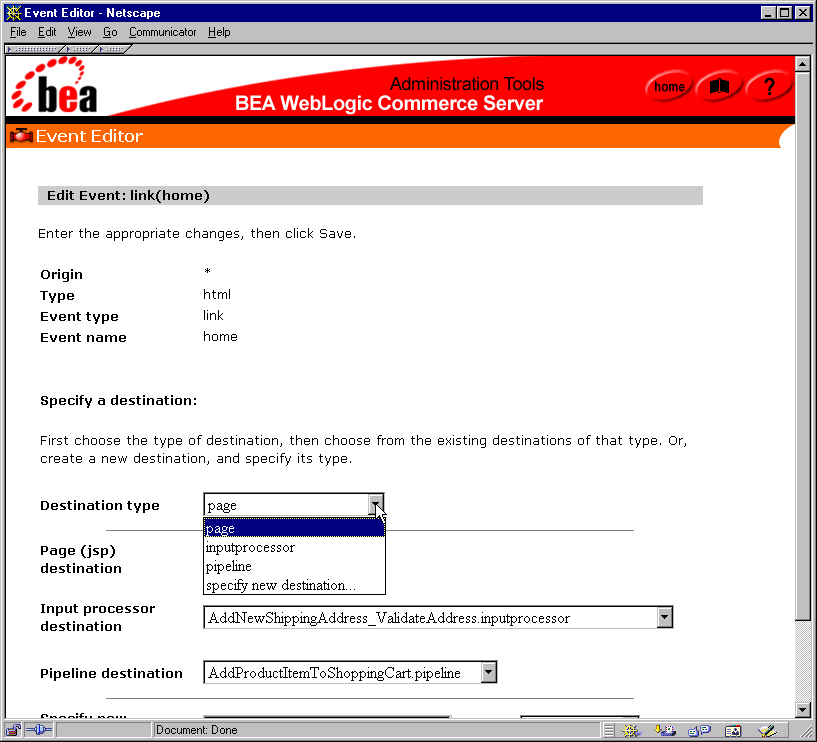
Note: The Edit Event page does not allow you to modify the event type or event name. To do so, you must first delete the event using the instructions provided in Deleting an Event and then recreate it using the instructions provided in Adding an Event.
- Recall that an event destination could be an existing page (.htm, .html, .jsp),
input processor, or Pipeline, or an entirely new page, input processor, or Pipeline.
To change the destination for the event, follow these steps:
- Select the destination type from the Destination Type pull-down menu (one of
Page, Input Processor, Pipeline, or Specify New Destination).
Note: Selecting a destination type in this menu disables form fields that are not required for the chosen destination type. To enable unavailable form fields, choose a different destination type.
- If you selected Page from the Destination Type pull-down menu, select an
existing page (.htm, .html, or .jsp) from the Page (JSP) Destination
pull-down menu. If you selected Input Processor, select an existing input
processor from the Input Processor Destination pull-down menu. If you
selected Pipeline, select an existing Pipeline from the Pipeline Destination
pull-down menu. If you selected Specify New Destination from the
Destination Type pull-down menu, enter the name of the destination in the
Specify New Destination text field, and select the destination type from the Of
Type pull-down menu (jsp, htm, html, inputprocessor, or pipeline).
- Click the Save button to save the changes to the event. You are returned to the
Global Origins page, and the modified event (marked by an open diamond)
appears beneath the appropriate global origin in an alphabetic list.
Deleting an Event
To delete an event currently associated with a global origin, follow these steps:
- Verify that the global origin for which you want to delete an event is expanded (that
is, an open arrow is shown to the left of the global origin, and the event you want
to delete is shown). If the global origin is not expanded, click the solid arrow
located to the left of the global origin to expand it.
- To delete the event, click the red X located to the right of the event.
- Click the OK button in the confirmation pop-up window.
Note: If you delete all the events associated with a global origin and then leave the Global Origins page (or click the arrow next to the origin to collapse it), the origin itself will also be deleted. This is done to prevent error conditions in the Webflow. However, if you just delete all the events associated with a global origin and immediately start to add new events to the global origin, the origin itself will remain. This way, you do not always have to recreate the origin after deleting all of its events.
Deleting a Global Origin
To delete a global origin, click the red X located to the right of the origin. Confirm the deletion by clicking the OK button.
Warning: Deleting a global origin means that the origin and all of its associated events will be deleted.
Page Origins
A page is any file with a .htm, .html, or .jsp extension. When a page appears to the left-hand side of the equal sign in the Webflow syntax, the page represents the current state and is considered an origin. Page origins require a result (destination) state to be defined for a link or button event, which is specified to the right-hand side of the equal sign in the Webflow syntax. Together, the complete line is referred to as a page Webflow transition.
Note: For more information about page origins and the Webflow syntax, see Customizing Webflow Using the webflow.properties File.
The Page Origins portion of the Webflow and Pipeline Editor allows you to provide all relevant information about the pages in your Web site. To work with page origins, click the Page Origins link (or its corresponding Edit button). The Page Origins page appears, as shown in Figure 3-8.
Figure 3-8 Page Origins
From this page, you can view, add, and delete page origins. You can also edit page origins by modifying their name, type, and associated events, or by associating new events.
Viewing Page Origins
Before working with page origins, you may first want to see what page origins are currently in the Webflow. When the Page Origins page is first loaded into your browser, you will see a list of the current page origins, but no details about them. To view a page origin's associated events, click the solid arrow located to the left of the page origin. The arrow changes to an open arrow, and the events currently associated with the global origin appear with an open diamond, as shown in Figure 3-9.
Figure 3-9 Viewing Events for the addaddress.jsp Page Origin
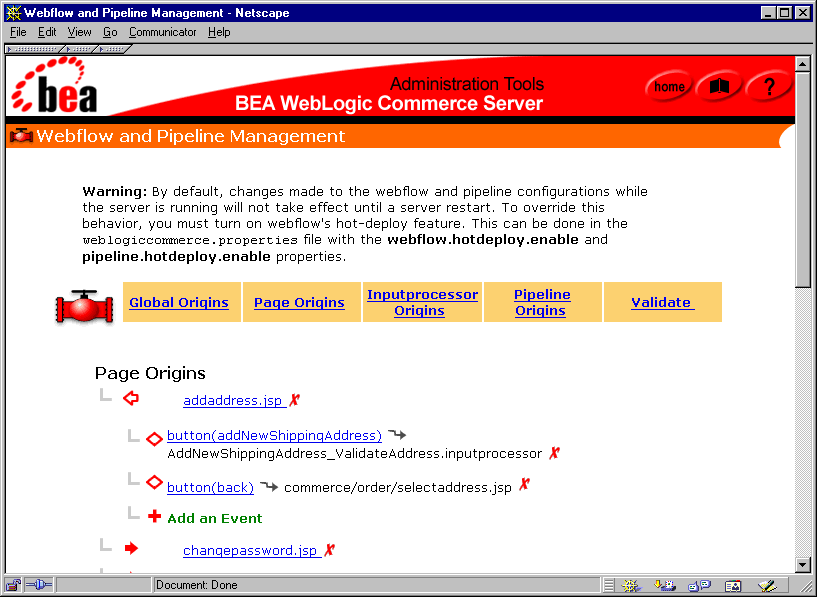
Note: The arrows to the left of each page origin are solid and point toward the origin if it can be expanded to show associated events. If the event information associated with a page origin can be collapsed, the arrow is open and points away from the origin. The addaddress.jsp page origin shown in Figure 3-9 can be collapsed. Events are always represented by open diamonds.
Adding a Page Origin
To add a page origin, follow these steps:
- Click the plus (+) symbol located to the left of Add a Page Origin. (If the list of
page origins is long, you may need to use the scrollbar.) The Add Page Origin page
appears, as shown in Figure 3-10.
Figure 3-10 Add Page Origin
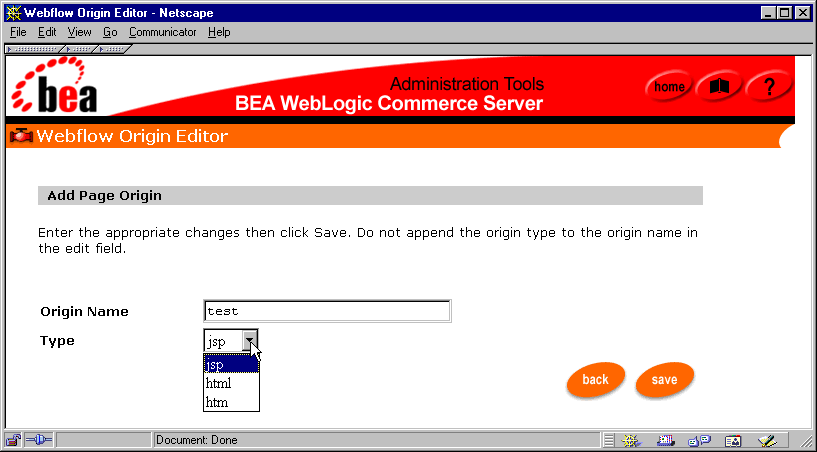
- Enter the origin (page) name in the Origin Name text field. Do not include the
file extension (type) in this field.
- Select the type of page origin (jsp, html, htm) you want to add from the Type
pull-down menu.
- Click the Save button to save the new page origin. You are returned to the Page
Origins page, and the new origin appears alphabetically in the list.
- Click the solid arrow located to the right of the new page origin to view its
associated events. The arrow changes to an open arrow pointing in the opposite
direction. The default event of link(home) -->index.jsp (marked by an open
diamond) and an option to Add an Event are shown.
- If you want to add a different event to the page origin, modify the default event,
or delete the default event, proceed to the appropriate section in Modifying a
Page Origin's Events.
Editing a Page Origin
You can edit a page origin in two ways:
- By modifying information about the page origin itself (that is, its name or file extension/type).
- By modifying the page origin's associated events.
Modifying Information About a Page Origin
To modify information about a page origin, follow these steps:
- Click a hyperlinked page origin to edit it (for example, click addaddress.jsp).
The Edit Page Origin page appears, containing the original values for each field, as
shown in Figure 3-11.
Figure 3-11 Edit Page Origin

- Change the origin (page) name or type of page origin using the form fields.
- Click the Save button to save your changes. You are returned to the Page Origins
page, and the modified page origin is shown alphabetically in the list.
Note: Modifications made to the page origin name and type could potentially affect other areas of the Webflow that utilize it. Be sure your modifications take this into account, and be sure to verify your modified properties file with the validation tool. For more information about the validation tool, see How to Validate Your Properties Files.
Modifying a Page Origin's Events
You can also edit a page origin by modifying its associated events. You can add, edit, or delete events associated with a page origin as described in the following sections.
Adding an Event
To add an event to a page origin, follow these steps:
- Verify that the page origin to which you want to add the event is expanded (that is,
an open arrow is shown to the left of the page origin, and the Add an Event option
is shown). If the page origin is not expanded, click the solid arrow located to the
left of the page origin to expand it.
- Click the plus (+) sign located next to Add an Event. (If the list of events is long,
you may need to use the scrollbar.) The New Event page appears, as shown in
Figure 3-12.
Figure 3-12 Page Origin: New Event

- Select the appropriate Event Type from the pull-down menu, and enter a name for
the event in the Event Name text field.
Note: For more information about event types and event names, see Syntax of the webflow.properties File and About Event Names, respectively.
- Next, you need to specify a destination for the event. The destination could be an
existing page (.htm, .html, or .jsp), input processor, or Pipeline, or the
destination could be an entirely new page, input processor, or Pipeline. To
specify the destination, follow these steps:
- Select the destination type from the Destination Type pull-down menu (one of
Page, Input Processor, Pipeline, or Specify New Destination).
Note: Selecting a destination type in this menu disables form fields that are not required for the chosen destination type. To enable unavailable form fields, choose a different destination type.
- If you selected Page from the Destination Type pull-down menu, select an
existing page (.htm, .html, or .jsp) from the Page (JSP) Destination
pull-down menu. If you selected Input Processor, select an existing input
processor from the Input Processor Destination pull-down menu. If you
selected Pipeline, select an existing Pipeline from the Pipeline Destination
pull-down menu. If you selected Specify New Destination from the
Destination Type pull-down menu, enter the name of the destination in the
Specify New Destination text field, and select the destination type from the Of
Type pull-down menu (jsp, htm, html, inputprocessor, or pipeline).
- Click the Save button to save the new event. You are returned to the Page
Origins page, and the new event (marked by an open diamond) appears beneath
the appropriate page origin in an alphabetic list.
Editing an Event
To edit an event already associated with a page origin, follow these steps:
- Verify that the page origin for which you want to edit an event is expanded (that is,
an open arrow is shown to the left of the page origin, and the event you want to
modify is shown). If the page origin is not expanded, click the solid arrow located
to the left of the page origin to expand it.
- Click a hyperlinked event to edit it (for example, click button(back) -->commerce/order/selectaddress.jsp). The Edit Event page appears,
containing the original values for each field, as shown in Figure 3-13.
Figure 3-13 Page Origin: Edit Event
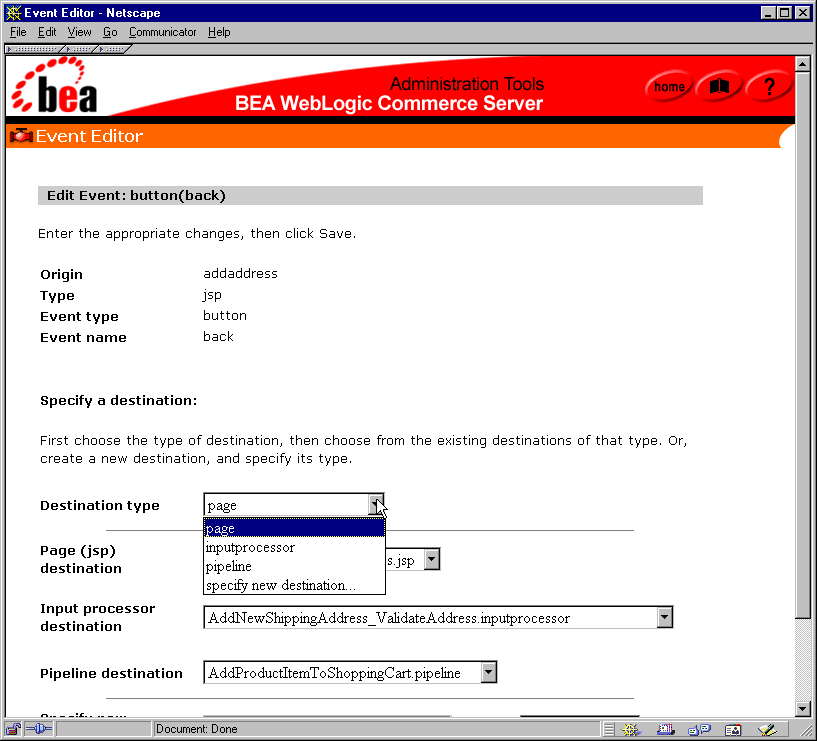
Note: The Edit Event page does not allow you to modify the event type or event name. To do so, you must first delete the event using the instructions provided in Deleting an Event and then recreate it using the instructions provided in Adding an Event.
- Recall that an event destination could be an existing page (.htm, .html, .jsp),
input processor, or Pipeline, or an entirely new page, input processor, or Pipeline.
To change the destination for the event, follow these steps:
- Select the destination type from the Destination Type pull-down menu (one of
Page, Input Processor, Pipeline, or Specify New Destination).
Note: Selecting a destination type in this menu disables form fields that are not required for the chosen destination type. To enable unavailable form fields, choose a different destination type.
- If you selected Page from the Destination Type pull-down menu, select an
existing page (.htm, .html, or .jsp) from the Page (JSP) Destination
pull-down menu. If you selected Input Processor, select an existing input
processor from the Input Processor Destination pull-down menu. If you
selected Pipeline, select an existing Pipeline from the Pipeline Destination
pull-down menu. If you selected Specify New Destination from the
Destination Type pull-down menu, enter the name of the destination in the
Specify New Destination text field, and select the destination type from the Of
Type pull-down menu (jsp, htm, html, inputprocessor, or pipeline).
- Click the Save button to save the changes to the event. You are returned to the
Page Origins page, and the modified event (marked by an open diamond)
appears beneath the appropriate page origin in an alphabetic list.
Deleting an Event
To delete an event currently associated with a page origin, follow these steps:
- Verify that the page origin for which you want to delete an event is expanded (that
is, an open arrow is shown to the left of the page origin, and the event you want to
delete is shown). If the page origin is not expanded, click the solid arrow located
to the left of the page origin to expand it.
- To delete the event, click the red X located to the right of the event.
- Click the OK button in the confirmation pop-up window.
Note: If you delete all the events associated with a page origin and then leave the Page Origins page (or click the arrow next to the origin to collapse it), the origin itself will also be deleted. This is done to prevent error conditions in the Webflow. However, if you just delete all the events associated with a page origin and immediately start to add new events to the page origin, the origin itself will remain. This way, you do not always have to recreate the origin after deleting all of its events.
Deleting a Page Origin
To delete a page origin, click the red X located to the right of the origin. Confirm the deletion by clicking the OK button.
Warning: Deleting a page origin means that the origin and all of its associated events will be deleted.
InputProcessor Origins
Input processors are classes that validate customer-supplied information within a form. When a customer submits a form, an input processor decides whether to reload the form and point out errors, or allow the customer to continue. Therefore, an input processor often appears to the left-hand side of the equal sign in the Webflow syntax. When this is the case, the input processor represents the current state and is considered an origin. Input processor origins require a result (destination) state to be defined for the success event, which is specified to the right-hand side of the equal sign. Together, the complete line is referred to as an input processor transition.
Notes: It is suggested that you also provide a result state for the exception event.
For more information about input processor origins and Webflow syntax, see Syntax of Input Processors in the webflow.properties File.
The InputProcessor Origins portion of the Webflow and Pipeline Editor allows you to provide all relevant information about your input processors. To work with input processor origins, click the InputProcessor Origins link (or its corresponding Edit button). The InputProcessor Origins page appears, as shown in Figure 3-14.
Figure 3-14 InputProcessor Origins
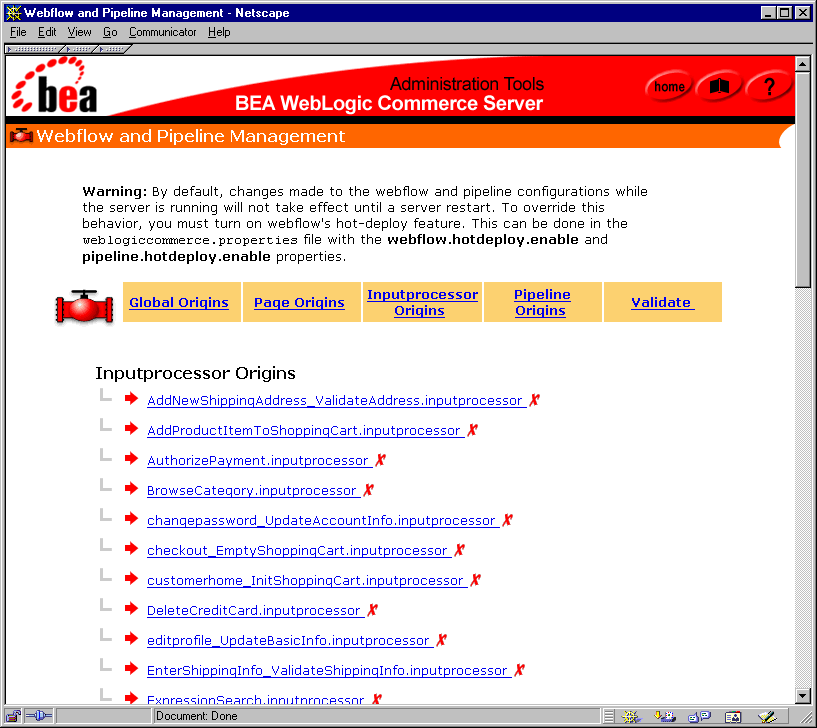
From this page, you can view, add, and delete input processor origins. You can also edit input processor origins by modifying their name, class name, and associated events, or by associating new events.
Viewing InputProcessor Origins
Before working with input processor origins, you may first want to see what input processor origins are currently in the Webflow. When the InputProcessor Origins page is first loaded into your browser, you will see a list of the current input processor origins, but no details about them. To view an input processor origin's associated events, click the solid arrow located to the left of the input processor origin. The arrow changes to an open arrow, and the events currently associated with the input processor origin appear with an open diamond, as shown in Figure 3-15.
Figure 3-15 Viewing Events for the AuthorizePayment.inputprocessor Origin
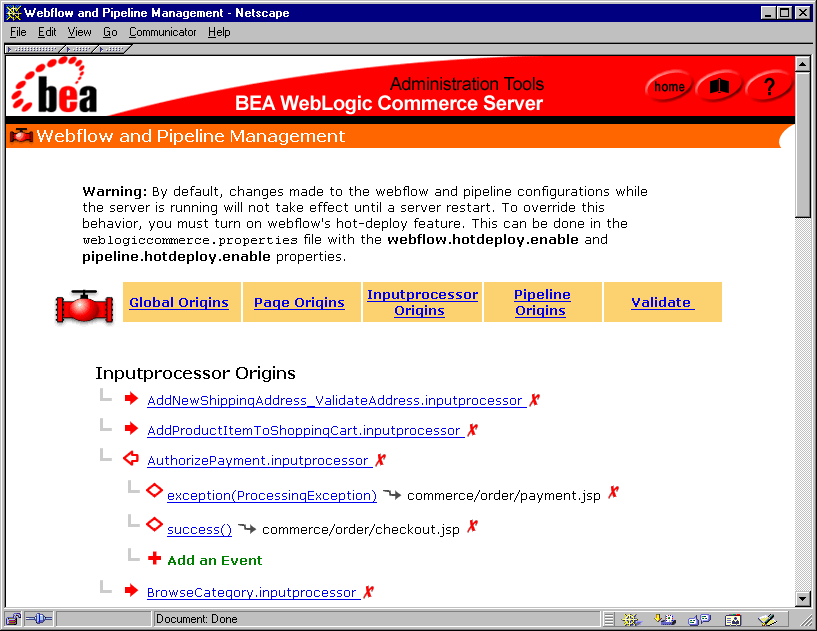
Note: The arrows to the left of each input processor origin are solid and point toward the origin if it can be expanded to show associated events. If the event information associated with an input processor origin can be collapsed, the arrow is open and points away from the origin. The AddProductItemToShoppingCart.inputprocessor input processor origin in Figure 3-15 is an example of an origin that can be expanded; the AuthorizePayment.inputprocessor input processor origin is an example of an origin that can be collapsed. Events are always represented by open diamonds.
Adding an InputProcessor Origin
To add an input processor origin, follow these steps:
- Click the plus (+) symbol located to the left of Add an InputProcessor Origin. (If
the list of input processor origins is long, you may need to use the scrollbar.) The
Add InputProcessor Origin page appears, as shown in Figure 3-16.
Figure 3-16 Add InputProcessor Origin
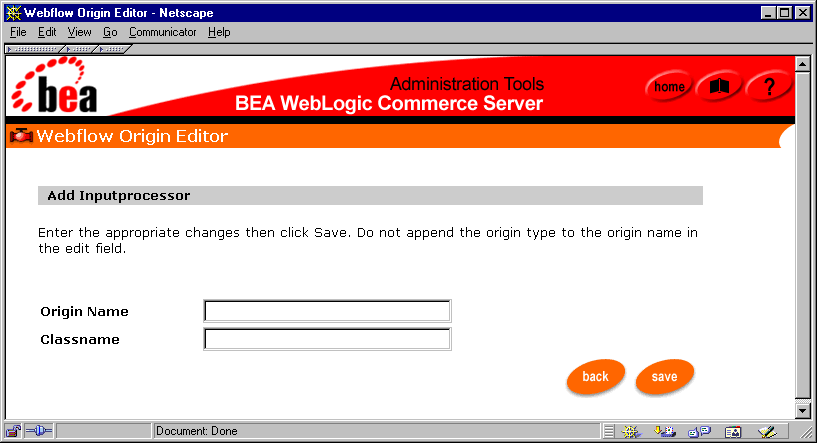
- Enter the origin (input processor) name in the Origin Name text field.
- Enter the full class name for the input processor in the Classname text field.
- Click the Save button to save the new input processor origin. You are returned to
the InputProcessor Origins page, and the new origin appears alphabetically in the
list.
- Click the solid arrow located to the right of the new input processor origin to
view its associated events. The arrow changes to an open arrow pointing in the
opposite direction. The default event of success() -->index.jsp (marked by
an open diamond) and an option to Add an Event are shown.
- If you want to add a different event to the input processor origin, modify the
default event, or delete the default event, proceed to the appropriate section in
Modifying an InputProcessor Origin's Events.
Editing an InputProcessor Origin
You can edit an input processor origin in two ways:
- By modifying information about the input processor origin itself (that is, its name or class name).
- By modifying the input processor origin's associated events.
Modifying Information About an InputProcessor Origin
To modify information about an input processor origin, follow these steps:
- Click a hyperlinked input processor origin to edit it (for example, click
AuthorizePayment.inputprocessor). The Edit InputProcessor Origin page
appears, containing the original values for each field, as shown in Figure 3-17.
Figure 3-17 Edit InputProcessor Origin
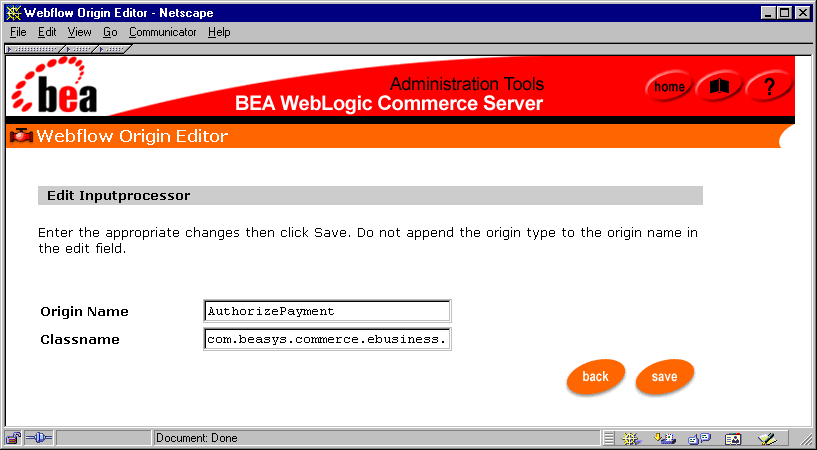
- Change the origin (input processor) name or class name using the form fields.
- Click the Save button to save your changes. You are returned to the
InputProcessor Origins page, and the modified input processor origin is shown
alphabetically in the list.
Note: Modifications made to the input processor origin name and class name could potentially affect other areas of the Webflow that utilize it. Be sure your modifications take this into account, and be sure to verify your modified properties file with the validation tool. For more information about the validation tool, see How to Validate Your Properties Files.
Modifying an InputProcessor Origin's Events
You can also edit an input processor origin by modifying its associated events. You can add, edit, or delete events associated with an input processor origin as described in the following sections.
Adding an Event
To add an event to an input processor origin, follow these steps:
- Verify that the input processor origin to which you want to add the event is
expanded (that is, an open arrow is shown to the left of the input processor origin,
and the Add an Event option is shown). If the input processor origin is not
expanded, click the solid arrow located to the left of the input processor origin to
expand it.
- Click the plus (+) sign located next to Add an Event. (If the list of events is long,
you may need to use the scrollbar.) The New Event page appears, as shown in
Figure 3-18.
Figure 3-18 InputProcessor Origin: New Event
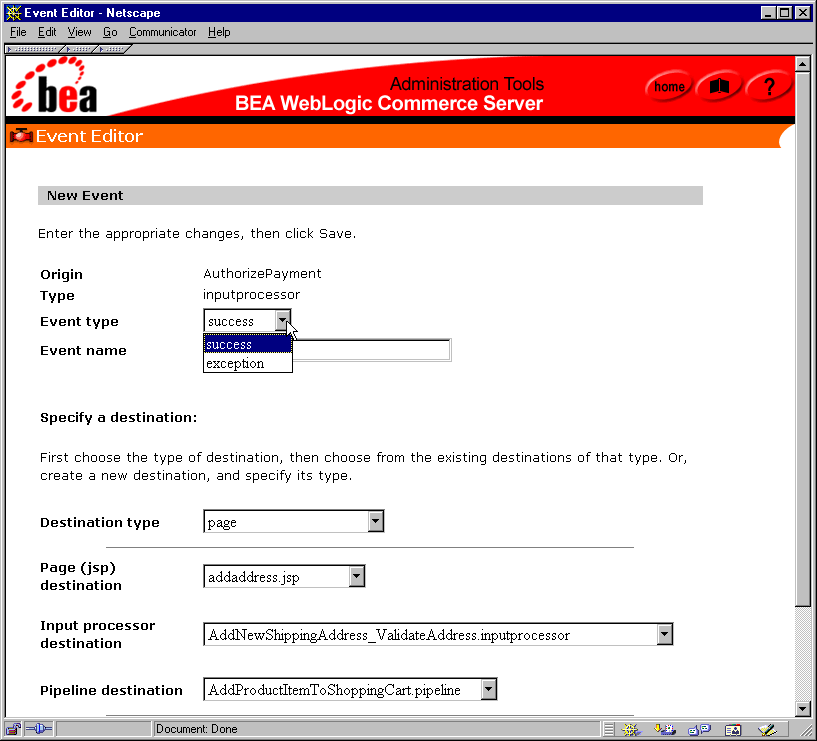
- Select the appropriate Event Type from the pull-down menu, and enter a name for
the event in the Event Name text field.
Note: For more information about event types and event names, see Syntax of the webflow.properties File and About Event Names, respectively.
- Next, you need to specify a destination for the event. The destination could be an
existing page (.htm, .html, or .jsp), input processor, or Pipeline, or the
destination could be an entirely new page, input processor, or Pipeline. To
specify the destination, follow these steps:
- Select the destination type from the Destination Type pull-down menu (one of
Page, Input Processor, Pipeline, or Specify New Destination).
Note: Selecting a destination type in this menu disables form fields that are not required for the chosen destination type. To enable unavailable form fields, choose a different destination type.
- If you selected Page from the Destination Type pull-down menu, select an
existing page (.htm, .html, or .jsp) from the Page (JSP) Destination
pull-down menu. If you selected Input Processor, select an existing input
processor from the Input Processor Destination pull-down menu. If you
selected Pipeline, select an existing Pipeline from the Pipeline Destination
pull-down menu. If you selected Specify New Destination from the
Destination Type pull-down menu, enter the name of the destination in the
Specify New Destination text field, and select the destination type from the Of
Type pull-down menu (jsp, htm, html, inputprocessor, or pipeline).
- Click the Save button to save the new event. You are returned to the
InputProcessor Origins page, and the new event (marked by an open diamond)
appears beneath the appropriate input processor origin in an alphabetic list.
Editing an Event
To edit an event already associated with an input processor origin, follow these steps:
- Verify that the input processor origin for which you want to edit an event is
expanded (that is, an open arrow is shown to the left of the input processor origin,
and the event you want to modify is shown). If the input processor origin is not
expanded, click the solid arrow located to the left of the input processor origin to
expand it.
- Click a hyperlinked event to edit it (for example, click
exception(ProcessingException) -->commerce/order/payment.jsp).
The Edit Event page appears, containing the original values for each field, as
shown in Figure 3-19.
Figure 3-19 InputProcessor Origin: Edit Event
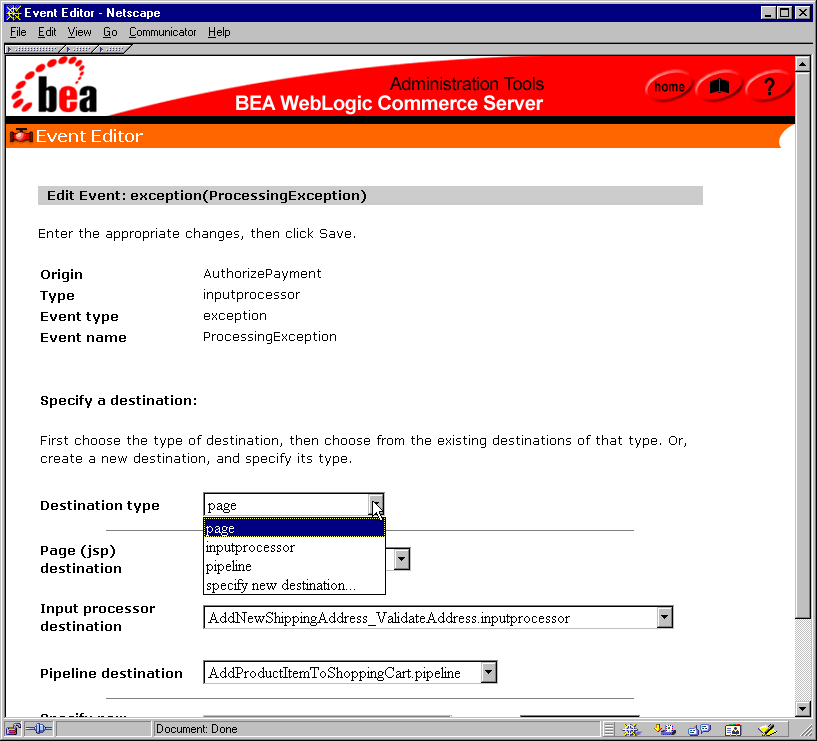
Note: The Edit Event page does not allow you to modify the event type or event name. To do so, you must first delete the event using the instructions provided in Deleting an Event and then recreate it using the instructions provided in Adding an Event.
- Recall that an event destination could be an existing page (.htm, .html, .jsp),
input processor, or Pipeline, or an entirely new page, input processor, or Pipeline.
To change the destination for the event, follow these steps:
- Select the destination type from the Destination Type pull-down menu (one of
Page, Input Processor, Pipeline, or Specify New Destination).
Note: Selecting a destination type in this menu disables form fields that are not required for the chosen destination type. To enable unavailable form fields, choose a different destination type.
- If you selected Page from the Destination Type pull-down menu, select an
existing page (.htm, .html, or .jsp) from the Page (JSP) Destination
pull-down menu. If you selected Input Processor, select an existing input
processor from the Input Processor Destination pull-down menu. If you
selected Pipeline, select an existing Pipeline from the Pipeline Destination
pull-down menu. If you selected Specify New Destination from the
Destination Type pull-down menu, enter the name of the destination in the
Specify New Destination text field, and select the destination type from the Of
Type pull-down menu (jsp, htm, html, inputprocessor, or pipeline).
- Click the Save button to save the changes to the event. You are returned to the
InputProcessor Origins page, and the modified event (marked by an open
diamond) appears beneath the appropriate input processor origin in an
alphabetic list.
Deleting an Event
To delete an event currently associated with an input processor origin, follow these steps:
- Verify that the input processor origin for which you want to delete an event is
expanded (that is, an open arrow is shown to the left of the input processor origin,
and the event you want to delete is shown). If the input processor origin is not
expanded, click the solid arrow located to the left of the input processor origin to
expand it.
- To delete the event, click the red X located to the right of the event.
- Click the OK button in the confirmation pop-up window.
Note: Unlike the other origins (global, page, and Pipeline), if you delete all the events associated with an input processor origin and then leave the InputProcessor Origins page (or click the arrow next to the origin to collapse it), the origin itself will not be deleted. This is because an input processor origin with no events will not cause an error condition in the Webflow, as the other origins would.
Deleting an InputProcessor Origin
To delete an input processor origin, click the red X located to the right of the origin. Confirm the deletion by clicking the OK button.
Warning: Deleting an input processor origin means that the origin and all of its associated events will be deleted.
Pipeline Origins
Pipelines are classes that handle the business logic or back-end processes of an e-business Web site. Therefore, a Pipeline often appears to the left-hand side of the equal sign in the Webflow syntax. When this is the case, the Pipeline represents the current state and is considered an origin. Pipeline origins require a result (destination) state to be defined for the success event, which is specified to the right-hand side of the equal sign in the Webflow syntax. Together, the complete line is referred to as a Pipeline transition.
Notes: It is suggested that you also provide a result state for the exception event.
For more information about Pipeline origins and the Webflow syntax see Using Pipelines in the Webflow.
The Pipeline Origins portion of the Webflow and Pipeline Editor allows you to provide all relevant information about your Pipelines. To work with Pipeline origins, click the Pipeline Origins link (or its corresponding Edit button). The Pipeline Origins page appears, as shown in Figure 3-20.
Figure 3-20 Pipeline Origins
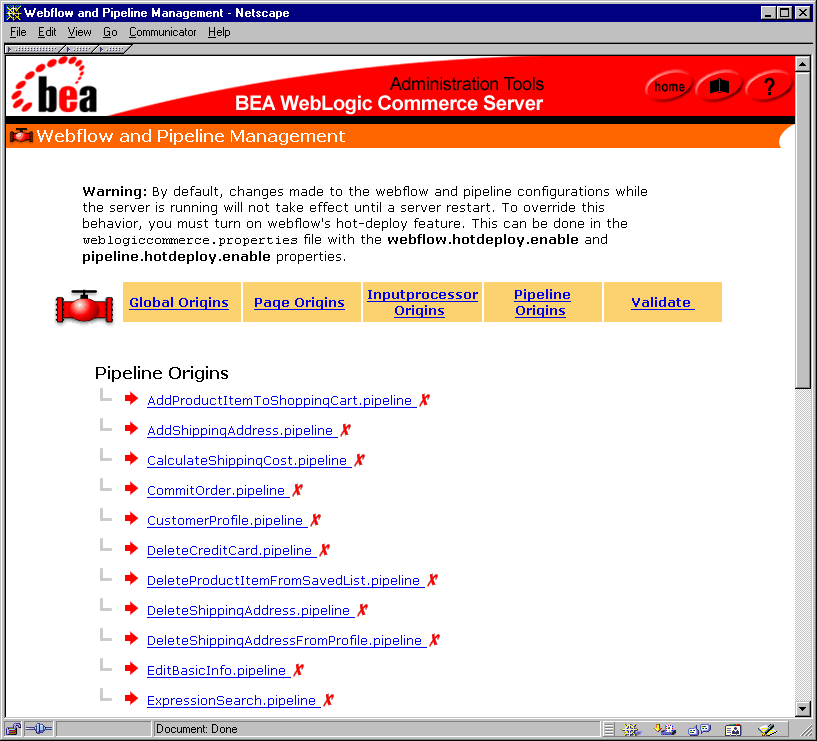
From this page, you can view, add, and delete Pipeline origins. You can also edit Pipeline origins by modifying their name or class name, working with the Pipeline's associated Pipeline components, or by modifying the Pipeline origin's associated events.
Viewing Pipeline Origins
Before working with Pipeline origins, you may first want to see what Pipeline origins are currently in the Webflow. When the Pipeline Origins page is first loaded into your browser, you will see a list of the current Pipeline origins, but no details about them. To view an Pipeline origin's associated events, click the solid arrow located to the left of the Pipeline origin. The arrow changes to an open arrow, and the events currently associated with the Pipeline origin appear with an open diamond, as shown in Figure 3-21.
Figure 3-21 Viewing Events for the AuthorizePayment.inputprocessor Origin
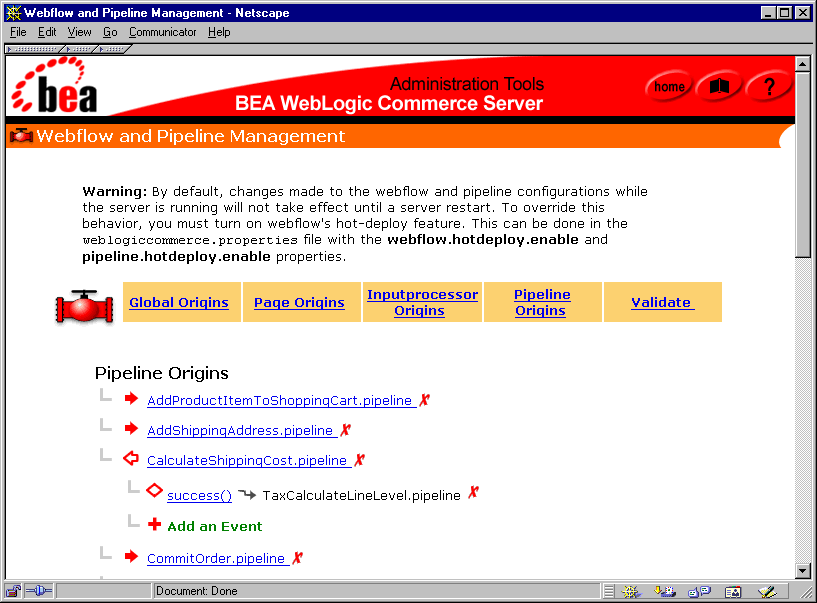
Note: The arrows to the left of each Pipeline origin are solid and point toward the origin if it can be expanded to show associated events. If the event information associated with an Pipeline origin can be collapsed, the arrow is open and points away from the origin. The AddShippingAddress.pipeline Pipeline origin in Figure 3-21 is an example of an origin that can be expanded; the CalculateShippingCost.pipeline Pipeline origin is an example of an origin that can be collapsed. Events are always represented by open diamonds.
Adding a Pipeline Origin
To add a Pipeline origin, follow these steps:
- Click the plus (+) symbol located to the left of Add a Pipeline Origin. (If the list
of Pipeline origins is long, you may need to scroll to the bottom of the page.) The
Add Pipeline Origin page appears, as shown in Figure 3-22.
Figure 3-22 Add Pipeline Origin
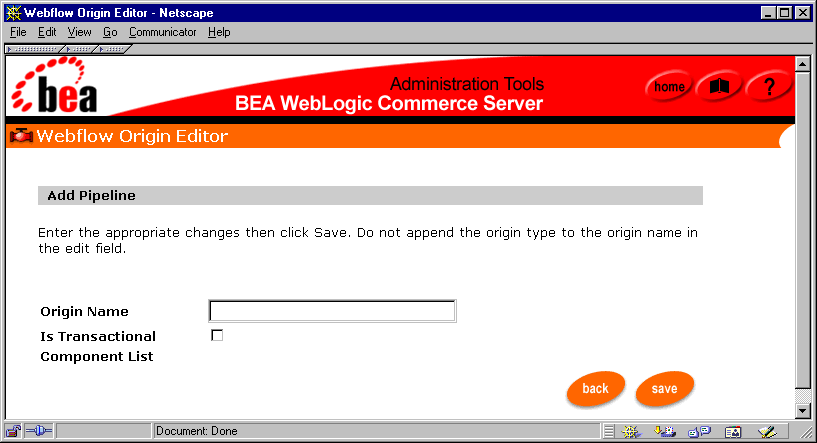
- Enter the origin (Pipeline) name in the Origin Name text field.
- If the Pipeline should be transactional, click the Is Transactional check box.
Notes: For more information about transactional and non-transactional Pipelines, see Transactional Versus Non-transactional Pipelines.
Initially, the Component List will be empty. You must add Pipeline components to the Pipeline separately, as described in Adding a Pipeline Component.
- Click the Save button to save the new Pipeline origin. You are returned to the
Pipeline Origins page, and the new origin appears alphabetically in the list.
- Click the solid arrow located to the right of the new Pipeline origin to view its
associated events. The arrow changes to an open arrow pointing in the opposite
direction. The default event of success() -->index.jsp (marked by an open
diamond) and an option to Add an Event are shown.
- If you want to add a different event to the Pipeline origin, modify the default
event, or delete the default event, proceed to the appropriate section in Modifying
a Pipeline Origin's Events.
Note: Be sure to add components to the Pipeline origin, as described in Adding a Pipeline Component.
Editing a Pipeline Origin
You can edit a Pipeline origin in three ways:
- By modifying information about the Pipeline origin itself (that is, its name or transactional status).
- By modifying the Pipeline origin's components.
- By modifying the Pipeline origin's associated events.
Modifying Information About a Pipeline Origin
To modify information about a Pipeline origin, follow these steps:
- Click a hyperlinked Pipeline origin to edit it (for example, click
CalculateShippingCost.pipeline). The Edit Pipeline Origin page appears,
containing the original values for each field, as shown in Figure 3-23.
Figure 3-23 Edit Pipeline Origin
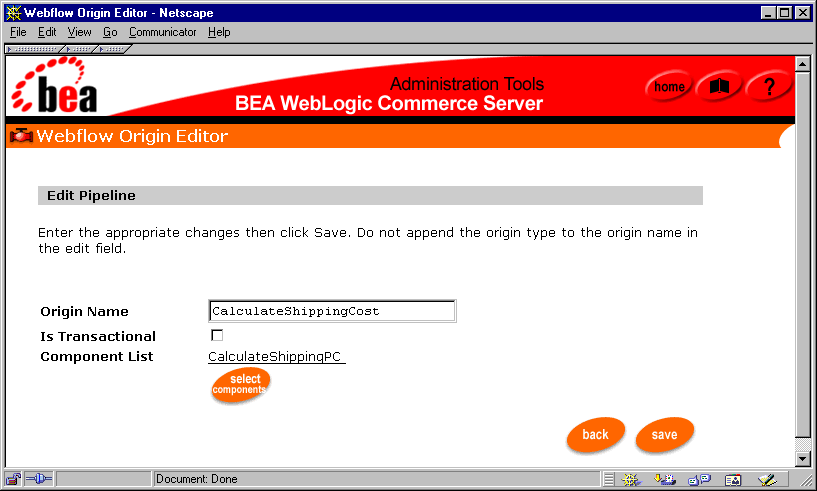
- Change the origin (Pipeline) name or transactional state using the form fields.
- Click the Save button to save your changes. You are returned to the Pipeline
Origins page, and the modified Pipeline origin is shown alphabetically in the list.
- If you want to modify the Pipeline origin's components, see Modifying a Pipeline
Origin's Components.
Note: Modifications made to the Pipeline origin name and transaction status could potentially affect other areas of the Webflow that utilize it. Be sure your modifications take this into account, and be sure to verify your modified properties file with the validation tool. For more information about the validation tool, see How to Validate Your Properties Files.
Modifying a Pipeline Origin's Components
Recall that a Pipeline consists of a number of Pipeline components that perform specific tasks related to business processes. Pipeline components can be reordered, added, edited, or removed from the Pipeline.
Notes: For more information about Pipeline components, see Customizing Pipelines Using the pipeline.properties File.
Pipeline components can never be completely deleted from the Webflow and Pipeline Editor. They can only be removed from a Pipeline.
Adding a Pipeline Component
Once you have created a new Pipeline, you will want to add components to the Pipeline. To add Pipeline components to a Pipeline, follow these steps:
Note: If you just created a new Pipeline, you can begin at step 2.
- Click a hyperlinked Pipeline origin to edit it (for example, click
CalculateShippingCost.pipeline). The Edit Pipeline page appears,
containing the original values for each field, as shown in Figure 3-24.
Figure 3-24 Edit Pipeline
- Click the Select Components button. The Select Pipeline Components page
appears, as shown in Figure 3-25.
Figure 3-25 Select Pipeline Components
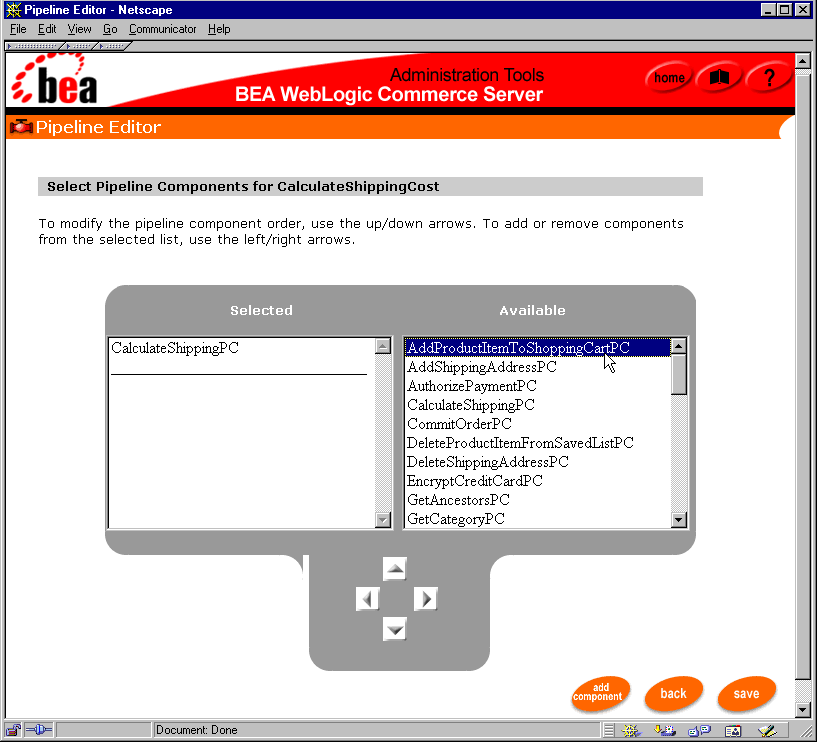
- If you want to add an existing Pipeline component to the Pipeline, select the
component from the Available list and click the left arrow button to move it to
the Selected list.
- If you want to add a new Pipeline component to the Pipeline instead, follow these
steps:
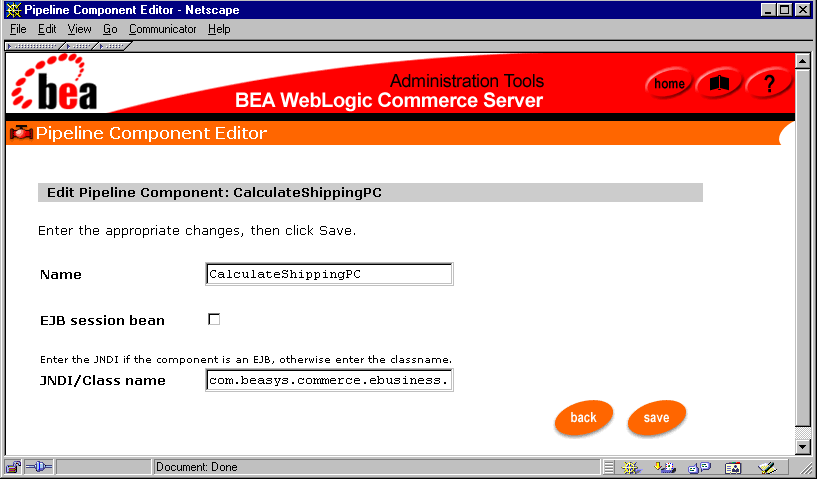
- Click the Add Component button. The New Pipeline Component page appears,
as shown in Figure 3-26.
Figure 3-26 New Pipeline Component

- Enter the Pipeline component name in the Name text field.
- If the Pipeline component is implemented as an EJB session bean, click the EJB
Session Bean check box.
- If you checked the EJB Session Bean check box in the previous step, provide
the JNDI name in the JNDI/Class Name text field. If you did not check the EJB
Session Bean check box, enter the class name in the field instead.
- Click the Save button to save your changes. You are returned to the Select
Pipeline Components page, and the new Pipeline component is shown at the
bottom of the Available List.
- Select the new Pipeline component from the Available list and click the left
arrow button to move it to the Selected list.
- Click the Save button to save your changes. You are returned to the Edit Pipeline
page, and the Pipeline component you added appears as a hyperlink to the left of
the Component List label.
Notes: Pipeline components appear on the Edit Pipeline page in the order they will be executed in the Pipeline. For information about reordering components in the Pipeline, see Reordering Pipeline Components.
If you make other changes to the Pipeline on the Edit Pipeline page, you will need to click the Save button on this page as well.
Reordering Pipeline Components
Occasionally, you may want to reorder the components in a Pipeline. To reorder Pipeline components within a Pipeline, follow these steps:
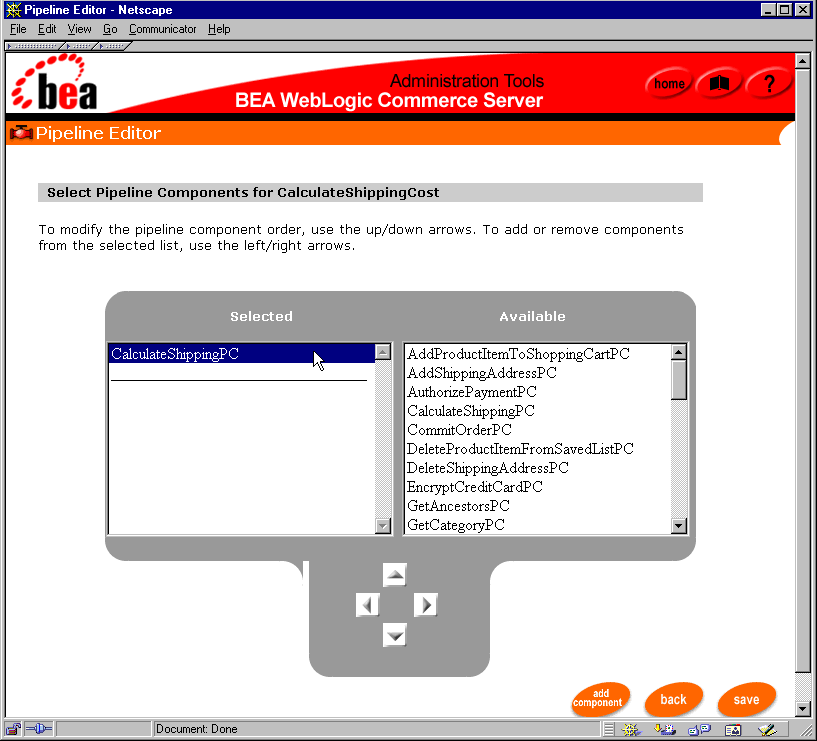
- Click a hyperlinked Pipeline origin to edit it (for example, click
CalculateShippingCost.pipeline). The Edit Pipeline page appears,
containing the original values for each field, as shown in Figure 3-27.
Figure 3-27 Edit Pipeline
- Click the Select Components button. The Select Pipeline Components page
appears, as shown in Figure 3-28.
Figure 3-28 Select Pipeline Components
- Click the Pipeline component in the Selected list to highlight it.
- Use the up or down arrow buttons to move the Pipeline component up or down in
the Selected list.
Note: You can add a Pipeline component to more than one Pipeline, so the Pipeline component you moved to the Selected list will still appear in the Available list.
- Click the Save button to save your changes. You are returned to the Edit Pipeline
page, and the Pipeline component appears as a hyperlink to the left of the
Component List label, in the order you specified.
Note: If you make other changes to the Pipeline on the Edit Pipeline page, you will need to click the Save button on this page as well.
Editing a Pipeline Component
Occasionally, you may want to edit a component that already exists within a Pipeline. To edit a Pipeline component, follow these steps:
- Click a hyperlinked Pipeline origin to edit it (for example, click
CalculateShippingCost.pipeline). The Edit Pipeline page appears,
containing the original values for each field, as shown in Figure 3-29.
Figure 3-29 Edit Pipeline
- Click the hyperlinked Pipeline component name, which appears in a list to the
left of the Component List label. The Edit Pipeline Component page appears, as
shown in Figure 3-30.
Figure 3-30 Edit Pipeline Component
- Use the Name text field, EJB Session Bean check box, and JNDI/Class Name
text field to make your modifications.
- Click the Save button to save your changes. You are returned to the Edit Pipeline
page, and the Pipeline component you edited still appears as a hyperlink to the
left of the Component List label.
Note: If you make other changes to the Pipeline on the Edit Pipeline page, you will need to click the Save button on this page as well.
Removing a Pipeline Component
Occasionally, you may want to remove a component from a Pipeline. To remove a Pipeline component from a Pipeline, follow these steps:
- Click a hyperlinked Pipeline origin to edit it (for example, click
CalculateShippingCost.pipeline). The Edit Pipeline page appears,
containing the original values for each field, as shown in Figure 3-31.
Figure 3-31 Edit Pipeline
- Click the Select Components button. The Select Pipeline Components page
appears, as shown in Figure 3-32.
Figure 3-32 Select Pipeline Components
- Click the Pipeline component in the Selected list to highlight it.
- Use the right arrow button to move the Pipeline component from the Selected list
to the Available list.
- Click the Save button to save your changes. You are returned to the Edit Pipeline
page, and the Pipeline component you removed no longer appears as a hyperlink
to the left of the Component List label.
Note: If you make other changes to the Pipeline on the Edit Pipeline page, you will need to click the Save button on this page as well.
Modifying a Pipeline Origin's Events
You can also edit a Pipeline origin by modifying its associated events. You can add, edit, or delete events associated with a Pipeline origin as described in the following sections.
Adding an Event
To add an event to a Pipeline origin, follow these steps:
- Verify that the Pipeline origin to which you want to add the event is expanded (that
is, an open arrow is shown to the left of the Pipeline origin, and the Add an Event
option is shown). If the Pipeline origin is not expanded, click the solid arrow
located to the left of the Pipeline origin to expand it.
- Click the plus (+) sign located next to Add an Event. (If the list of events is long,
you may need to use the scrollbar.) The New Event page appears, as shown in
Figure 3-33.
Figure 3-33 Pipeline Origin: New Event
- Select the appropriate Event Type from the pull-down menu, and enter a name for
the event in the Event Name text field.
Note: For more information about event types and event names, see Syntax of the webflow.properties File and About Event Names, respectively.
- Next, you need to specify a destination for the event. The destination could be an
existing page (.htm, .html, or .jsp), input processor, or Pipeline, or the
destination could be an entirely new page, input processor, or Pipeline. To
specify the destination, follow these steps:
- Select the destination type from the Destination Type pull-down menu (one of
Page, Input Processor, Pipeline, or Specify New Destination).
Note: Selecting a destination type in this menu disables form fields that are not required for the chosen destination type. To enable unavailable form fields, choose a different destination type.
- If you selected Page from the Destination Type pull-down menu, select an
existing page (.htm, .html, or .jsp) from the Page (JSP) Destination
pull-down menu. If you selected Input Processor, select an existing input
processor from the Input Processor Destination pull-down menu. If you
selected Pipeline, select an existing Pipeline from the Pipeline Destination
pull-down menu. If you selected Specify New Destination from the
Destination Type pull-down menu, enter the name of the destination in the
Specify New Destination text field, and select the destination type from the Of
Type pull-down menu (jsp, htm, html, inputprocessor, or pipeline).
- Click the Save button to save the new event. You are returned to the Pipeline
Origins page, and the new event (marked by an open diamond) appears beneath
the appropriate Pipeline origin in an alphabetic list.
Editing an Event
To edit an event already associated with a Pipeline origin, follow these steps:
- Verify that the Pipeline origin for which you want to edit an event is expanded (that
is, an open arrow is shown to the left of the Pipeline origin, and the event you want
to modify is shown). If the Pipeline origin is not expanded, click the solid arrow
located to the left of the Pipeline origin to expand it.
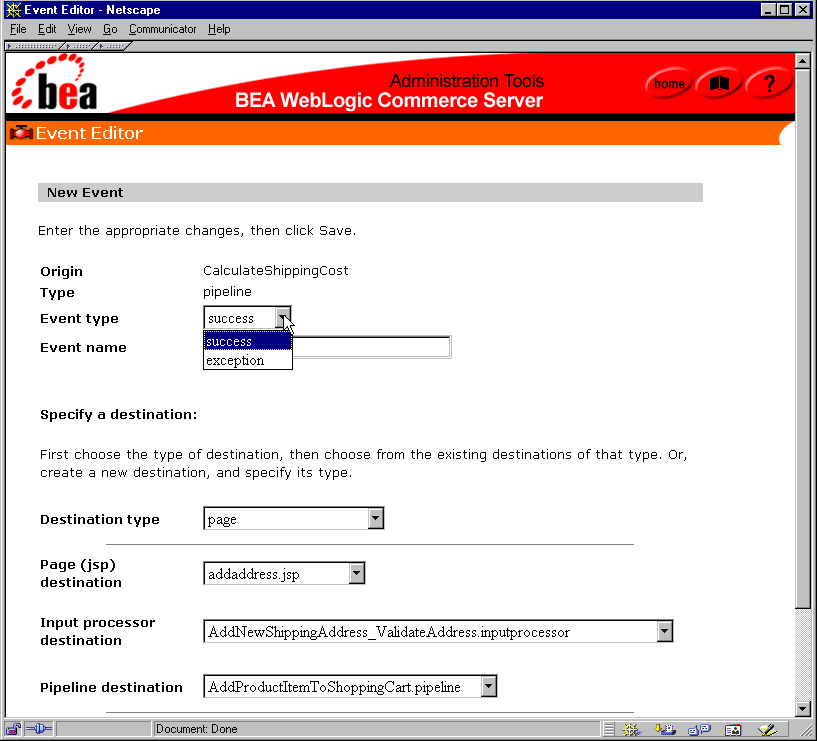
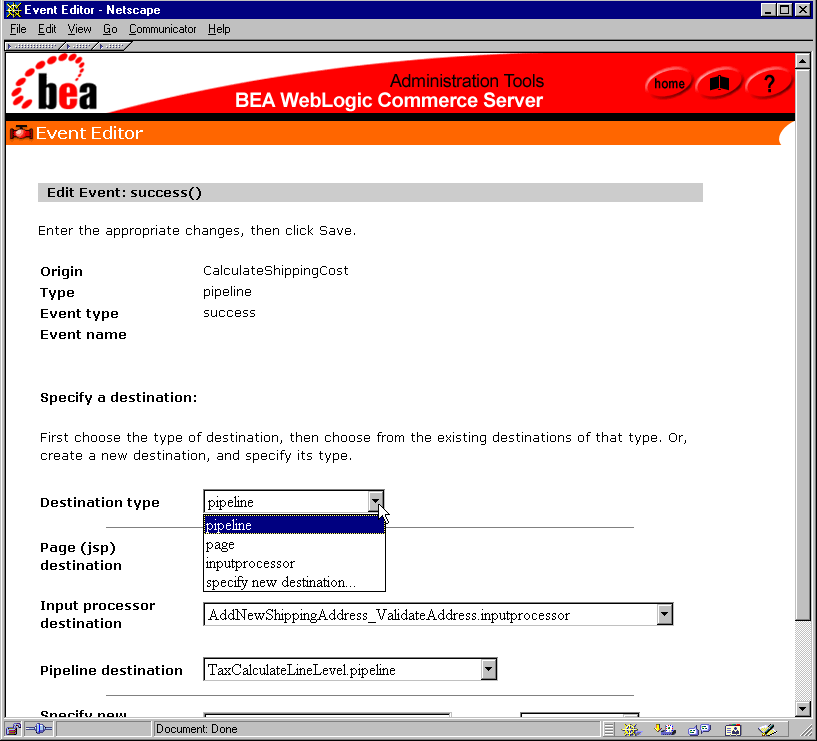
- Click a hyperlinked event to edit it (for example, click success() -->TaxCalculateLineLevel.pipeline). The Edit Event page appears,
containing the original values for each field, as shown in Figure 3-34.
Figure 3-34 Pipeline Origin: Edit Event
Note: The Edit Event page does not allow you to modify the event type or event name. To do so, you must first delete the event using the instructions provided in Deleting an Event and then recreate it using the instructions provided in Adding an Event.
- Recall that an event destination could be an existing page (.htm, .html, .jsp),
input processor, or Pipeline, or an entirely new page, input processor, or Pipeline.
To change the destination for the event, follow these steps:
- Select the destination type from the Destination Type pull-down menu (one of
Page, Input Processor, Pipeline, or Specify New Destination).
Note: Selecting a destination type in this menu disables form fields that are not required for the chosen destination type. To enable unavailable form fields, choose a different destination type.
- If you selected Page from the Destination Type pull-down menu, select an
existing page (.htm, .html, or .jsp) from the Page (JSP) Destination
pull-down menu. If you selected Input Processor, select an existing input
processor from the Input Processor Destination pull-down menu. If you
selected Pipeline, select an existing Pipeline from the Pipeline Destination
pull-down menu. If you selected Specify New Destination from the
Destination Type pull-down menu, enter the name of the destination in the
Specify New Destination text field, and select the destination type from the Of
Type pull-down menu (jsp, htm, html, inputprocessor, or pipeline).
- Click the Save button to save the changes to the event. You are returned to the
Pipeline Origins page, and the modified event (marked by an open diamond)
appears beneath the appropriate Pipeline origin in an alphabetic list.
Deleting an Event
To delete an event currently associated with a Pipeline origin, follow these steps:
- Verify that the Pipeline origin for which you want to delete an event is expanded
(that is, an open arrow is shown to the left of the Pipeline origin, and the event you
want to delete is shown). If the Pipeline origin is not expanded, click the solid
arrow located to the left of the Pipeline origin to expand it.
- To delete the event, click the red X located to the right of the event.
- Click the OK button in the confirmation pop-up window.
Note: If you delete all the events associated with a Pipeline origin and then leave the Pipeline Origins page (or click the arrow next to the origin to collapse it), the origin itself will also be deleted. This is done to prevent an error condition in the Webflow. However, if you just delete all the events associated with a Pipeline origin and immediately start to add new events to the Pipeline origin, the origin itself will remain. This way, you do not always have to recreate the origin after deleting all of its events.
Deleting a Pipeline Origin
To delete a Pipeline origin, click the red X located to the right of the origin. Confirm the deletion by clicking the OK button.
Warning: Deleting a Pipeline origin means that the origin and all of its associated events will be deleted.
How to Validate Your Properties Files
The Webflow and Pipeline Editor provides you with two methods for validating your Webflow and Pipeline properties files. Using the validation tool in the Webflow and Pipeline Editor, you can either:
- Validate the Webflow, or
- Validate the Webflow and verify the existence of various Webflow components (that is, input processors, Pipeline components, and so on).
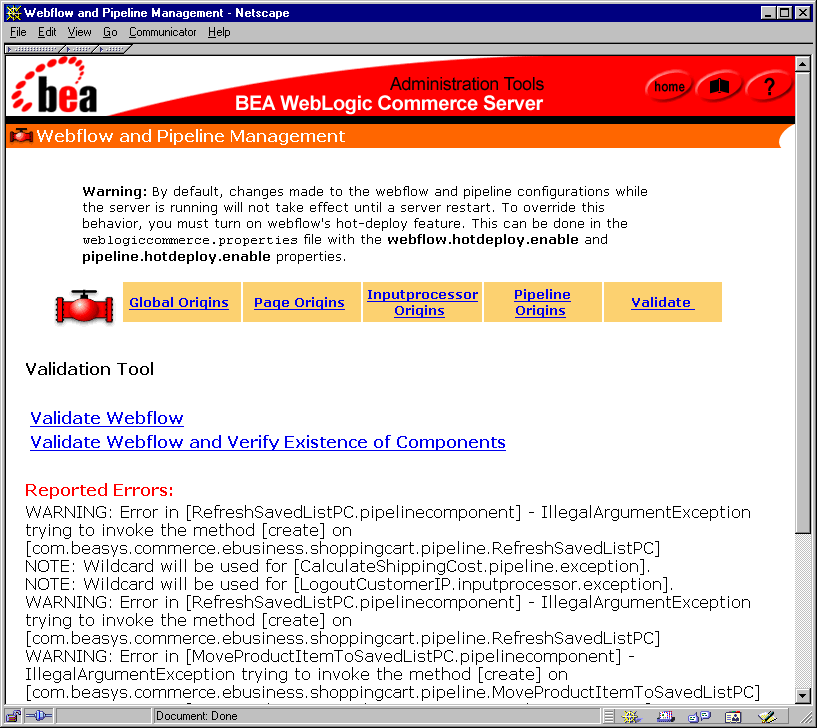
To open the Webflow and Pipeline Editor validation tool, click the Validate link (or its corresponding Validate button). The Validation Tool page appears, as shown in Figure 3-35.
Figure 3-35 Validation Tool
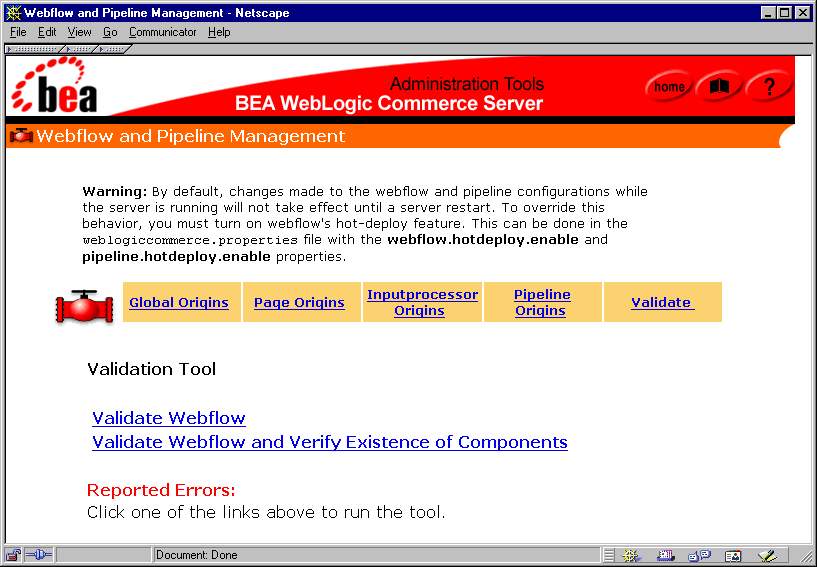
The remainder of this section describes how to use the two options in the Webflow and Pipeline Editor validation tool, and provides some helpful information about interpreting reported errors.
Validating the Webflow
Validation of Webflow syntax includes checks for the following:
- Missing states (that is, success, exception).
- Wildcards (in the case of missing states).
- Proper configuration of the configurationerrorpage property.
- Validity of extensions (valid extensions are .jsp, .htm, .html, .inputprocessor and .pipeline).
- Missing configurations (for example, references to non-existent home.jsp.link(browse)).
- Missing class names for Inputprocessors.
- Validity of Pipeline definitions (that is, a Pipeline's isTransactional property and component list).
To validate only the Webflow syntax, click the Validate Webflow link. Any problems with the Webflow will appear at the bottom of the page under the Reported Errors label, as shown in Figure 3-36.
Figure 3-36 Webflow Validation
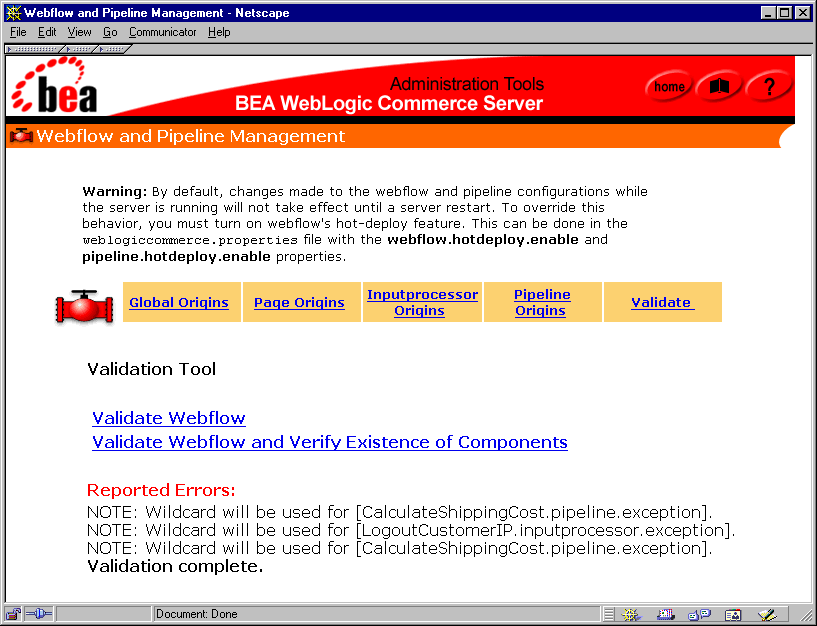
Note: In addition to errors, the output produced by the validation tool may contain notes or warnings. These are not error conditions per se, but are informational in nature. For more information about the validation tool's output, see Validator Message Descriptions.
If any errors are shown, use the other options in the Webflow and Pipeline Editor to make modifications. It is a good idea to run the validation tool until there are no errors in your Webflow.
Validating the Webflow and Verifying the Existence of Components
Validation of Webflow syntax with verification of components includes checks for the following:
- Missing states (that is, success, exception).
- Wildcards (in the case of missing states).
- Proper configuration of the configurationerrorpage property.
- Validity of extensions (valid extensions are .jsp, .htm, .html, .inputprocessor and .pipeline).
- Missing configurations (for example, references to non-existent home.jsp.link(browse)).
- Missing class names for Inputprocessors.
- Validity of Pipeline definitions (that is, a Pipeline's isTransactional property and component list).
- Deployment (existence) of InputProcessors and PipelineComponents.
To validate the Webflow and verify the existence of components, click the Validate Webflow and Verify Existence of Components link. Any problems with the Webflow and its components will appear at the bottom of the page under the Reported Errors label, as shown in Figure 3-37.
Figure 3-37 Webflow Validation and Verification of Components
Note: In addition to errors, the output produced by the validation tool may contain notes or warnings. These are not error conditions per se, but are informational in nature. For more information about the validation tool's output, see Validator Message Descriptions.
If any errors are shown, use the other options in the Webflow and Pipeline Editor to make modifications. It is a good idea to run the validation tool until there are no errors in your Webflow.
Validator Message Descriptions
The message descriptions should assist you in resolving issues identified by the Webflow and Pipeline Editor validation tool.
- Notes
- A message with a NOTE is displayed if a wildcard is used in place of a
missing configuration.
- Warnings
- A WARNING is displayed when there are missing states or missing exceptions for an InputProcessor or a Pipeline.
- Errors
- An ERROR is displayed when there are: missing or invalid extensions; missing configurations, Pipeline definitions, classNames (for InputProcessors) or jndiNames (for PipelineComponents). Additionally, an ERROR can be displayed if the validation tool is unable to verify the existence of either an InputProcessor or a PipelineComponent.