Deploying EJBs with the WebLogic Enterprise EJB Deployer
This topic includes the following sections:
Introducing the WebLogic Enterprise EJB Deployer
This topic includes the following sections:
The WebLogic Enterprise-TM (WLE) WebLogic Enterprise EJB Deployer provides a graphical interface that Application Assemblers can use to deploy EJBs to one or more Java servers. The WebLogic Enterprise EJB Deployer simplifies the process of configuring EJB deployment properties and mapping EJB references to actual resource factories, roles and other EJBs available on a Java server.
The WebLogic Enterprise EJB Deployer provides many services related to EJB deployment. You can use it to:
- Examine all EJBs in an EJB Java ARchive (JAR) file and change their deployment properties.
- Validate EJB interfaces and classes to ensure that they are compliant with the Enterprise JavaBeans Specification 1.1 published by Sun Microsystems, Inc.
- Map EJB references, resource references, resource factories, and roles available in a Java server.
- Generate EJB implementation classes.
- Deploy EJBs to one or more servers.
For general information about deploying EJBs on WebLogic Enterprise, or for information on using hot deployment features, see "Developing WebLogic Enterprise EJB Applications" in Getting Started.
WebLogic Enterprise Deployment Files
When you modify deployment properties with the WebLogic Enterprise EJB Deployer, the utility updates and saves information in the XML deployment files, ensuring that the XML is correct for its associated Document Type Definition (DTD). The WebLogic Enterprise EJB Deployer can modify all properties in ejb-jar.xml. It can also create the weblogic-ejb-extensions.xml file if it is not available in the EJB JAR.
weblogic-ejb-extensions.xml contains properties that define the performance behavior of EJBs. It also contains properties that map available WebLogic Enterprise resources to EJBs. WebLogic Enterprise resources include security role names, data sources such as JDBC pools and JMS connection factories, other deployed EJBs, and container-managed persistence services available in the server.
Properties in weblogic-ejb-extensions.xml are linked to EJB names in ejb-jar.xml and resource names of EJBs running in the WebLogic Enterprise environment. If you want to edit the XML deployment files manually, outside of the WebLogic Enterprise EJB Deployer utility, see the WebLogic Enterprise EJB XML Reference.
Roles and Responsibilities
The WebLogic Enterprise EJB Deployer is designed primarily for:
- Deployers who are configuring EJBs to run in the WebLogic Enterprise container.
- Application Assemblers who are linking multiple EJBs and EJB resources to create larger web application systems.
- EJB developers who are creating and configuring new EJB JAR files.
To satisfy the requirements of these roles, the WebLogic Enterprise EJB Deployer provides complete controls for managing multiple EJB JAR files and Java servers, and for configuring WebLogic Enterprise deployment properties and resources. Roles are designated by two primary types of WebLogic Enterprise EJB Deployer projects: deployer projects and developer projects.
Deployer Projects
Deployer projects enable EJB deployers and application assemblers to configure EJB deployment properties and deploy EJB JAR files to Java servers. Using deployer, you can automatically create the required weblogic-ejb-extensions.xml file with valid deployment properties. Deployer projects enable you to work with EJB JAR files without knowing the details of the EJB code.
Developer Projects
Developer projects provide all the capabilities of a deployer project. Developer projects also enable you to modify EJB deployment properties that may require some knowledge of the EJB implementation code.
Note: Although a developer project enables you to configure some basic properties defined in the ejb-jar.xml deployment file, it is the responsibility of the Bean Provider to create this file and package it with the compiled EJB classes and interfaces. WebLogic Enterprise provides the DDConverter utility to generate an ejb-jar.xml file from an existing WebLogic Enterprise-compatible text descriptor.
Requirements
Requirements for using the WebLogic Enterprise EJB Deployer depend on whether you are a Deployer or Developer.
To use the WebLogic Enterprise EJB Deployer in the Deployer role, you must have:
- A Java ARchive (EJB JAR) file containing the EJB module
- One or more running Java servers
To use the WebLogic Enterprise EJB Deployer in the Developer role, you must have:
Java ARchive (EJB JAR) File
An EJB module in the WebLogic Enterprise EJB Deployer consists of a Java Archive (EJB JAR) file. The EJB JAR file must contain all of the compiled classes for your EJB home interface, remote interface, and implementation class. It must also have a META-INF subdirectory that contains, at minimum, a valid ejb-jar.xml deployment file. The EJB JAR file may contain classes and deployment descriptors for one or more distinct EJBs.
Note: You do not need to include a MANIFEST file in the EJB JAR file, as was required with the Enterprise JavaBeans Specification 1.0.
Optionally, the EJB JAR file can contain the weblogic-ejb-extensions.xml file, which defines additional deployment properties for EJBs. If the EJB JAR does not contain this file, the WebLogic Enterprise EJB Deployer creates it as necessary during the deployment process.
Listing 1-1 shows the contents of a simple EJB JAR file that can be loaded into the WebLogic Enterprise EJB Deployer:
Listing 1-1 Sample EJB JAR File
$ jar tf ejb_basic_beanManaged.jar
META-INF/
META-INF/MANIFEST.MF
examples/ejb/basic/beanManaged/
examples/ejb/basic/beanManaged/Account.class
examples/ejb/basic/beanManaged/AccountBean.class
examples/ejb/basic/beanManaged/AccountHome.class
examples/ejb/basic/beanManaged/AccountPK.class
examples/ejb/basic/beanManaged/ProcessingErrorException.class
META-INF/ejb-jar.xml
META-INF/weblogic-ejb-extensions.xml
Note: Classes in the EJB JAR file must reside in directories that match their Java package hierarchy.
Java Servers
The WebLogic Enterprise EJB Deployer connects to one or more Java servers during the deployment process, enabling you to map references in the deployment description files to actual Java server resources, and to pass some information for the module to the Java server.
Getting Started
To begin using the WebLogic Enterprise EJB Deployer:
- Read Introducing the WebLogic Enterprise EJB Deployer to learn how to work
with the WebLogic Enterprise EJB Deployer user interface.
- Start the WebLogic Enterprise EJB Deployer using the instructions in Starting
the WebLogic Enterprise EJB Deployer.
- Load the EJB JAR file you want to deploy using the instructions in Working with
EJB Modules.
- Read additional sections as necessary for:
- Deploy the EJB JAR file to one or more Java servers using the instructions in
Compiling and Deploying EJBs.
Starting the WebLogic Enterprise EJB Deployer
To start the WebLogic Enterprise EJB Deployer, enter the following command:
% java -ms24m -mx24m weblogic.EJBDeployWizard
The Java standard -ms24m and -mx24m parameters are optional.
The WebLogic Enterprise EJB Deployer loads and displays an empty program window, as shown in Figure 1-1.
Figure 1-1 WebLogic Enterprise EJB Deployer Program Window
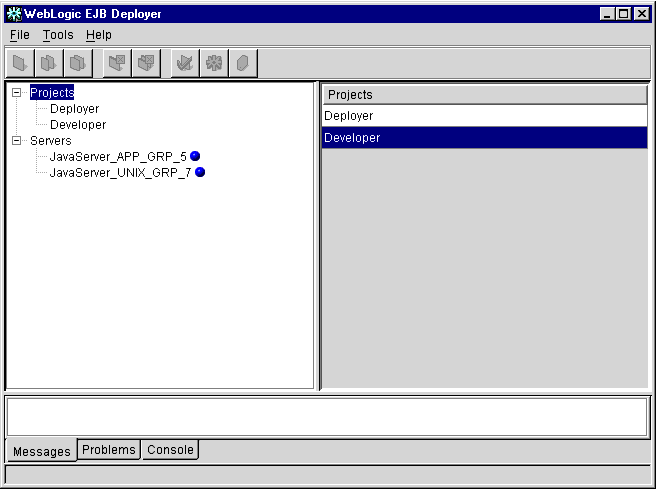
The WebLogic Enterprise EJB Deployer program window is divided into the following main components:
Menu Bar
The menu bar contains several menus to:
- Open, create, and save EJB JAR files
- Edit WebLogic Enterprise EJB Deployer preferences and deploy EJBs
- Get help for the WebLogic Enterprise EJB Deployer
Toolbar
Icons in the toolbar provide quick access to selected WebLogic Enterprise EJB Deployer menu options. Hold your cursor over an individual icon to learn its function.
Object Panel
The Object panel provides a hierarchical view of the EJB JAR files, EJBs, and EJB properties you have opened. Clicking the plus (+) symbol next to an object expands the object, listing the nested objects or properties it contains. Clicking the hyphen (-) symbol collapses the object, hiding its nested properties.
Clicking directly on an object or property name displays its details and editable fields in the Properties panel, described below.
Top-level Categories
The top-level categories in the Object panel represent WebLogic Enterprise EJB Deployer Projects and Servers. WebLogic Enterprise EJB Deployer Projects can contain Deployer projects or Developer projects. Developer projects allow you to configure properties that require some knowledge of the EJB code. Deployer projects allow EJB deployers or application assemblers to deploy EJBs on Java servers without knowing the details of the EJB code.
The Servers category lists all Java servers to which the WebLogic Enterprise EJB Deployer can connect and deploy. See Setting Up Java Servers and WebLogic Enterprise EJB Deployer Preferences for information on configuring servers.
Properties Panel
The Properties panel displays detailed information about the selected EJB JAR, EJB, or EJB property, and allows you to edit certain property fields. The contents of the Properties panel differs depending on the object or property you have selected in the Object panel. For example, if you click an EJB JAR filename in the Object panel, the Properties panel shows display characteristics for the EJB JAR file. If you expand the EJB JAR file and select the Security object, the Properties panel displays the file's application role definitions.
Many, but not all, of the fields displayed in the Properties panel can be modified. To modify the contents of a field, you can either:
- Click the field and enter a new value,
- Click the field and select an appropriate value from a drop-down list, or
- Double-click the field to bring up a dialog box with editable fields.
The sections that follow provide details about how to edit fields to perform EJB configuration tasks.
Message Panel
The Message panel displays informational and error messages as you perform tasks in the WebLogic Enterprise EJB Deployer. The Message panel has three separate displays, indicated by the tabs at the bottom of the panel: Messages, Problems, and Console.
- The Messages display (active by default) shows current progress and error messages for the task you are performing. For example, when you check EJB classes for compliance with the Enterprise JavaBeans Specification 1.1, the WebLogic Enterprise EJB Deployer displays any noncompliance messages in the Messages display.
- The Problems display lists deployment errors for the object you have selected in the Object panel. If you select an EJB JAR file in the Object panel, the Problems display lists all errors associated with deployment properties in the EJB JAR. If you select a single EJB in the Object panel, only the errors for that bean are displayed.
Deployment property errors can occur because of undefined or incorrectly defined deployment values. The text of each error message indicates the field to enter or modify in order to correct the error. See Validating Deployment Properties for more information about addressing deployment errors.
- The Console display lists any WebLogic Enterprise EJB Deployer or Java errors that would normally appear in the command shell you used to start the WebLogic Enterprise EJB Deployer.
Setting Up Java Servers and WebLogic Enterprise EJB Deployer Preferences
This topic includes the following sections:
Viewing Java Server Properties
The WebLogic Enterprise EJB Deployer enables you to connect and deploy to one or more Java servers. The WebLogic Enterprise EJB Deployer displays the properties of all running Java servers in the Servers category of the Object panel. The Java server properties are defined in the application's UBBCONFIG file. With the WebLogic Enterprise EJB Deployer, you can select a default server for deployment and you can deploy, redeploy, and undeploy to one or more Java servers, but you cannot change the properties. You must configure at least one new server to begin deploying EJBs. For more information about setting up Java servers, see "Creating a Configuration File" in the Administration Guide.
Note: The WebLogic Enterprise EJB Deployer provides access to running Java servers within a WebLogic Enterprise domain. The domain is defined in a UBBCONFIG file. You can change domains by changing the tuxconfig setting, as described in Changing Preferences for the WebLogic Enterprise EJB Deployer.
To view the properties of all running Java servers:
- Start the WebLogic Enterprise EJB Deployer using the instructions in Starting the
WebLogic Enterprise EJB Deployer.
- Select the Servers category in the Object panel.
- Click the name of a server in the Properties panel. The WebLogic Enterprise EJB
Deployer displays the properties for the selected Java server, as shown in
Figure 1-2.
Figure 1-2 Java Server Properties

The WebLogic Enterprise EJB Deployer displays the following properties:
- Name: The name of this Java server (as defined in the UBBCONFIG file).
- Group: The server group to which this Java server belongs.
- ServerID: The server ID associated with this Java server.
- State: The current status of the Java server (active, inactive, and so on). To refresh state information, right-click the mouse button and choose the Refresh command.
- Modules: Displays a list of one or more EJB JAR files deployed on this Java server.
- Default: Select this check box to have the WebLogic Enterprise EJB Deployer use this Java server as the default for deployment.
- To undeploy a module, select it from the Modules list and click the Undeploy
button.
Changing Preferences for the WebLogic Enterprise EJB Deployer
You can optionally configure WebLogic Enterprise EJB Deployer and ejbc options to customize the behavior and appearance of the tool. You can modify the WebLogic Enterprise EJB Deployer preferences to specify the Java compiler that ejbc uses during compilation. The WebLogic Enterprise EJB Deployer preferences also affect the location of temporary files and the window size and location for the utility.
The WebLogic Enterprise EJB Deployer stores these settings in the deployer.properties file. You can use an ASCII text editor to change some of these settings. For more information, see WebLogic Enterprise EJB Deployer Properties File.
Changing WebLogic Enterprise EJB Deployer Preferences
To change WebLogic Enterprise EJB Deployer preferences:
- Start the WebLogic Enterprise EJB Deployer using the instructions in Starting the
WebLogic Enterprise EJB Deployer.
- From the Tools menu, choose Preferences... to display the WebLogic EJB
Deployer Properties dialog box, as shown in Figure 1-3.
Figure 1-3 WebLogic Enterprise EJB Deployer Properties Dialog Box

- Click the environment category.
- Edit the following properties:
- localclasspath: Optional. Enter the path and filename of one or more additional EJB JARs that are required to load.
- tuxconfig: Enter or select the directory for the tuxconfig file associated with the WebLogic Enterprise domain you want to work with. Changing the domain changes the available Java servers to which you can deploy EJB JAR files.
- Click OK.
Changing Compiler Options
To change ejbc compiler options:
- Start the WebLogic Enterprise EJB Deployer using the instructions in Starting the
WebLogic Enterprise EJB Deployer.
- From the Tools menu, choose Preferences... to display the WebLogic EJB
Deployer Properties dialog box, as shown in Figure 1-3.
- Click the ejbc category to display the WebLogic EJB Deployer Properties dialog
box, as shown in Figure 1-4.
Figure 1-4 ejbc Properties

- Edit the following properties:
- compiler: Enter the full path of the Java compiler to use with ejbc, or click Choose... to select a compiler. By default, ejbc uses javac as a compiler. For faster performance, specify a different compiler, such as Symantec's sj.
- keepgenerated: Select true to save the intermediate Java files that ejbc creates during compilation, or false to discard them.
- Click OK to save the current options.
Working with EJB Modules
This topic includes the following sections:
Loading an EJB JAR File
The WebLogic Enterprise EJB Deployer can import multiple EJB JAR files for editing or deploying to servers.
Note: Before importing an EJB JAR file, make sure the file meets the requirements described in Java ARchive (EJB JAR) File.
To load an EJB JAR module:
- Start the WebLogic Enterprise EJB Deployer using the instructions in Starting the
WebLogic Enterprise EJB Deployer.
- From the File menu, choose Open...
- Enter the complete path to the EJB JAR file you want to import, or navigate to
select the file.
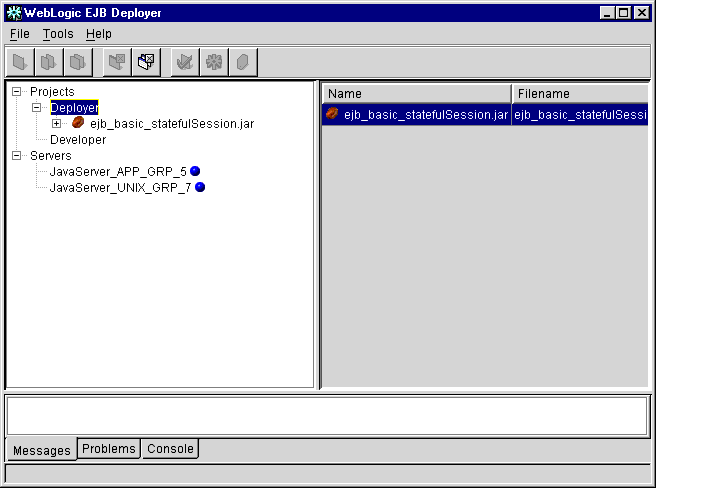
- Click Open to open the selected EJB JAR file. The WebLogic Enterprise EJB
Deployer places the new EJB JAR file in the Deployer category, as shown in
Figure 1-5.
Figure 1-5 New EJB Jar File
Viewing the Contents of an EJB JAR File
Once you have loaded an EJB JAR file, to view the file's contents, complete the following steps:
- Expand the EJB JAR file contents by clicking the + sign next to its filename in the
Object panel.
- Select the Files item to display details about the class files the EJB JAR contains,
as shown in Figure 1-6.
Figure 1-6 Class Files in an EJB JAR File
.: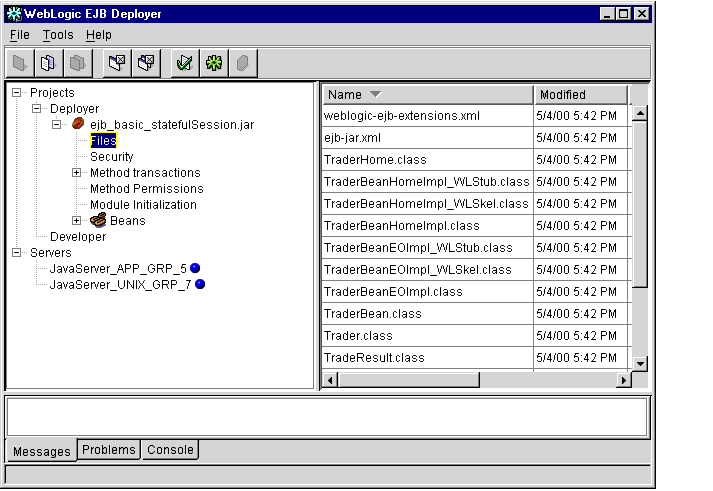
Columns in the Files display show the name, date modified, size, and relative directory of class files and XML deployment files contained in the EJB JAR. You cannot edit the information stored in these columns.
Setting EJB JAR File Display Properties
Once you have loaded an EJB JAR file, to edit the file's display name or description within the WebLogic Enterprise EJB Deployer, complete the following steps:
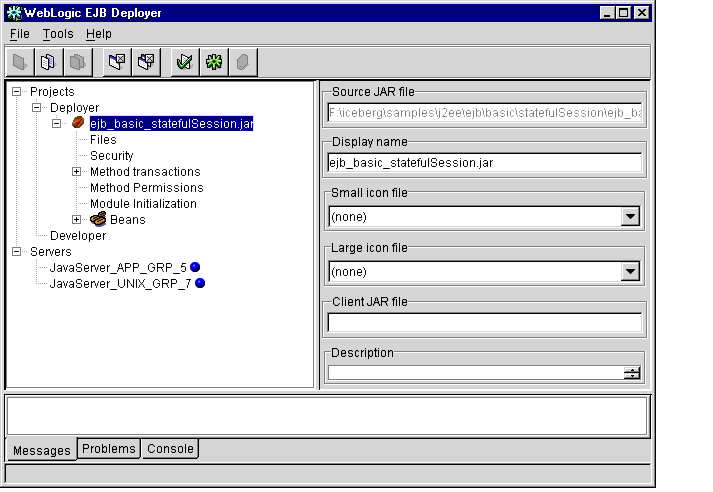
- Select the name of the EJB JAR file in the Object panel to display basic file
properties, as shown in Figure 1-7.
Figure 1-7 Basic EJB JAR File Properties
- Edit fields in the Properties panel as necessary:
- Source JAR file: This field lists the full path and filename of the EJB JAR file. You cannot modify this entry.
- Display name: Enter the name that the WebLogic Enterprise EJB Deployer uses to represent this EJB JAR in the Object panel.
- Small icon file: If your EJB JAR file contains icon files, use the drop-down list to select the small icon file to use for display within the WebLogic Enterprise EJB Deployer.
- Large icon file: If your EJB JAR file contains icon files, use the drop-down list to select the large icon file to use for display within the WebLogic Enterprise EJB Deployer.
- Description: Enter text to describe the contents of this EJB JAR file.
Creating a New EJB JAR File
The WebLogic Enterprise EJB Deployer can help you create a new EJB JAR file from scratch, if you have not yet created one using the jar tool included in your JDK. To create a new EJB JAR file from scratch:
- From the File menu, choose New... to open the New Jar File dialog box, as shown
in Figure 1-8.
Figure 1-8 New Jar File Dialog Box
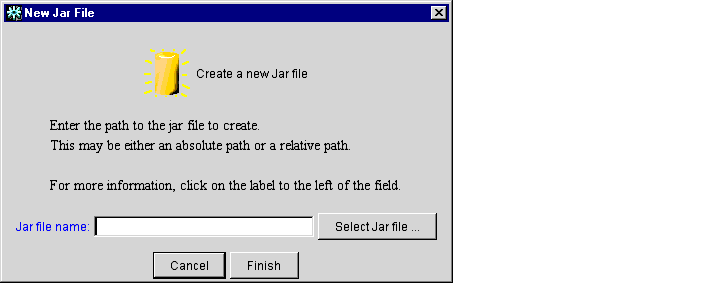
- Enter the full path and filename of the new EJB JAR file to create, or use the
Select path... button to navigate to an existing location.
- Click Finish when you have specified the new EJB JAR file. The WebLogic
Enterprise EJB Deployer adds an entry for the new EJB JAR file to the
Developer category.
- The contents of the new EJB JAR file must observe the requirements described in
Java ARchive (EJB JAR) File. If you need to modify any of the basic EJB
properties, select the EJB JAR file in the Object panel and follow the instructions
in Setting EJB Class Properties.
Configuring Basic EJB Properties
This topic includes the following sections:
The following sections explain how to change basic EJB class and method properties. The deployment properties described in this section are all part of the ejb-jar.xml file defined in the Enterprise JavaBeans Specification 1.1.
Setting EJB Class Properties
To view or change the basic home, remote, and EJB class information in an EJB module, complete the following steps:
- Start the WebLogic Enterprise EJB Deployer and load the EJB JAR file, if you
have not already done so. For instructions, see Starting the WebLogic Enterprise
EJB Deployer and Loading an EJB JAR File.
- Select the + sign next to the EJB JAR filename to display its contents.
- Select the + sign next to the Beans object to display available EJBs in the EJB
JAR file.
- Select the name of the EJB you want to view or modify. The WebLogic
Enterprise EJB Deployer shows the EJB display name and icon files (if
applicable) in the Properties panel.
- Select the Classes tab in the Properties panel to display basic EJB class
information, as shown in Figure 1-9.
Figure 1-9 Classes Tab
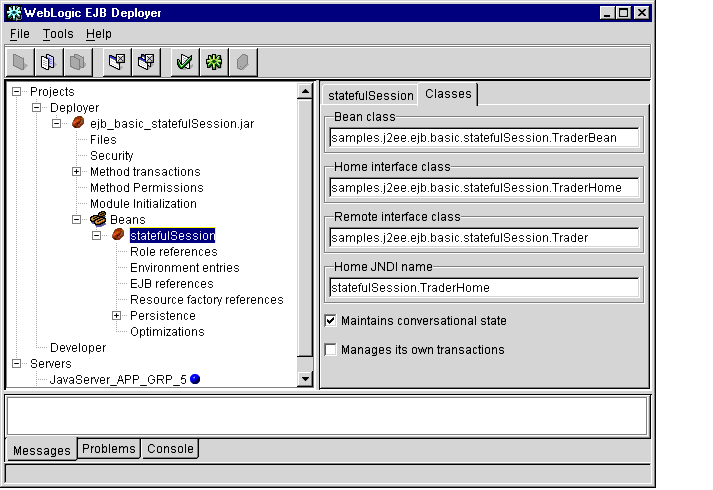
- To edit basic EJB class information, click the desired field in the Properties panel
and type the new value. Editable values include:
- Bean class: Enter the class name of the EJB implementation class.
- Home interface class: Enter the class name of the EJB's home interface class.
- Remote interface class: Enter the class name of the EJB's remote interface class.
Note: Classes and interfaces in the EJB JAR file must reside in directories that match their Java package hierarchy.
- Home JNDI name: Enter the JNDI name that clients will use to look up the EJB's home interface.
- Maintains conversational state: (Session EJBs only) Check this box to designate a stateful session bean, or leave the box unchecked for stateless session beans.
- Manages its own transactions: (Session EJBs only) Check this box if the EJB uses bean-managed transactions. Clear the box to have the WebLogic Enterprise EJB container manage the bean's transactions.
- Uses bean-managed persistence: Check this box if the entity EJB manages its own persistent storage. Leave the box unchecked if you want to use WebLogic JDBC-based or file-based persistence services.
- From the File menu, choose Save to save your changes to the EJB JAR file.
Setting Method Transaction Attributes
To create or change the transaction attributes for EJB methods, complete the following steps:
- Start the WebLogic Enterprise EJB Deployer and load the EJB JAR file, if you
have not already done so. For instructions, see Starting the WebLogic Enterprise
EJB Deployer and Loading an EJB JAR File.
- Select the + sign next to the EJB JAR filename to display its contents.
- Select the EJB JAR file's Method transactions object. If you have already
assigned method transaction attributes for the EJB, each collection of attributes is
listed as tx-n where n is the collection number.
If no method transactions are available, click the Add button to create a new tx-0 transaction attribute. The WebLogic Enterprise EJB Deployer highlights the new attribute collection in red to indicate that you have not yet assigned attributes to methods.
- Select the + sign next to the Method transactions object to display available
transactions.
- Select the transaction attribute name that you want to view or edit. The
WebLogic Enterprise EJB Deployer displays the transaction attribute
assignments in the Properties panel, as shown in Figure 1-10.
Figure 1-10 Transaction Attributes
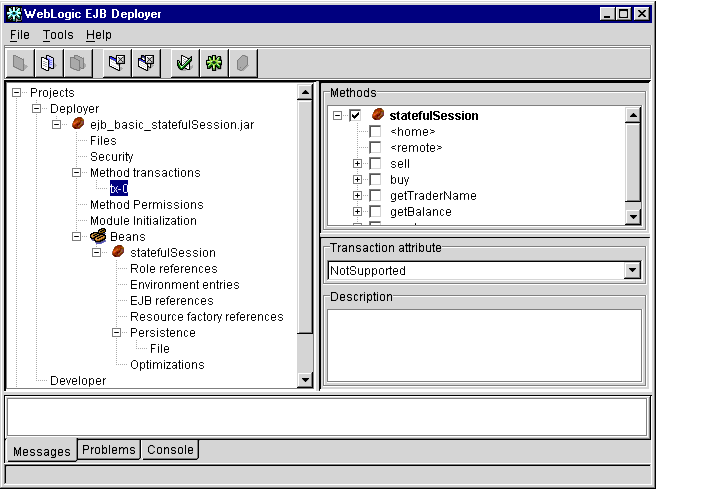
- Choose the transaction attribute you want to apply by selecting it from the
Transaction attribute drop-down menu. Valid attributes are:
- Mandatory: The caller must start a transaction before invoking the method.
- Supports: If the EJB client has an active transaction context, WebLogic Enterprise executes the method within the same transaction. If the client does not have a transaction context, WebLogic Enterprise does not create one for invoking the method.
Note: If the EJB provider does not specify a transaction attribute in the ejb-jar.xml file, WebLogic Enterprise uses Supports by default.
- Never: The EJB method does not participate within a transaction context. If the client calling the method has an active transaction context, WebLogic Enterprise throws a java.rmi.RemoteException.
- RequiresNew: WebLogic Enterprise starts and ends a new transaction with each call to the EJB method. If the caller already has an active transaction, WebLogic Enterprise suspends it during the method's invocation.
- NotSupported: The EJB method does not participate within a transaction context. If the client calling the method has an active transaction context, WebLogic Enterprise suspends the client transaction during the invocation of the method.
- Required: The EJB method requires an active transaction. If the client has an active transaction context, the EJB method is executed from within that context. If the client does not have a transaction context, WebLogic Enterprise starts a new transaction for the invoking the EJB method.
- In the Methods portion of the Properties panel, use the + signs to expand the bean
and interface name(s) that contains the methods you want to configure.
- Check the selection boxes next to listed methods in the home and remote
interfaces to apply the selected attribute.
- If you want to apply a different transaction attribute to a different selection of
methods, return to step 3 and create a new collection.
- From the File menu, choose Save to save your changes to the EJB JAR file.
Assigning Method Permissions
The steps that follow describe how to limit access to individual EJB method calls by assigning method-level permissions.
Default Method Permissions in WebLogic Enterprise
You must specify method-level permissions for an EJB. If you specify no method-level permissions for an EJB (there is no method-permission stanza in ejb-jar.xml), all EJB methods in the EJB JAR file will not be accessible.
Note: You must specify method-level permissions for all methods in all EJBs stored in the EJB JAR file. WebLogic Enterprise denies access for any methods that do not have permissions defined in the EJB JAR file.
Changing Method Permissions
To change an EJB's method-level permissions:
- Start the WebLogic Enterprise EJB Deployer and load the EJB JAR file, if you
have not already done so. For instructions, see Starting the WebLogic Enterprise
EJB Deployer and Loading an EJB JAR File.
- If the EJB JAR file does not yet contain an application role, follow the
instructions in Mapping Application Roles to WebLogic Enterprise Principals to
create one.
- Select the + sign next to the EJB JAR filename to display its contents.
- Select the EJB JAR file's Method permissions object. If you have already
assigned method permissions for the EJB, each collection of permissions is listed
as perm-n where n is the collection number.
If no method permissions are available, click the Add button to create a new perm-0 permission. The WebLogic Enterprise EJB Deployer highlights the new permission in red to indicate that you have not yet assigned an application role to the EJB methods.
Note: If you choose to specify method-level permissions, you must do so for all methods in all EJBs in the EJB JAR file. Otherwise, WebLogic Enterprise denies access for methods that have no assigned permissions.
- Select the + sign next to the Method permissions object to display available
permissions.
- Select the permission name you want to view or edit. The WebLogic Enterprise
EJB Deployer displays the current application role assignments in the Properties
panel, as shown in Figure 1-11.
Figure 1-11 Application Role Assignments
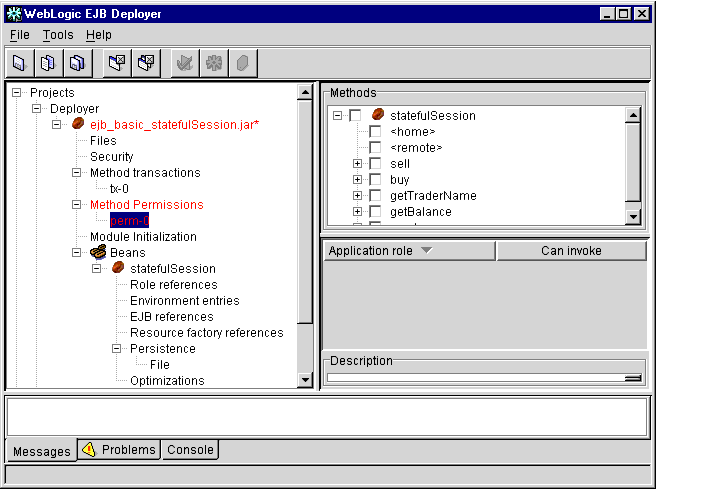
- In the Methods portion of the Properties panel, use the + signs to expand the bean
and interface name(s) that contains the methods you want to configure.
- Use the Methods check boxes to select each method to which you want to assign
an application role.
- Use the Can invoke check boxes to specify which application roles can invoke
the selected methods.
- Return to step 4 and assign method permissions for all other EJB methods in the
EJB JAR file that must be available to clients.
Adding, Removing, and Changing Environment Entries
To configure an EJB's environment entries or values, complete the following steps:
- Start the WebLogic Enterprise EJB Deployer and load the EJB JAR file, if you
have not already done so. For instructions, see Starting the WebLogic Enterprise
EJB Deployer and Loading an EJB JAR File.
- Select the + sign next to the EJB JAR filename to display its contents.
- Select the + sign next to the Beans object to display all available EJBs in the EJB
JAR file.
- Select the + sign next to the EJB name you want to view or modify.
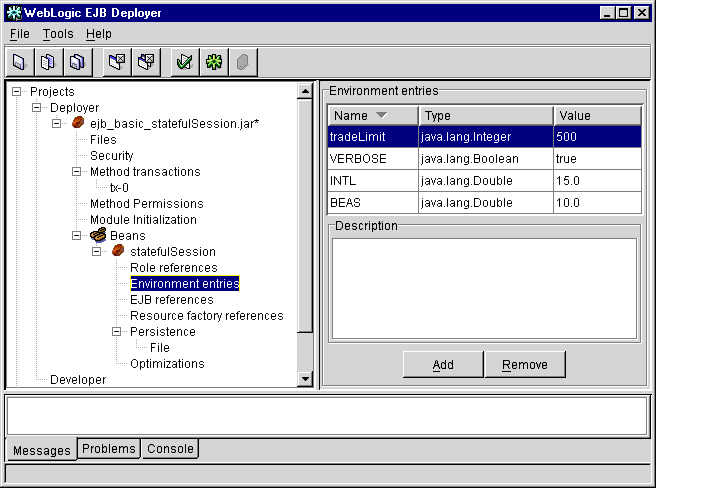
- Select the Environment entries item to display the environment properties for the
selected EJB. The WebLogic Enterprise EJB Deployer shows the Name, Type,
and Value for environment entries in the Properties panel, as shown in
Figure 1-12.
Figure 1-12 Environment Entries
- To edit an existing environment entry, double-click an existing Name, Type, or
Value box, and then enter or select a new entry as described below:
- Name: Enter a new name for the EJB environment entry. This is the name that a deployed EJB uses to look up the environment value.
- Type: Select a Java primitive type from the drop-down menu. The Java type must be compatible with the specified environment value.
- Value: Enter a new value for the environment property. The new value must be compatible with the specified Java primitive type.
- To add a new environment entry, click the Add button to display the Input New
Environment Entry dialog box, as shown in Figure 1-13.
Figure 1-13 Input New Environment Entry Dialog Box
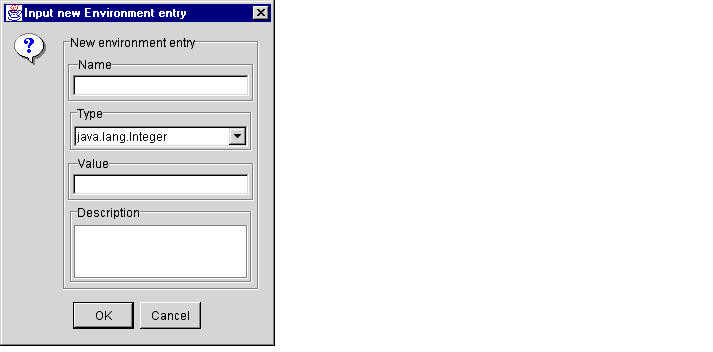
Specify a new Name, Type, Value, and optional Description for the entry, and then click OK.
- To delete an existing environment entry, click once in the row of the entry you
want to delete, and then click the Remove button.
- From the File menu, choose Save to save your changes to the EJB JAR file.
Configuring Deployment Properties
WebLogic Enterprise uses deployment properties defined in the weblogic-ejb-extensions.xml file to specify an EJB's performance properties. Use the following instructions to set or change any of these WebLogic Enterprise-specific properties.
- Start the WebLogic Enterprise EJB Deployer and load the EJB JAR file, if you
have not already done so. For instructions, see Starting the WebLogic Enterprise
EJB Deployer and Loading an EJB JAR File.
- Select the + sign next to the EJB JAR filename to display its contents.
- Select the + sign next to the Beans object to display all available EJBs in the EJB
JAR file.
- Select the + sign next to the EJB name that you want to view or modify.
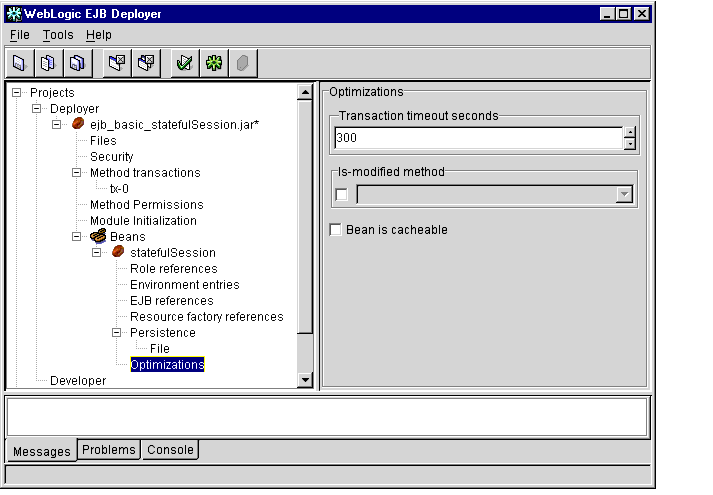
- Select the Optimizations item to display the caching and performance properties
for the selected EJB. The WebLogic Enterprise EJB Deployer displays the
current property values in the Properties panel, as shown in Figure 1-14.
Figure 1-14 Performance Optimizations
- Edit the displayed property values as necessary:
- Transaction timeout seconds: Specifies the default timeout, in seconds, for container-initiated transactions for this bean. If a transaction duration exceeds this value, the transaction will be rolled back.
- Is-modified method (Entity EJBs only): Specifies an EJB method that WebLogic Enterprise calls to determine whether or not the EJB data should be stored at the successful commit of a transaction.
- Bean is cacheable (Entity and Stateful EJBs only): Specifies whether or not an entity bean or stateful session bean can be cached. The information supplied for the is-cacheable element is used by the EJB container to determine if a bean can be cached. The is-cacheable element applies to entity beans and stateful session beans, but not to stateless session beans.
- From the File menu, choose Save to save your changes to the EJB JAR file.
Mapping EJB References
This topic includes the following sections:
Mapping Application Roles to WebLogic Enterprise Principals
EJB providers can define application roles for EJBs in the ejb-jar.xml deployment file. Application roles (security groups) define required roles for EJBs, but they do not specify the actual security principal names in the running application server. Security roles are defined and administered (in the UBBCONFIG file) per domain. For more information about security roles, see "Configuring Authentication" in Using Security.
The WebLogic Enterprise EJB Deployer enables you to create EJB application roles and map them to actual security principal names during the deployment process.
To map principals to EJB application roles:
- Start the WebLogic Enterprise EJB Deployer using the instructions in Starting the
WebLogic Enterprise EJB Deployer.
- Select the Java server you want to deploy to by clicking on its name in the Server
category.
- Load an EJB module using the instructions in Loading an EJB JAR File.
- Expand the EJB JAR file by clicking the + sign next to its name.
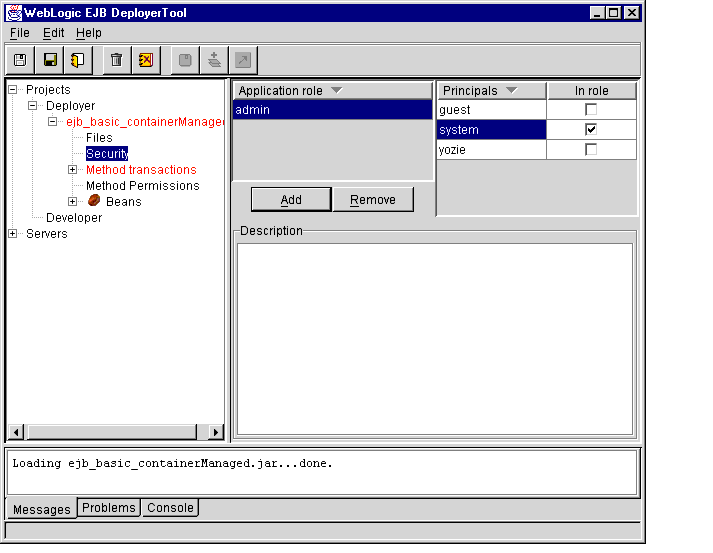
- Select the EJB JAR file's Security item to display available application roles in
the EJB JAR file, and available principal names in the selected Java server.
If the EJB JAR file does not contain any application roles, click Add and enter a name for the new role.
- Click the name of the application role to modify. The WebLogic Enterprise EJB
Deployer shows which of the current principal names are members of the role by
checking the In role checkbox, as shown in Figure 1-15.
Figure 1-15 Application Roles and Principals
- To change membership in the selected application role, check or clear the In role
boxes for the principals you want to add or remove.
- To delete a selected application role, click the Remove button.
- From the File menu, choose Save to save your changes to the EJB JAR file.
Mapping EJB References
To map EJB references to actual EJBs:
- Start the WebLogic Enterprise EJB Deployer using the instructions in Starting the
WebLogic Enterprise EJB Deployer.
- Select the Java server you want to deploy to by clicking on its name in the Server
category.
- Load an EJB module using the instructions in Loading an EJB JAR File.
- Expand the EJB JAR file by clicking the + sign next to its name.
- Expand the Beans item to display all available EJBs in the EJB JAR file.
- Expand the EJB name that contains the references you want to view or modify.
- Select the EJB's EJB references item to display available references in the EJB
JAR file.
If the EJB JAR file does not contain any EJB references, click Add to create one.
- Expand the EJB References object (if it is not already expanded) to view
available references in the EJB JAR file.
- Select a listed EJB reference to display its properties in the Properties panel, as
shown in Figure 1-16.
Figure 1-16 EJB References
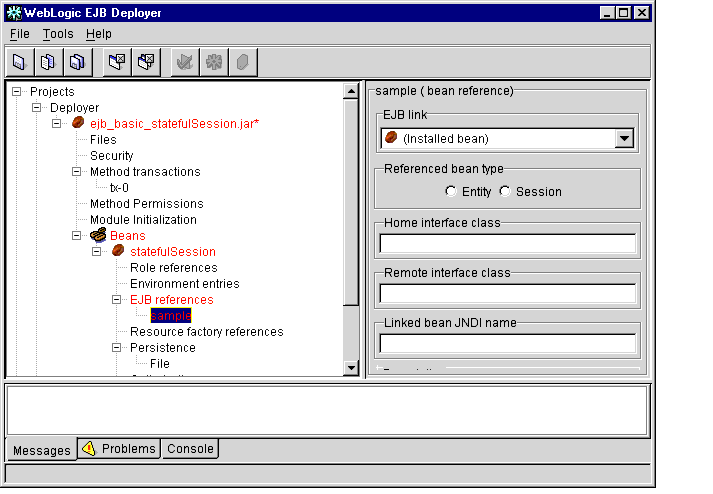
- Edit the following EJB reference properties:
- EJB Link: This entry defines a link to a specific EJB defined in ejb-jar.xml, or to an EJB installed in a running server (Installed bean).
- Reference bean type: Specify whether the referenced bean is a session EJB or entity EJB.
- Home interface class: Enter the expected Java class type of the home interface for this referenced EJB.
- Remote interface class: Enter the expected Java class type of the remote interface for this EJB reference.
- Description: Enter descriptive text for the EJB reference.
Mapping Resource Factory References
To map resource factory references:
- Start the WebLogic Enterprise EJB Deployer using the instructions in Starting the
WebLogic Enterprise EJB Deployer.
- Select the Java server you want to deploy to by clicking on its name in the Server
category.
- Load an EJB module using the instructions in Loading an EJB JAR File.
- Expand the EJB JAR file by clicking the + sign next to its name.
- Expand the Beans item to display all available EJBs in the EJB JAR file.
- Expand the EJB name that contains the resource references you want to view or
modify.
- Select the EJB's resource factory references item to display available resource
references in the EJB JAR file.
If the EJB JAR file does not contain any EJB references, click Add and enter a name for the new reference.
- Expand the resource factory references item to list references in the EJB JAR file.
- Select a listed resource factory reference to display its properties in the Properties
panel, as shown in Figure 1-17.
Figure 1-17 Resource Factory References
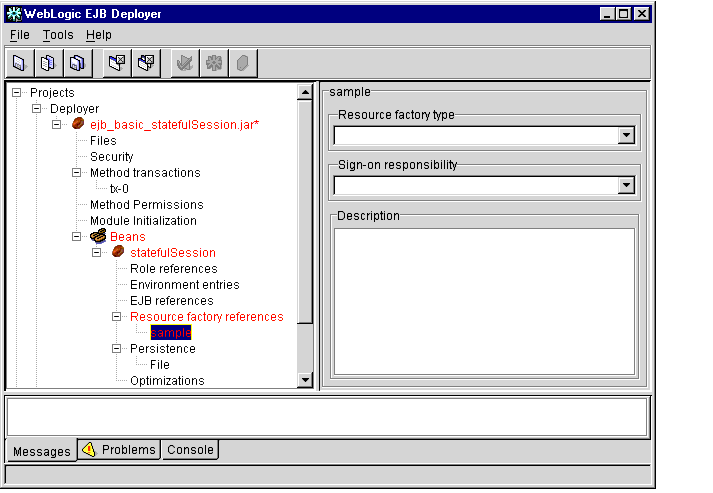
- Edit the following resource factory reference properties:
- Resource factory type: Select a resource factory type from the drop-down list.
- Sign-on responsibility: Select whether the responsibility for signing on to the resource factory lies with the Container or Application.
- Description: Enter descriptive text for the resource factory.
Configuring Persistence Properties for EJBs
This topic includes the following sections:
You can use the WebLogic Enterprise EJB Deployer to configure persistence properties for entity beans and stateful session beans that use container-managed persistence. For container-managed persistence, the WebLogic Enterprise EJB container supports storing an EJB in either of the following formats:
- A flat file (for stateful session beans only).
- A database that is managed with a WebLogic Enterprise JDBC connection pool (for entity beans only).
Note: JDBC-based persistence is required for an entity bean to fully cooperate in a WebLogic Enterprise global transaction.
You can use the WebLogic Enterprise EJB Deployer to configure JDBC-based or file-based persistence properties for stateful session beans or entity beans. For more information about EJB persistence, see "Developing WebLogic Enterprise EJB Applications" in Getting Started.
Configuring Container-managed Fields
To view or modify the container-managed fields defined in your XML deployment files:
- Start the WebLogic Enterprise EJB Deployer using the instructions in Starting the
WebLogic Enterprise EJB Deployer.
- Load an EJB module that uses JDBC-based persistence.
- Expand the EJB JAR file by clicking the + sign next to its name.
- Expand the Beans item to display available EJBs in the EJB JAR file.
- Expand the EJB name that uses JDBC-based persistence.
- Select the Persistence object to display the JDBC persistence properties, as
shown in Figure 1-18.
Figure 1-18 JDBC Persistence Properties
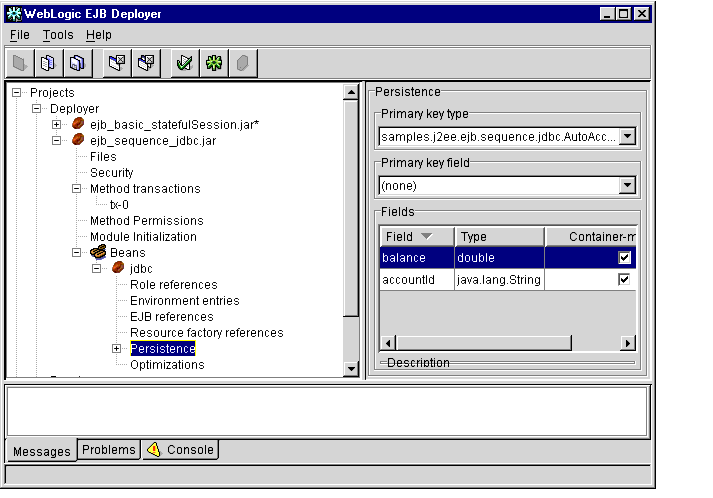
- To change the primary key type, select a type from the Primary key type
drop-down menu. You can specify a simple primary key by selecting a simple
Java type. Select a compiled primary key class type to define a compound key.
- For simple primary keys, select a Primary key field from the drop-down menu.
- Select the Container-managed check boxes next to a field name to have
WebLogic Enterprise automatically manage persistence for those fields using
JDBC-based persistence.
Note: For each field that you designate as Container-managed, define the mapping of the field to a database column using the instructions in Configuring JDBC-based Persistence for Entity Beans.
Configuring JDBC-based Persistence for Entity Beans
The WebLogic Enterprise EJB Deployer enables you to perform the following configuration tasks for entity beans that use JDBC-based persistence:
Specifying the Table and Connection for JDBC Operations
To specify table and connection properties for JDBC operations:
- Start the WebLogic Enterprise EJB Deployer using the instructions in Starting the
WebLogic Enterprise EJB Deployer.
- Load an EJB module that uses JDBC-based persistence.
- Expand the EJB JAR file by clicking the + sign next to its name.
- Expand the Beans item to display available EJBs in the EJB JAR file.
- Expand the name of an entity bean that uses JDBC-based persistence.
- Expand the Persistence item.
- Select JDBC to display configuration properties in the Properties panel.
- Click the Configuration tab in the Properties panel to display basic configuration
properties, as shown in Figure 1-19.
Figure 1-19 JDBC Persistence Configuration Properties
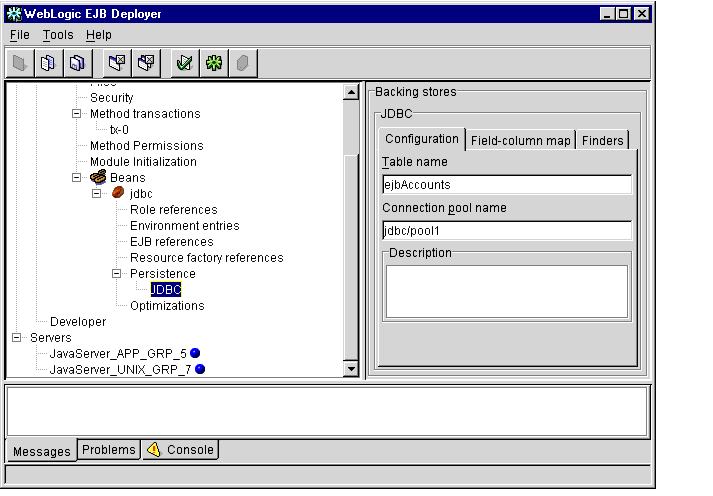
- Edit configuration properties to define the high-level mapping for JDBC
operations:
- Table name: Enter the JDBC table name that stores data for the entity bean's container-managed fields. See Mapping Container-managed Fields to Database Columns for information on assigning fields to individual columns in the selected table.
- Connection pool name: Enter the JNDI name of the connection pool to use for accessing the JDBC.
Mapping Container-managed Fields to Database Columns
To map individual EJB container-managed fields to columns in a selected datastore:
- Follow the instructions in Specifying the Table and Connection for JDBC
Operations to open the JDBC panel.
- Click the Field-column map tab in the Properties panel to display the current
mapping between container-managed fields and database columns, as shown in
Figure 1-20.
Figure 1-20 Field-column Mappings
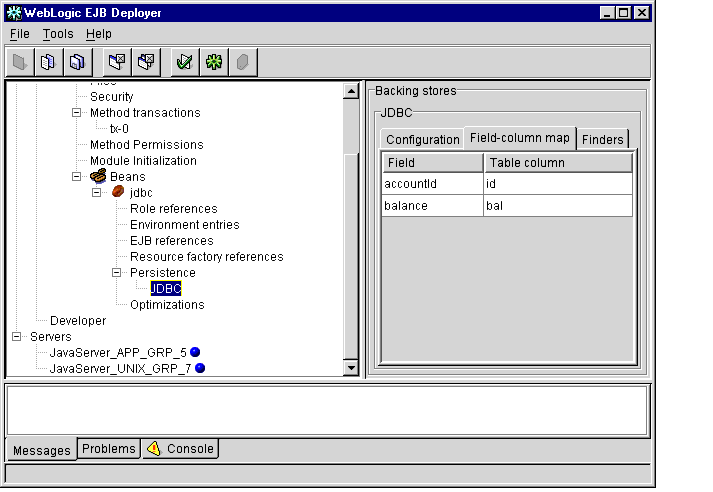
- To change the database column used to back a container-managed EJB field,
double click the Table column name and enter the new name.
Note: WebLogic Enterprise does not support using quoted RDBMS keywords in a column mapping. For example, you cannot map EJB fields to columns named "create" or "select" if those names are reserved in the underlying datastore.
Editing EJB Finder Method Expressions
To modify the finder signature expressions used in EJB finder methods:
- Follow the instructions in Specifying the Table and Connection for JDBC
Operations to open the JDBC panel.
- Click the Finders tab in the Properties panel to display the finder methods
available in your deployment files, as shown in Figure 1-21.
Figure 1-21 Finder Methods
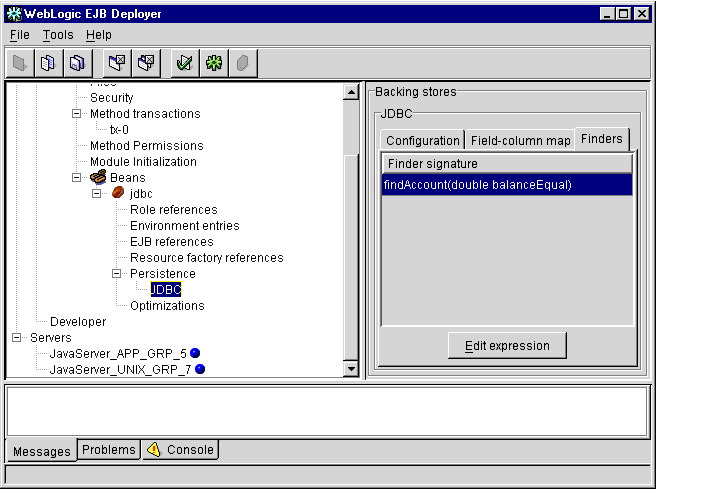
- To view or change the expressions used in a particular finder method, double
click the method name to display an Edit Expression dialog box, as shown in
Figure 1-22.
Figure 1-22 Edit Expression Dialog Box

The Edit Expression dialog box displays an editing window for changing the expression for the selected finder signature.
- Edit the expression. The expression must comply with the following syntax rules.
Syntax
The query grammar syntax has an expression prefix notation of:
[operator operand1 operand2]
Operators
Valid operators include:
- ( ) = < > <= >= / ! & |
- like
- isNull
- isNotNull
- orderBy
- ! is the Boolean not
- & is the Boolean and
- | is the Boolean or
Operands
Valid operands include:
- Another expression
- An EJB field
- A finder method parameter (when preceded by $)
Examples
The following examples show sample query expressions in finder methods.
The following expression determines whether balance exceeds amount:
"(> balance $amount)"
The following example shows the use of compound expressions. Note that single quotes are used to denote strings:
"(& (> bal $amount) (! (= accountType 'checking')))"
The following example is a method signature and an expression that is converted to a findBigAccounts method in the generated persistent storage class. The method returns an enumeration of beans of this class that satisfy this expression:
"findBigAccounts(double amount)" "(> balance $amount)"
The following example finds all the EJBs in a table:
"findAll()" "(= 1 1)"
The following example finds all EJBs whose lastName fields starts with M:
"findNamesStartingWithM()" "(like lastName M%)"
The following example finds all EJBs whose firstName field is null:
"findNullFirstNames()" "(isNull firstName)"
The following example finds all EJBs whose firstName field is not null:
"findNullFirstNames()" "(isNotNull firstName)"
The following expression finds all EJBs in which the value of the balance field exceeds balanceGreaterThan and returns the beans ordered by the id database column. Notice that this expression should all be contained in a single line and that no column mapping is performed. The database column must be specified directly:
"findOrderedAccounts(double balanceGreaterThan)"
  "(orderBy 'id' (> balance $balanceGreaterThan))"
The following expression is identical to the previous one except that it returns the beans in descending order:
"findOrderedAccounts(double balanceGreaterThan)"
  "(orderBy 'id desc' (> balance $balanceGreaterThan))"
- Click OK or Cancel to save or cancel changes to the finder expression.
Configuring File-based Persistence for Stateful Session Beans
To configure file-based persistence for a stateful session bean with container-managed persistence:
- Start the WebLogic Enterprise EJB Deployer using the instructions in Starting the
WebLogic Enterprise EJB Deployer.
- Load an EJB module that uses file-based persistence.
- Expand the EJB JAR file by clicking the + sign next to its name.
- Expand the Beans item to display available EJBs in the EJB JAR file.
- Expand the name of a stateful session bean.
- Expand the persistence item.
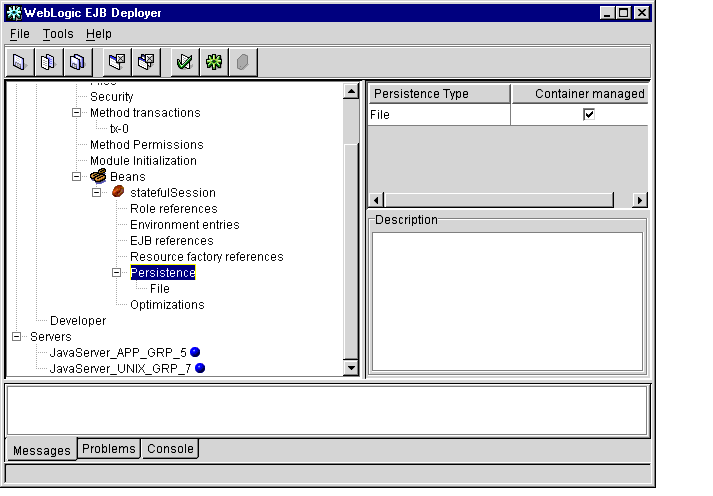
- To enable file-based persistence for this bean, you must select the checkbox
under Container managed, as shown in Figure 1-23.
Figure 1-23 File-based Persistence Checkbox
- Select File to display the Properties panel, as shown in Figure 1-24.
Figure 1-24 File-based Persistence Properties
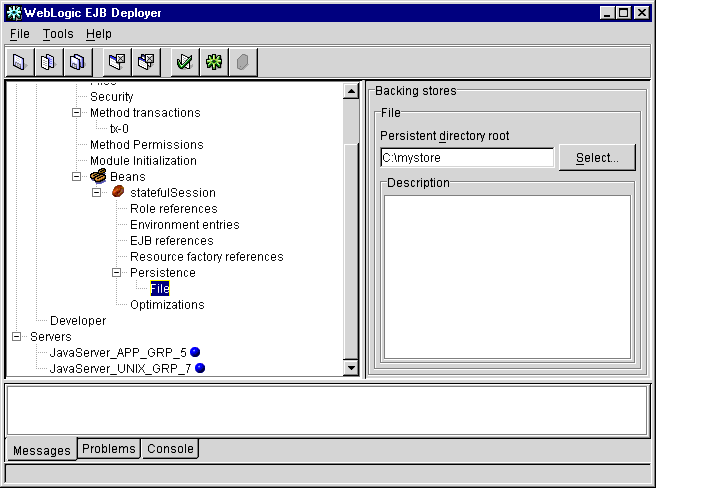
- Enter the full path and filename of the file to use for file-based persistence, or
click the Select... button to navigate to an existing file.
Validating Modules
This topic includes the following sections:
The WebLogic Enterprise EJB Deployer validates EJB modules in the following ways:
- By automatically checking deployment properties and references to ensure that they contain appropriate values.
- By checking EJB home, remote, and implementation classes to ensure that method signatures are compliant with the Enterprise JavaBeans Specification 1.1.
Validating Deployment Properties
When you load a new EJB JAR file or change deployment properties, the WebLogic Enterprise EJB Deployer automatically checks the properties to ensure that supplied values are valid and appropriate for the selected server. This includes:
- Ensuring that all class files referenced in ejb-jar.xml exist in the EJB JAR file.
- Ensuring that required deployment properties contain values.
- Checking environment entry values to ensure that they match their associated Java types.
If the WebLogic Enterprise EJB Deployer finds any errors in the deployment properties that would prevent you from deploying to the selected server, it lists those errors in the Problems display of the Message panel. The WebLogic Enterprise EJB Deployer also highlights in red the EJB JAR file, EJB, method, or property category that contains the error.
To address deployment property errors:
- Start the WebLogic Enterprise EJB Deployer and open the EJB JAR file that
contains deployment errors. For instructions, see Starting the WebLogic Enterprise
EJB Deployer and Loading an EJB JAR File.
- Click the Problems tab in the Message panel to display the deployment error
messages.
- Expand the red highlighted objects in the Object panel to locate the source of
individual deployment errors. As you select nested objects, the Problems display
changes to show only those deployment errors in the current object or property
listing.
- Edit the property value as indicated in the error message to correct the problem.
The WebLogic Enterprise EJB Deployer validates your entry immediately after
editing, so you can determine if the problem is resolved.
- Continue addressing highlighted items in the Object panel as necessary. Once you
have addressed all of the deployment errors, the EJB JAR file entry will no
longer appear highlighted, and you can continue compiling or deploying the
EJBs.
Checking for Compliance with the Enterprise JavaBeans Specification 1.1
The WebLogic Enterprise EJB Deployer provides a compliance checking option to check compiled EJB classes for compliance with the Enterprise JavaBeans Specification 1.1 published by Sun Microsystems, Inc. To check the contents of a module for compliance with the specification:
- Start the WebLogic Enterprise EJB Deployer and open the EJB JAR file that you
want to check for compliance. For instructions, see Starting the WebLogic
Enterprise EJB Deployer and Loading an EJB JAR File.
- If you have not already done so, address all deployment property errors using the
instructions in Validating Deployment Properties. You cannot check for
compliance to the Enterprise JavaBeans Specification 1.1 until all deployment
properties are valid.
- Select the name of the EJB JAR file to check in the WebLogic Enterprise EJB
Deployer Object panel.
- Select the Messages tab in the Message panel.
- From the Tools menu, choose Check Compliance to begin the validation process.
The WebLogic Enterprise EJB Deployer displays any noncompliance messages in the Message panel.
For more information about system messages, see the System Messages in the WebLogic Enterprise online documentation. If you need more information about how to address a noncompliance message, see the Enterprise JavaBeans Specification 1.1.
After addressing known compliance errors, recompile your classes, repackage the EJB JAR file, and use the WebLogic Enterprise EJB Deployer to repeat the compliance check.
Compiling and Deploying EJBs
This topic includes the following sections:
Compiling EJB Container Classes
For each EJB deployment present in an EJB JAR file, the WebLogic Enterprise EJB Deployer calls the ejbc compiler to generate container implementation classes. The implementation classes are then processed through the RMI compiler, which generates a client-side stub and a server-side skeleton.
When you use the WebLogic Enterprise EJB Deployer to generate container classes, the files are inserted back into the EJB JAR file. If you want to place the container classes into a different file, use ejbc from the command line, as described in Commands, Systems Processes, and MIB Reference.
By default, ejbc uses javac as a compiler. For faster performance, specify a different compiler (such as Symantec's sj) by setting up ejbc preferences within the WebLogic Enterprise EJB Deployer. See Setting Up Java Servers and WebLogic Enterprise EJB Deployer Preferences for more information.
To generate container classes for EJBs:
- If you have not done so, address all deployment property errors using the
instructions in Validating Deployment Properties. You cannot generate container
classes until all deployment properties are valid.
- Select the name of the EJB JAR file to check in the WebLogic Enterprise EJB
Deployer Object panel.
- From the Tool menu, choose Generate container... to begin compiling EJBs in the
EJB JAR file.
Deploying EJB JAR Files to Java Servers
You can deploy EJB JAR files to one or more running Java servers in accordance with the following requirements:
- The target Java server must be started with the -Dwle.dynamic switch to enable hot deployment. For more information, see the "Starting JavaServer" section in Administration Guide.
- If you are redeploying an updated EJB JAR file to a Java server on which a version of the EJB JAR file deployed previously:
- the filename of the EJB JAR file must be different, and
- you must specify a different module name.
To deploy an EJB JAR file to a Java server:
- If you have not done so, compile the container classes into the EJB JAR file using
the instructions in Compiling EJB Container Classes.
- If you have not done so, select the WebLogic Enterprise domain in which the
target Java server is running, as described in Changing WebLogic Enterprise EJB
Deployer Preferences.
- Select the name of the EJB JAR file to check in the WebLogic Enterprise EJB
Deployer Object panel.
- Do one of the following:
- To deploy the EJB JAR file to the default Java server, from the Tools menu, choose Deploy...
- To deploy the EJB JAR file to a nondefault server, from the Tools menu, choose Deploy To...-->server_name, where server_name is the Java server that you want to use.
The Enter Module Name dialog box appears, as shown in Figure 1-25.
Figure 1-25 Enter Module Name Dialog Box
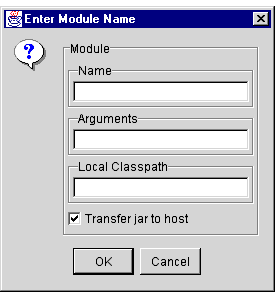
- Edit the following properties, which are used in the deployment process:
- Name. Specify a name for this module.
Note: If you are redeploying an EJB JAR file to this server, you must specify a different module name.
- Arguments. Optional. A parameter string that, if specified, provides values that will be used to initialize the module when it is deployed to the Java server.
- Local Class Path. Optional. If specified, identifies the path and filename of one or more additional EJB JAR files that might be required for the deployed EJB JAR file. These EJB JAR files are available locally to the deployed EJB JAR file on the Java server,
- Transfer JAR to Host. Select this checkbox if you want the WebLogic Enterprise EJB Deployer to copy the EJB JAR file to the host server.
- Click OK.
Note: The WebLogic Enterprise EJB Deployer uses hot deployment, via the deploy command shell utility, to deploy Enterprise JavaBeans (EJBs). For more information, see "Developing WebLogic Enterprise EJB Applications" in Getting Started.
Undeploying EJB JAR Files
Undeploying an EJB JAR file removes it from a Java server on which it is deployed. To undeploy an EJB JAR file from a Java server:
- Start the WebLogic Enterprise EJB Deployer using the instructions in Starting the
WebLogic Enterprise EJB Deployer.
- Select the Servers category in the Object panel.
- In the Properties panel, click the name of the server from which you want to
undeploy the EJB JAR file. The WebLogic Enterprise EJB Deployer displays the
properties for the selected Java server, as shown in Figure 1-26.
Figure 1-26 Java Server Properties

- Select the module that you want to deploy.
- Click the Undeploy button.
WebLogic Enterprise EJB Deployer Properties File
This section includes the following topics:
The WebLogic Enterprise EJB Deployer stores its settings in the deployer.properties file. You can modify this file using the WebLogic Enterprise EJB Deployer, as described in Changing Preferences for the WebLogic Enterprise EJB Deployer. If you want, you can also modify many, but not all, properties using an ASCII text editor.
The WebLogic Enterprise EJB Deployer creates this file in the user's home directory. For example, on Unix, the home directory might be /home/loginName, where loginName is the user's login name. On Windows NT, this directory might be c:\winnt\profiles\loginName. If the file does not exist in the user's home directory, the WebLogic Enterprise EJB Deployer creates one with default settings automatically.
Properties Specified in the deployer.properties File
Table 1-1 describes the properties specified in the deployer.properties file.
|
Property
|
Description
|
|
ejbc.compiler
|
Path and executable name of the Java compiler. Default setting is /java/bin/javac.exe.
|
|
ejbc.keepgenerated
|
Specify true to keep generated intermediate Java files, or specify false to remove them. Default setting is true.
|
|
environment.localclasspath
|
Optional. Path and filename to one or more additional EJB JARs that are required to load. Default setting is no path.
|
|
environment.tuxconfig
|
Path and filename of the tuxconfig file. Default setting is /tuxconfig.
|
|
layout.bounds
|
Do not edit manually. Managed internally by the WebLogic Enterprise EJB Deployer.
|
|
layout.horz-divider.location
|
Do not edit manually. Managed internally by the WebLogic Enterprise EJB Deployer.
|
|
layout.vert-divider.location
|
Do not edit manually. Managed internally by the WebLogic Enterprise EJB Deployer.
|
|
maxRecentProjects
|
Maximum number of entries in the list of most recently used projects under the File menu. Default setting is 5.
|
Sample deployer.properties File
Listing 1-2 shows a sample deployer.properties file.
Listing 1-2 Sample deployer.properties File
environment.localclasspath=e\:\\ij_51\\IcedJava\\jars\\QaDb.jar;e\:\\ij_51\\IcedJava\\jars\\qafunc.jar;e\:\\ij_51\\IcedJava\\jars\\qalib.jar
environment.tuxconfig=F\:/iceberg/samples/j2ee/ejb/basic/statefulSession/tuxconfig
ejbc.compiler=E\:/VisualCafe/Bin/SJ.exe
ejbc.keepgenerated=true
layout.bounds=0.21375,0.14166666666666666,0.5325,0.6725
layout.horz-divider.location=0.6071942446043166
layout.vert-divider.location=0.2872467222884386
maxRecentProjects=5
Note: Do not change the values of the layout.bounds, layout.horz-divider.location, or layout.vert-divider.location settings.
|
|
|
Copyright © 2000 BEA Systems, Inc. All rights reserved.
Required browser: Netscape 4.0 or higher, or Microsoft Internet Explorer 4.0 or higher.
|


