

|
|
|
|
|
|
Using the BEA Jolt Repository Editor
Use the BEA Jolt Repository Editor to add, modify, test, export, and delete BEA Tuxedo service definitions from the Jolt Repository based on the information available from the BEA Tuxedo configuration file. The Jolt Repository Editor accepts BEA Tuxedo service definitions, including the names of the packages, services, and parameters.
Note: Before you use the Jolt Repository Editor, you must first configure the JET system according to the instructions in Configuring JET for Client Access. In particular, the JSL and JSHs must be correctly configured and running.
This topic includes the following sections:
Note: In order to use the Jolt Repository Editor to edit service definitions, you must first configure the Jolt Servers (JSL and JSHs). If you want to use this tool across a firewall, you must also configure Jolt Internet Relay. For configuration instructions, see Configuring JET for Client Access.
Introducing the Jolt Repository Editor
This topic includes the following sections:
The Jolt Repository is used internally by JET to translate data between JET and BEA Tuxedo type buffers. The Jolt Repository Editor is used to edit service definitions in the Repository. The Jolt Repository Editor is available as a downloadable Java applet. When a BEA Tuxedo service is added to the Repository, it must be exported to the Jolt server to ensure that the client requests can be made from a JET client.
Jolt Repository Editor Window
Jolt Repository Editor windows contain entry fields, scrollable displays, command buttons, status, and radio buttons. Figure 5-1 illustrates the parts of the window. Table 5-1 describes each component.
Figure 5-1 Jolt Repository Editor Window
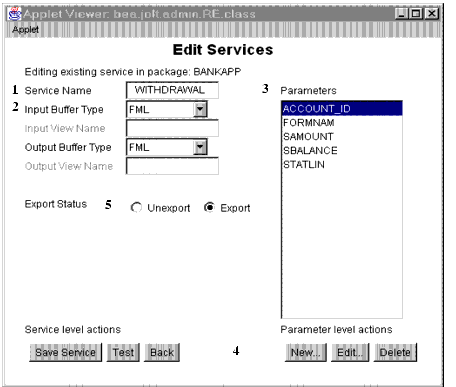
Components of the Jolt Repository Editor Window
Table 5-1 describes the parts of the Jolt Repository Editor window shown in Figure 5-1.
|
# |
Component |
Description |
|---|---|---|
|
1 |
Text boxes |
Enter text, numbers, or alphanumeric characters such as Service Name, Input View Name, server names, or port numbers. In Figure 5-1, Service Name is used. |
|
2 |
Drop-down arrow |
View lists that extend beyond the display using an arrow button. In Figure 5-1, Input Buffer Type is used. |
|
3 |
Display list |
Select from a list of predefined items such as the Parameters list or select from a list of items that have been defined. |
|
4 |
Command buttons |
Activate an operation such as displaying the Packages window, Services window, or Package Organizer. In Figure 5-1, command buttons include: Save Service, Test, Back, New, Edit, and Delete. |
|
5 |
Radio buttons |
Select one of a number of options. Only one of the radio buttons can be activated at a time. For example, Export Status can only be Unexport or Export. |
Getting Started with the Jolt Repository Editor
Note: Before you use the Jolt Repository Editor, you must first configure the JET system according to the instructions in Configuring JET for Client Access. In particular, the JSL and JSHs must be correctly configured and running.
To use the Jolt Repository Editor:
You can start the Jolt Repository Editor from either the JavaSoft appletviewer or from your Web browser. Both of these methods are detailed in the following sections.
Note: For information about exiting the Jolt Repository Editor after you enter information, see Exiting the BEA Jolt Repository Editor.
Starting the Jolt Repository Editor
You can start the Jolt Repository Editor from either the JavaSoft appletviewer or from your Web browser.
Starting the Jolt Repository Editor Using the Java Applet Viewer
To start the Jolt Repository Editor using the Java applet viewer:
Note: If the m3.jar file is already specified in the CLASSPATH, then the directory containing the jolt.jar file must be specified ahead of the directory containing the m3.jar file.
appletviewer RE.html
If you are loading the applet from the Web server, type the following at the URL location (including the full path):
appletviewer http://<www.server>/<URL path>/RE.html
The window is displayed as shown in Figure 5-2.
Starting the Jolt Repository Editor from Your Web Browser
From a Web browser, you can start the Jolt Repository Editor from a local file or from a Web server.
Starting from a Local File
To start the Jolt Repository Editor from a local file:
file:RE.html
The BEA Jolt Repository Editor Login window appears, as shown in the example in Figure 5-2.
Starting from a Web Server
To start the Jolt Repository Editor from a Web server:
http://<www.server>/<URL path>/RE.html
Note: If jolt.jar and admin.jar are in the same directory as RE.html, the Web server provides the classes. If they are not in the same directory as RE.html, modify the applet codebase parameter in the Re.html file.
The BEA Jolt Repository Editor Login window appears, as shown in the example in Figure 5-2.
Logging On to the Jolt Repository Editor
After starting the Jolt Repository Editor, complete the following steps to log on:
Note: The Jolt Repository Editor Logon Window must be displayed before you log on. See Figure 5-2 as you perform the following procedure.
The system validates the server and port information.
Note: Unless you are logging on through Jolt Relay, the same port number is used to configure the Jolt Listener. See your UBBCONFIG file for additional information.
Depending upon the authentication level, complete steps 4 and 5 as required.
The Packages and Services command buttons are enabled.
Sample Logon Window
Figure 5-2 BEA Jolt Repository Editor Logon Window
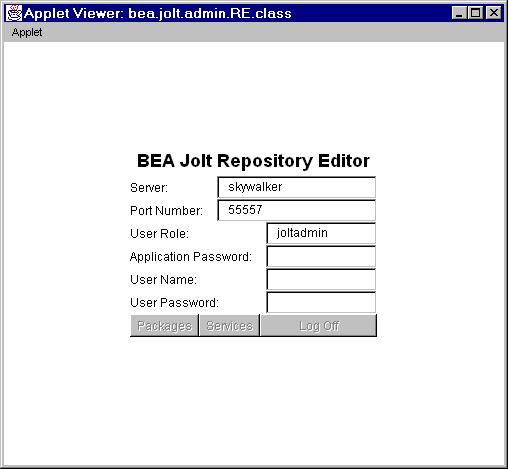
Table 5-2, describes the Jolt Repository Editor logon window elements.
Components of the BEA Jolt Repository Editor Logon Window
Table 5-2 describes the components of the BEA Jolt Repository Editor Logon window shown in Figure 5-2.
|
Option |
Description |
|---|---|
|
Server |
Server name. |
|
Port Number |
Port number in decimal value. Note: After the Server Name and Port Number are entered, the User Name and Password fields are activated. Activation is based on the authentication level of the BEA Tuxedo application. |
|
User Role |
BEA Tuxedo user role. Required only if BEA Tuxedo authentication level is USER_AUTH or higher. |
|
Application Password |
BEA Tuxedo administrative password text entry. |
|
User Name |
BEA Tuxedo user identification text entry. The first character must be an alpha character. |
|
User Password |
BEA Tuxedo password text entry. |
|
Packages |
Accesses the Packages window. (Enabled after the logon.) |
|
Services |
Accesses the Services window. (Enabled after the logon.) |
|
Log Off |
Terminates the connection with the server. |
Exiting the BEA Jolt Repository Editor
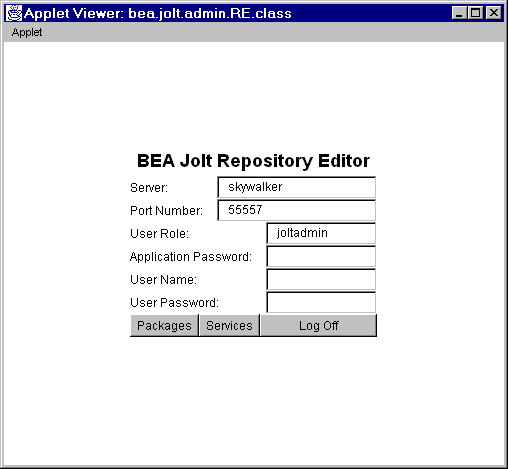
Exit the BEA Jolt Repository Editor when you finish adding, editing, testing, or deleting packages, services, and parameters. Prior to exiting, the window is displayed as shown in Figure 5-3.
Figure 5-3 BEA Jolt Repository Editor Logon Window Prior to Exiting
 .
.
Note that only the Packages, Services, and Log Off command buttons are enabled. All of the text entry fields are disabled.
To exit the Jolt Repository Editor:
The Jolt Repository Editor Logon window shows disabled fields.
Main Components of the BEA Jolt Repository Editor
This topic includes the following sections:
The Jolt Repository Editor allows you to add, modify, or delete any of the following components: packages, services (you can also test and group services), and parameters.
Workflow for the BEA Jolt Repository Editor
After you log on to the Jolt Repository Editor, two buttons are enabled, Packages and Services.
Figure 5-4 illustrates the Jolt Repository Editor flow to help you determine which of these two buttons to select.
Figure 5-4 Jolt Repository Editor Flow Diagram
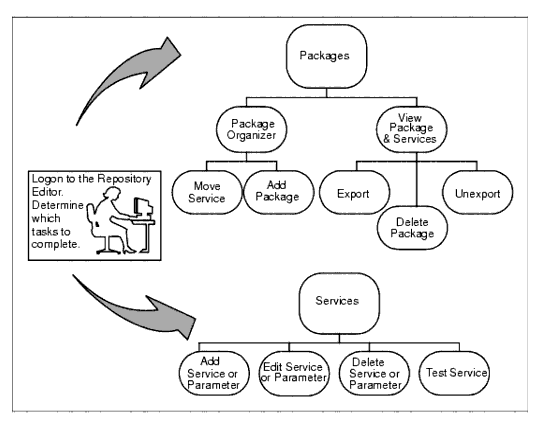
Select Packages to open the Packages window and perform the following functions:
See What Is a Package? for complete details.
Use Services to open the Services window and perform the following functions:
See What Is a Service? for complete details.
What Is a Package?
Packages provide a convenient method for grouping services for Jolt administration.
You use the Packages window to perform the following tasks:
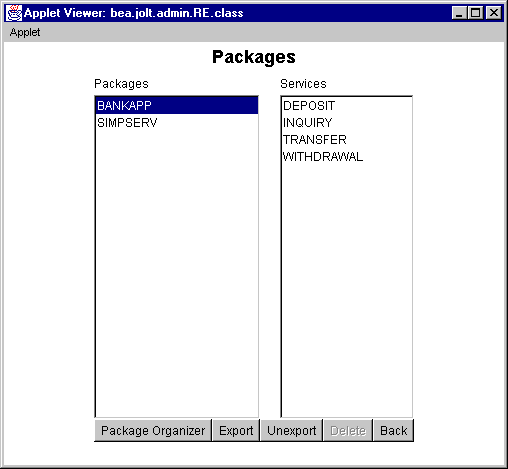
Click the Packages button in the Jolt Repository Editor logon window to display the available packages. When you select a specific package from the display list, its services within that package are displayed.
Sample Packages Window
Figure 5-5 contains a sample Packages window.
Figure 5-5 Packages Window
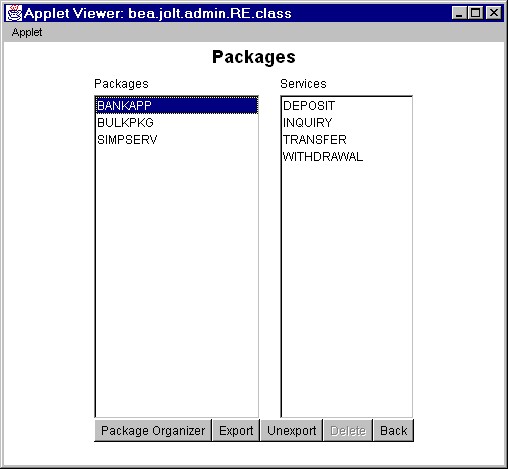
Components of the Packages Window
Table 5-3 describes the components of the Packages window shown in Figure 5-3.
|
Option |
Description |
|---|---|
|
Packages |
Lists available packages. |
|
Services |
Lists available services within the selected package. |
|
Package Organizer |
Accesses the Package Organizer window to review available packages and services. Use this window to move the services among the packages or add a new package. |
|
Export |
Makes the most current services available to the client. This option is enabled when a package is selected. |
|
Unexport |
Select this option before testing an existing service. This option is enabled when a package is selected. |
|
Delete |
Deletes a package. This option is enabled when a package is selected and the package is empty (no services contained within the package). |
|
Back |
Returns the user to the previous window. |
To view a package:
The Packages window opens and displays the list of available packages.
In Figure 5-5, BANKAPP, BULKPKG, and SIMPSERV are the available packages.
What Is a Service?
A service definition describes the properties of a BEA Tuxedo service, such as its name, input and output buffer types, and individual parameters. Adding or editing a Jolt service in the Jolt Repository does not change an existing BEA Tuxedo service.
Sample Services Window
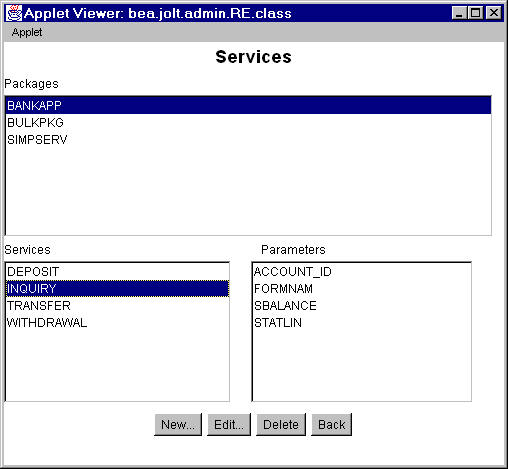
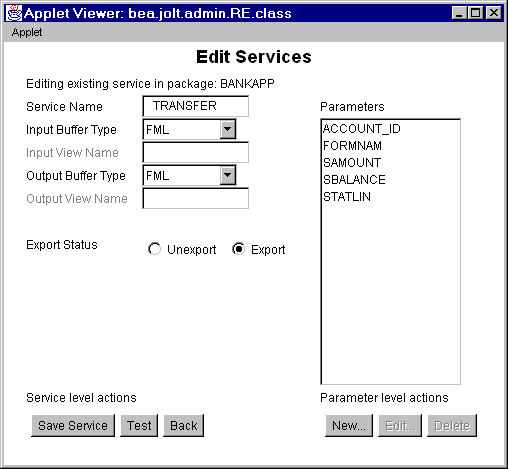
You use the Services Window to add, edit, or delete services. Figure 5-6 shows an example of a Services window with the BANKAPP package selected, and the display list of services and parameters available for this package (parameters are detailed later).
Figure 5-6 Services Window

Components of the Services Window
Table 5-4 describes the components in the Services window shown in Figure 5-4.
|
Option |
Description |
|---|---|
|
Packages |
Lists the available packages. |
|
Services |
Lists the services in the selected package, which you can edit or delete. Selecting a service displays the parameters within the service. |
|
Parameters |
Displays the parameters of the selected service. |
|
New |
Displays the Edit Services window for adding a new service. |
|
Edit |
Displays the Edit Services window for editing an existing service. This button is enabled only if a service has been selected. |
|
Delete |
Deletes a service. This button is only enabled if a service has been selected. |
|
Back |
Returns the user to the previous window. |
To view a service:
The Services window opens and displays the list of available packages.
The list of available services for the selected package is displayed.
In Figure 5-6, BANKAPP is the selected package. DEPOSIT, INQUIRY, TRANSFER, and WITHDRAWAL are the available services for BANKAPP.
Working with Parameters
A service contains parameters, which may be a pin number, account number, payment, rate, term, age, or Social Security number.
Sample Services Window with Parameters
Figure 5-7 shows a Services window displaying a selected service and its parameters.
Note: Adding or editing a parameter does not modify or change an existing BEA Tuxedo Service.
Figure 5-7 Services Window with Parameters List
To view a parameter:
The Services window opens and displays the list of available packages.
The list of available services for the selected package is displayed.
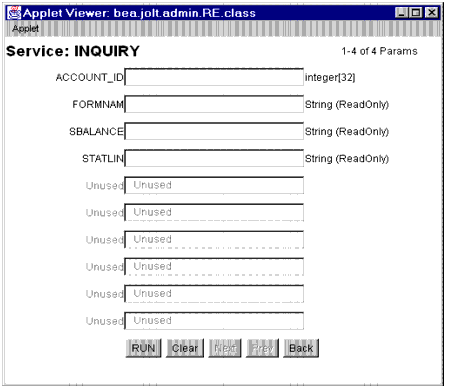
In Figure 5-7, BANKAPP is the selected package.
The list of available parameters for the selected service is displayed.
In Figure 5-7, INQUIRY is the selected service.
In Figure 5-7, ACCOUNT_ID, FORMNAM, SBALANCE, and STATLIN are the available parameters for the INQUIRY service.
Setting Up Packages and Services
This topic includes the necessary steps for setting up a package and its services:
As you create and edit services and parameters, it is important to regularly save information to avoid losing input. Clicking Save Service in the Edit Services window can prevent the need to re-enter information in the event of a system failure.
Caution: When you add or edit the parameters of a service, you must select Add before choosing Back from the Edit Parameters window and returning to the Edit Services window.
If adding a new service or modifying an existing service in the Edit Services window, be sure to select Save Service before choosing Back. If you select Back before you save the modified information, a warning is briefly displayed on the status line at the bottom of the window.
Adding Packages
When you need to add a new group of services, you create a new package before adding the services. The Package Organizer Window and the following procedure show how to add a new package, BALANCE, to the Packages listing.
Sample Package Organizer Window
Figure 5-8 Package Organizer Window
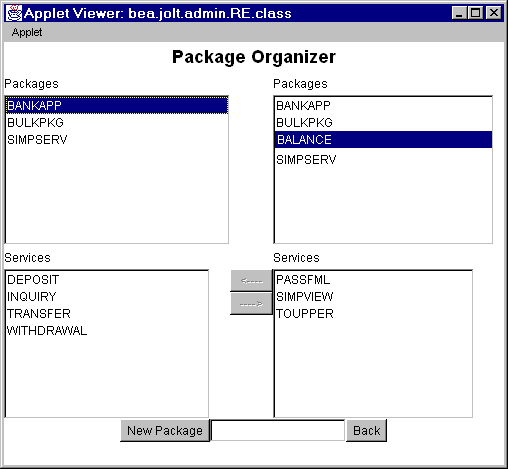
To add a package:
For a description of contents of this window, see Table 5-7.
The text field is activated.
The new name (shown in Figure 5-8 as BALANCE) is displayed on the Packages list in random order.
Adding Services
Services are definitions of available BEA Tuxedo services and can only be a part of a Jolt package.You must create the service as a part of a new or existing package.
The Jolt Repository Editor accepts the new service name exactly as it is typed (that is, all uppercase letters, abbreviations, misspellings are accepted). Service names must not exceed 30 characters.
Sample Edit Services Window
Figure 5-9 shows the Edit Services window for adding a service.
Figure 5-9 Edit Services Window: Add a New Service to a Package
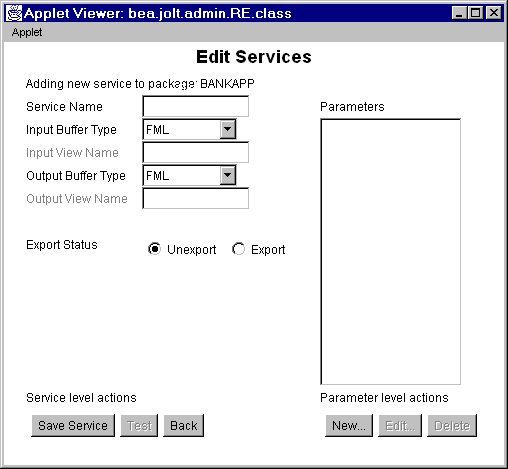
Table 5-5 describes the options for adding services to a package in a package window.
|
|
Option |
Description |
|
Edit Services Selections |
Service Name |
Name of the new service to be added to the Jolt Repository. |
|
Input Buffer Type/Output Buffer Type |
For more information, see Using BEA Tuxedo Buffer Types with JET.
|
|
|
Input View Name/Output View Name |
Unique name assigned to the Input View Buffer and Output View Buffer types. These fields are only enabled if VIEW or VIEW32 are the selected buffer types. |
|
|
Export Status |
Unexport |
Radio button with current status of the service. EXPORT or UNEXPORT status is checked. UNEXPORT is the default. |
|
Service Level Actions |
Save Service |
Saves the newly created service in the Repository. |
|
Test |
Tests the service. This command button is disabled until a new service is created or edits to an existing service are saved. |
|
|
Back |
Returns you to the previous window. |
|
|
Parameter |
Parameters |
List of service parameters to edit or delete. |
|
Parameter Level Actions |
New |
Adds new parameters to the service. |
|
Edit |
Edits an existing parameter. This command button is disabled until a new parameter is selected. |
|
|
Delete |
Deletes a parameter. This option is disabled until a parameter is selected. |
To add a service:
The Services window opens, similar to the one shown in Figure 5-6.
If you later decide that another package should contain the new service, use the Package Organizer to move the service to a different package. (See Grouping Services Using the Package Organizer for additional information.)
Although the same buffer type selected for the Input Buffer is automatically selected for the Output Buffer, you can select a different Output Buffer type.
Selecting CARRAY or STRING as a Service Buffer Type
If CARRAY or STRING is selected as the buffer type for a new service, only CARRAY or STRING can be added as the data type for the accompanying parameters. See also Adding Parameters and Selecting CARRAY or STRING as a Parameter Data Type. For additional information, see Invoking BEA Tuxedo Services.
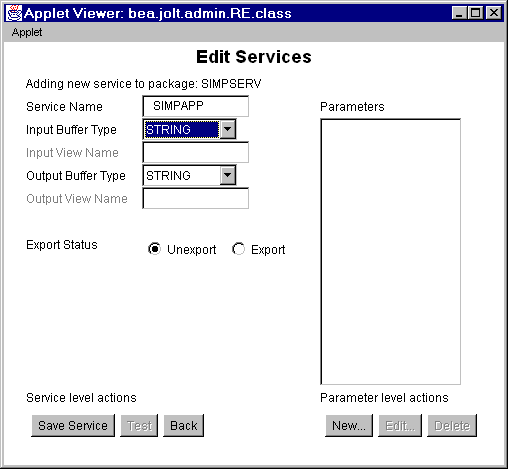
Figure 5-10 shows an example Edit Services window with STRING selected as the buffer type for the service SIMPAPP.
Figure 5-10 Edit Services Window: Select STRING Buffer Type
Clicking New under the label Parameter level actions in the Edit Services window displays the Edit Parameters window.
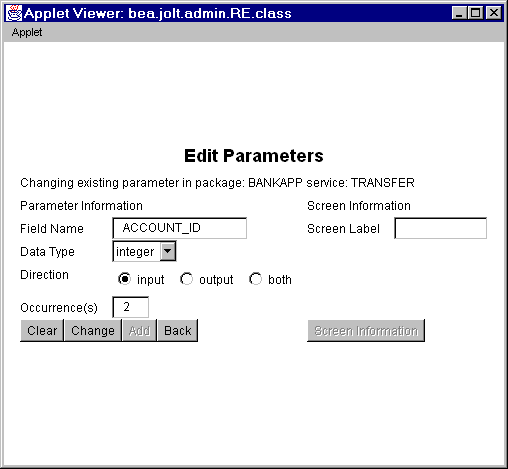
Sample Edit Parameters Window
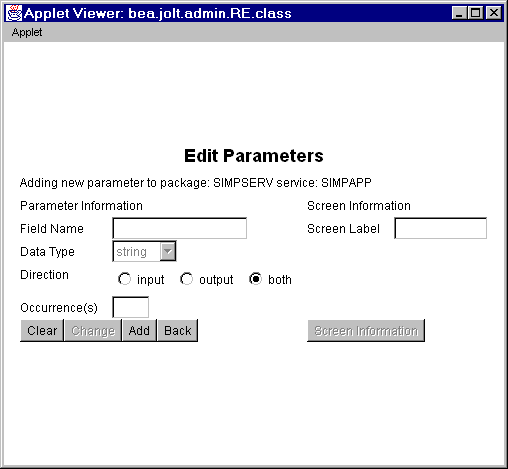
Figure 5-11 shows an example of the Edit Parameters window, which you use to enter the parameter and screen information for a service.
Figure 5-11 Edit Parameters Window: Add a Parameter
Components of the Adding a Parameter Window
Table 5-6 describes the components of the Parameter window shown in Figure 5-11.
|
Option |
Description |
|---|---|
|
Field Name |
Adds the field name (for example, asset). |
|
Data Type |
Lists data type choices:
|
|
Direction |
Radio button choices for direction of information:
|
|
Occurrence(s) |
Number of times that an identical field name can be used. If 0, the field name can be used an unlimited number of times. Occurrences are used by JET to build test screens; not to limit information sent or retrieved by BEA Tuxedo. |
|
Screen Information |
This button is disabled when the window is launched. |
|
Clear |
Clears the fields of the window. |
|
Change |
Is disabled while new parameters are added. |
|
Add |
Adds new parameters to the service. The parameters are saved when the service is saved. |
|
Back |
Returns the user to the previous window. |
To add a parameter:
Note: If the buffer type is FML or VIEW, the field name must match the corresponding parameter field name in FML or VIEW.
Warning: If you do not click Save Service before you click Back, the parameters are not saved as part of the service.
Selecting CARRAY or STRING as a Parameter Data Type
If CARRAY or STRING is the selected buffer type for a new service, only a carray or string can be added as the data type for the accompanying parameters.
In this case, only one parameter can be added. It is recommended that you use the parameter name "CARRAY" for a CARRAY buffer type, and the parameter name "STRING" for a STRING buffer type.
See also Adding a Service and Selecting CARRAY or STRING as a Service Buffer Type. For additional information, see Invoking BEA Tuxedo Services.
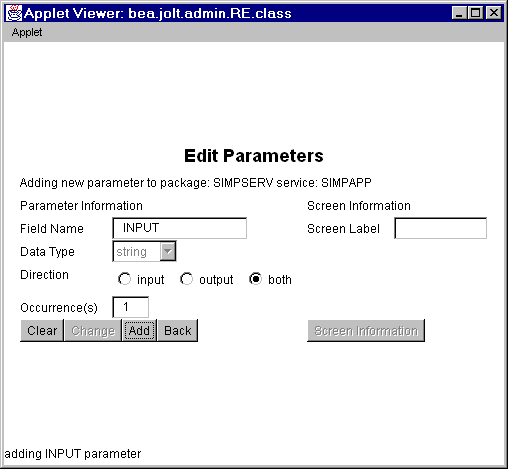
Figure 5-12 shows an example of the Edit Parameters window with STRING as the selected data type for the parameter. The Data Type defaults to STRING and does not allow you to modify that particular data type. The Field Name can be any name.
Figure 5-12 Edit Parameters Window: string Data Type
Grouping Services Using the Package Organizer
This topic includes the following sections:
The Package Organizer moves services between packages. You may want to group related services in a package (for example, WITHDRAWAL services that are exported only at a certain time of the day can be grouped together in a package).
Use the Package Organizer arrow buttons to move a service from one package to another. These buttons are useful if you have several services to move between packages. The packages and services display listings to help track a service within a particular package.
Sample Package Organizer Window
Figure 5-13 shows an example of a Package Organizer window with a service selected for transfer to another package.
Figure 5-13 Package Organizer Window
Components of the Package Organizer Window
Table 5-7 describes the components of the Package Organizer window shown in Figure 5-12.
|
Option |
Description |
|---|---|
|
Packages |
Lists packages containing services in the selected package. |
|
Packages |
Lists packages available as destinations for the selected service. |
|
Services |
Lists available services for the selected package. |
|
Services |
Lists available services of the highlighted package that you moved. |
|
Left arrow |
Moves services (one service at a time) to the package highlighted on the left. |
|
Right arrow |
Moves services (one service at a time) to the package highlighted on the right. |
|
New Package |
Adds the name of a new package. |
|
Back |
Returns user to the previous window. |
Grouping Services with the Package Organizer
To group services with the Package Organizer:
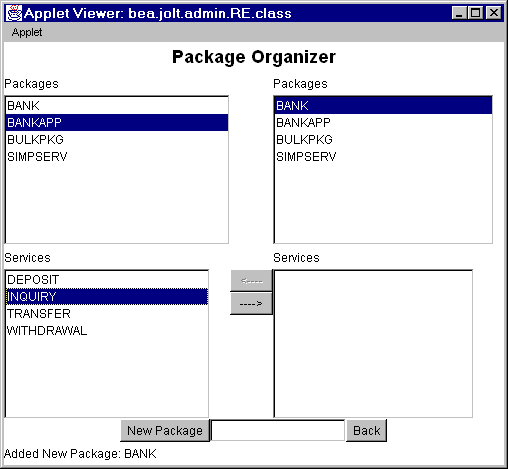
In Figure 5-14, INQUIRY is the selected service in the BANKAPP package.
Figure 5-14 shows the selected service, INQUIRY, and the selected package, BANK, to which the INQUIRY service will be moved.
Figure 5-14 Example of a Moved Service
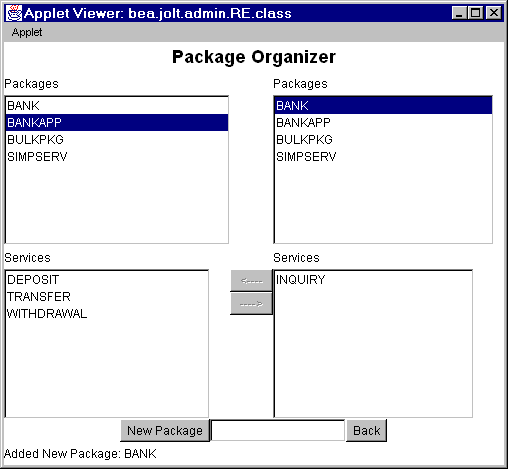
These keys are activated only when both packages (left and right are displayed) and a service are selected. The keys are only active in the direction of the package where the service is to be moved. Figure 5-14 shows that the INQUIRY service has been moved to the BANK package on the right.
Note: You cannot select the same package in both the left and right display lists.
Modifying Packages, Services, and Parameters
This topic includes the following sections:
You can edit an existing service name or service information, or access the window to add new parameters to an existing service. For a description of the Edit Services window, see Options for Adding a Service.
Sample Edit Services Window
Figure 5-15 shows an example of the Edit Services window.
Figure 5-15 Edit Services Window

To edit a service:
The services available for the selected package are displayed.
The parameters available for the selected service are displayed.
Editing Parameters
All parameter elements can be changed, including the name of the parameter.
Warning: If you create a new parameter using an existing name, the system overwrites the existing parameter.
Sample Edit Parameters Window
Figure 5-16 shows an example of the Edit Parameters window.
Figure 5-16 Edit Parameters Window
 .
.
To change a parameter:
The Edit Parameters Window is displayed as shown in Figure 5-16.
Deleting Parameters, Services, and Packages
This section describe how to delete a package. Before deleting a package, all the services must be deleted from the package. The Delete option is not enabled until all components of the package or service are deleted.
Warning: The system does not display a prompt to confirm that items are to be deleted. Be certain that the parameter, service, or package is scheduled to be deleted or has been moved to another location before selecting Delete.
Deleting a Parameter
To delete a parameter:
Deleting a Service
To delete a service:
Note: Make certain that all parameters within this service are deleted before selecting this option.
Delete is enabled.
Deleting a Package
To delete a package:
Note: Make sure all services contained in this package are deleted or moved to another package before selecting this option.
The package is deleted.
Making a Service Available to the JET Client
To make a service available to a JET client, you export it. All services in a package must be exported or unexported as a group. A service is made available by using the Export and Unexport radio buttons.
This topic includes the following sections:
Exporting and Unexporting Services
Determine which services are being made available or unavailable to the JET client. Services are exported to ensure that the JET client can access the most current service definitions from the Jolt server.
Sample Packages Window
Figure 5-17 shows the Packages window, where you can export and unexport services.
Figure 5-17 Packages Window: Export and Unexport Buttons
Exporting or Unexporting a Service
To export or unexport a service:
The Export and Unexport buttons are enabled.
To make the services in the selected package unavailable, select Unexport.
Caution: The system does not display a confirmation message indicating that the service is exported or unexported. See Reviewing the Exported and Unexported Status for additional information.
Reviewing the Exported and Unexported Status
When a service is exported or unexported, you can review its status from the Edit Services window.
Figure 5-18 displays the Export radio button as active, for Export Status; therefore, the current status for the service TRANSFER is exported.
Figure 5-18 Export Status
To review the current exported or unexported status of a service:
The Services display list of available services for the selected package is displayed.
The Edit Services window is displayed as shown in Figure 5-15.
One of the radio buttons (Export or Unexport) next to the Export Status label will be active, indicating the current status of the service.
Testing a Service
This topic includes the following sections:
Test a service and its parameters before you make them available to JET clients. You can test currently available services without making changes to the services and parameters.
Note: The Jolt Repository Editor allows you to test an existing BEA Tuxedo service with JET, without writing a line of Java code.
An exported or unexported service can be tested; if you need to change a service and its parameters, unexport the service prior to editing.
Sample Service Test Window
Use the Run button to test the service to ensure that the parameter information is accurate. A service can only be tested when the corresponding BEA Tuxedo server is running for the service being tested.
Although the Test button in the Edit Services window is enabled when parameters are not added to the service, the Service Test window displays unused in the parameter fields, and they are disabled. See Service Test Window for an example of unused parameter fields.
Note: The Service Test window displays up to 20 items of any multiple-occurrence parameters. All items that follow the twentieth occurrence of a parameter cannot be tested.
Figure 5-19 shows an example of a Service Test window with both writable and read-only text fields.
Figure 5-19 Service Test Window
Components of the Service Test Window
Table 5-8 describes the components of the Service Test window shown in Figure 5-19.
Note: You can enter a two-digit hexadecimal character (0-9, a-f, A-F) for each byte in the CARRAY data field. For example, the hexadecimal value for 1234 decimal is 0422.
|
Option |
Description |
|---|---|
|
Service |
Displays the name of the tested service (read-only). |
|
Parameters displayed |
Tracks the parameters displayed in the window (read-only). |
|
Parameter text fields |
The parameter information text entry field. These fields are writable or read-only. Disabled if read-only. |
|
RUN |
Runs the test with the data entered. |
|
Clear |
Clears the text entry field. |
|
Next |
Lists additional parameter fields, if applicable. |
|
Prev |
Lists previous parameter fields, if applicable. |
|
Back |
Returns to the Edit Services window. |
You can test a service without making changes to the service or its parameters. You can also test a service after editing the service or its parameters.
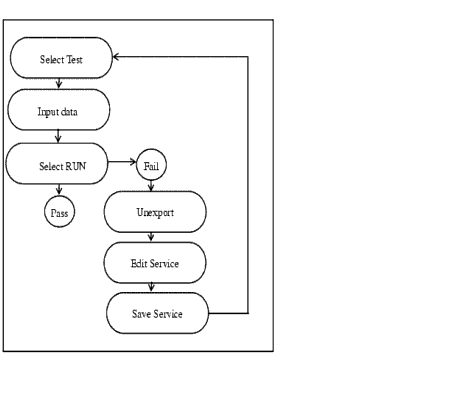
Test Service Process Flow
Figure 5-20 shows a typical Jolt Repository Editor service flow test.
Figure 5-20 Test Service Flow
For troubleshooting information, see the first two entries in Table 5-9.
To test a service:
The Services window is displayed.
The status line displays the outcome as follows:
See Jolt Repository Editor Troubleshooting for additional Jolt Repository Editor troubleshooting information.
If edits are required after testing:
Troubleshooting
Table 5-9 provides troubleshooting tips if you encounter problems while using the Jolt Repository Editor.
|
Problem |
Suggested Action(s) |
|---|---|
|
A parameter is incorrect |
Edit the service. |
|
The Jolt server is down |
Check the server. The BEA Tuxedo service is down. You do not need to edit the service. |
|
You receive any error |
Make sure the browser you are running is Java-enabled:
|
|
You cannot connect to the Jolt server (after entering Server and Port Number) |
Make sure that:
|
|
You cannot start the Jolt Repository Editor |
If you are running the editor in a browser and downloading the Jolt Repository Editor applet through http, make sure that:
If running the editor in a browser (or appletviewer) and loading the applet from disk, make sure that:
|
|
You cannot display Packages or Services even though you are sure they exist |
|
|
You cannot save changes in the Jolt Repository Editor |
Check permissions on the Repository file. The file must be writable by the user who starts JREPSVR. |
|
You cannot test services |
|
Repository Enhancements for Jolt
The Jolt Repository uses the FML32 buffer type, which increases the internal buffer size beyond 64K bytes.
Additionally, the JREPSVR and the Jolt Server (JSH) support the following XATMI buffer types:

|

|
|
|
|
Copyright © 2000 BEA Systems, Inc. All rights reserved.
|