|
|
This topic describes how to implement RosettaNet solutions for trading partner integration in WebLogic Integration. It contains the following sections:
RosettaNet is a business protocol that enables enterprises to conduct business over the Internet. To learn about RosettaNet, see http://www.rosettanet.org.
This tutorial has the following goals:
This topic describes tasks that you should perform before you begin using this tutorial. It contains the following sections:
To use this tutorial, you must have:
To gain a detailed understanding of how RosettaNet solutions are implemented in WebLogic Integration, consider reading the following material:
To learn more about the RosettaNet business protocol and how to implement RosettaNet solutions, see:
The RosettaNet W3C XSD schemas for selected PIPs are included in the RosettaNet Self-Test Kit (STK) which can be downloaded from the Developer Tools area on the RosettaNet Ready Web site, available at: http://www.rosettanet.org.
If the schema for the PIP you are using is not available on this web site, it is possible to implement RosettaNet solutions in WebLogic integration using RosettaNet message definitions specified as DTD files. However, it is recommended to use W3C XSD files instead, since many of the WebLogic Integration tools such as the XQuery mapping tools (used to define data transformations) only support XSD schemas.
If you want to use the graphical XQuery mapping tools, you need to convert the RosettaNet DTD files to W3C XSD files (using a tool like XML Spy Enterprise Edition) and then import the XSD files into your project. Make sure that you refer to the RosettaNet Message Guidelines for the PIP which DTD file you are converting and add the appropriate validation rules for Service Content Validation to your XSD file after the conversion. For instructions on how to convert the files using XML Spy, see Converting RosettaNet DTD Schemas to XSD Schemas.
In this tutorial, all the XSDs necessary to complete the examples are included in the tutorial files.
The RosettaNet example includes business process definitions (.java), schemas, and other files that illustrate how to implement RosettaNet PIPs using WebLogic Integration 10.2. The example business process files implement common design patterns and provide a head start for building initiator and participant business processes for RosettaNet conversations. Rather than build the business processes from scratch, you can easily adapt the example files to implement any PIP.
This topic contains the following sections:
The PIPs implemented in this tutorial follow RosettaNet Implementation Framework (RNIF) 2.0.
The following table describes the RosettaNet examples that are provided in this tutorial:
|
You can initiate this business process from any other business process in which a RosettaNet notification of failure is required. For example, you can use this business process in conjunction with the RosettaNet Participant Business Process template provided in BEA WorkSpace Studio. For more information, see
Building RosettaNet Participant Business Processes.
|
|
Implements PIP3B2: Notify of Advance Shipment. Described in Step 3: Open the PIP3B2: Notify of Advance Shipment Example.
|
|
Implements PIP3A4: Request Purchase Order. Described in Step 4: Open the PIP3A4: Request Purchase Order Example.
|
The following table describes the folders you see in your Package Explorer pane when you open the in the \tptutorialapps\rosettanet directory:
RosettaNet PIPs follow one of the following design patterns:
|
The PIP3B2 (Notify of Advance Shipment) example, which implements this design pattern, is described in Step 3: Open the PIP3B2: Notify of Advance Shipment Example.
|
|||
|
The PIP3A4 (Request Purchase Order) example, which implements this design pattern, is described in Step 4: Open the PIP3A4: Request Purchase Order Example.
|
|||
Synchronous versions of the above design patterns, in which an immediate response is required. The current release of WebLogic Integration does not support synchronous design patterns.
|
The example PIP implementations provided in this tutorial allow you to quickly and easily build any PIPs that following the same design patterns, as described in Implementing New PIPs Based on the Example PIPs.
For more information about RosettaNet design patterns and conversation choreography, see the following documents:
This section describes the following tutorial steps:
Before you proceed through these steps, make sure that you have reviewed the material in Before You Begin.
The RosettaNet example application contains all the PIP implementations described in PIPs Implemented In These Examples.
To open the RosettaNet example application:
tptutorialapps folder that you created in Step 3: Install the Tutorial Files.rosettanet folder and click OK. | Note: | If you are prompted to select a WebLogic Integration domain and server, select the WebLogic Integration domain that you created in Step 1: Create a New WebLogic Integration Domain (such as c:\bea\user_projects\domains\tptutorial) |
The Package Explorer pane displays the contents of the RosettaNet tutorial application (see Figure 2-2), which is described in Folders in the RosettaNet Tutorial Application.
This topic describes the example implementation of PIP0A1: Notification of Failure. It contains the following sections:
For detailed information about PIP0A1, see http://www.rosettanet.org.
PIP0A1 is an example of how to implement the PIP0A1 Notification of Failure. The PIP0A1Processes folder contains business process definitions for PIP0A1. The PIP0A1Schemas schema project contains the schema file for the PIP0A1 message.
The PIP0A1 demonstrates how to set up business logic, properly process error messages, and then, based on the business logic and error messages, open the correct channel to use when sending notifications of failure to the appropriate failure administrator. In this tutorial, the PIP0A1 Notification of Failure scenarios are:
| Note: | For demonstration purposes, the business processes in the tutorial examples are purposely configured to trigger Notification of Failure. |
The following steps provides a brief overview of the PIP A01 business logic:
PIP0A1.java) receives a Notification of Failure request from either the PIP3A4 Seller or the PIP3B2 Receiver side.PIP0A1ReportAdmin.java). The Failure Notifier process also writes a notification on the WebLogic Server Console to show that it has sent the message.
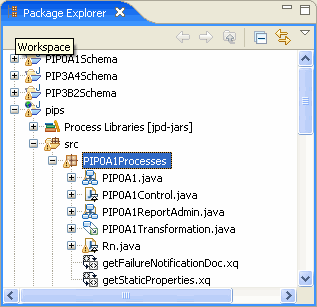
When you open the PIP0A1Processes folder in WorkSpace Studio, the Package Explorer pane displays the contents of the folder (see Figure 2-3).
The following table summarizes the components of the PIP0A1 example:
RosettaNet control definition file used to exchange messages with the failure administrator business process. For more information about the RosettaNet control, see
RosettaNet Control.
|
|
Transformation control definition file which is used to generate XQueries. To learn more about transformation and XQueries, see
Guide to Data Transformation.
|
|
This section describes the example initiator business process (PIP0A1.java). To view this business process:
The success path of the business process is as follows:
RosettaNet Context properties from the incoming message. For more information about RosettaNet Context, see
Interface RosettaNet Control.RosettaNet Context properties to a document based on the PIPA01 Schema.
To view the fields that are being mapped, in the Package Explorer pane, double click on the getFailureNotification.xq file.
| Note: | This step is necessary since the WebLogic Integration transformation output by default does not contain the DOCTYPE property. |
PIP0A1ReportAdmin business process and waits for an acknowledgement that the message was received.
For demonstration purposes, the Send Notification of Failure node also prints a message to the WebLogic Server Console after it has sent the message to the PIP0A1ReportAdmin process.
PIP0A1ReportAdmin business process.The OnTimeout path handle failure management, such as in the event of a network failure. To view the failure path:
This path represents a standard BPM OnTimeout construct. The timeout value is set to two hours (the standard PIP retry interval) and three retries (the standard PIP retry count). Thus, if for any reason the acknowledgement fails to arrive within two hours, the group will be retried and the sendNotification of Failure step will be executed again. The OnTimeout path contains a condition that determines whether retries have been exhausted and, if so, logic could be added to the path which takes the appropriate action.
The participant business process of the PIP0A1 example is named PIPA01ReportAdmin.java. To view the participant business process in WorkSpace Studio, in the Package Explorer pane, double click on PIPA01ReportAdmin.java.

The Report Administrator business process includes the following steps:
The following two examples in this tutorial, both utilize the PIP0A1 notification of failure example. To see how the example works, complete either Running the PIP3B2 Example or Running the PIP3A4 Example.
This topic describes the example implementation of PIP3B2: Notify of Advance Shipment. It contains the following sections:
For detailed information about PIP3B2, see http://www.rosettanet.org.
PIP3B2 is an example of the asynchronous single action activity design pattern described in RosettaNet Design Patterns. The PIP3B2Processes folder contains business process definitions for PIP3B2. The PIP3B2Schemas schema project contains the schema file for the PIP3B2 message. The sampledata directory contains sample XML documents that you can use in section Running the PIP3B2 Example.
The following steps provides a brief overview of the PIP3B2 business logic:
PIP3B2.java) constructs an Notify of Advance Shipment message and sends it to the Receiver (participant process- PIP3B2Participant.java).PIP3B2ParticipantPrivate.java) for further processing.
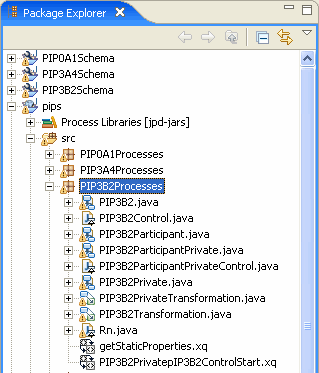
When you open the PIP3B2Processes folder in WorkSpace Studio, the Package Explorer pane displays the contents of the folder (see Figure 2-7).
The following table summarizes the components of the PIP3B2 example:
RosettaNet control definition file which is used to exchange messages with the Receiver via RNIF. For more information about the RosettaNet control, see
RosettaNet Control.
|
|
This section describes the example initiator business process (PIP3B2.java) for PIP3B2. To view this business process:
PIP3B2Processes folder.PIP3B2.java file.The success path is the main path of the business process:
sendMessage method on the RosettaNet control. The Control Receive node named Receipt acknowledgement waits for the receipt acknowledgement callback (rn_onAck method) from the Receiver.Because PIP3B2 implements the single-action activity design pattern, no business action is returned from the Receiver—only a business signal (Receipt Acknowledgment or Exception). The response to the private process merely indicates a successful completion and returns no data.
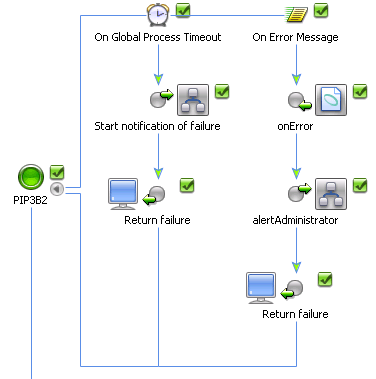
The OnTimeout and On Error Message paths handle failure management, such as in the event of a network failure. To view the failure paths:
This path represents a standard BPM OnTimeout construct. The timeout value is set to two hours (the standard PIP retry interval) and three retries (the standard PIP retry count). Thus, if for any reason the acknowledgement fails to arrive within two hours, the group will be retried and the sendMessage step will be executed again. The OnTimeout path contains a condition that determines whether retries have been exhausted and, if so, the PIP 0A1 (Notification of Failure) subprocess is triggered (via a Control Send node), and the process responds to the private process with an error and finishes.
The Global Process Timeout is configured for the standard PIP timeout value of 24 hours. If the whole process fails to complete within this time, the PIP0A1 (Notification of Failure) subprocess is triggered and an error is returned to the private process.
Finally, the Receiver might reject the message for a variety of reasons (for example, the message fails validation). The message rejection is represented as the onError callback on the RosettaNet control. You can see that the global On Error Message handler is prepared to receive the error at any time and, if it does, it starts a subprocess to notify the administrator of the problem, returns an error to the private process, and exits. Notice that, if we cannot successfully send the message (for example, due to network problems), the business process starts the PIP0A1 (Notification of Failure) to try to notify the remote partner of the problem. Similarly, upon receipt of an error from the Receiver, the business process should notify the local administrator as well as the remote administrator.
To view the participant business process in WorkSpace Studio, open the PIP3B2Participant.java file.

The participant business process includes the following nodes:
The private processes on both sides are place holders for processes which in production environments would interact with backend applications. For example, the shipment notice can be inserted into an ERP application via the Application View control and BEA adapters, sent on a message queue, and written out to file or database.
The public/private process pattern used in this example is not mandatory and is merely a recommended approach. You are free to partition your processes as best suits your environment. It is entirely possible to not use the private processes and implement all the necessary backend integration as well as RosettaNet interactions in a single process. However, separating processes into public (those that only deal with RosettaNet choreography) and private (those that deal with backend system integration) may improve the reuse and maintainability of your application.
In this example, the PIP3B2ParticipantPrivate.java is purposely configured to trigger an error and invoke the PIP0A1 example when you run the process.
By default, WebLogic Integration runs in Test (development) mode, which allows you to run the PIP3B2 example business processes on the same machine (collocated). In a production environment, each trading partner would run its respective business process on its own separate WebLogic Integration server. For more information about the Test and Production modes, see “Configuring the Mode and Message Tracking” in Trading Partner Management.
c:\bea\user_projects\domains\tptutorial), and then click OK. The samples domain integration server is started, and the RequestQuote application is deployed on it. When WebLogic Server is running, the following indicator is visible in the Servers view:
[file location]\rosettanet\pips\WebContent\PIP3B2Processes\sampledata\3B2AdvanceShipmentNotificationMessageBase.xml
Where [file location] is the directory in which you installed the tutorial files as described in Step 3: Install the Tutorial Files.
onMessage.This topic describes the example implementation of the PIP3A4: Request Purchase Order. It contains the following sections:
For detailed information about PIP3A4, see http://www.rosettanet.org.
PIP3A4 is an example of the asynchronous two-action activity design pattern described in RosettaNet Design Patterns. The PIP3A4Processes folder contains business process definitions for PIP3A4. The PIP3A4Schemas schema project contains the schema file for the PIP3A4 message. The sampledata directory contains sample XML documents that you can use when Running the PIP3A4 Example.
The PIP3A4 Request Purchase Order involves the following steps:
When you open the PIP3A4Processes folder in WorkSpace Studio, the Package Explorer pane displays the contents of the folder.

The following table describes the components of the PIP3A4 example implementation.
RosettaNet control definition file used to exchange messages with the Seller via RNIF. For more information about the RosettaNet control, see
RosettaNet Control.
|
|
Public business process that receives the message and sends the receipt acknowledgement, responds with a message and receives acknowledgement. The RosettaNet annotations include the PIP name, version, and role. For more information, see
Annotation Type RosettaNet.
|
|
This section describes the example initiator business process (PIP3A4.java) for PIP3B2. To view this business process:
The success path business logic is as follows:
sendMessage method on the RosettaNet control. The Control Receive node named Receipt acknowledgement waits for the receipt acknowledgement callback (rn_onAck method) from the Receiver.| Note: | WebLogic Integration allows the receipt acknowledgement and business message to be received in either order, in conformance with RosettaNet specifications. If the initiator receives the response message before the receipt acknowledgement, the response message is queued for later processing. |
The OnTimeout and On Error Message paths handle failure management, such as in the event of a network failure. To view the failure paths:
This path represents a standard BPM OnTimeout construct. The timeout value is set to two hours (the standard PIP retry interval) and three retries (the standard PIP retry count). Thus, if for any reason the acknowledgement fails to arrive within two hours, the group will be retried and the sendMessage step will be executed again. The OnTimeout path contains a condition that determines whether retries have been exhausted and, if so, the PIP 0A1 (Notification of Failure) subprocess is triggered (via a Control Send node), and the process responds to the private process with an error and finishes.
The Global Process Timeout is configured for the standard PIP timeout value of 24 hours. If the whole process fails to complete within this time, the PIP0A1 (Notification of Failure) subprocess is triggered and an error is returned to the private process.
Finally, the Receiver might reject the message for a variety of reasons (for example, the message fails validation). The message rejection is represented as the onError callback on the RosettaNet control. You can see that the global On Error Message handler is prepared to receive the error at any time and, if it does, it starts a subprocess to notify the administrator of the problem, returns an error to the private process, and exits. Notice that, if we cannot successfully send the message (for example, due to network problems), the business process starts the PIP0A1 (Notification of Failure) to try to notify the remote partner of the problem. Similarly, upon receipt of an error from the Receiver, the business process should notify the local administrator as well as the remote administrator.
The participant business process (PIP3A4Participant.java) on the Seller side is less complex than the initiator business process. To view the participant business process in WorkSpace Studio, open the PIP3A4Participant.java file.

The participant business process includes the following steps:
RosettaNet Context properties from the incoming message. These properties are needed only in case of errors. These properties can be saved for later use and contains the information that is needed to construct the PIP0A1 Notification of Failure. For example: from / to / message id / etc.sendReply callback method, while the Receive receipt acknowledgement Client Request node waits for the receipt acknowledgement.Unlike the 3B2 participant business process, which merely receives the message, the 3A4 participant business process sends out a response, so it is necessary to account for failure scenarios, such as network failures or validation failure. Open the onTimeout path on the Retry Block to display the time-outs and retries. Note that this path is similar to the onTimeout path in the 3B2 initiator business process described in Walkthrough of the Shipper Business Process. In addition, there is a global onMessage handler that handles errors returned by the Buyer.
As in the 3B2 example, the private processes on both sides are merely place holders for backend business logic. The participant private process actually echoes the received message. You would typically customize these processes to tie them with the backend applications. For example, the shipment notice can be inserted into an ERP application via the Application View control and BEA adapters, sent on a message queue, written out to file or database.
The public/private process pattern used in this example is not mandatory and is merely a recommended approach. You are free to partition your processes as best suits your environment. It is entirely possible to not use the private processes and implement all the necessary backend integration as well as RosettaNet interactions in a single process. However, separating processes into public (those that only deal with RosettaNet choreography) and private (those that deal with backend system integration) may improve the reuse and maintainability of your application.
fc.java file so that it can find the correct sample data file:fc.java file.directory-name attribute to:
[file location]\tptutorialapps\rosettanet\PIP3A4Processes
Where [file location] is the directory in which you installed the tutorial files as described in Step 3: Install the Tutorial Files.
PIP3A4Participant.java, click Run As, and click Run On Server.c:\bea\user_projects\domains\tptutorial), and then click OK. The samples domain integration server is started, and the RequestQuote application is deployed on it. When WebLogic Server is running, the following indicator is visible in the Servers view:
[file location]\rosettanet\pips\WebContent\PIP3A4Processes\sampledata\3A4PurchaseOrderRequestMessageBase_0010.xml
Where [file location] is the directory in which you installed the tutorial files as described in Step 3: Install the Tutorial Files.
onMessage.In a few moments, the end-to-end choreography will execute. The client response will echo back the XML message.
In a few moments, you should see the following messages on the console:
This topic describes implementing new PIP based on the example PIPs in this tutorial. It contains the following topics:
You can implement a new PIP based on an existing PIP implementation with a similar design pattern. For example, PIP 3A2: Request Price and Availability, is an example of a message send with response design pattern. Therefore, the business process choreography is identical to that of PIP3A4. The main differences are that the request and response message schemas are different and the annotations must be changed. You can duplicate and rename the 3A4 processes and change the schema type of the messages to easily create a PIP 3A2. implementation. For detailed information about PIP3A4, see http://www.rosettanet.org.
To implement a new PIP based on an existing PIP implementation, complete the following tasks:
pip and pip-version, to-role, and from-role attributes (and others if needed) in the
Interface RosettaNetControl.pip-name, pip-role and pip-version attributes (and others if needed) in the
Annotation Type RosettaNet.The RosettaNet W3C XSD schemas for selected PIPs are included in the RosettaNet Self-Test Kit (STK) which can be downloaded from the Developer Tools area on the RosettaNet Ready Web site, available at: http://www.rosettanet.org.
If the schema for the PIP you are using is not available on this web site, it is possible to implement RosettaNet solutions in WebLogic integration using RosettaNet message definitions specified as DTD files. However, it is recommended to use W3C XSD files instead, since many of the WebLogic Integration tools such as the XQuery mapping tools (used to define data transformations) only support XSD schemas.
If you want to use the graphical XQuery mapping tools, you need to convert the RosettaNet DTD files to W3C XSD files (using a tool like XML Spy Enterprise Edition) and then import the XSD files into your project. Make sure that you refer to the RosettaNet Message Guidelines for the PIP which DTD file you are converting and add the appropriate validation rules for Service Content Validation to your XSD file after the conversion.
When converting the files, consider the following issues:
xml:lang name. To fix the problem, replace the following text:<xs:extension base="xs:string">
<xs:attribute name="xml:lang" type="xs:string"/>
</xs:extension>
<xs:extension base="xs:string">
<xs:attribute ref="xml:lang"/>
</xs:extension>
and add the following import statement:
<xs:import namespace="http://www.w3.org/XML/1998/namespace"
 schemaLocation="http://www.w3.org/2001/xml.xsd"/>
Save the schema file, and then drag and drop it into a WorkSpace Studio schema project.
<xs:element name="ActionIdentity" ref="ActionIdentity"/>
This creates problems in WorkSpace Studio. To fix the file, open it in WorkSpace Studio, press Ctrl+H, make sure that wildcard pattern matching is enabled, and then replacing all occurrences of:
<xs:element ref="ActionIdentity"/>
In some cases, two different schemas will contain identical element definitions, which results in schema compilation problems. The name collisions can be avoided by using explicit targetNamespace. For example for the 3A4 Purchase Order Request W3C Schema in this tutorial we use: <xs:schema id="Pip3A4PurchaseOrderRequest" targetNamespace="Pip3A4PurchaseOrderRequest" xmlns="Pip3A4PurchaseOrderRequest">
After you build the schema projects, the PIP types will become available in the type system for use in parameter and variable types.


|