Managing WebLogic Integration Solutions
Worklist Administration
This section provides the information you need to use the Worklist Administration module of the WebLogic Integration Administration Console to:
- View summary or detailed task status in order to monitor the progress of task completion against due dates.
- Perform queries to show individual workload.
- Reassign tasks in order to speed progress.
- Change task properties, such as state or due date.
- Control task routing by creating or changing substitute routing rules.
Note: You must be logged in as a member of the Administrators, IntegrationAdministrators, or IntegrationOperators group to make changes to task properties. See Default Groups, Roles, and Security Policies.
The following topics are provided:
Overview of the Worklist Administration Module
The following table lists the pages you can access from the Worklist Administration module. The tasks and topics associated with each are provided:
|
Page
|
Associated Tasks
|
Topics
|
|
Worklist Task Summary
|
View a list of task instances. Task ID, name, description, state (assigned, claimed, started, completed, aborted, or suspended), complete due date, assignees, claimant, owner, and priority are displayed.
|
Listing and Locating Worklist Tasks
|
|
Filter the list by task name. Use * to match zero or more characters.
|
|
Access the Worklist Task Details page for a selected task instance.
|
|
Select task instances for update. Task state, comment, owner, and due dates can be updated.
|
Updating Task Comment, Owner, or Due Dates from the Summary Page
|
|
Update State for Selected Tasks
|
Update the state for one or more task instances.
|
Updating Task State or Deleting Tasks
|
|
Update Comment for Selected Tasks
|
Update the comment for one or more task instances.
|
Updating Task Comment, Owner, or Due Dates from the Summary Page
|
|
Update Complete Due Date for Selected Tasks
|
Update the due date for task completion for one or more task instances.
|
|
Update Claim Due Date for Selected Tasks
|
Update the claim due date for one or more task instances.
|
|
Update Owner for Selected Tasks
|
Update the owner for one or more task instances.
|
|
Custom Query
|
Construct a custom query using properties such as task ID, parent process URI, description, or due dates.
|
Constructing a Custom Query for Task Instances
|
|
Worklist Task Details
|
View task instance properties.
|
Viewing and Changing Task Details
|
|
Update the state of the task, or delete the task.
|
Updating Task State or Deleting Tasks
|
|
Edit Worklist Task Details
|
Edit task instance details.
|
Viewing and Changing Task Details
|
|
Work Substitute Routing Table
|
View the list of substitute routing rules. Rule name, effective date, expiration date, source, and target are displayed.
|
Listing and Locating Substitute Routing Rules
|
|
Filter the list by rule name. Use ? to match any single character or * to match zero or more characters.
|
|
Add a New Substitute Rule
|
Define the name, effective date, expiration date, source, and target for a new substitute routing rule.
|
Adding a Substitute Routing Rule
|
|
Edit Substitute Rule
|
Change the effective date, expiration date, source, or target for an existing substitute routing rule.
|
Changing a Substitute Routing Rule
|
Listing and Locating Worklist Tasks
The Worklist Task Summary page displays the following information for each task instance. For a more detailed description of the properties, see Viewing and Changing Task Details.

|
Property
|
Description
|
|
Task ID
|
Unique task instance ID. This is a link to the Worklist Task Detail page. See Viewing and Changing Task Details.
|
|
Task Name
|
Name assigned to the task.
|
|
Description
|
Description of the task.
|
|
State
|
Current state of the task (assigned, claimed, started, completed, suspended, or aborted).
|
|
Complete Due Date
|
Due date for task completion
|
|
Assignees
|
One or more users or groups to which the task is assigned.
|
|
Claimant
|
If the task is claimed, the user that claimed the task.
|
|
Owner
|
The owner of the task. A user or group.
|
|
Priority
|
The priority assigned to the task.
|
To list and locate tasks:
- Select the Worklist Administration module from the home page.
- To locate a specific task, do one of the following:
- Filter by task name. Enter the search target (use
* to match zero or more characters.), then click Search. The tasks matching the search criteria are displayed.
- Resort the list. Ascending
 and descending
  arrow buttons indicate sortable columns. Click the button to change the sort order.
- Scroll through the pages. Use the controls in the lower left corner. Go to a page by selecting the page number or by using the arrow buttons to go to the next
 , previous
  , first
  , or last
  page.
page.
- Select Custom Query from the Go menu and construct a custom query. See Constructing a Custom Query for Task Instances.
Listing and Locating Substitute Routing Rules
The Work Substitute Routing Table page displays the following for each routing rule:
- Name
Unique identifier for the rule.
- Effective date
The date the rule takes effect. If null, the rule takes effect immediately.
- Expiration date
The date the rule expires. If null, the rule remains in effect indefinitely.
- Source
The user or group that will be unavailable.
- Target
The substitute user or group. (Only a group can substitute for a group; only a user can substitute for a user.)
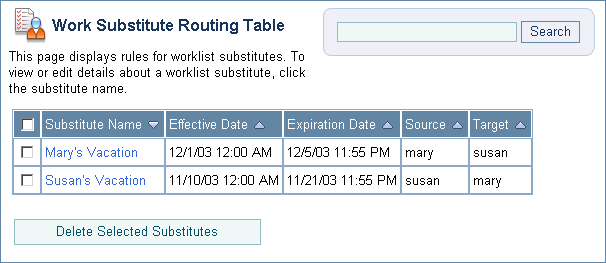
To list and locate substitute routing rules:
- Select the Worklist Administration module from the home page.
- From the left panel, select Substitute Routing Table.
- To locate a specific substitute routing rule, do one of the following:
- Filter by name. Enter the search target (use
? to match any single character or * to match zero or more characters.), then click Search. The rules matching the search criteria are displayed.
- Resort the list. Ascending
 and descending
  arrow buttons indicate sortable columns. Click the button to change the sort order.
- Scroll through the pages. Use the controls in the lower left corner. Go to a page by selecting the page number or by using the arrow buttons to go to the next
 , previous
  , first
  , or last
  page.
page.
Constructing a Custom Query for Task Instances
The Custom Query page allows you to construct a complex task instance search.
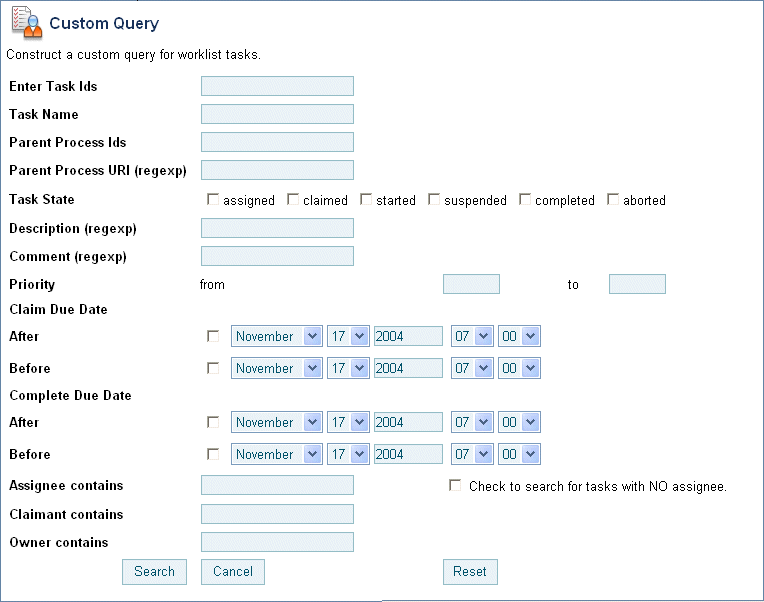
The following table summarizes the available search criteria:
|
Setting
|
Description
|
|
In the Enter Task IDs field, enter one or more task IDs (comma separated list).
|
Specify one or more task IDs. Do not use wildcards. The search returns task instances matching any of the task IDs specified.
|
|
In the Task Name field, enter the task name.
|
Specify the task name. Use * to match zero or more characters. The search returns tasks that match the target name that also match any other criteria specified.
|
|
In the Parent Process IDs field, enter one or more task IDs (comma separated list).
|
Specify one or more parent process IDs. Do not use wildcards. The search returns task instances associated with any of the parent process instances specified.
|
|
In the Parent Process URI field, enter the URI for the parent process. Regular expressions can be used.
|
Specify the a single parent process URI or a regular expression. The search returns tasks associated with matching process instances that also match any other criteria specified.
|
|
Using the Task State check boxes, select one or more states.
|
Specify one or more of the following states: assigned, claimed, started, suspended, completed, aborted. The search returns tasks in the specified states that also match any other criteria specified.
|
|
In the Description field, enter a regular expression.
|
Specify a regular expression to match the target description. The search returns tasks with matching descriptions that also match the other criteria specified.
|
|
In the Comment field, enter a regular expression.
|
Specify a regular expression to match the target comment. The search returns tasks with matching comments that also match the other criteria specified.
|
|
In the Priority from and to fields specify the low and high ends of the range.
|
Specify the priority range. The search returns tasks with an assigned priority that falls within the range (inclusive) that also match any other criteria specified.
|
|
Under Claim Due Date, do one or both of the following:
|
The search returns tasks with a claim due date later than the After date (if specified) and earlier than the Before date (if specified), that also match any other criteria specified.
|
|
Under Complete Due Date, do one or both of the following:
|
The search returns tasks with a complete due date later than the After date (if specified) and earlier than the Before date (if specified), that also match any other criteria specified.
|
|
In the Assignee contains field, enter one or more users or groups in a comma separated list.
|
Specify one or more users or groups. Do not use wildcards.The search returns tasks with an assignee that matches any of the users or groups, that also match any other criteria specified.
|
|
If needed, select the Check to search for tasks with NO assignee field.
|
searching for tasks that are not assigned.
|
|
In the Claimant contains field, enter one or more users in a comma separated list.
|
Specify one or more users. The search returns tasks with a claimant that matches any of the users, that also match any other criteria specified.
|
|
In the Owner contains field, enter one or more users or groups in a comma separated list.
|
Specify one or more users or groups. Do not use wildcards.The search returns tasks with an owner that matches any of the users or groups, that also match any other criteria specified.
|
To execute a custom query:
- Select the Worklist Administration module from the home page.
- From the Go menu, select Custom Query.
- Enter the search criteria. See the preceding table for settings.
The a message indicating the search is complete is displayed.
You are returned to the Worklist Task Summary page. The tasks matching the criteria (if any are found) are displayed.
Viewing and Changing Task Details
The Worklist Task Details page allows you to view task properties. If the task is in the assigned, claimed, or started state, you can link to the Edit Worklist Task Details page to update the task.
Note: If an authenticator that implements the required MBeans is not configured, the options for updating the owner, or assigning or claiming the task are disabled. To learn more about the authenticator requirements, see Security Provider Requirements for User Management.
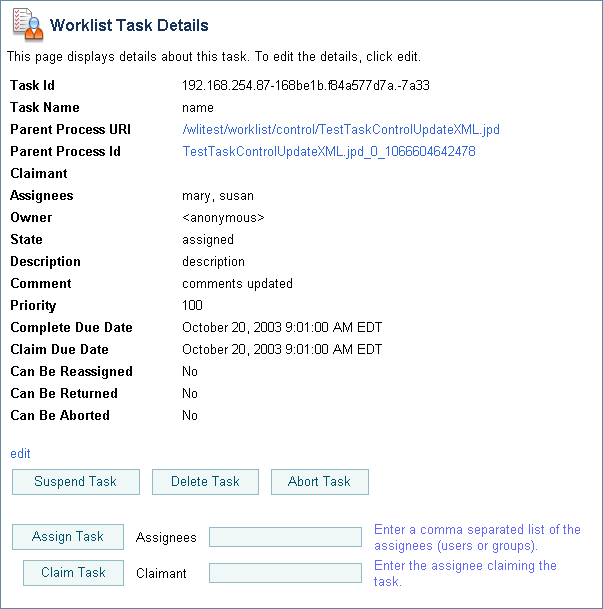
The following table summarizes the properties displayed:
|
Property
|
Description
|
Administrator Can Set (Yes/No)
|
|
Task ID
|
Unique task instance ID.
|
No
|
|
Task Name
|
Name assigned to the task.
|
No
|
|
Parent Process URI
|
URI for the parent process. This is a link to the Process Type Details page for the process.
|
No
|
|
Parent Process ID
|
Instance ID for the parent process. This is a link to the Process Instance Details page for the process instance.
|
No
|
|
Claimant
|
If the task has been claimed, the user that claimed the task. Claiming a task indicates a user's intent to complete the task. If the task has not yet been claimed, this field is empty.
|
Yes
|
|
Assignees
|
Comma separated list that designates who should perform the task. A task can be assigned to one or more users or groups. Once assigned, the task can be claimed by:
|
Yes
|
|
Owner
|
User or group that owns the task. This is typically the stakeholder interested in getting the task completed. Use of the owner is application specific, but notification of task status (for example, task complete or overdue) is often sent to the owner.
|
Yes
|
|
State
|
State of the task.
|
Yes
|
|
Assigned
|
The assignees have be designated, but the task has not yet been claimed.
|
|
Claimed
|
A user has claimed the task, thus indicating an intent to complete the task.
|
|
Started
|
The claimant has started working on the task.
|
|
Completed
|
The claimant has completed the task.
|
|
Suspended
|
The task is "on hold." An assigned, claimed, or started task can be placed in the suspended state.
|
|
Aborted
|
The task has been cancelled. An aborted task can be assigned or deleted.
|
|
Description
|
Description of the task.
|
No
|
|
Comment
|
Comment associated with the task.
|
Yes
|
|
Priority
|
Priority assigned to the task.
|
Yes
|
|
Complete Due Date
|
The date by which the task should be completed.
|
Yes
|
|
Claim Due Date
|
The date by which the task should be claimed.
|
Yes
|
|
Can Be Reassigned
|
Indicates whether or not the task can be reassigned.
|
Yes
|
|
Can Be Returned
|
Indicates whether or not the task can be returned.
|
Yes
|
|
Can Be Aborted
|
Indicates whether or not the task can be aborted.
|
Yes
|
To view task properties:
- Click the task ID to display the Worklist Task Details page.
You can update the state of a task (for example, update assignees, claim an assigned task, or mark a task as complete) from the Worklist Task Details page as described in Updating Task State or Deleting Tasks. If the task is not suspended, aborted, or completed, you can link to the Edit Worklist Task Details page to change other task properties as described in the following procedure.
To change task properties:
- On the Worklist Task Details page, click the Edit link.
Note: The Edit link is only displayed if the task state is assigned, claimed, or started. If the task is completed, suspended, or aborted, the Edit option is not available.
The Edit Worklist Task Details page is displayed.
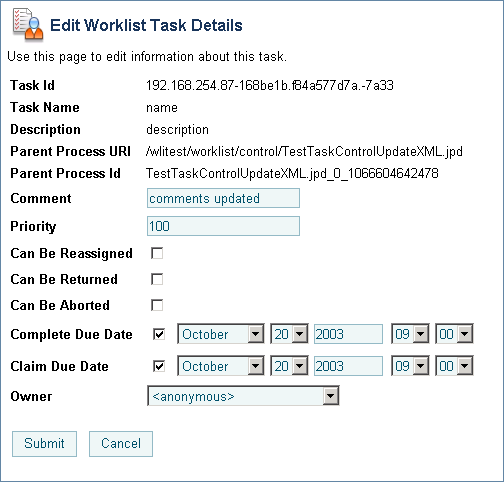
- Do one or more of the following as required:
- In the Comment field, enter a new comment, or revise the existing comment.
- In the Priority field, enter a new priority, or update an existing priority.
- Check or uncheck Can be reassigned, Can be returned, or Can be aborted check boxes as required.
- Check or uncheck the Claim Due Date check box. If you have checked Claim Due Date, specify the Month, Date, Year (using
YYYY format), Hour, and Minute.
- Check or uncheck the Complete Due Date check box. If you have checked Complete Due Date, specify the Month, Date, Year (using
YYYY format), Hour, and Minute.
- From the Owner drop-down, select the owner (user or group).
- Click Submit to save changes and return to the Worklist Task Details page.
Updating Task State or Deleting Tasks
Depending on the current state of a task instance, you can assign, claim, return, start, stop, complete, suspend, abort, or delete the task. The following tables describes each available action. To learn more about task states and operations, see Creating and Managing Worklist Tasks in Using the Worklist.
Note: If an authenticator that implements the required MBeans is not configured, the options for updating tasks assigmees or claimant are disabled. To learn more about the authenticator requirements, see Security Provider Requirements for User Management.
|
Action
|
Description
|
|
Assign
|
Designates who should perform the task. and updates the task to the assigned state. Tasks can be assigned to one or more users or groups. Once assigned, the task can be claimed by:
|
|
Claim
|
Claims the task on behalf of the specified user and updates the task to the claimed state. Claiming a task indicates an intent to complete the task.
|
|
Return
|
Reassigns a claimed task to the original assignees. The task returns to the assigned state.
|
|
Start
|
Updates a claimed task to the started state.
|
|
Stop
|
Returns a started task to the claimed state.
|
|
Complete
|
Updates a started task to the completed state.
|
|
Suspend
|
Updates the task to the suspended state, indicating that the task is "on hold."
|
|
Abort
|
Updates the task to the aborted state.
|
|
Delete
|
Deletes the task from the system.
|
The following tables summarizes the available actions by task state:
|
Task State
|
Available Actions
|
|
Assigned
|
Assign, Claim, Suspend, Abort, or Delete
|
|
Claimed
|
Start, Return, Suspend, Abort, or Delete
|
|
Started
|
Complete, Suspend, Return, Stop, Abort, or Delete
|
|
Completed
|
Assign or Delete
|
|
Suspended
|
Resume or Delete
|
|
Aborted
|
Assign or Delete
|
You can update the state of a task in the following contexts:
- Worklist Task Detail page
- Worklist Task Summary page
To update the state from the Worklist Task Details page:
- Click the task ID to display the Worklist Task Details page.
Note: The buttons displayed depend on the current state of the task.
- To start, stop, complete, suspend, abort, or delete the task, click Start Task, Stop Task, Complete Task, Suspend Task, Abort Task, or Delete Task as required.
- To claim the task on behalf of a user, enter the user name in the Claimant field, then click Claim Task.
- To assign a task, enter the assignees (comma separated list that can include users or groups) in the Assignees field, then click Assign Task.
- To return a task, click Return Task. The task is returned to the original assignees.
The task state is updated to reflect the action.
To update the state from the Worklist Task Summary page:
- Click the check box to the left of each task to be updated.
- Select Update State from the drop-down list, then click Run Command.
The Update State for Selected Tasks page is displayed.
Note: The buttons displayed depend on the current state of the selected tasks.
- To start, stop, complete, suspend, abort, or delete the task, click Start Task, Stop Task, Complete Task, Suspend Task, Abort Task, or Delete Task as required.
- To claim the task on behalf of a user, enter the user name in the Claimant field, then click Claim Task.
- To assign a task, enter the assignees (comma separated list that can include users or groups) in the Assignees field, then click Assign Task.
- To return a task, click Return Task. The task is returned to the original assignees.
The selected tasks are updated to reflect the action.
Updating Task Comment, Owner, or Due Dates from the Summary Page
You can update the comment, owner, complete due date, or claim due date for one or more tasks from the Worklist Task Summary page.
To update the comment for one or more tasks:
- Click the check box to the left of each task to be updated.
Note: Only select assigned, claimed, or started task instances. You cannot update the comment for a suspended, completed, or aborted instance.
- Select Update Comment from the drop-down list, then click Run Command.
The Update Comment for Selected Tasks page is displayed.
- In the Enter updated comment field, enter the comment.
- Click Submit to apply the comment to the selected tasks.
To update the complete due date for one or more tasks:
- Click the check box to the left of each task to be updated.
Note: Only select assigned, claimed, or started task instances. You cannot update the complete due date for a suspended, completed, or aborted instance.
- Select Update Complete Due Date from the drop-down list, then click Run Command.
The Update Complete Due Date for Selected Tasks page is displayed.
- To clear the date, uncheck the Complete Due Date check box.
- To specify the date, check the Complete Due Date check box, then specify the Month, Date, Year (using
YYYY format), Hour, and Minute.
- Click Submit to apply the new complete due date to the selected tasks.
To update the Claim Due Date for one or more tasks:
- Click the check box to the left of each task to be updated.
Note: Only select assigned, claimed, or started task instances. You cannot update the claim due date for a suspended, completed, or aborted instance.
- Select Update Claim Due Date from the drop-down list, then click Run Command.
The Update Claim Due Date for Selected Tasks page is displayed.
- To clear the date, uncheck the Claim Due Date check box.
- To specify the date, check the Claim Due Date check box, then specify the Month, Date, Year (using
YYYY format), Hour, and Minute.
- Click Submit to apply the new claim due date to the selected tasks.
To update the Owner for one or more tasks:
- Click the check box to the left of each task to be updated.
Note: Only select assigned, claimed, or started task instances. You cannot update the owner for a suspended, completed, or aborted instance.
- Select Update Owner from the drop-down list, then click Run Command.
The Update Owner for Selected Tasks page is displayed.
- From the Select new owner drop-down, select the owner (user or group).
- Click Submit to apply the new claim due date to the selected tasks.
Adding a Substitute Routing Rule
The Add a New Substitute Rule page allows you to create a substitute routing rule.
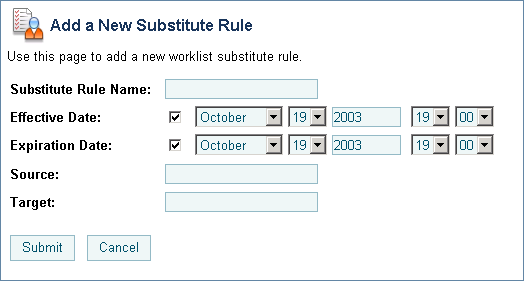
These rules dynamically re-route tasks or task status notifications to a substitute user or group. Each rule consists of the following:
- Name
Unique identifier for the rule.
- Effective date
The date the rule takes effect. If no date is specified, the rule takes effect immediately.
- Expiration date
The date the rule expires. If no date is specified, the rule remains in effect indefinitely.
- Source
The user or group that will be unavailable.
- Target
The substitute user or group. (Only a group can substitute for a group; only a user can substitute for a user.)
To add a substitute routing rule:
- From the home page, select the Worklist Administration module.
- From the left panel, select Substitute Routing Table.
- From the left panel, select Create New to display the Add a New Substitute Rule page.
- Check or uncheck the Effective Date check box. If you check Effective Date, specify the Month, Date, Year (using
YYYY format), Hour, and Minute. If you do not check the Effective Date check box, the rule takes effect immediately.
- Check or uncheck the Expiration Date check box. If you check Expiration Date, specify the Month, Date, Year (using
YYYY format), Hour, and Minute. If you do not check the Expiration Date check box, the rule remains in effect indefinitely.
- In the Source field, enter the user or group that will be unavailable.
- In the Target field, enter the substitute user or group.
- To create the rule, click Submit.
The Work Substitute Routing Table page is displayed. The new rule is included in the list.
Note: If there is an error, the Add a New Substitute Rule page is redisplayed. A message indicating the problem is displayed above the input requiring correction.
- To disregard changes and return to the Work Substitute Routing Table page, click Cancel.
Changing a Substitute Routing Rule
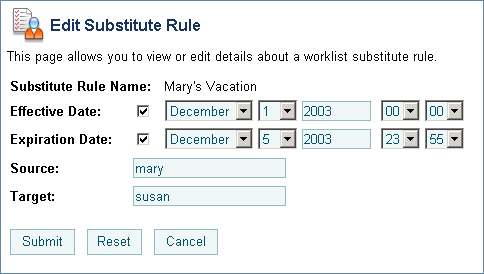
The Edit Substitute Rule page allows you to change the properties of a substitute routing rule.
To change a substitute routing rule:
- Click the name to display the Edit Substitute Rule page.
- Do one or more of the following as required:
- Check or uncheck the Effective Date check box. If you check Effective Date, specify the Month, Date, Year (using
YYYY format), Hour, and Minute. If you do not check the Effective Date check box, the rule takes effect immediately.
- Check or uncheck the Expiration Date check box. If you check Expiration Date, specify the Month, Date, Year (using
YYYY format), Hour, and Minute. If you do not check the Expiration Date check box, the rule remains in effect indefinitely.
- In the Source field, select a new user or group.
- In the Target field, select a new user or group.
- To update the rule, click Submit.
The Work Substitute Routing Table page is displayed. The updated rule is included in the list.
Note: If there is an error, the Edit Substitute Rule page is redisplayed. A message indicating the problem is displayed above the input requiring correction.
- To disregard changes and return to the Work Substitute Routing Table page, click Cancel.
- To reset to the last saved values, click Reset.
Deleting a Substitute Routing Rule
You can delete substitute routing rules from the Work Substitute Routing Table page.
To delete substitute routing rules:
- Click the check box to the left of each substitute to be deleted.
- Click Delete Selected Substitutes.