Managing WebLogic Integration Solutions
XML Cache
This section provides the information you need to use the XML Cache module of the WebLogic Integration Administration Console to:
- Add new entries to the XML Cache.
- Modify existing XML Cache entries.
- Delete existing XML Cache entries.
- View the code for existing cache entries.
Note: You must be logged in as a member of the Administrators, IntegrationAdministrators, or IntegrationOperators group to add, view, or modify XML Cache entries. See Default Groups, Roles, and Security Policies.
The following topics are provided:
About the XML Cache
The XML Cache stores XML metadata documents. When you are designing a business process, you use the XML MetaData Cache Control to retrieve the XML documents stored in the XML Cache. You use the XML Cache module to create and maintain the XML metadata documents stored in the XML Cache.
Different applications that reside on different server-nodes can share the XML Cache.
Overview of the XML Cache Module
The following table lists the pages you can access from the XML Cache module. The tasks and topics associated with each are provided:
Adding XML Documents to the XML Cache
The XML Cache module allows you to add XML documents to the XML Cache.
To add an XML document to the XML Cache:
- From the home page, select the XML Cache module.
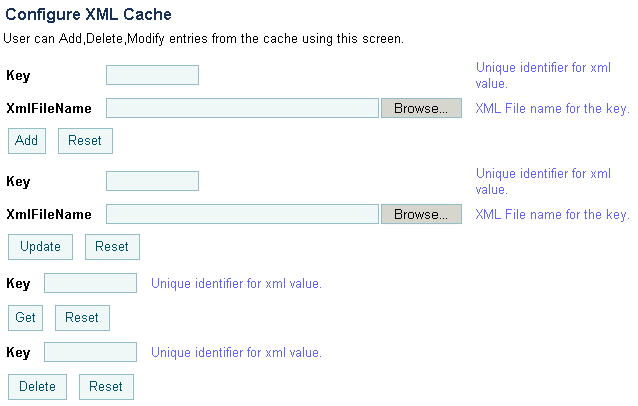
The Configure XML Cache page is displayed.

- In the first Key field, enter a key for the XML document you want to add to the XML Cache. When you are entering the key, remember that entries in the Key field are case insensitive and cannot be more than 256 characters long.
The key is a logical name that uniquely identifies the XML document in the XML Cache. Do not use MBCS characters in the key name.
Note: Leading and trailing spaces are trimmed for entries in the Key field.
- Enter a filename for the document in the XmlFileName field or click Browse and select an existing file.
The XML document is added to the XML Cache.
Updating an XML Document in the XML Cache
You can update an existing XML document from the Configure XML Cache page.
To update an existing XML document:
- From the home page, select the XML Cache module.
The Configure XML Cache page is displayed.

- In the second Key field, enter the key for the XML document you want update. When you are entering the key, remember that entries in the Key field are case insensitive and cannot be more than 256 characters long.
The key is a logical name that uniquely identifies the XML document in the XML Cache.
- Enter a new filename for the document in the XmlFileName field or click Browse and select an existing file.
The XML document is updated in the XML Cache.
Viewing the Code for an XML Document
You can view the code for any XML document stored in the XML Cache.
To view the code:
- From the home page, select the XML Cache module.
The Configure XML Cache page is displayed.

- In the third Key field, enter the key for the XML document you want view. When you are entering the key, remember that entries in the Key field are case insensitive and cannot be more than 256 characters long.
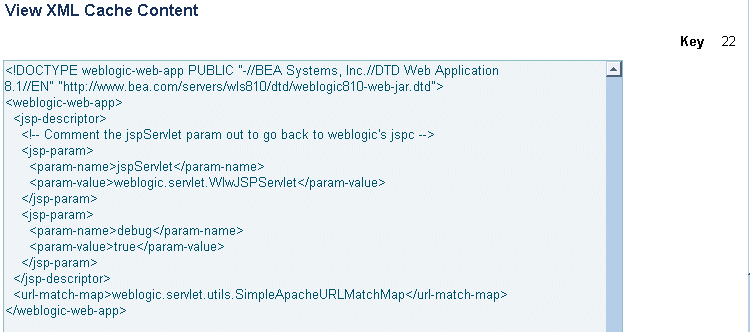
The code for the specified XML document is displayed in the View XML Cache Content page.

- Click Configure XML Cache at the bottom of the page to return to the Configure XML Cache page.
Deleting an XML Document from the XML Cache
You can delete any XML document from the XML Cache whenever you want.
To delete an XML document:
- From the home page, select the XML Cache module.
The Configure XML Cache page is displayed.

- In the last Key field, enter the key for the XML document you want delete. When you are entering the key, remember that entries in the Key field are case insensitive and cannot be more than 256 characters long.
The XML document associated with the key you specified is deleted from the XML Cache.
Viewing All XML Documents in the XML Cache
You can view all of the entries for the XML Cache from the XML Cache module.
To view all the entries in the XML Cache:
- From the home page, select the XML Cache module.
The Configure XML Cache page is displayed.

- Click View All in the left panel.
The View XML MetaData Keys page is displayed.

- To view the individual details of a particular key, click the key name.
The content for the selected key is displayed on the View XML Cache Content page.