Tutorial: Building a Worklist Application
Step 4. Create Task and Assign to User
This step describes how to design a common pattern in worklist business processes—one that creates a task, assigns the task to a user, and specifies a date by which the completion of the task is due. You design this integration of your business process with a user using a Worklist control, specifically the Task control.
This section provides two methods for creating a task and assigning the task to a user:
Note: BEA recommends that you create a new business process (JPD) for each alternative.
Create Task and Assign to User Alternative 1
This alternative is the preferred method. It is more intuitive than Alternative 2 and compacts four operations into one.
This section includes the following tasks:
Create a Task Control
A Task control creates and manages an instance of a Task. To create the Task control that manages the task of approving the resolution of a bug in our SoftCo enterprise, complete the following:
- If the business process is not displayed in the Design View, in the Application panel, double-click ResolutionApproval.jpd.
- On the Data Palette, in the Controls tab, click Add—>Integration Controls—>Task. The Insert Control - Task dialog box is displayed.
Note: If the Controls tab is not visible in WebLogic Workshop, click View—>Windows—>Data Palette from the menu bar.
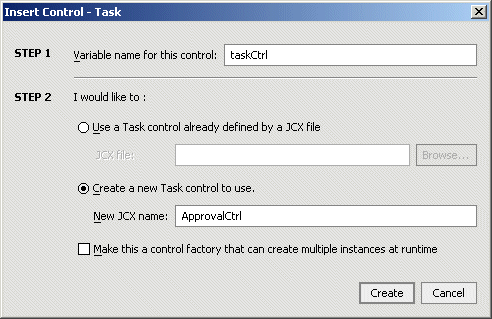
- In Step 1, enter
taskCtrl as the name for the instance of this control.
- In Step 2, select Create a new Task control to use. Then, in the New JCX name field, enter
ApprovalCtrl.
- Click Create. A new Task control and an instance of it are created and the Insert Control dialog box is closed.
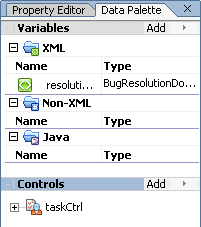
A new JCX file, named ApprovalCtrl.jcx, is created and displayed on the Application tab. The instance of the control is displayed on the Controls tab of the Data Palette.
Set the Default Values for the Task Control
A Task control lets you specify some of the control's default values whenever a task is created. These values can be overridden by the arguments in the creation method.
- On the Data Palette, click taskCtrl.
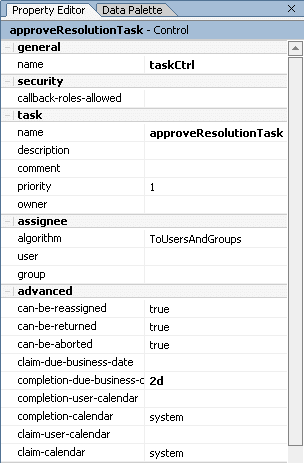
The Property Editor displays a list of properties for the Worklist control. Notice that some values are already set. These values can be modified.
- In the Property Editor locate the task group, then click the name property and enter
approveResolutionTask.
- In the advanced group, click the completion-due-business-date property, then click
 . The Property Text Editor is displayed.
- In the Property Text Editor, enter
2d, then click OK.
Note: If you do not specify a valid business date, the syntactic analyzer catches the error when looking at the control declaration and displays it in the Source View of the JPD.
The default control values are now defined for creating a task, as shown in the following figure:
Define the Assignee and the Request Message
Define the assignee and request message using a single XML operation and the XML Mapper, as follows:
- Click the Data Palette tab.
- If the available methods on the approveResolutionTask control are not visible, click the + beside taskCtrl to expand the list.
- Select the
String createTask(TaskCreationXMLDocument arg0) method, then drag and drop it onto the business process, placing it on the process immediately after the Receive Resolution node.
- Rename the business process to better represent its function:
- Click createTask to rename it, then enter
createAndAssignTask as the name of the node, then press Enter on your keyboard.
- Double-click the createAndAssignTask node. The node builder opens with the General Settings tab displayed with the Control instance and target method already selected.
- Open the Send Data tab. By default, the Send Data tab opens with the Variable Assignment pane displayed.
- In Step 1, click Select Variable, then click resolutionXML (BugResolutionDocument).
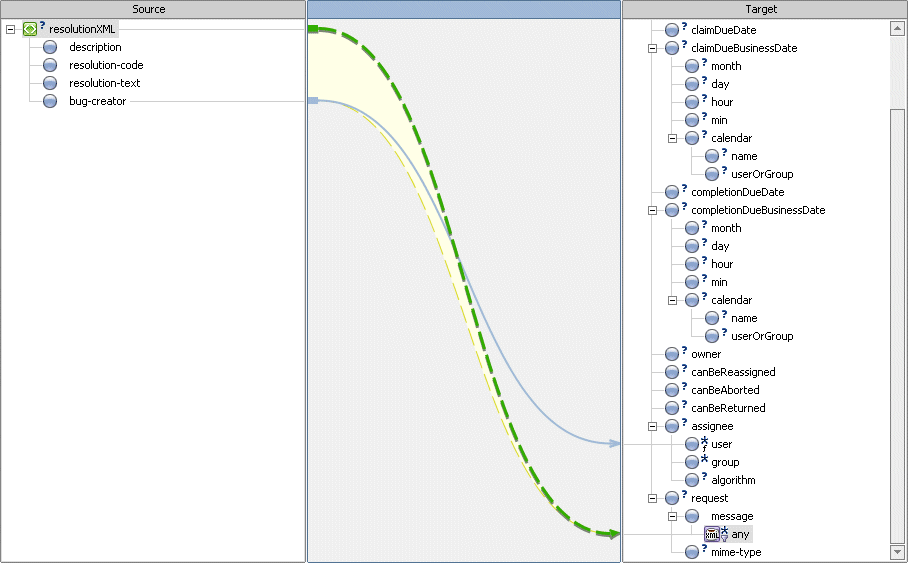
- In Step 2, click Create Transformation. The Transformation tool opens, which displays a representation of the BugResolution XML document in the Source pane, and a String in the Target pane.
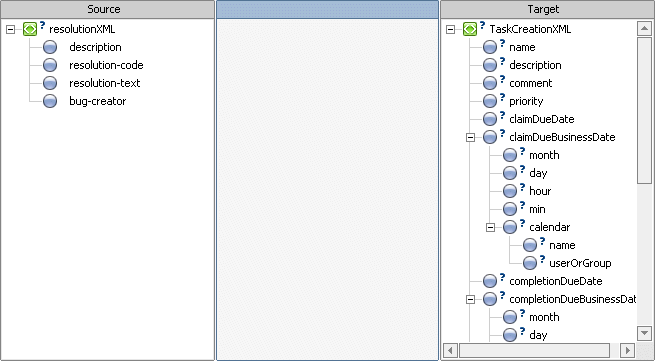
This figure shows the XML mapper. The left column shows the schema of the XML that is expected by the create method. You use the center column to create the map. The right column shows the schema of the XML that is received. All the elements in this schema are optional. The only thing we need to be sure of when creating a task is that it has a name. You do not need to worry about setting a name in this tutorial because you have already set the default name value for this control: taskCtrl.
- In the Source pane, click bug-creator, then drag your mouse pointer over to assignee-user in the Target pane. A line is drawn between the bug-creator and the assignee-user elements in the map pane.
- In the Source pane, click resolutionXML and drag your mouse pointer over to request-message-any in the Target pane. Lines are drawn between the resolutionXML and bug-creator elements and the request-message-any element on the map pane.
Specify the Algorithm to Assign the Task
By default, the algorithm AssignToUsersAndGroups is used. However, in this tutorial we want the task to be assigned to a specific user and to be claimed by this user.
To Specify Which Algorithm is Used to Assign the Task
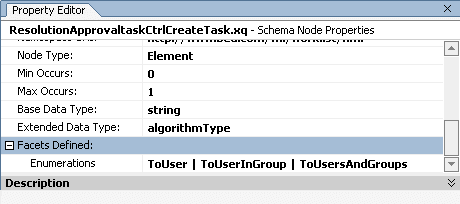
- In the Target pane of the XML Mapper, right-click the assignee-algorithm element, then select Create Constant from the menu.
- In the Create Constant dialog box, enter
ToUser, and then click OK. The assignee-algorithm node changes to show that it's a constant:  .
.
Note: In the Property Editor, click the + beside the Facets Defined property. The Facets Defined property shows the list of accepted values. If you do not see this property in the Target pane, click the assignee-algorithm element.
- In the Application pane, double-click ResolutionApproval.jpd to return to the node builder.
Note: If the node builder is not displayed in Design View, click the Design View tab.
- Open the Receive Data tab.
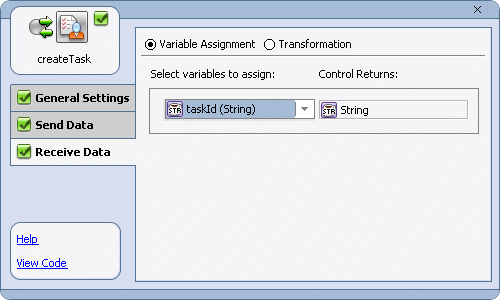
- By default, the Receive Data tab opens on the Variable Assignment pane. The Control Returns field is populated with
String, which is the data type expected to be returned by the createTask() method.
- Under Select variables to assign, click the arrow in the drop-down list and select Create new variable.
The Create Variable dialog box is displayed with the Java radio button selected and java.lang.String entered in the Variable type filed. You do not need to set a default value.
- In the Create Variable dialog box, in the Variable Name field, enter
taskId.
- Click OK. Your new variable (of type String) is created and displayed in the Receive Data tab. All tabs in the node builder should be marked complete.
- To close the createAndAssignTask node builder, click the X in the top right-hand corner.
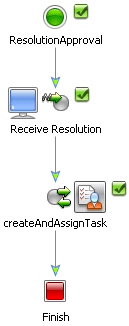
The Resolution Approval business process should now resemble the following figure:
- Select File—>Save All to save your work.
This completes the design of a business process that creates a task, assigns the task to a user, and specifies a date by which the completion of the task is due using a Worklist control. This step also assigned the task of approving the resolution of a bug to the user who created the bug.
This method is more intuitive than the Create Task and Assign to User Alternative 2 as it compacts four operations into one. However, it is worthwhile to examine the Create Task and Assign to User Alternative 2 to deepen your understanding of the Worklist and utilize its functionality more fully.
Create Task and Assign to User Alternative 2
This alternative shows you a less efficient way to design a business process. When compared to Alternative 1, it can help avoid common pitfalls and more effectively use the features of Worklist.
This section includes the following tasks:
Create a New Business Process
BEA recommends that you create a new business process (JPD) for each alternative.
- From the WebLogic Workshop menu, click File—>New—>Process File. The New File dialog box is displayed.
- In the File name field enter a name, such as
ResolutionApproval2.jpd.
Your business process is created and displayed in the Application panel and in the Design View.
Note: If the Application panel is not visible in WebLogic Workshop, choose View—>Application from the menu bar.
Create a Task Control
A Task control creates and manages an instance of a Task. To create the Task control that manages the task of approving the resolution of a bug in our SoftCo enterprise, complete the following:
- If the business process is not displayed in the Design View tab, in the Application panel, double-click ResolutionApproval2.jpd.
- On the Data Palette, in the Controls tab, click Add—>Integration Controls—>Task. The Insert Control - Task dialog box is displayed.
Note: If the Controls tab is not visible in WebLogic Workshop, click View—>Windows—>Data Palette from the menu bar.

- In Step 1, enter
taskCtrl as the name for the instance of this control.
- In Step 2, select Create a new Task control to use. Then, in the New JCX name field, enter
ApprovalCtrl2.
- Click Create. A new Task control and an instance of it are created and the Insert Control dialog box is closed.
A new JCX file, named ApprovalCtrl2.jcx, is created and displayed on the Application tab. The instance of the control is displayed on the Controls tab of the Data Palette. On the Data Palette, expand the control instance by clicking the + beside its name to display the base methods provided for this control.
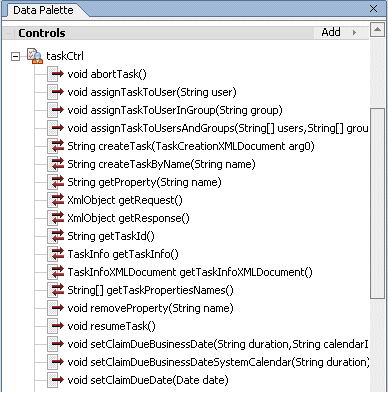
Note: For a complete list of the base methods on Task controls, see Using Worklist Controls in Using the Worklist.
Create the Approve Resolution Task
In this step, you design the interaction of the business process with the Task control in Design View by simply dragging and dropping the Task control methods from the Data Palette onto the point in your business process at which you want to create the appropriate logic. In this tutorial, you create one node in the process that creates the task and another node that sends the data about the task to the Task control. To do so, complete the steps in the following sections:
To Create the Approve Resolution Task
- If necessary, expand the list of available methods by clicking the + beside the taskCtrl control on the Data Palette.
- Select the following method:
String createTaskByName(String name). Then drag and drop it onto the business process in the Design View, placing it on the process immediately after the Receive Resolution node.
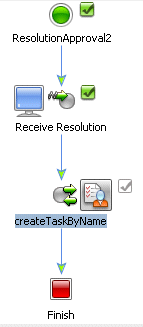
A Control Send with Return node is created that represents the synchronous call to your taskCtrl control. The node is named according to the name of the method you dragged onto the business process. In this case: createTaskByName.
Note: This interaction is designed to be synchronous, meaning that the business process blocks waiting for a response from the control. In the case of the createTaskByName method, the response is a String that contains the Task ID. A unique Task ID is assigned to each task created using an instance of the Task control.
- Double-click the createTaskByName node. The node builder opens with the General Settings tab displayed. The Control instance and target methods are already selected: taskCtrl and String createTaskByName(String name), respectively.
By default, the Send Data tab opens with the Variable Assignment pane displayed. The Control Expects field is populated with String name, which is the data type expected by the createTaskByName() method exposed by the taskCtrl control.
- Under Select variables to assign, click the arrow in the drop-down list and select Create new variable... The Create Variable dialog box is displayed with Java selected as the variable type.
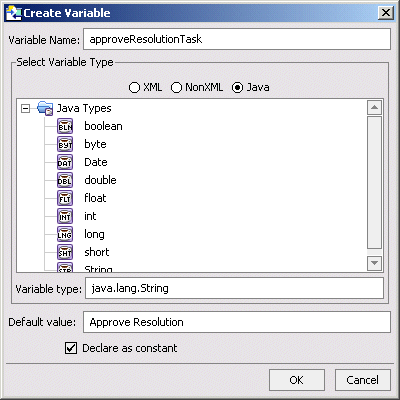
- In the Create Variable dialog box, complete the following steps:
- In the Variable Name field, enter
approveResolutionTask.
- The Variable type field should contain
java.lang.String.
- In the Default Value field, enter
Approve Resolution. In this way, you specify the name of the task.
- Select Declare as constant.
- Click OK. Your new variable (of type String) is created and displayed in the Send Data tab. Note that the approveResolutionTask variable is also listed as a Java variable in the Data Palette.
- Open the Receive Data tab.
By default, the Receive Data tab opens on the Variable Assignment pane. The Control Returns field is populated with String, which is the data type expected to be returned by the createTaskByName() method.
- Under Select variables to assign, click the arrow in the drop-down list and select Create new variable... The Create Variable dialog box is displayed with Java selected as the variable type.
- In the Create Variable dialog box, complete the following steps:
- In the Variable Name field, enter
taskId.
- Click OK. Your new variable (of type String) is created and displayed in the Receive Data tab.
The node builder should be marked complete  .
.
- To close the assignTaskByName node builder, click the X in the top right-hand corner.
To Send Information About the Task to the Task Control
In this tutorial, you designed the business process to be invoked when it receives a Bug Resolution document from a client. The data contained in the Bug Resolution document can be used by the Task control when tasks, due dates, and so on are being assigned. In this step, you create a node in the business process to send the Bug Resolution document data to the Task control. To do so, complete the following steps:
- If necessary, expand the list of available methods on the Data Palette by clicking the + beside the taskCtrl control.
- Select the following method:
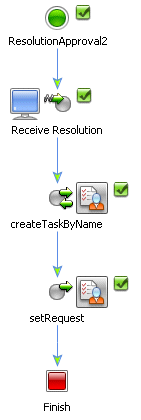
void setRequest(XmlObject xml). Then in the Design View drag and drop it onto the business process, placing it on the business process immediately after the createtaskByName node. A new node (setRequest) is created.
- Double-click the setRequest node.
- Open the Send Data tab. Its node builder opens with the Variable Assignment panel selected by default.
- Under Select variables to assign, click the arrow and select resolutionXML (bug-resolution).
- To close the node builder, click the X in the top right-hand corner.
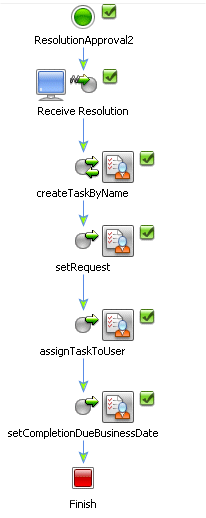
The Resolution Approval business process should now resemble the following figure:
Assign the Task to a User
In this step you assign the approveResolution task you created in the preceding step to a user in the SoftCo enterprise. You do so in the same way as you created the task—that is, in Design View, you drag and drop a Task control method from the Data Palette onto the point in your business process at which you want to design the interaction.
- On the Data Palette, from the taskCtrl, select the following method:
void assignTaskToUser(String user). Then in the Design View, drag and drop it onto the business process, placing it on the process immediately after the setRequest node.
- Double-click the assignTaskToUser node, then open the Send Data tab to specify a variable from which you can get the user name to assign. The Send Data tab has two modes:
- Variable Assignment—Use this mode when you want to directly assign a variable that holds the data expected by the method.
- Transformation—Use this mode when you want to create a transformation between the data assigned to a variable and that expected by the method parameter.
For this part of the tutorial, you must switch to the Transformation mode because the data type required as input to the taskCtrl control is a Java String type and the variable in which the Bug Resolution message is stored is of type XML, that is, the BugResolutionDocument. Note that the Bug Resolution message includes the names of the users to which a bug can be assigned and the BugResolutionDocument is valid against the BugResolution.xsd schema.
WebLogic Integration provides a data mapping tool to map between heterogeneous data types. The data transformations you create using the tool are stored in Data Transformation Format (DTF) files.
- Click Transformation to open the pane that allows you to define a transformation between your variable and the expected data type of the parameter on the control method.
- In Step 1, click Select Variable to display the variables in your project. Then choose
resolutionXML (BugResolutionDocument), which is the variable you created for the Receive Resolution node at the start of your business process.
- In Step 2, click Create Transformation. The Transformation tool opens, which displays a representation of the BugResolution XML document in the Source pane, and a String in the Target pane.
- Click bug-creator in the Source pane and drag your mouse pointer over to String in the Target Schema pane. A line is drawn between the bug-creator and String elements in the map pane. It represents the transformation between the two data types.

- In the Application panel, double-click ResolutionApproval2.jpd to return to the assignTaskToUser node builder.
Note: Creating the transformation in the preceding steps creates a Transformation control in your project: A DTF file, named ResolutionApproval2Transformation.dtf is created. An XQ file, which contains the query (written in the XQuery language) for the transformation method is also created. Both the DTF and XQ files are displayed in the Application tab. Also, an instance of the Transformation control is created and is represented as transformations in the Controls tab on the Data Palette.
- To close the assignTaskToUser node builder, click the X in the top right-hand corner.
This step completes the design of the assignTaskToUser node. Through this node, you specified that the person who created the bug (the bug-creator) is assigned the task of resolving the bug.

Note: This method sets the Assignees List to a specific Integration User: the user named in the bug-creator element of the XML document who starts the business process. Because this user is the only one on the Assignees List, this operation automatically causes the task to be claimed for the specified user.
Specify a Due Date for Completion of the Task
In the preceding step, you designed your business process to specify that the person who created the bug (the bug-creator) is assigned the task of resolving the bug. In this step, you specify the due date for the task. In other words, you specify the date that the user assigned to the task must complete the task.
To specify a due date, you create a node on your business process by dragging a method from the taskCtrl in the Data Palette onto the business process in the same way as you created nodes in the preceding two steps.
- In the Data Palette, from the taskCtrl, select the following method:
void setCompletionDueBusinessDate(String duration String calendarID)
Then in Design View, drag and drop it onto the business process, placing it on the process immediately after the assignTaskToUser node.
- Double-click the setCompletionDueBusinessDate node, then open the Send Data tab. In the Variable Assignment pane, you can specify the variables from which your process gets the due date and the calendar name to pass to the task.
- In the Variable Assignment pane, under Select variables to assign, in the field associated with the String duration parameter under Control Expects, click the arrow in the drop-down list and select Create new variable...
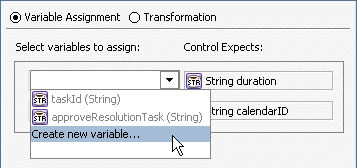
The Create Variable dialog box is displayed with Java selected as the variable type.
- In the Create Variable dialog box, complete the following steps:
- In the Variable Name field, enter
dueDate.
- In the Default Value field, enter
2 d (two days). In this way, you specify the duration of business time—the time the task is due to be completed.
- Select Declare as constant.
- Click OK. Your new variable (of type
String) is created and displayed in the Send Data tab.
- Under Select variables to assign, in the field associated with the String calendarID parameter under Control Expects, click the arrow in the drop-down list and select Create new variable... The Create Variable dialog box is displayed with Java selected as the variable type.
- In the Create Variable dialog box, complete the following steps:
- In the Variable Name field, enter
calendarName.
- In the Default Value field, enter
SoftwareTeamCalendar.
In this way, you specify which calendar the business process bases its calculation on. In this case, the 2 d duration specified for the dueDate.
- Select Declare as constant.
- Click OK. Your new variable (of type String) is created and displayed on the Send Data tab.
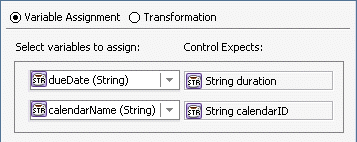
- To close the setCompletionDueBusinessDate node builder, click the X in the top right-hand corner.
The Resolution Approval business process should now resemble the following figure:
- Select File—>Save All to save your work.
This completes the design of a business process that creates a task, assigns the task to a user, and specifies a date by which the completion of the task is due using a Worklist control. This step also assigned the task of approving the resolution of a bug to the user who created the bug.
To design your business process to handle the other possible events for the resolution of the bug, proceed to Step 5. Receive Resolution Approval From the Task Owner.
Create Task and Assign to User Alternative 3
In this section, you learn how to build your own Task control and customized to your needs.
This section includes the following tasks:
Create a New Business Process
BEA recommends that you create a new business process (JPD) for each alternative.
- From the WebLogic Workshop menu, click File—>New—>Process File. The New File dialog box is displayed.
- In the File name field enter a name, such as
ResolutionApproval3.jpd.
Your business process is created and displayed in the Application panel and in Design View.
Note: If the Application panel is not visible in WebLogic Workshop, choose View—>Application from the menu bar.
Create a Task Control
A Task control creates and manages an instance of a Task. To create the Task control that manages the task of approving the resolution of a bug in our SoftCo enterprise, complete the following steps:
- If the business process is not displayed in Design View tab, in the Application panel, double-click ResolutionApproval3.jpd.
- On the Data Palette, in the Controls tab, click Add—>Integration Controls—>Task. The Insert Control - Task dialog box is displayed.
Note: If the Controls tab is not visible in WebLogic Workshop, click View—>Windows—>Data Palette from the menu bar.
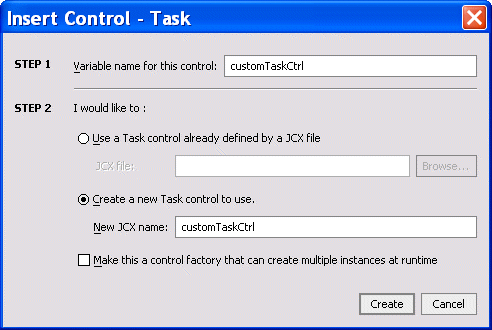
- In Step 1, enter
customTaskCtrl as the name for the instance of this control.
- In Step 2, select Create a new Task control to use. Then, in the New JCX name field, enter
CustomTaskCtrl.
- Click Create. A new Task control and an instance of it are created and the Insert Control dialog box is closed.
A new JCX file, named CustomTaskCtrl.jcx, is created and displayed on the Application tab. The instance of the control is displayed on the Controls tab of the Data Palette.
Customize the Task Control
In the following steps, you customize the Task control that you created.
- On the Data Palette, right-click customTaskControl, and then select Edit.
The Design View displays all the default methods defined for this control. In this part of the tutorial, you do not need all of these methods. In the steps that follow, you will remove the unnecessary methods.
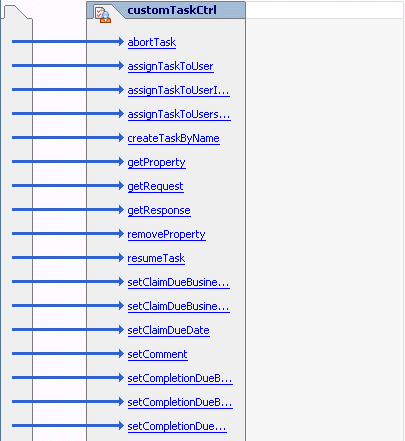
- Click the Source View tab. The control's source code is displayed.
- Remove all the methods defined in the
CustomTaskCtrl interface except for the Callback interface. Your interface should look like the following:
/**
 * @jc:task
 */
public interface CustomTaskCtrl extends TaskControl,
    com.bea.control.ControlExtension
{
    public interface Callback extends TaskControl.Callback {
        /**
         * @jc:task-event event-type="complete" response="{response}"
         */
         void onTaskCompleted(XmlObject response);

         /**
          * @jc:task-event event-type="abort" response="{response}"
          */
          void onTaskAborted(XmlObject response);

         /**
          * @jc:task-event event-type="expire" time="{time}"
          */
          void onTaskOverdue(Date time);
    }
}
Note: Some methods are not customizable. If you click the Design View tab and look at the control instance, you will see that most of the methods have disappeared.
- Copy the following code and replace the interface code in Source View.
public interface CustomTaskCtrl extends TaskControl,
    com.bea.control.ControlExtension
{
    public void createAndAssignTask(XmlObject requestXml, String username);
public interface Callback extends TaskControl.Callback {
        /**
         * @jc:task-event event-type="complete" response="{response}"
         */
         void onTaskCompleted(XmlObject response);

        /**
         * @jc:task-event event-type="abort" response="{response}"
         */
         void onTaskAborted(XmlObject response);

        /**
         * @jc:task-event event-type="expire" time="{time}"
         */
         void onTaskOverdue(Date time);
    }
}
Note: The overloading of methods definition is not supported. When creating your own methods be careful not to use one of the default task control method names.
There are only two dynamic arguments, request and assignee, to specify at run time. In the following steps, you will define the behavior of the method and application of its arguments.
- If not selected, in the Source View, click the method name (
createAndAssignTask), and then, in the Property Editor, find task-create.
- If necessary, expand the task-create property by clicking the + beside its name. The list of attributes displays all the arguments that can be supported when creating a task.
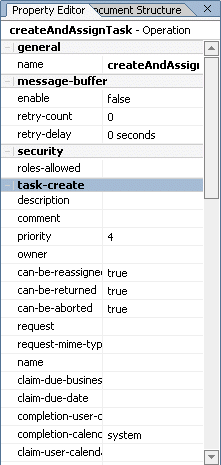
- Specify the task name and due date:
- In the task-create property, click the Name attribute
- In the task-create property field, enter
Approve Resolution.
- Press Enter. The source code shows the following:
/**
 * @jc:task-create name="Approve Resolution"
 */
public void createAndAssignTask(XmlObject requestXml, String username);
This method now creates a task with the name Approve Resolution.
- Specify the completion due date:
- In the Property Editor, inside the task-create property, click the completion-due-business-date attribute.
- In the completion-due-business-date attribute, click
 . The Property Text Editor is displayed.
- Enter
2d, then click OK. The source code shows the following:
/**
 * @jc:task-create completion-due-business-date="2d" name="Approve Resolution"
 */
public void createAndAssignTask(XmlObject request, String username);
- Map the methods arguments to the task properties. This requires the use of curly brackets: {}.
- If necessary, click the method name (
createAndAssignTask) in the Source View.
- Inside the task-create property, click the request attribute, then click
 . The Property Text Editor is displayed.
- In the Property Text Editor, enter
{requestXml}, then click OK.
This specifies that the value passed by the requestXml argument is used to set the task request. To see the list of supported request types, see "Altering Method Signature—Request and Response" in Advanced Topics in Using the Worklist.
- Specify the assignee, as follows:
- Click the method name (
createAndAssignTask) in the Source View.
- If necessary, expand the task-assign property by clicking the + beside its name.
- Inside the task-assign property, click the user attribute, then click
 . The Property Text Editor is displayed.
- In the Property Text Editor, enter
{username}, then click OK.
- Inside the task-assign property, click the algorithm attribute, then click the arrow in the drop-down list and select ToUser. The source code shows the following:
/**
 * @jc:task-create request="{requestXml}" completion-due-business-date="2d" name="Approve Resolution"
 * @jc:task-assign algorithm="ToUser" user="{username}"
 */
public void createAndAssignTask(XmlObject requestXml, String username);
This method now creates a task with a name Approve Resolution with a due date two business days after the task is created. The task request is passed by the requestXml argument and the user the task is assigned to is specified by the username argument.
- In the source code, modify the method signature to return the
taskId, by replacing void with String so it looks like the following:
public String createAndAssignTask(XmlObject requestXml, String username);
The method will now return the taskId.
- Build the application by pressing F7. This ensures that changes are incorporated in the JPD.
Modify the Business Process
In this section, you add a node to the Resolution Approval business process.
- Click the Design View tab.
- If the business process is not visible, in the Application panel, double-click the ResolutionApproval.jpd.
- On the Data Palette, expand the customTaskCtrl by clicking the + beside its name, then select String createAndAssignTask(XMObject, String username). Drag and drop this method on to the business process in Design View, placing it on the process immediately after the Receive Resolution node.
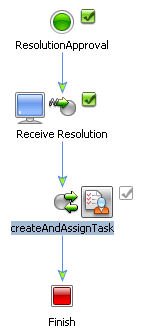
In the following steps, you will use the Transformation mode because the data types required as input to the customTaskCtrl control are an XML type and a Java String type. Additionally, the variable in which the Bug Resolution message is stored is of type XML (BugResolutionDocument). Note that the Bug Resolution message includes the names of the users to which a bug can be assigned and the BugResolutionDocument is valid against the BugResolution.xsd schema.
Note: WebLogic Integration provides a data mapping tool to map between heterogeneous data types. The data transformations you create using the tool are stored in Data Transformation Format (DTF) files.
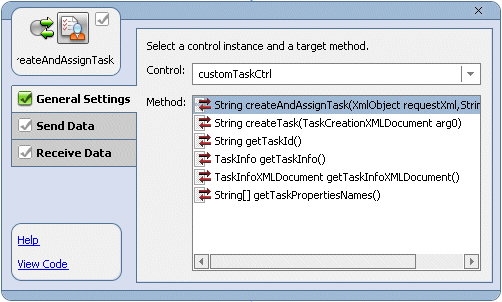
- In Design View, double-click the createAndAssignTask node to invoke the node builder. By default, the node builder opens with the General Settings tab selected, as shown in the following figure:
- Click Transformation to open the pane that allows you to define a transformation between your variable and the expected data type of the parameter on the control method.
- In Step 1, click Select Variable to display the variables in your project. Then choose resolutionXML (BugResolutionDocument), which is the variable you created for the Receive Resolution node at the start of your business process.
- In Step 2, click Create Transformation to open the Transformation tool, which displays a representation of the BugResolution XML document in the Source pane, and a String in the Target pane.
- Click bug-creator in the Source pane and drag your mouse pointer over to username in the Target pane. A line is drawn between the bug-creator and username elements in the map pane.
- Click resolutionXML in the Source pane and drag your mouse pointer over to XmlObject in the Target pane. Lines are drawn between the resolutionXML and bug-creator elements and the XmlObject element in the map pane.

- In the Application panel, double-click ResolutionApproval.jpd to return to the assignTaskToUser node builder.
- Open the Receive Data tab.
By default, the Receive Data tab opens on the Variable Assignment pane. The Control Returns field is populated with String, which is the data type expected to be returned by the createAndAssignTask() method.
- Under Select variables to assign, click the arrow in the drop-down list, and select Create new variable. The Create Variable dialog box is displayed with Java selected as the variable type.
- In the Create Variable dialog box, complete the following steps:
- In the Variable Name field, enter
taskId.
- Click OK. Your new variable (of type String) is created and displayed in the Receive Data tab.
All tabs in the node builder should be marked complete  .
.
- Click the X in the top right-hand corner of the node builder. The node builder closes.
This completes the creation and customization of the tutorial's Task control. In this section, you discovered the power of extending the Task control. If you want to learn more about customization, see Advanced Topics in Using the Worklist or look at the default Task control that is generated when you create a new control. All the methods it contains are defined using control properties and can be modified. The callback methods can also be customized.
To design your business process to handle the other possible events for the resolution of the bug, proceed to Step 5. Receive Resolution Approval From the Task Owner.