Using the WebLogic
Integration
Administration Console
Message Broker
The Message Broker module allows you to:
View a list of channels, with the number of subscribers and processed messages for each.
View channel properties and set channel security policies.
View the subscribers to a channel and quickly access a list of the subscriber process instances.
View channel summary statistics (number of active channels, subscribed channels, and dead letter count).
Reset the message counter.
Note:
You must be logged in as a member of the Administrators or IntegrationAdministrators group to modify channel security policies. See About WebLogic Integration Users, Groups, Roles, and Security Policies in User Management in the Worklist Console Online Help.
A Message Broker channel has similar properties to a Java Message Service (JMS) topic, but is optimized for use with WebLogic Integration processes, controls, and event generators. Within a WebLogic Integration application:
Message Broker Publish controls are used by process or Web service instances to publish messages to a Message Broker channel.
Event generators that receive outside events route them as messages to a Message Broker channel.
Subscription start nodes start processes upon receipt of a message from a Message Broker channel. This constitutes a static subscription to the channel.
Message Broker Subscription controls are used by process or Web service instances to receive messages from a Message Broker channel. This constitutes a dynamic subscription to the channel.
Publishers to a Message Broker channel can pass message metadata with the message. This metadata can be received by the subscriber as a parameter.
Channel files define the channels available in a deployed application. To restrict the messages routed to static or dynamic subscribers, XQuery filters can be applied against message metadata (if the metadata is typed XML) or message body (if the body is string or typed XML). All subscribers registered to receive a message on a channel receive the message, subject to any filters they have set up. To learn more about defining channels, publishing or subscribing to channels, and creating subscription filters, see the following sections of Building Integration Applications in the WebLogic Workshop help:
Publishing and Subscribing to Channels
Note About Static and Dynamic Subscriptions" in
@com.bea.wli.control.broker.MessageBroker.StaticSubscription
Overview of the Message Broker Module
The following table lists the pages you can access from the Message Broker module. The tasks and help topics associated with each are provided.
Table 4-1 Elements of Message Broker Module
Page
Associated Tasks
Help Topics
Channel Summary List
View a list of channels. Channel name, message type, message count, subscriber count, and dead letter count are displayed.
Filter the list by channel name. Use ? to match any single character or * to match zero or more characters.
View Channel Details
View channel properties. Channel name, message type (xml, rawData, string, or none), number of subscribers, message count, dead letter count, security policies (publish roles, subscribe roles, and `dispatch as' principal) and subscription rules are displayed. You can access the process details for a subscriber from this page.
Reset the counts (published messages and dead letter).
Listing and Locating Channels
The Channel Summary List displays the channel name, type (xml, rawData, string, or none), number of subscribers, message count, and dead letter count for each channel.
From the home page, select the Message Broker module to display the Channel Summary List.
To locate a specific channel, do one of the following:
Filter by name. Enter the search target (use ? to match any single character or * to match zero or more characters.), then click Search. The channels matching the search criteria are displayed.
Note:
If the Search field is empty, all entries are returned.
Resort the list. Ascending and descending arrow buttons indicate sortable columns. Click the arrow to change the sort order.
Scroll through the pages. Use the controls in the lower left corner. Go to a page by selecting the page number or by using the arrow buttons to go to the next , previous , first , or last page.
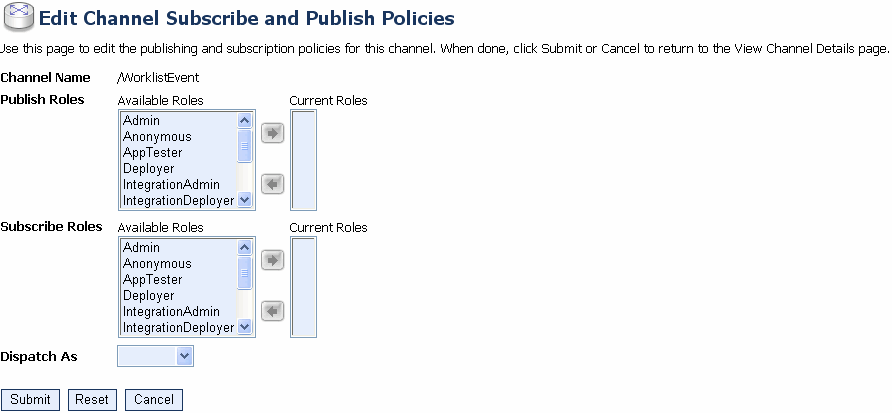
The Edit Channel Subscribe and Publish Policies page allows you to set the following channel properties:
Publish Roles The roles authorized to publish to the channel.
Subscribe Roles The roles authorized to subscribe to the channel.
Dispatch As The user under which messages are dispatched to subscribers.
Note:
If an authenticator that implements the required MBeans is not configured, the options for configuring the channel security policies are disabled. To learn more about the authenticator requirements, see
Security Provider Requirements for User Management
Figure 4-2 Edit Channel Subscribe and Publish Policies
Note:
If the publish and subscribe roles are not defined, everyone is authorized. If the dispatch as user is not defined, messages are dispatched as anonymous.
Click the channel name to display the View Channel Details page.
Click Edit Security Details.
Add or remove Publish Roles or Subscribe Roles as follows:
To add roles:
a. From the Available Roles list, select the required roles. (To select multiple roles, press and hold the Ctrl key as you click each additional role.)
b. Click the icon to move the selected roles to the Current Roles list.
To remove roles:
a. From the Current Roles list, select the required roles. (To select multiple roles, press and hold the Ctrl key as you click each additional role.)
b. Click the icon to move the selected roles to the Available Roles list.
From the Dispatch As drop-down list, select a valid user name.
Note:
If no user is specified, messages are dispatched as anonymous.
Do one of the following:
To update the policies, click Submit.
The View Channel Details page is displayed.
To restore original settings, click Reset.
To disregard changes and return to the View Channel Details page, click Cancel.
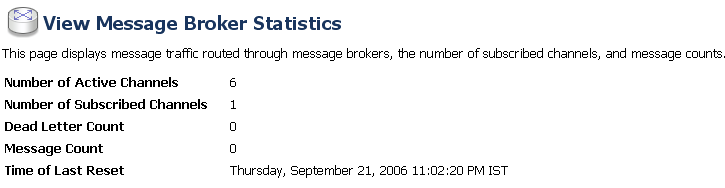
Viewing Global Message Counts
The View Message Broker Statistics page displays the following:
Figure 4-3 Message Broker Statistics Page
Table 4-3 Elements of Message Broker Statistics page
Statistic
Description
Number of Active Channels
Number of channels available.
Number of Subscribed Channels
Number of channels that have one or more subscribers.
Dead Letter Count
When the Message Broker is unable to determine the URI to send a message to (that is, no subscribers are found), the message is sent to appropriate deadletter channel: /deadletter/xml, /deadletter/string, or /deadletter/rawData. The Dead Letter Count reflects the number of messages sent to the dead letter channels since the count was last reset.
Message Count
Messages published since the count was last reset.
Time of last reset
Time the message count was last reset.
From the home page, select the Message Broker module.
From the left panel, select View Statistics to display the View Message Broker Statistics page.


 and descending
  arrow buttons indicate sortable columns. Click the arrow to change the sort order.
 , previous
  , first
  , or last
  page.
page.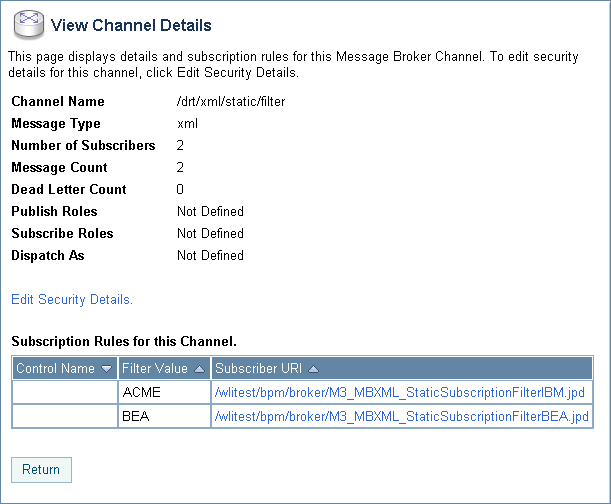
 icon to move the selected roles to the Current Roles list.
 icon to move the selected roles to the Available Roles list.