Using the WebLogic
Integration
Administration Console
System Configuration
The System Configuration module allows you to:
View or set the purge schedule.
Start or stop the purge process.
Enable or disable the transmission of data to an offline datastore.
View or set the JNDI name for the datastore used to store data offline.
View or set the default tracking level and reporting data policy for processes.
Create, view, or change password aliases.
Configure the JMS connection factory, repository root, and debug level for application integration.
Note:
You must be logged in as a member of the Administrators or IntegrationAdministrators group to make any changes to the system configuration. See About WebLogic Integration Users, Groups, Roles, and Security Policies in User Management in the Worklist Console Online Help.
The following sections provide background information related to system administration:
Process Tracking Data
Reporting and Purging Policies for Tracking Data
Password Aliases and the Password Store
Process Tracking Data
Each process instance generates events that contain information about process execution such as information about the node that is executing, timings, and associated data.
The following types of events can be tracked:
Global events Events such as start process, end process, suspend, and resume.
Node transitions Events generated by each node (a start node event and an end or abort node event).
Administrators can set the tracking level for processes to optimally tune their system to meet their reporting needs and performances requirements. The tracking levels are:
Full Global events, node transitions, and data are tracked.
Node Global and node transitions are tracked.
Minimum Global events are tracked.
None No events or data are tracked.
The system default tracking level is set from the System Configuration module. The tracking level for each process type is set from the Process Configuration module. The administrator has the option of either:
Setting the tracking level for a process to the system default.
Overriding the system default by setting the tracking level for a process to full, node, minimum, or none.
To learn more about:
Setting the system default tracking level, see
Configuring the Default Data Policy and Tracking Level for Processes on page 8-13.
Setting tracking level for a process type, see
Viewing and Changing Process Details on page 2-14.
Reporting and Purging Policies for Tracking Data
Tracking data includes:
Process instance history (see
Process Tracking Data above for tracking levels).
Trading partner message history (see
Configuring the Mode and Message Tracking on page 7-10 for tracking levels).
In order to optimize performance, the amount of tracking data stored in the runtime database should be kept to a minimum. To help ensure this, the purge process is configured to run at regular intervals set by the administrator.
Note:
You cannot disable the purge process.
If the data is required for reporting and analysis, the administrator can enable the transfer of tracking data suitable for reporting to an offline database. If the reporting data stream is enabled, the specified database is populated by a near real-time data stream.
Note:
Because the reporting database is populated by a near real-time stream, it is possible to see a snapshot of the data where some process instances contain partial data.
To provide a greater level of control, the administrator also configures the following:
Reporting data policy for each process type The reporting data policy for a process can be set to one of the following:
On—Instance data for the process is transmitted to the reporting database if the reporting data stream is enabled.
Off—Instance data is not transmitted to the reporting database.
Default—The system default reporting data policy (described below) is used.
System default reporting data policy for processes The system default reporting data policy can be set to On or Off. If the reporting data policy for a process is set to Default, the process inherits the system default setting. Instance data for the process is, or is not, transmitted to the reporting database, accordingly.
Purge Delay The amount of time after the following events that must pass before the data is subject to purge by the purge process:
Completion or termination of a process instance.
Receipt or delivery of business message.
For example, suppose the reporting data stream is enabled, the reporting data policy for a process is On, the purge delay is set to 5 days, and the purge process is configured to purge data every hour. In that case, the data for an instance completing on day 1 would be transmitted to the reporting database as it is generated, but would not be purged from the runtime database until 5 days elapsed.
The administrator can reset the purge schedule at any time and run the purge process on demand.
An aborted instance must be terminated.
A suspended instance must be resumed and completed, or terminated.
A frozen instance must be unfrozen and completed, or terminated.
To learn more about:
Managing process tracking data, see
Managing Process Tracking Data on page 2-3.
Configuring the reporting data stream, see
Configuring the Reporting Data and Purge Processes on page 8-11.
Setting the system default reporting data policy level, see
Configuring the Default Data Policy and Tracking Level for Processes on page 8-13.
Setting the reporting data policy for a process, see
Viewing and Changing Process Details on page 2-14.
The password store provides for the secure storage of the passwords used by controls, event generators, and other WebLogic Integration components. Each required password is defined in the password store and associated with a password alias. This alias can then be referenced in the annotations of process definitions (*.jpd), control extensions (*.jcx), and event generator configuration files (wliconfig/*EventGen.xml).
For example, when configuring an Email event generator, rather than specifying the password required to access a user's email account in plain text, the password would be defined and associated with a password alias in the password store. The password alias, rather than the password, can then be referenced in the event generator configuration file.
To learn how to add passwords and aliases, see
Adding Passwords to the Password Store on page 8-16.
Overview of the System Configuration Module
The following table lists the pages you can access from the System Configuration module. The tasks and help topics associated with each are provided:
Table 8-1 System Configuration Module
Page
Associated Tasks
Help Topics
Reporting and Tracking Policies
Current Tracking and Reporting Data Settings
View the system-level settings for the reporting data generation and purge processes. The current status of the reporting data stream (enabled or disabled), purge schedule, purge delay, reporting datastore (if the reporting data stream is enabled), default reporting data policy, and default tracking level are displayed.
Viewing the Configuration for Tracking, Reporting, and Purging Data on page 8-8
Tracking Data Purge and Reporting Data Policy Settings
Enable or disable reporting data generation.
Configuring the Reporting Data and Purge Processes on page 8-11
Edit the purge start time and repeat interval.
Edit the purge delay.
Edit Data Store Configuration Settings
Change the JNDI name of the offline reporting database.
Configuring the Reporting Data and Purge Processes on page 8-11
Default Tracking Level and Reporting Data Policy for Processes
Change the default tracking level or default reporting data policy for processes.
Configuring the Default Data Policy and Tracking Level for Processes on page 8-13
Purge
Purge Tracking Data
Request an immediate purge cycle.
Manually Starting and Stopping the Purge Process on page 8-14
Interrupt a purge cycle.
View the number of records in the runtime database for completed or terminated process instances.
View the time the last purge cycle completed.
Password Store
View and Edit Password Aliases
View a list of password aliases.
Listing and Locating Password Aliases on page 8-17
Filter the list by alias name. Use ? to match any single character or * to match zero or more characters.
Delete one or more password aliases.
Deleting Passwords from the Password Store on page 8-19
Add New Password Alias
Add a password by assigning a unique alias and defining the password.
Adding Passwords to the Password Store on page 8-16
Edit Password Alias
Change the password associated with a password alias.
Changing the Password for a Password Alias on page 8-18
Application Integration
View Application Integration Configuration
View the application integration configuration. Debug status (enabled or disabled), JMS connection factory, and repository root directory are displayed.
Configuring the Server for Application Integration on page 8-19
Edit Application Integration Configuration
Edit the application integration debug status, JMS connection factory, or repository root directory.
Configuring the Server for Application Integration on page 8-19
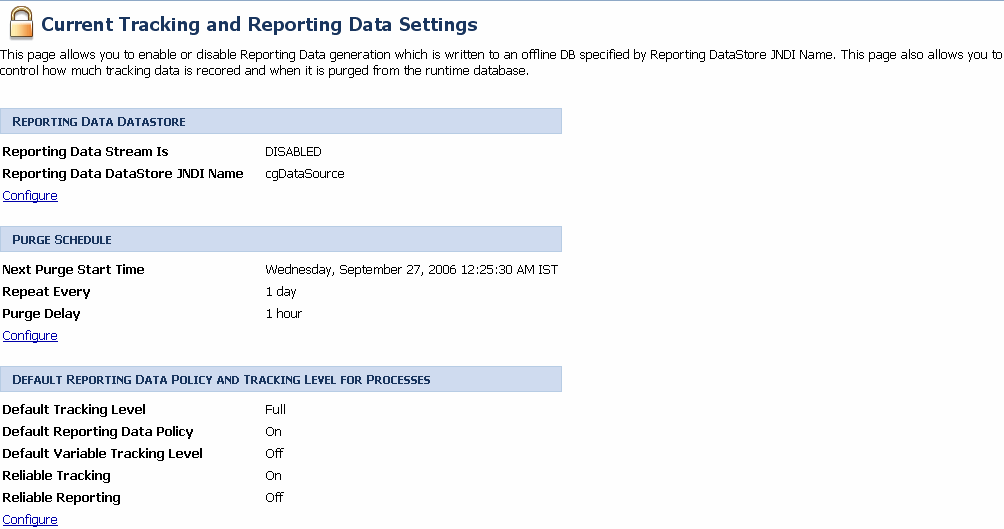
Viewing the Configuration for Tracking, Reporting, and Purging Data
The Current Tracking and Reporting Data Settings page allows you to view the:
Reporting data configuration.
Purge schedule.
Default tracking level for processes and tasks.
Default reporting data policy for processes.
Figure 8-1 Current Tracking and Reporting Data Settings
From the home page, select the System Configuration module. The Current Tracking and Reporting Data Settings is displayed by default.
Note:
You can also click Tracking, Purging, and Reporting Policies on the left menu to access the Current Tracking and Reporting Data Settings page.
Table 8-1 describes the properties displayed on the page:
Table 8-2 Elements of Current Tracking and Reporting Data Settings page
Property
Description
Reporting Data Datastore
Reporting Data Stream Process Is
Status of reporting data generation (enabled or disabled):
Note:
Tracking data includes process instance, task instance, and trading partner message history. To learn more, see
Reporting and Purging Policies for Tracking Data on page 8-3.
Reporting Data Datastore JNDI Name
JNDI name of the database to which reporting data is written when the reporting data stream is enabled.
Purge Schedule
Next Purge Start Time
The start date and time for the purge process.
Repeat Every
Intervals from the start time that the purge process runs.
Purge Delay
The amount of time after completion or termination before process instance, task tracking. or message history data is subject to purge.
Default Reporting Data Policy and Tracking Level for Processes
Default Tracking Level
The system default tracking level (full, node, minimum, or none). If the Tracking Level for a process is set to Default, the process inherits this setting. To learn how to set the reporting data policy for a process see
Viewing and Changing Process Details on page 2-14.
Default Reporting Data Policy
The system default reporting data policy (on or off). If the Reporting Data Policy for a process is set to Default, the process inherits this setting. Instance data for the process is, or is not, transmitted to the reporting database accordingly. To learn how to set the reporting data policy for a process see
Viewing and Changing Process Details on page 2-14.
Default Variable Tracking Level
Reliable Tracking
If this property isOn, then the process tracking data is written in the same transaction of the process. If a problem is encountered during this operation, then the complete transaction including the process transaction is rolled back.
If this property is Off, then tracking data is written in a different transaction of the process. If a problem is encountered during this operation, then there will be no impact on the process transaction.
Reliable Reporting
If this property isOn, then process reporting data is written in the same transaction of the process. If a problem is encountered during this operation, then the complete transaction including the process transaction is rolled back.
If this property is Off, then reporting data is written in a different transaction of the process. If a problem is encountered during this operation, then there will be no impact on the process transaction.
Related Topics
Configuring the Reporting Data and Purge Processes on page 8-11
Configuring the Reporting Datastore on page 8-12
Configuring the Default Data Policy and Tracking Level for Processes on page 8-13
Process Tracking Data on page 8-2
Reporting and Purging Policies for Tracking Data on page 8-3
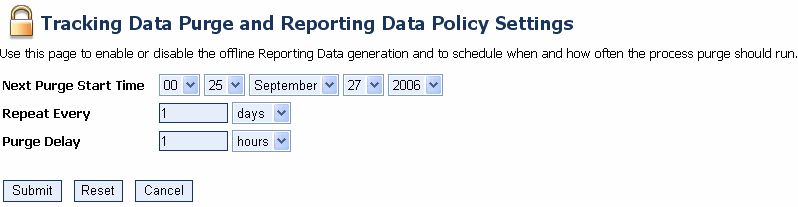
Configuring the Reporting Data and Purge Processes
The Tracking Data Purge and Reporting Data Policy Settings page allows you to enable or disable the reporting data stream and update the purge schedule and purge delay.
Figure 8-2 Tracking Data Purge and Reporting
From the home page, select the System Configuration module. The Current Tracking and Reporting Data Settings is displayed by default.
Note:
You can also click Tracking, Purging, and Reporting Policies on the left menu to access the Current Tracking and Reporting Data Settings page.
In the Purge Schedule section, click the Configure.
Do one or more of the following:
To update the Next Purge Start Time, select the hour, minute, month, day, and year from the drop-down lists.
To update the repeat interval, enter a new value in the Repeat Every field, then select mins, hours, or days from the drop-down list.
To update the purge delay, enter a new value in the Purge Delay field, then select mins, hours, or days from the drop-down list.
Click Submit to save your changes and return to the Current Tracking and Reporting Data Settings page.
Note:
When you update the repeat interval without changing the Next Purge Start Time, the new interval will not be effective until after the next scheduled purge. The scheduled start time for the next purge is displayed in the Purge Schedule section of the Current Tracking and Reporting Data Settings page.
Related Topics
Reporting and Purging Policies for Tracking Data on page 8-3
Viewing the Configuration for Tracking, Reporting, and Purging Data on page 8-8
Configuring the Reporting Datastore
The Edit Data Store Configuration Settings page allows you to specify the database used to store reporting data.
Figure 8-3 Edit Data Store Configuration Settings Page
From the home page, select the System Configuration module. The Current Tracking and Reporting Data Settings is displayed by default.
Note:
You can also click Tracking, Purging, and Reporting Policies on the left menu to access the Current Tracking and Reporting Data Settings page
In the Reporting Data Datastore section, click the Configure link.
To enable or disable the reporting data stream, check or uncheck the Enable Reporting Data Generation check box.
In the Reporting Data Datastore JNDI Name field, enter the JNDI name for the datastore.
Click Submit to save your changes and return to the Current Tracking and Reporting Data Settings page.
Note:
When you set or update the Reporting Data Datastore JNDI Name, the change will not take effect until you restart the server.
Related Topics
Viewing the Configuration for Tracking, Reporting, and Purging Data on page 8-8
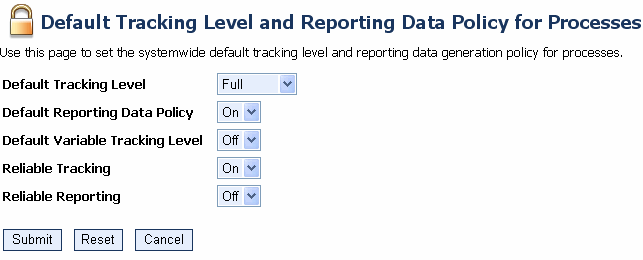
Configuring the Default Data Policy and Tracking Level for Processes
In addition to allowing you to configure the reporting data stream and purge processes, the Current Tracking and Reporting Data Settings page allows you to configure:
The default tracking level and reporting data policies for processes.
See
Viewing the Configuration for Tracking, Reporting, and Purging Data on page 8-8 for a description of all the properties displayed on the Current Tracking and Reporting Data Settings page.
From the home page, select the System Configuration module. The Current Tracking and Reporting Data Settings is displayed by default.
Note:
You can also click Tracking, Purging, and Reporting Policies on the left menu to access the Current Tracking and Reporting Data Settings page.
In the Default Reporting Data Policy and Tracking Level for Processes section, click the Configure link.
The Default Tracking Level and Reporting Data Policy for Processes page is displayed.
Figure 8-4 Default Tracking Level and Reporting Data Policy
Do one or both of the following:
From the Default Tracking Level drop-down list, select Full, Node, Minimum, or None.
From the Default Reporting Data Policy drop-down list, select On or Off.
From the Default Variable Tracking Level drop-down list, select On or Off.
From the Reliable Tracking drop-down list, select On or Off.
From the Reliable Reporting drop-down list, select On or Off.
Click Submit to save your changes and return to the Current Tracking and Reporting Data Settings page.
Related Topics
Viewing the Configuration for Tracking, Reporting, and Purging Data on page 8-8
Process Tracking Data on page 8-2
Reporting and Purging Policies for Tracking Data on page 8-3
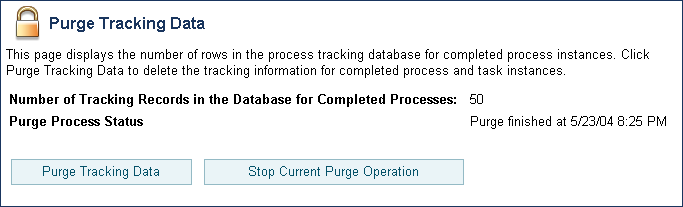
Manually Starting and Stopping the Purge Process
The Purge Tracking Data page displays the:
Number of records stored in the runtime database for completed or terminated process instances.
Time the purge process last completed.
Figure 8-5 Purge Tracking Data
If the purge process is scheduled to run regularly, tracking data, which includes process history, task history, and trading partner integration message history, is purged from the runtime datastore according to the schedule currently set. If required, you can request that the purge process run immediately, or if a purge operation is underway, you can manually stop the process, as described in the following procedure.
From the home page, select the System Configuration module.
From the left menu, select Purge to display the Purge Tracking Data page.
Do one of the following:
To start a purge of the tracking data, click the Purge Tracking Data button.
To stop a purge operation that is currently underway, click the Stop Current Purge Operation button.
A confirmation dialog box is displayed.
Click OK to confirm, or Cancel to dismiss the dialog and cancel the action.
Related Topics
Reporting and Purging Policies for Tracking Data on page 8-3
Configuring the Reporting Data and Purge Processes on page 8-11
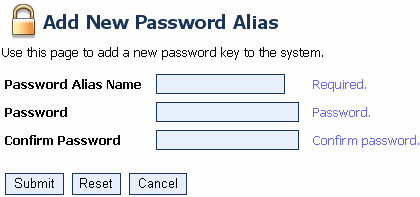
Adding Passwords to the Password Store
The Add a New Password Alias page allows you to create a password and associate it with a password alias.
Figure 8-6 Add New Password
From the home page, select the System Configuration module.
From the left menu, select Password Store.
From the left menu, select Create New to display the Add a New Password Alias page.
In the Password Alias Name field, enter a unique name.
In the Password field, enter the password.
In the Confirm Password field, enter the password again.
Do one of the following:
To create the password alias, click Submit.
The View and Edit Password Aliases page is displayed. The new alias is included in the list. (You may need to page forward to see the new alias.)
Note:
If there is an error, the Add a New Password Alias page is redisplayed. A message indicating the problem is displayed above the input requiring correction.
To disregard the changes and return to the View and Edit Password Aliases page, click Cancel.
Related Topics
Password Aliases and the Password Store on page 8-5
Listing and Locating Password Aliases on page 8-17
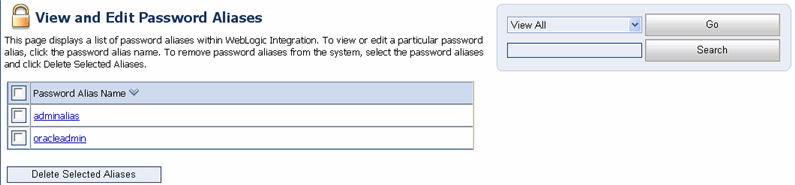
Listing and Locating Password Aliases
The View and Edit Password Aliases page lists the password aliases defined in the password store.
Figure 8-7 View and Edit Password
From the home page, select the System Configuration module.
In the left panel, click Password Store to display the View and Edit Password Aliases page.
To locate a specific password alias, do one of the following:
Filter by alias name. Enter the search target, then click Search. The password aliases matching the search criteria are displayed.
Resort the list. Ascending and descending arrow buttons indicate sortable columns. Click the button to change the sort order.
Scroll through the pages. Use the controls in the lower left corner. Go to a page by selecting the page number or by using the arrow buttons to go to the next , previous , first , or last page.
Related Topics
Adding Passwords to the Password Store on page 8-16
Changing the Password for a Password Alias on page 8-18
Deleting Passwords from the Password Store on page 8-19
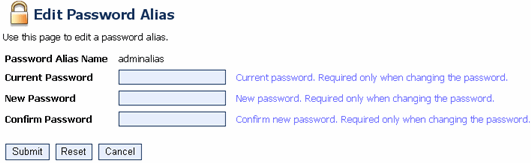
Changing the Password for a Password Alias
The Edit Password Alias page allows you to change the password associated with the password alias.
Figure 8-8 Edit Password
Locate the password alias. See
Listing and Locating Password Aliases on page 8-17.
Click the alias name to display the Edit Password Alias page.
In the Current Password field, enter the current password.
In the New Password field, enter the new password.
In the Confirm Password field, enter the new password again.
Do one of the following:
To update the password, click Submit.
The View and Edit Password Aliases page is displayed.
Note:
If there is an error, the Edit Password Alias page is redisplayed. A message indicating the problem is displayed above the input requiring correction.
To reset to the last saved values, click Reset.
To disregard the changes and return to the View and Edit Password Aliases page, click Cancel.
Deleting Passwords from the Password Store
The View and Edit Password Aliases page allows you to locate and delete selected password aliases.
Locate the password alias or aliases to be deleted. See
Listing and Locating Password Aliases on page 8-17.
Click the check box to the left of the password aliases to be deleted to select them.
Click Delete Selected Aliases.
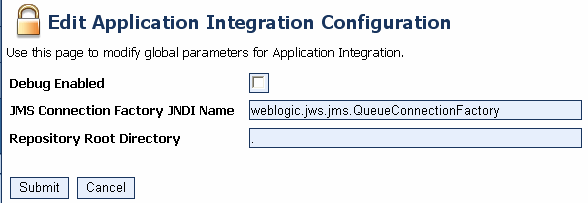
Configuring the Server for Application Integration
The Edit Application IntegrationConfiguration page allows you to define the server configuration for application integration.
Figure 8-9 Edit AI Configuration
From the home page, select the System Configuration module.
From the left panel, select Application Integration.
On the View Application Integration Configuration page, click Configure.
Update the configuration as required. The following table summarizes the available settings:
Table 8-3 Elements of View Application Integration Configuration page
Setting
Description
Check or uncheck the Debug Enabled check box.
When Debug is enabled, additional application integration debug messages are generated. Because these messages are logged using the standard WebLogic Server logging facility, they are only logged if debug messages are also enabled in the WebLogic Server Administration Console.
In the JMS Connection Factory JNDI Name field, enter the name of the required JMS connection factory.
Application views use JMS resources to handle events and asynchronous service invocations, and therefore require access to a JMS Connection Factory. This field specifies the JMS Connection Factory JNDI context.
In the Repository Root Directory field, enter repository root.
Files related to application views are stored in a file repository (wlai-repository). This field specifies the root directory for that repository.


 and descending
  arrow buttons indicate sortable columns. Click the button to change the sort order.
 , previous
  , first
  , or last
  page.
page.