BEA Logo BEA XML Translator 2.0

  BEA Home  |  Events  |  Solutions  |  Partners  |  Products  |  Services  |  Download  |  Developer Center  |  WebSUPPORT


   XML Translator Documentation   |   XML Translator Plug-In Guide   |   Previous Topic   |   Next Topic   |   Contents   |   Index

Running the WebLogic Process Integrator Sample Applications


The BEA WebLogic XML/Non-XML Translator software includes two sample applications designed to illustrate the integration of XML Translator with BEA WebLogic Process Integrator. This section describes these samples and gives you step-by-step instructions for running the samples. The following topics are discussed:


Prerequisite Considerations

There are certain software applications that must be installed and tasks that must be performed prior to running the these samples. Please refer to the BEA WebLogic XML/Non-XML Translator Release Notes for more information.

Note: The instructions presented in this section assume that you have a good working knowledge of BEA WebLogic Integration, specifically the WebLogic Process Integrator component, and BEA WebLogic Server. You should have successfully installed the WebLogic Process Integrator component of WebLogic Integration and run a sample workflow prior to running the sample applications.


Running the WebLogic Process Integrator Servlet Sample

This sample application implements a Web Archive (WLPI_sample.war) that installs a servlet to accept requests for conversion of binary data to XML. The servlet is accessed via a browser and responds by displaying the generated XML data. In addition, the data is posted to the WebLogic Process Integrator event topic in either XML or binary format. The data may then be used to start a WebLogic Process Integrator workflow.

What is Included in the Servlet Sample

The following table provides a listing and description of the files included in the WebLogic Process Integrator Servlet sample application. This sample application can be found in the samples\wpli\servlet directory.

Table 3-1 List of Servlet Sample Application Files

Directory

File

Description

\servlet\source

WLPI_sample.java

The source code for the servlet used to present the HTML screen and process binary data to XML. This XML may be placed, optionally, onto the WebLogic Process Integrator JMS topic.

\servlet

SampleData.mfl

The Message Format Language description of the sample binary data file used to start the sample WebLogic Process Integrator workflow.

\servlet

SampleData.data

The sample data file used as input to start the sample WebLogic Process Integrator workflow.

\servlet

SampleWorkflow.xml

The exported WebLogic Process Integrator workflow used in the sample. This workflow should be imported via the WebLogic Process Integrator Studio GUI to setup the workflow tasks involved in the sample.

\servlet

Makefile

Make file for building the sample source to a .jar file.

\servlet

build.cmd

Builds the .jar file from source.

\servlet

WLPI_sample.war

A Web Archive file containing all executable sample code and configuration files.

\servlet\images

bealogo.jpg

The BEA logo image displayed on the HTML page rendered by the sample servlet.

\servlet\WEB-INF

hello.html

The HTML page used by the sample servlet to obtain input data from the user.

\servlet\WEB-INF

web.xml

The J2EE configuration file defining deployment information for the sample servlet.

\servlet\WEB-INF

weblogic.xml

The BEA configuration file defining WebLogic-specific information for the sample servlet.

\servlet\WEB-INF\lib

*.jar

Utility libraries, including XML Translator, that are used in the execution of the sample code.


How to Run the Servlet Sample

Follow the steps below to run the servlet sample. For instructions on the tasks specific to WebLogic Server and WebLogic Process Integrator, refer to the documentation that accompanies those applications.

Step 1. Configure and Run WebLogic Process Integrator

  1. Start the WebLogic Process Integrator Server.

  2. Copy the WLPI_sample.war file to the default web application directory. By default, these directories are:

    C:\bea\wlserver6.0\config\mydomain\applications (for Windows NT or Windows 2000)

    $BEA_HOME/wlserver6.0/config/mydomain/applications (for Unix)

Step 2. Deploy the Web Application

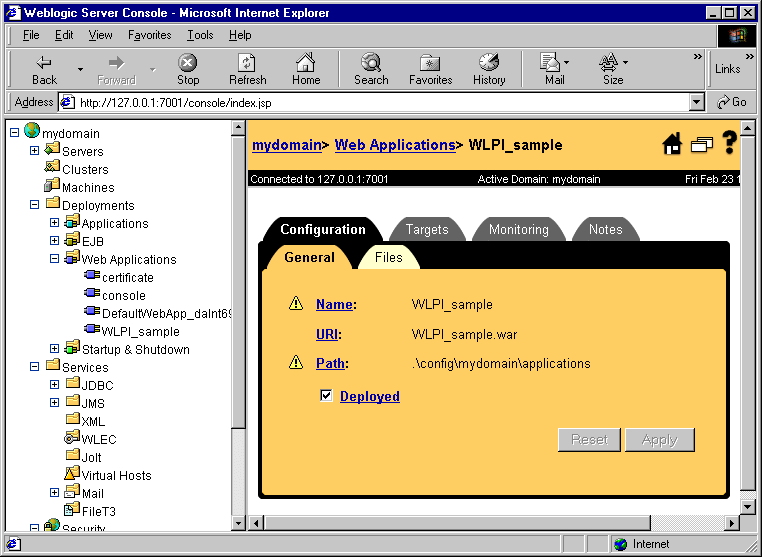
  1. If your WebLogic Server has auto-deployment enabled, the sample web application is deployed within several seconds. Verify the deployment setting using the WebLogic Server Console, as shown in Figure 3-1.

    Figure 3-1 WebLogic Server Console


  2. If you have disabled auto-deployment on your WebLogic Server, you must statically deploy the web application using the WebLogic Server Console. To do this, follow the steps below:

    1. From the tree in the left pane, choose Web Applications.

    2. In the right pane, click Install a New Web Application.

    3. Enter the path and file name of the WLPI_sample.war file and press Upload.

      After the WLPI_sample.war file is successfully uploaded, WLPI_sample appears in the tree under Web Applications.

    4. Select the new WLPI_sample node from the tree.

    5. Click the Deployed checkbox in the right pane and click Apply.

    6. Select the Targets tab.

    7. Move your server name from the Available column to the Chosen column, as shown in Figure 3-2.

      Figure 3-2 WebLogic Server Console Targets Tab


Step 3. Configure the Mail Session

  1. From the tree in the left pane, choose Mail—>wlpiMailSession.

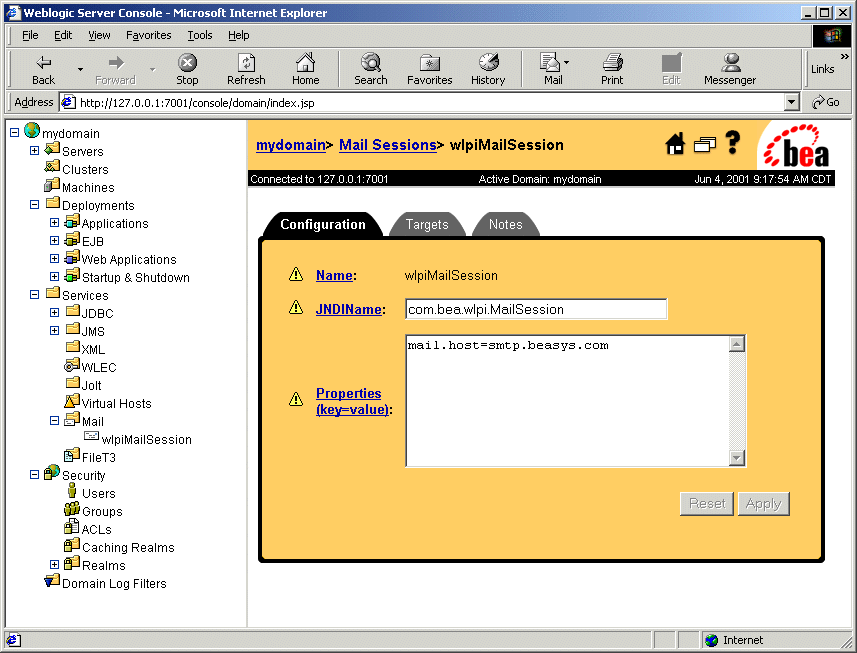
  2. Enter the appropriate information to configure your mail host. Figure 3-3 shows an example of the Mail Session Configuration screen.

    Figure 3-3 WebLogic Server Console Mail Session Configuration Tab


  3. Select the Targets tab.

  4. Move your mail server name from the Available column to the Chosen column, as shown in Figure 3-4.

    Figure 3-4 WebLogic Server Console Mail Session Targets Tab


Step 4. Create a New Template and Activate the Workflow

  1. Start WebLogic Process Integrator Studio and log on.

  2. Select Templates in the left pane, click the right mouse button and choose Create to create a new template.

  3. Select the newly created template, click the right mouse button and choose Import Template Definition.

  4. Select the file \samples\wlpi\servlet\SampleWorkFlow.xml.

  5. Select the newly imported workflow, click the right mouse button and choose Open. The workflow opens.

  6. Select the newly imported workflow, click the right mouse button and choose Properties. The Properties dialog displays.

  7. Select Active and click OK.

  8. Select the workflow, click the right mouse button and choose Save.

Step 5. Store the SampleData.mfl File in the Repository

There are two methods for storing files in the repository. Both methods are described below.

Using Format Builder

  1. Start XML Translator Format Builder.

  2. Open the samples\wlpi\servlet\SampleData.mfl file.

  3. Log in to the repository.

  4. Choose Repository—>Store As to store the sample file in the repository.

Using the command line

At the console command prompt, invoke the Batch Import Utility using the following command.

java com.bea.wlxt.repository.Import [-v] [-n] [-t type] [-f folder] files...

The following information describes the commands and their options.

-v

specifies that verbose mode is on. This switch may appear anywhere within the command line and affects all operations that follow. Verbose mode is disabled by default.

-n

specifies that verbose mode is off. This switch may appear anywhere within the command line and affects all operations that follow. Verbose mode is disabled by default.

-f

Optional switch specifying the parent folder of all the following files. Multiple -f switches may be specified to change folders during an import execution. By default, documents are imported into the root folder of the repository. A special -f switch argument of @ may be used to specify the root folder.

Folder names specified in the -f switch are always absolute pathnames from the repository root folder. Folder names within a path should be separated by a forward slash.

-t

Optional switch specifying the default type of all the following files. The default type is assigned to documents when the document type cannot be determined by the file extension. Valid values are .mfl, .dtd, .class, .xsl, and .xsd.

files

specifies one or more filenames to be imported. Wildcards may be used based on the current command line shell.

Step 6. Generate the XML Data and Send the Message

  1. Using a text editor, open the file \samples\wlpi\servlet\SampleData.data. Replace the text user@bea.com with a valid email address. This is the address the workflow uses to deliver the email message.

  2. Open a browser and go to the following URL:
    http://<weblogic server/port>/WLPI_sample/WLXTTest

  3. Enter SampleData into the MFL text field.

  4. Browse to the following data file:
    samples\wlpi\servlet\SampleData.data

  5. Select the option to invoke WebLogic Process Integrator and click Submit. A short email message is sent to the address you supplied in the data file.


Running the WebLogic Process Integrator EJB Sample

This sample simulates a dataflow from an HR system to a payroll system, initiated by the entry of payroll data. The employee data is obtained from a legacy payroll system that uses binary data. The data is translated to XML in order to perform a calculation to determine the employee's pay information. The result of the calculation is translated back to binary and sent on to the payroll system.

What is Included in the EJB Sample

The following table provides a listing and description of the files included in the WebLogic Process Integrator EJB sample application. This sample application can be found in the samples\wpli\ejb directory.

Table 3-2 List of EJB Sample Application Files

Directory

File

Description

\ejb

Makefile

Make file for building the sample source to a .jar file.

\ejb

WLXTExample.jar

Exported sample workflow from WebLogic Process Integrator.

\ejb

HR.mfl

MFL file for binary data returned from the Sample HR Bean.

\ejb

Payroll.mfl

MFL file for binary data passed to the Sample Payroll Bean.

\ejb

Autopay.cmd

Windows NT command script to initiate the workflow from the command line.

\ejb

Autopay.sh

Unix shell script to initiate the workflow from a command prompt.

\ejb

build.cmd

Builds wlxtejb.jar from source.

\ejb\lib

WLXTEJB.jar

Executables for the sample application.

\ejb\source

Payroll.java

Sample EJB to represent legacy payroll system.

\ejb\source

PayrollHome.java

Sample EJB to represent legacy payroll system.

\ejb\source

PayrollBean.java

Sample EJB to represent legacy payroll system.

\ejb\source

HR.java

Sample EJB to represent legacy HR system.

\ejb\source

HRHome.java

Sample EJB to represent legacy HR system.

\ejb\source

HRBean.java

Sample EJB to represent legacy HR system.

\ejb\source

AutoPay.java

Program to place a pre-formatted message on the WLPI Event Topic to start the sample workflow.

\ejb\source

HexDump.java

Utility class used by the sample EJBs.

\ejb\source

EmployeeRecord.java

Employee data class used by the sample HR EJB.


How to Run the EJB Sample

Follow the steps below to run the EJB sample. For specific instructions on performing the tasks in WebLogic Process Integrator and WebLogic Server, please refer to the documentation that accompanies those applications.

Step 1. Configure and Run WebLogic Process Integrator

  1. Copy the file WLXTEJB.jar from the \samples\wlpi\ejb\lib directory where you have XML Translator installed to the \lib directory where you have WebLogic Process Integrator installed.

  2. Open the file config.xml in a text editor. This file can be found in the config directory where you have BEA WebLogic Process Integrator installed.

    Note: The config directory contains separate subdirectories for each domain you have created. Each of these subdirectories contains its own config.xml file. Make sure you open the file under the correct domain.

  3. Add the following lines to the end of the WebLogic Process Integrator Application section of the file:
    <EJBComponent
    Name="wlxt-sample"
    Targets="<your_machine_name>"
    URI="WLXTEJB.jar"
    />

  4. Start the WebLogic Process Integrator Server.

Step 2. Import the Workflow Definition

To import the workflow definition:

  1. Run WebLogic Process Integrator Studio.

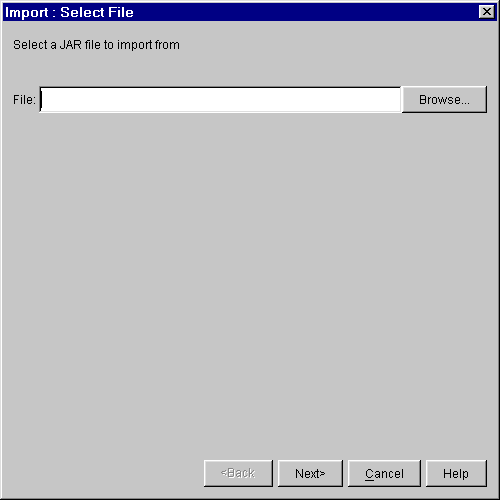
  2. Choose Tools—>Import Package. The Import: Select File dialog opens (Figure 3-5).

    Figure 3-5 Import: Select File Dialog


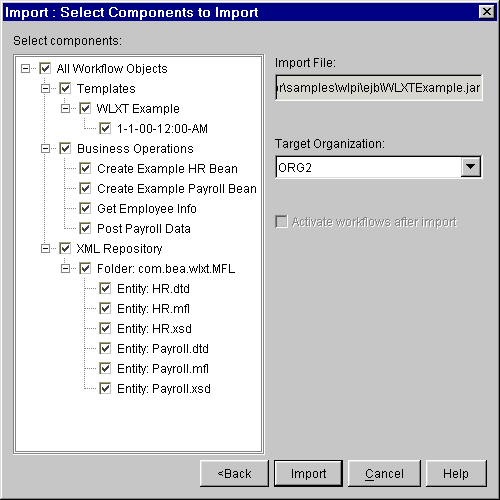
  3. Click Browse, select the definition file WLXTExample.jar, and click Open. Click Next, the Import: Select Components to Import dialog opens (Figure 3-6).

    Figure 3-6 Import: Select Components to Import


  4. Make sure all components are selected and click Import. The Import: Review Import Summary dialog opens (Figure 3-7).

    Figure 3-7 Import: Review Import Summary
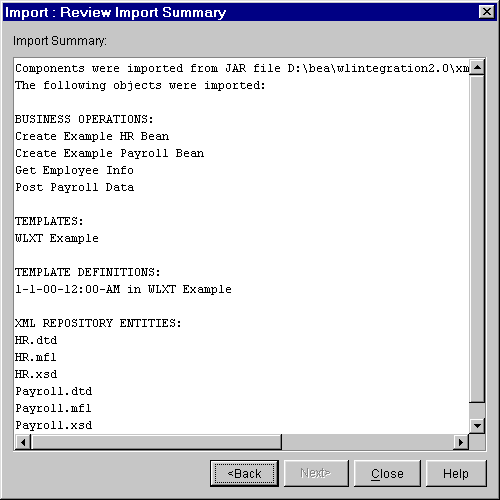


  5. Confirm that the correct components are listed. If not, click Back and select the components again. If so, click Close. You are now ready to open the template.

Step 3. Open the Template

To open the template:

  1. Expand the WLXT Example template imported in the previous step in the tree view. Select the template definition 1-1-00-12:00-AM and click the right mouse button.

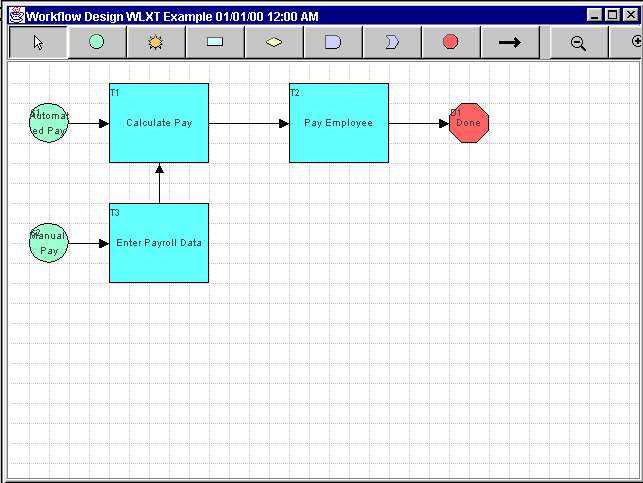
  2. Choose Open. The workflow created for this sample application displays.

    Figure 3-8 Workflow for XML Translator Example


  3. Select the XML Translator Example template definition again from the tree view and click the right mouse button.

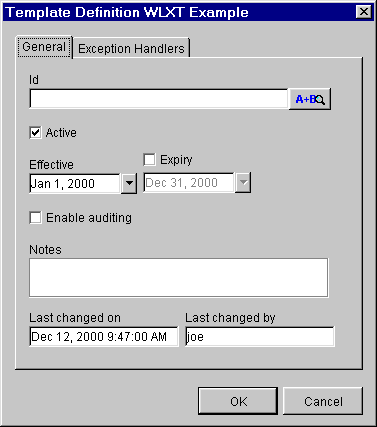
  4. Choose Properties. The Template Definition properties dialog displays.

    Figure 3-9 Template Definition


  5. Click Active to confirm that the template is active and click OK.

  6. Select the XML Translator Example template definition a third time from the tree view and click the right mouse button again.

  7. Choose Save to save the template definition with the changes you made.

Step 4. Start the Workflow

There are two ways to start the workflow created in the sample:

From the WebLogic Process Integrator Worklist

To start the sample workflow from the Weblogic Process Integrator Worklist:

  1. Start WebLogic Process Integrator Worklist and choose Workflow—>Start a Workflow.

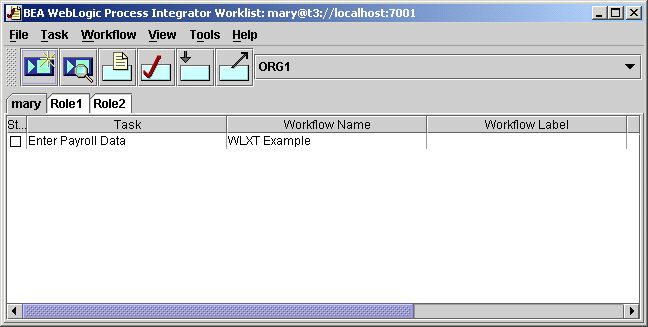
  2. Select WLXT Example. Click OK.

    Figure 3-10 XML Translator Example Worklist


  3. Select the Enter Payroll Data task and click the right mouse button.

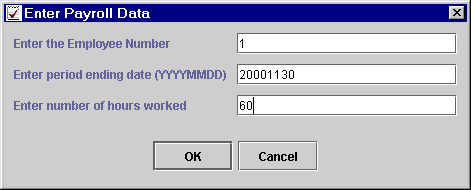
  4. Choose Execute. The Enter Payroll Data dialog displays.

    Figure 3-11 Enter Payroll Data


  5. Enter the payroll data and click OK. The task is started and the workflow runs.

    Note: For this example, the employee numbers 1 through 4 are valid. You can enter any period ending date and any number of hours worked.
From the Command Line

To start the sample workflow from a command line prompt:

  1. Open the script file (Autopay.cmd on Windows NT systems; Autopay.sh on Unix systems) in a text editor and check the location of the WebLogic Process Integrator Server. By default, the location is localhost and port:7001.

  2. Change the location information to match the host and port for your system.

  3. Set the environment variable WL_HOME to the home directory for WebLogic Server on your system. For example:
    set WL_HOME=c:\bea\wlserver6.0

  4. Run the command scripts for your system (Windows NT or Unix), passing the same parameters shown in Figure 3-11. For example:
    Autopay 1 2000-11-30 60

Figure 3-12 shows the WebLogic Process Integrator output from executing the workflow.

Figure 3-12 WebLogic Process Integrator Server Console


back to top previous page