


|

|
|
|
|
Using a Custom Exception Handler
In this section we focus on the Studio's exception handling facility, by showing an example of a user-defined exception handler used by the Order Fulfillment workflow. After an overview that describes all the nodes in the workflow, this section describes how to:
In this section of the tutorial, it is assumed that you have imported the Order Fulfillment workflow, the Create OrderBean and Calculate Total Price business operations, and the cancelledorder event key, as described in Importing Workflow Objects: Importing the Tutorial Package File.
Overview of the Order Fulfillment Workflow
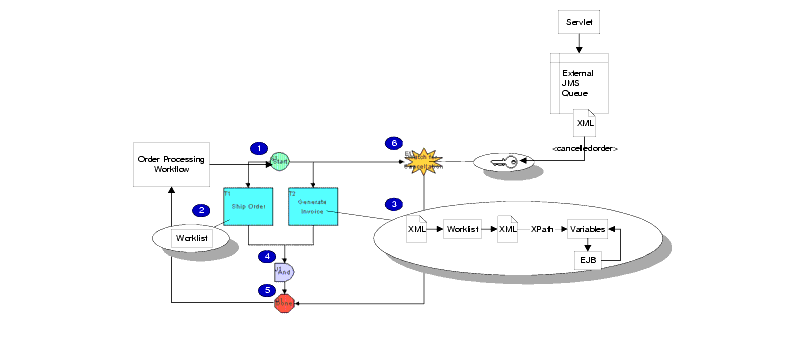
The Order Fulfillment workflow, called by the Order Processing workflow, contains tasks to handle the shipping and invoicing of the ordered item. Because both tasks in the workflow are to be executed in parallel, both are connected directly to the start node. To ensure that both tasks are executed before the workflow terminates, an AND node joins them together.
The workflow also defines and invokes a custom exception handler to prompt a Worklist user to correct the invalid state abbreviation that was provided in the original XML document in the Order Processing Trigger workflow.
A detailed view of the Order Fulfillment workflow is shown in the following figure. The numbered steps in the figure are described in a table following the figure. The table maps the real-world processes to the actual implementation in the sample workflow.
Figure 6-1 Order Fulfillment Workflow: Detailed View
Table 6-1 Order Fulfillment Workflow Summary
About the Exception Handlers
All WebLogic Integration workflow template definitions contain a default exception handler: the system exception handler. The system exception handler responds to exceptions that occur at run time by marking the active transaction for rollback only and rethrowing the exception to the client.
You can also define custom exception handlers to perform workflow actions upon the occurrence of an exception. You can configure the custom exception handler to catch any exceptions that occur at run time, or to handle specific exceptions that have been defined in called EJBs. To define your custom exception handler, you specify commit and rollback actions to be performed for the active transaction. (See About Exception Handler Actions.)
An exception handler exists at the workflow level, so that it can be called from within any node. After you have defined an exception handler, you use one of two actions to invoke it from within a node:
You can create and view existing exception handlers from both the folder tree and on the Exception Handlers tab of the template definition's Properties dialog box.
To view the exception handler defined for the Order Fulfillment workflow in the folder tree:
Figure 6-2 Order Fulfillment Workflow: Exception Handlers
This workflow contains one user-defined exception handler: Bad Data to OrderBean.
Figure 6-3 Exception Handler Usage Dialog Box
As the window shows, the custom exception handler is invoked from the Generate Invoice node. We will now examine this node more closely before viewing the Bad Data to OrderBean exception handler's properties in detail.
Viewing the Generate Invoice Task
Let us first view the actions that make up the Generate Invoice task, including the calls to business operations and to the Bad Data to OrderBean custom exception handler.
To view the Generate Invoice task properties:
Figure 6-4 Generate Invoice Task Properties Dialog Box: Executed Tab
The Executed tab contains the following actions:
Viewing the Calculate Total Price Business Operation
Double-click the Perform Business Operation "Calculate Total Price" action to display its properties.
Figure 6-5 Calculate Total Price: Perform Business Operation Dialog Box
The calculate() method returns the total price, including state sales tax, to the variable OrderTotalPrice. To get more information about the calculate() method, let us look at the business operation configuration. To view the Calculate Total Price business operation configuration: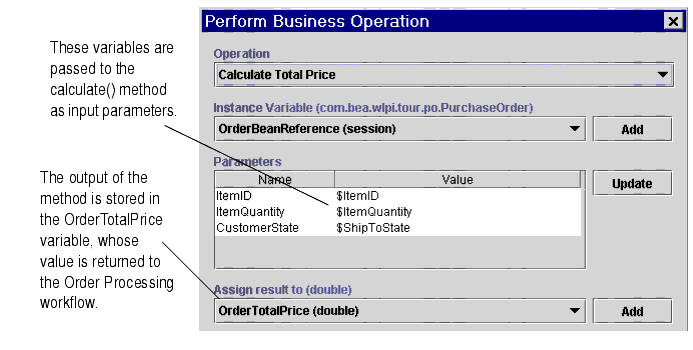
Figure 6-6 Calculate Total Price: Define Business Operation Dialog Box
You can see that in the Method to Call field, the calculate() method throws an exception, BadStateException. In the EJB class file, this exception is defined to occur if invalid state data is passed to the method. In the source code, invalid state data is any text that does not match a valid two-letter abbreviation for a U.S. state name.
To handle the possibility of this exception being thrown, the Bad Data to OrderBean exception handler is set up in the workflow to correct the error at run time. We look at this exception handler in more detail in the following sections.
Note: For more information on the POBean.jar EJB, see the BEA WebLogic Integration Javadoc.
Defining a Custom Exception Handler: Viewing the Bad Data to OrderBean Exception Handler
As you may recall from Understanding Workflow Objects and Properties, we simulated the occurrence of invalid data being passed to the POBean in the <shiptostate> value in the Neworder XML document that triggered the Order Processing workflow. That workflow set the ShipToState variable to an incorrect value, KK, which was passed by the Start Order Fulfillment task node to the Order Fulfillment workflow.
When the Generate Invoice task is executed, the Perform Business Operation action attempts to call the calculate() method with the wrong ShipToState variable value as input. Because the calculate() method of the POBean throws the BadStateException when the invalid state data is passed to it, the server invokes the custom-defined exception handler, Bad Data to OrderBean.
Let us now view the Bad Data to OrderBean exception handler and the actions defined within it.
To view the Bad Data to Order Bean exception handler:
Figure 6-7 Exception Handler Properties Dialog Box
About Exception Handler Actions
The Actions on Commit and Actions on Rollback tabs allow you to specify workflow actions to be executed on the transaction's commit and rollback paths. In most cases, the transaction is committed unless it has been specifically marked for rollback only; in this case, the exception handler executes the actions specified on the rollback tab. Although the called EJB method may mark transactions for rollback only, it is a good idea to specify both types of actions.
As you can see in the Exception Handler Properties dialog box, the Bad Data to OrderBean exception handler defines the following actions:
Exit Exception Handler and Rollback—An exception handling action that stops the exception handler, rolls back the active transaction to its state before the exception was thrown, and rethrows the exception to the client.
Viewing the Evaluate Condition Action
To view the Evaluate Condition action, in the Exception Handler Properties dialog box, double-click the Evaluate Condition action. The Evaluate Condition dialog box appears.
Figure 6-8 Evaluate Condition Dialog Box
The condition is defined with the following expression: WorkflowAttribute("ExceptionType") = "com.bea.wlpi.tour.po.BadStateException" In this case, this expression uses the workflow attribute ExceptionType to test whether the exception thrown equals the BadStateException specified by the POBean. Using a condition like this is a common way to set up an exception handler to catch specific exceptions. You can use the WorkflowAttribute function to identify the target exception, with a number of different exception attributes, including: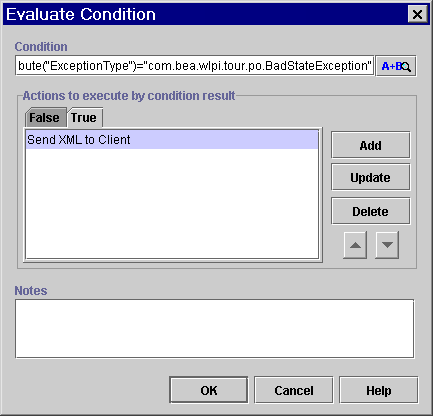
For a complete list of workflow functions and attributes, see Using Workflow Expressions in Using the WebLogic Integration Studio.
The Evaluate Condition action specifies actions to execute according to the test result, that is, whether the expression evaluates to true or false. In this example the action specifies the following actions:
Send XML to Client—An integration action that sends an XML message to a Worklist user to prompt him or her to correct the invalid data that was passed to the calculate() method, and re-executes the Generate Invoice task. This action is described in detail in Viewing the Send XML to Client Action.
No actions are specified here; if the condition evaluates to false, the exception handler executes the Rollback actions specified in the Exception Handler Properties dialog box.
Viewing the Send XML to Client Action
The Send XML to Client action sends a message to a Worklist user, requesting correction of the bad data that has been passed to the POBean and caused the BadStateException to occur. Then it re-executes the actions specified on the Executed tab of the Generate Invoice Task Properties dialog box so that the task can now complete successfully.
To view the Send XML to Client action, in the Evaluate Condition dialog box, select the True tab, and double-click the Send XML to Client action. The Send XML to Client dialog box appears.
Figure 6-9 Bad Data to OrderBean Exception Handler: Send XML to Client Dialog Box
This Send XML to Client action sends an XML document, based on the ClientSetVarsReq DTD, to the Worklist client, causing the Worklist to display a message box with a field in which the Worklist user types information. The XML document has the following structure. Listing 6-1 ClientSetVarsReq XML Document Structure The following figure shows the tags and values in the XML document that correspond to the message box displayed by the Worklist client. Figure 6-10 Error Warning Message Box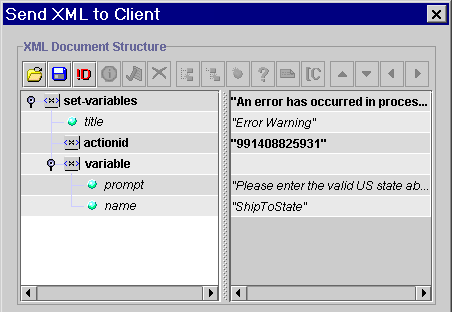
<set-variables title="text">
text
   <actionid>provided by default	</actionid>
   <variable name="variable name" prompt="text" />
   [<variable name="variable name" prompt="text" />]
</set-variables>
To capture the response from the Worklist user, data is extracted from the XML document returned by the Worklist client, based on the ClientSetVarsResp.dtd, specifically from the <variable name> attribute, as shown in Listing 6-2. Listing 6-2 ClientMsgBoxResp XML Document Structure To extract the desired information, the following XPath expression is defined: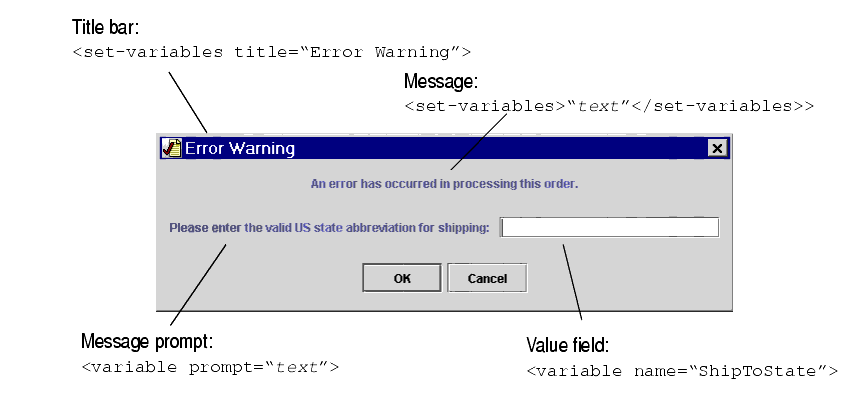
<set-variables>
   <variable name="variable name" />
   [<variable name="variable name" />]
</set-variables>
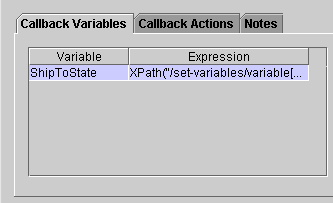
XPath("/set-variables/variable[@name=\"ShipToState\"]/text()")
Then the result is assigned to the ShipToState variable in the Callback Variables tab of the Send XML to Client dialog box.
Finally, a callback action is specified.
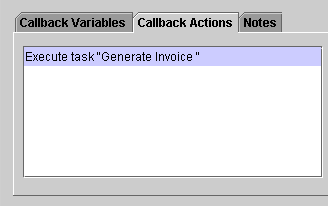
This action re-executes all the actions listed on the Executed tab of the Generate Invoice Task Properties dialog box (see Viewing the Generate Invoice Task) after the Worklist user has entered valid data. Note that if the user enters invalid data, he or she is repeatedly prompted with the message box until acceptable data is provided.
When the task is marked done by the final action of the Generate Invoice task, the workflow proceeds to the AND node. When the Ship Order task is marked done, the workflow terminates. At this point variable values that have been collected during the workflow execution are passed back to the Order Processing workflow.

|

|

|
|
|
|
Copyright © 2001 BEA Systems, Inc. All rights reserved.
|