BEA Logo BEA WLI Release 2.1

  BEA Home  |  Events  |  Solutions  |  Partners  |  Products  |  Services  |  Download  |  Developer Center  |  WebSUPPORT


   WLI Doc Home   |   Data Integration Topics   |   Data Integration Plug-In   |   Previous Topic   |   Next Topic   |   Contents   |   Index   |   View as PDF

Running the WebLogic Integration Sample Applications


The data integration software includes two sample applications designed to illustrate the integration of business process management (BPM) in WebLogic Integration. This section describes these samples and give you step-by-step instructions for running them. The following topics are discussed:


Prerequisite Considerations

The instructions presented in this section assume that you have a good working knowledge of WebLogic Integration, specifically data integration and the BPM engine. You should have successfully installed WebLogic Integration and run a sample workflow prior to running the sample applications.


Running the BPM Servlet Sample

This sample application implements a Web Archive (WLPI_sample.war) that installs a servlet to accept requests for conversion of binary data to XML. The servlet is accessed via a browser and responds by displaying the generated XML data. In addition, the data is posted to the WebLogic Integration event topic in either XML or binary format. The data may then be used to start a workflow.

What is Included in the Servlet Sample

The following table provides a listing and description of the files included in the BPM Servlet sample application. This sample application can be found where WebLogic Integration is installed in the \samples\di\ subdirectory.

Table 3-1 List of Servlet Sample Application Files

Directory

File

Description

\wlpi\source

WLPI_sample.java

The source code for the servlet used to present the HTML screen and process binary data to XML. This XML may be placed, optionally, onto the JMS topic.

\wlpi

SampleData.mfl

The Message Format Language description of the sample binary data file used to start the sample workflow.

\wlpi

SampleData.data

The sample data file used as input to start the sample workflow.

\wlpi

SampleWorkflow.jar

The exported workflow used in the sample. This workflow should be imported via the WebLogic Integration Studio GUI to setup the workflow tasks involved in the sample.

\wlpi

Makefile

Make file for building the sample source to a .jar file.

\wlpi

build.cmd

Builds the .jar file from source.

\wlpi\images

bealogo.jpg

The BEA logo image displayed on the HTML page rendered by the sample servlet.

\wlpi\WEB-INF

hello.html

The HTML page used by the sample servlet to obtain input data from the user.

\wlpi\WEB-INF

web.xml

The J2EE configuration file defining deployment information for the sample servlet.

\wlpi\WEB-INF

weblogic.xml

The BEA configuration file defining WebLogic-specific information for the sample servlet.

wlpi\WEB-INF\lib

cos.jar

Utility libraries that are used in the execution of the sample code.

wlpi\WEB-INF\lib

HtmlScreen.jar

Utility libraries that are used in the execution of the sample code.

Under (WebLogic Integration Home)\


config\samples\
applications

WLPI_sample.war

A Web Archive file containing all executable sample code and configuration files. This file is automatically deployed to the WebLogic Integration application directory upon installation.


How to Run the Servlet Sample

Follow the steps below to run the servlet sample. For instructions on the tasks specific to WebLogic Server and BPM, refer to the documentation that accompanies those applications.

Step 1. Start the WLI Sample Application Launcher

For first-time users:

  1. Choose Start—>BEA WebLogic E-Business Platform—>WebLogic Integration 2.1—>Samples—>Run Samples. This will configure all samples and will open the samples launcher. It takes several minutes to configure all samples.

  2. Select the Data Integration Servlet Sample.

If you have already configured samples before:

  1. Choose Start—>BEA WebLogic E-Business Platform—>WebLogic Integration 2.1—>Samples—>Start Server.

  2. Choose Start—>BEA WebLogic E-Business Platform—>WebLogic Integration 2.1—>Samples—>Samples Launcher.

  3. Select the Data Integration Servlet Sample.

Step 2. Configure the Mail Session

This step is optional if you have already configured your mail host. You may also use this step to verify your configuration.

  1. From the navigation tree, choose Services—>Mail—>wlpiMailSession.

  2. Enter the appropriate information to configure your mail host. Make sure that mail.host=mailserver. The following figure shows an example of the Mail Session Configuration screen.

    Figure 3-1 WebLogic Server Console Mail Session Configuration Tab


  3. Select the Targets tab.

  4. Move your mail server name from the Available column to the Chosen column, as shown in the following figure.

  5. Click Apply.

    Figure 3-2 WebLogic Server Console Mail Session


Step 3. Create a New Template and Activate the Workflow

To import the workflow definition:

  1. Run WebLogic Integration Studio by choosing Start—>Programs—>BEA WebLogic E-Business Platform—>WebLogic Integration 2.1—>Studio.

  2. Choose Tools—>Import Package. The Import: Select File dialog box opens (the following figure).

    Figure 3-3 Import: Select File Dialog Box


  3. Click Browse, select the definition file SampleWorkflow.jar, and click Open. Click Next, the Import: Select Components to Import dialog box opens (the following figure).

    Figure 3-4 Import: Select Components to Import


  4. Make sure that the Activate workflows after import check box is selected, make sure all components are selected, and click Import. The Import: Review Import Summary dialog box opens (the following figure).

  5. Confirm that the correct components are listed. If not, click Back and select the components again. If so, click Close. You are now ready to open the template.

    Figure 3-5 Import: Review Import Summary


Step 4. Store the SampleData.mfl File in the Repository

  1. Start Format Builder by choosing Start—>Programs—>BEA WebLogic E-Business Platform—>WebLogic Integration 2.1—>Format Builder.

  2. Open the \samples\di\wlpi\SampleData.mfl file.

  3. Choose Repository—>Log In.

  4. Choose Repository—>Store As to store the file as SampleData in the repository.

Step 5. Update the Sample XML Data and Send Message

  1. Using a text editor, open the file \samples\di\wlpi\SampleData.data. Replace the text user@bea.com with a valid email address. This is the address the workflow uses to deliver the email message.

  2. From the servlet sample enter SampleData into the MFL text field.

  3. Navigate to the following data file:
    \samples\di\wlpi\SampleData.data

  4. Select the option to invoke the process engine and click Submit. A short email message is sent to the address you supplied in the data file.


Running the BPM EJB Sample

This sample simulates a dataflow from an HR system to a payroll system, initiated by the entry of payroll data. The employee data is obtained from a legacy payroll system that uses binary data. The data is translated to XML in order to perform a calculation to determine the employee's pay information. The result of the calculation is translated back to binary and sent on to the payroll system.

What is Included in the EJB Sample

The following table provides a listing and description of the files included in the EJB sample application. This sample application can be found in the \samples\di\ejb directory.

Table 3-2 List of EJB Sample Application Files

Directory

File

Description

\ejb

Makefile

Make file for building the sample source to a .jar file.

\ejb

WLXTExample.jar

Exported sample workflow from data integration.

\ejb

HR.mfl

MFL file for binary data returned from the Sample HR Bean.

\ejb

Payroll.mfl

MFL file for binary data passed to the Sample Payroll Bean.

\ejb

Autopay.cmd

Windows NT command script to initiate the workflow from the command line.

\ejb

Autopay.sh

UNIX shell script to initiate the workflow from a command prompt.

\ejb

build.cmd

Builds wlxtejb.jar from source.

\ejb\source

Payroll.java

Sample EJB to represent legacy payroll system.

\ejb\source

PayrollHome.java

Sample EJB to represent legacy payroll system.

\ejb\source

PayrollBean.java

Sample EJB to represent legacy payroll system.

\ejb\source

HR.java

Sample EJB to represent legacy HR system.

\ejb\source

HRHome.java

Sample EJB to represent legacy HR system.

\ejb\source

HRBean.java

Sample EJB to represent legacy HR system.

\ejb\source

AutoPay.java

Program to place a pre-formatted message on the Event Topic to start the sample workflow.

\ejb\source

HexDump.java

Utility class used by the sample EJBs.

\ejb\source

EmployeeRecord.java

Employee data class used by the sample HR EJB.

Path = (WebLogic Integration Home)\


config\samples\
applications

WLXTEJB.jar

Executables for the sample application.


How to Run the EJB Sample

Follow the steps below to run the EJB sample.

Step 1. Import the Workflow Definition

To import the workflow definition:

  1. Run WebLogic Integration Studio.

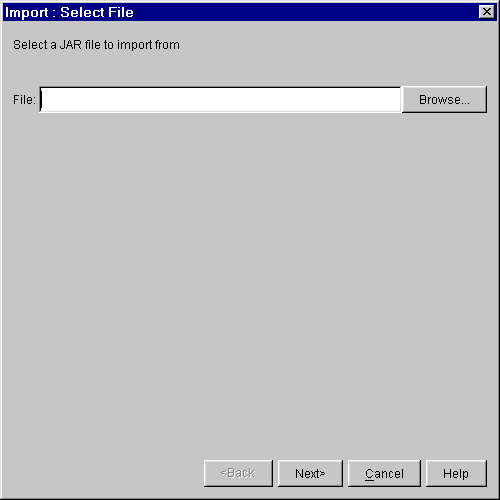
  2. Choose Tools—>Import Package. The Import: Select File dialog box opens (Figure 3-6).

    Figure 3-6 Import: Select File Dialog Box


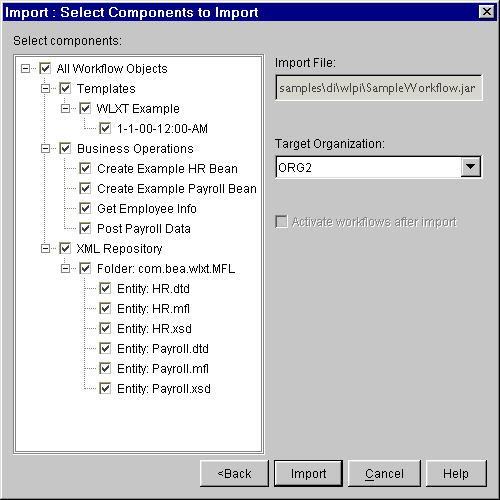
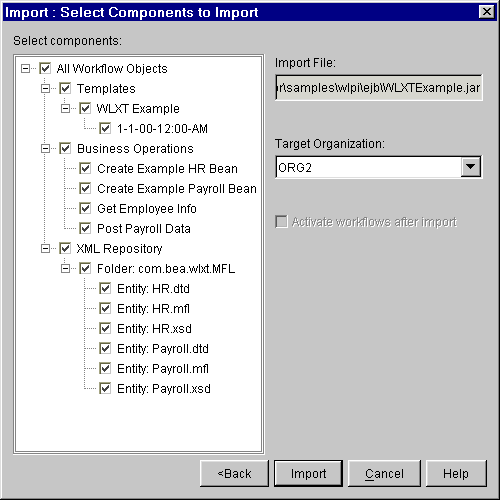
  3. Click Browse, select the definition file WLXTExample.jar, and click Open. Click Next, the Import: Select Components to Import dialog box opens (Figure 3-7).

    Figure 3-7 Import: Select Components to Import


  4. Make sure that the Activate workflows after import check box is selected, make sure all components are selected, and click Import. The Import: Review Import Summary dialog box opens (Figure 3-8).

  5. Confirm that the correct components are listed. If not, click Back and select the components again. If so, click Close. You are now ready to open the template.

    Figure 3-8 Import: Review Import Summary


Step 2. Open the Template

To open the template:

  1. Expand the WLXT Example template imported in the previous step in the navigation tree. Right-click the template definition 1-1-00-12:00-AM.

  2. Choose Open. The workflow created for this sample application displays.

    Figure 3-9 Workflow for WebLogic Integration Example


Step 3. Start the Workflow

There are two ways to start the workflow created in the sample:

From the WebLogic Integration Worklist

To start the sample workflow from the WebLogic Integration Worklist:

  1. Start WebLogic Integration Worklist and choose Workflow—>Start a Workflow.

  2. Select WLXT Example. Click OK.

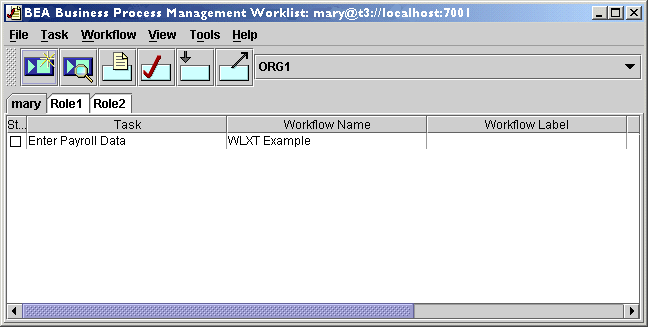
    Figure 3-10 WLXT Example Worklist


  3. Right-click the Enter Payroll Data task.

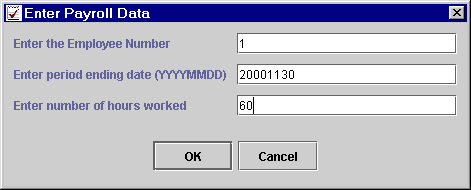
  4. Choose Execute. The Enter Payroll Data dialog box displays.

    Figure 3-11 Enter Payroll Data


  5. Enter the payroll data and click OK. The task is started and the workflow runs.

    Note: For this example, the employee numbers 1 through 4 are valid. You can enter any period ending date and any number of hours worked.

From the Command Line

To start the sample workflow from a command line prompt:

  1. Open the script file (Autopay.cmd on Windows NT systems; Autopay.sh on Unix systems) in a text editor and check the location of the BPM Server. By default, the location is localhost and port:7001.

  2. Change the location information to match the host and port for your system.

  3. Set the environment variable WL_HOME to the home directory for WebLogic Server on your system. For example:
    set WL_HOME=c:\bea\wlserver6.1

  4. Run the command scripts for your system (Windows NT or UNIX), passing the same parameters shown in Figure 3-11. For example:
    Autopay 1 2000-11-30 60


back to top previous page