|
|
WebLogic Portal supports a relatively simple technique for passing custom data between consumers and producers. A set of interfaces is provided that let you attach arbitrary data to request and response objects. This chapter explains how to use these interfaces to achieve custom data transfer and includes detailed examples.
This chapter includes the following topics:
Custom data transfer allows portlet developers to exchange arbitrary data between producers and consumers. The primary use cases for custom data transfer are:
| Note: | It is recommend that you use this technique only after trying other techniques for data transfer. The preferred technique for transferring data between producers and consumers is to use custom events. For more information, see Data Transfer with Custom Events. |
Some example use cases for custom data transfer include:
Custom data transfer allows you to easily resolve these situations and many others like them. The technique for using custom data transfer is straightforward, and involves these primary tasks:
Both simple producers and complex producers can take advantage of this feature.
The following interfaces enable the transfer of data between producers and consumers. To perform custom data transfer, implementations of these interfaces must be deployed on both the consumer and producer.
Performing Custom Data Transfer includes a detailed example demonstrating how to use these interfaces. For more information on these interfaces, refer to their Javadoc descriptions.
| Note: | These interfaces are not supported for events and render depencencies requests. |
| Tip: | If you do not want to create your own implementations of these interfaces, the serializable com.bea.wsrp.ext.holders.SimpleStateHolder class provides a default implementation. The examples in this chapter use SimpleStateHolder to pass custom data. |
This section presents examples that illustrate how to use custom data transfer between consumers and producers. Both examples use the serializable com.bea.wsrp.ext.holders.SimpleStateHolder class, which implements the five interfaces listed previously in Custom Data Transfer Interfaces. This class provides a default implementation of the above interfaces that lets you exchange simple name-value pairs of data.
This example demonstrates custom data transfer between a consumer and a complex producer.
This example demonstrates custom data transfer between a consumer and a simple producer.
This example explains how to transfer data from a consumer to a complex producer. For information on complex producers, see WebLogic Portal Producers.
In this example, a backing file in the consumer application packages arbitrary data in a com.bea.wsrp.ext.holders.SimpleStateHolder object. This object is attached to a request using the setAttribute() method. The producer retrieves the data from the request and places it in a JSP page. The modified page is then displayed by the consumer application.
The example consists of these steps:
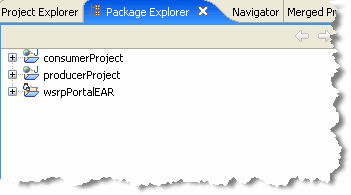
If you want to try the example discussed in this chapter, you need to run Workshop for WebLogic and perform the prerequisite tasks listed in Table 13-1. For detailed information on performing these basic setup tasks, see the WebLogic Portal tutorial Setting Up Your Portal Development Environment.
Figure 13-1 shows the Package Explorer after the prerequisite tasks have been completed.
We also assume that you know how to view and edit portlet properties in the Properties view. For information, see the WebLogic Portal Portlet Development Guide.
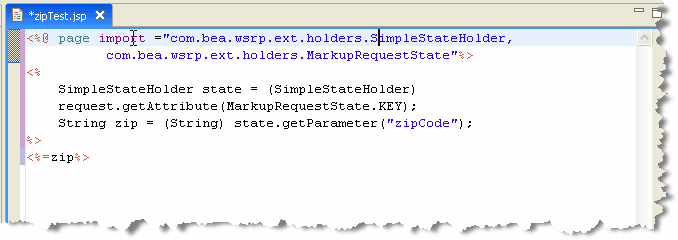
With the example environment in place, create a JSP file on the producer and a portlet to surface that file. Code placed in the JSP file retrieves a SimpleStateHolder object from the request, retrieves its data payload, and displays the data.
zipTest.jsp in the File name field, and click Finish. <%@ page import ="com.bea.wsrp.ext.holders.SimpleStateHolder,
com.bea.wsrp.ext.holders.MarkupRequestState"%>
<%
SimpleStateHolder state = (SimpleStateHolder)
request.getAttribute(MarkupRequestState.KEY);
String zip = (String) state.getParameter("zipCode");
%>
<%=zip%>
Figure 13-2 shows the editor with the new source code.
| Tip: | Later in this example, you will add a backing file to the proxy portlet in the consumer web application. This backing file creates the SimpleStateHolder object, adds some data to it, and puts the object into the request that is sent from the consumer to the producer. For more information on SimpleStateHolder, refer to its Javadoc description. |
producerProject/WebContent folder. Right-click zipTest.jsp in the WebContent folder and select Generate Portlet...
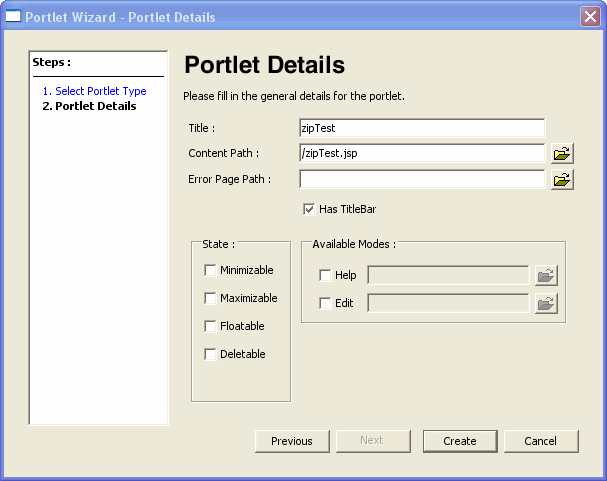
The Portlet Details dialog box appears. Note that zipTest.jsp already appears in the Content Path field, as shown in Figure 13-3.
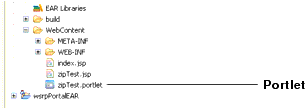
The portlet zipTest.portlet appears in the Package Explorer, as shown in Figure 13-4.
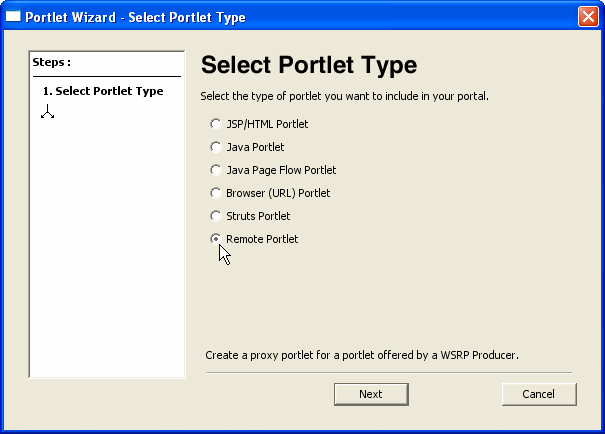
Next, create a remote portlet in the consumer application to surface in zipTest.portlet from the producer:
| Tip: | The Portlet selection only appears on the New menu if you are using the Portal perspective. Switch to the Portal perspective if Portlet does not appear on the menu. |
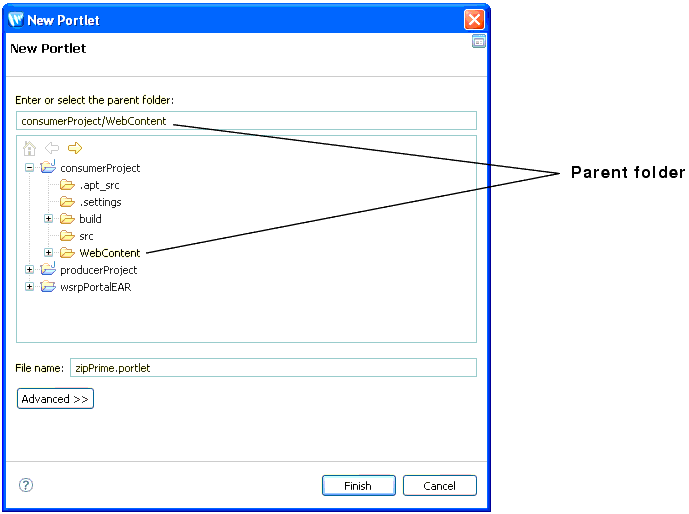
The New Portlet dialog box appears, as shown in Figure 13-6.
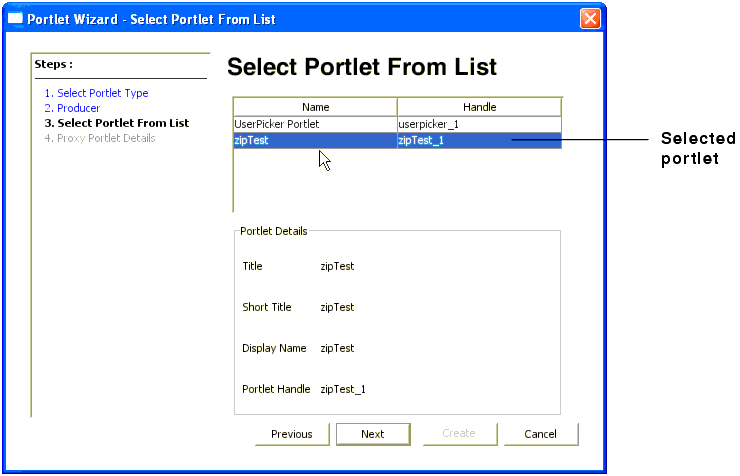
zipPrime.portlet in the File name field, and click Finish.The Select Portlet Type dialog box appears as shown in Figure 13-7.
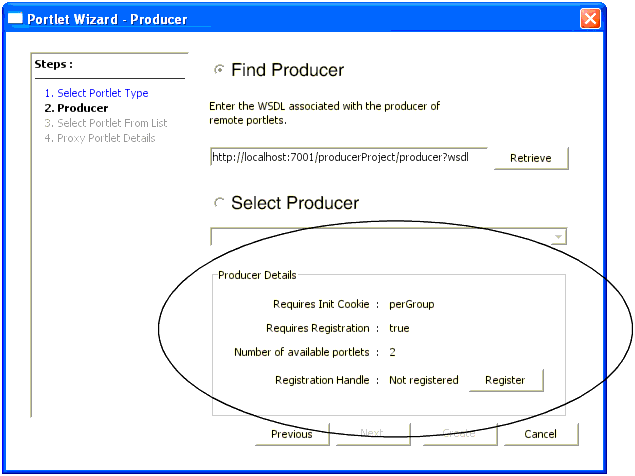
http://localhost:7001/producerProject/producer?wsdl
| Tip: | Of course, the host name localhost is only appropriate if the producer is running on the same server as the consumer. We co-located the consumer and producer to simplify the presentation of this example. Typically, producers and consumers do not run in the same server. |
| Tip: | WSDL stands for Web Services Description Language and is used to describe the services offered by a producer. For more information, see WebLogic Portal Consumers. |
After a few moments, the Portlet Wizard – Producer dialog box refreshes, and registration information appears in the Producer Details panel, as shown in Figure 13-9.
| Tip: | Registration is an optional feature described in the WSRP specification. A WebLogic Portal complex producer implements this option and, therefore, requires consumers to register before discovering and interacting with portlets offered by the producer. See Complex Producers for more information. |
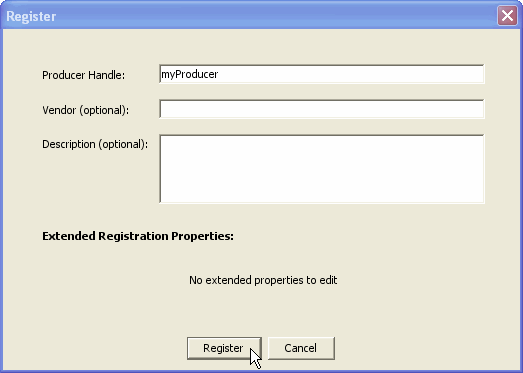
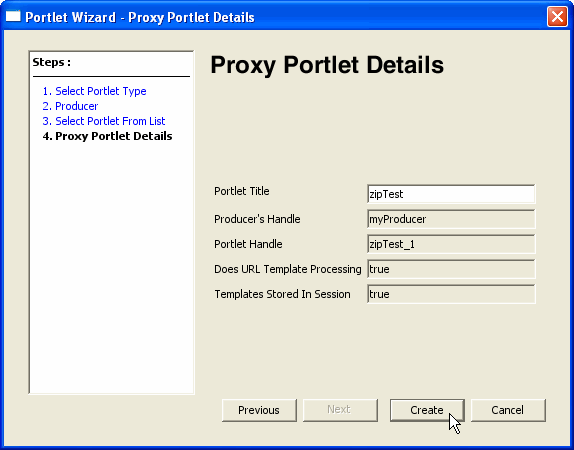
myProducer in the Producer Handle field, as shown in Figure 13-10, and click Register. The handle is stored on the consumer and is used to identify the producer. The new portlet appears in the Editor, as shown in Figure 13-13.
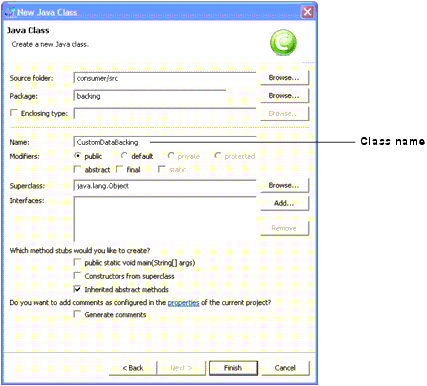
In this step, you will create a backing file called CustomDataBacking.java in the consumer application. Then, you will attach the backing file to the remote portlet you created previously, zipPrime.portlet.
| Tip: | A backing file is a Java class that adds functionality to a portlet. For information on backing files, see the Portlet Development Guide. |
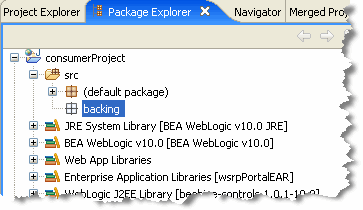
backing. The src/backing folder appears in the Package Explorer, as shown in Figure 13-14.
| Tip: | Alternatively, instead of a folder, you can create a Java package. |
CustomDataBacking and click Finish. The new Java source file appears in the editor. package backing;
import javax.servlet.http.HttpServletRequest;
import javax.servlet.http.HttpServletResponse;
import com.bea.netuix.servlets.controls.content.backing.AbstractJspBacking;
import com.bea.wsrp.ext.holders.MarkupRequestState;
import com.bea.wsrp.ext.holders.SimpleStateHolder;
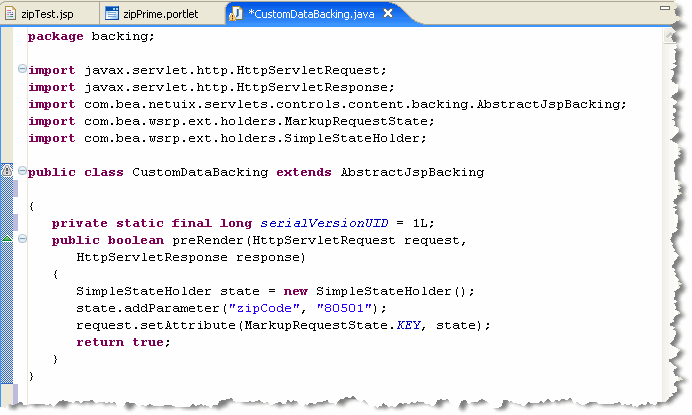
public class CustomDataBacking extends AbstractJspBacking
{
private static final long serialVersionUID = 1L;
   public boolean preRender(HttpServletRequest request,
      HttpServletResponse response)
   {
      SimpleStateHolder state = new SimpleStateHolder();
      state.addParameter("zipCode", "80501");
      request.setAttribute(MarkupRequestState.KEY, state);
      return true;
   }
}
| Tip: | The backing file implements the AbstractJspBacking.preRender() method. This method is called before the request is sent to the producer. The implementation attaches a SimpleStateHolder object containing custom data to the request. This object will be retrieved on the producer where the data is extracted and displayed in the remote portlet. |
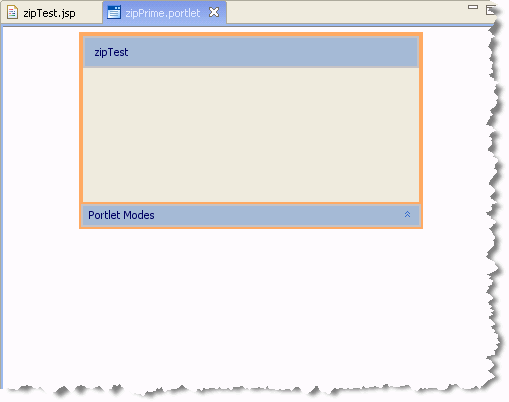
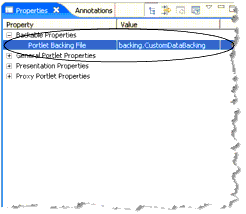
zipPrime.portlet to display it in the editor.zipPrime.portlet. To do this, enter the full classname of the backing file in the Backing File field in the Properties view:Figure 13-17 shows the class name after it has been added.
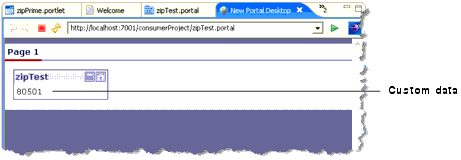
With the consumer application components in place, you can now test the configuration. If the test is successful, the zip code 80501, provided by the backing file, will appear in the remote portlet when it is rendered.
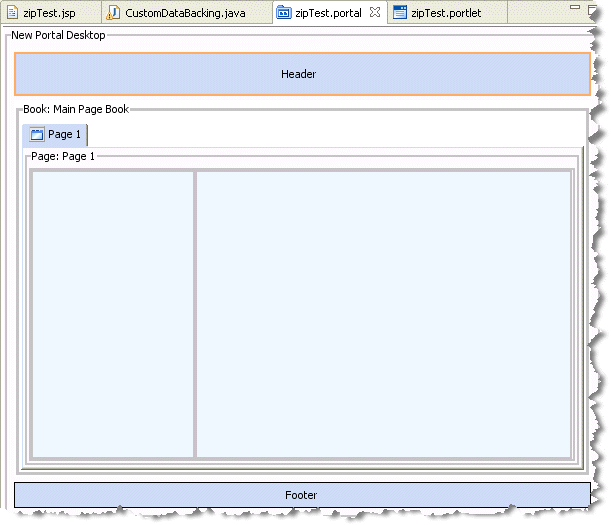
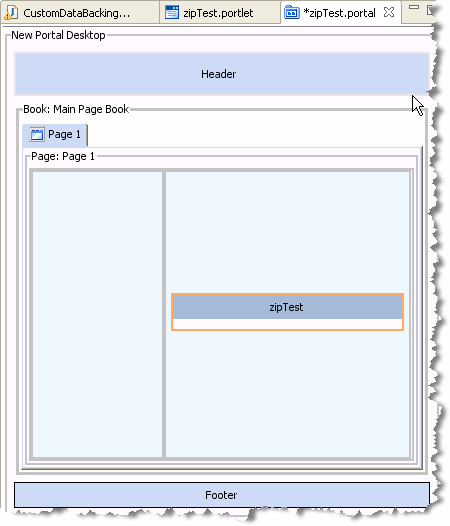
and select New > Portal. The New Portal dialog appears.zipTest.portal and click Finish.The portal is created and appears in the editor, as shown in Figure 13-18.
The portal appears in the Workshop for WebLogic browser. The custom data sent from the consumer displays in the portlet, as shown in Figure 13-20.
The previous section, Custom Data Transfer with a Complex Producer, explains how to transfer data between a WebLogic Portal consumer application and a complex producer running in a WebLogic Portal domain. You can also transfer data between a WebLogic Portal consumer and a simple producer running in a WebLogic Server domain.
| Tip: | For a detailed discussion of complex and simple producers, see WebLogic Portal Producers. |
To use custom data transfer with a simple producer:
Use an implementation of the com.bea.wsrp.ext.holders.XmlPayload interface to transfer XML data (objects of type Element) between consumers and producers. You can place an instance of this class directly in request and response objects. For more information on the XmlPayload interface, refer to its
Javadoc description.
Listing 13-3 shows sample code that uses XmlPayload.
//-- Create an Element object to send.
Element xml = ...

XmlPayload payload = new XmlPayload(xml);
httpRequest.setAttribute(MarkupRequestState.KEY, payload);
This section discusses guidelines for implementing the custom data transfer interfaces listed in Custom Data Transfer Interfaces.
serialVersionUID for all versions.| Tip: | The com.bea.wsrp.ext.holders.SimpleStateHolder class provides a default implementation of the four data transfer interfaces. This class lets you exchange simple name-value pairs of data. For detailed information on the methods of this class, refer to its
Javadoc description. |
Whether a consumer or producer can send custom data depends on the type of request. These rules apply:
InteractionRequestState. There are no exceptions.InteractionResponseState. There are no exceptions.MarkupRequestState only when there is a need to refresh the portlet. For example, if caching is enabled on the remote portlet, consumer may not always send a request to the producer to generate markup.MarkupResponseState if any the following options are enabled:


|