|
|
This chapter describes the most common ways to create portlets, including the Portlet Wizard and the use of out-of-the-box portlets. This chapter also contains instructions for building each type of portlet that is supported by WebLogic Portal.
Before you begin, be sure you are familiar with the concepts associated with creating portlets, as described in Understanding Portlet Development.
This chapter contains the following sections:
The following portlet types are supported by WebLogic Portal:
For a detailed discussion of each portlet type, refer to Portlet Types.
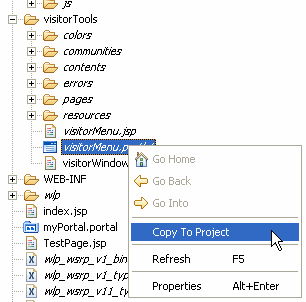
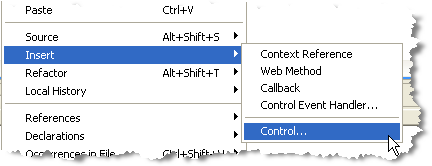
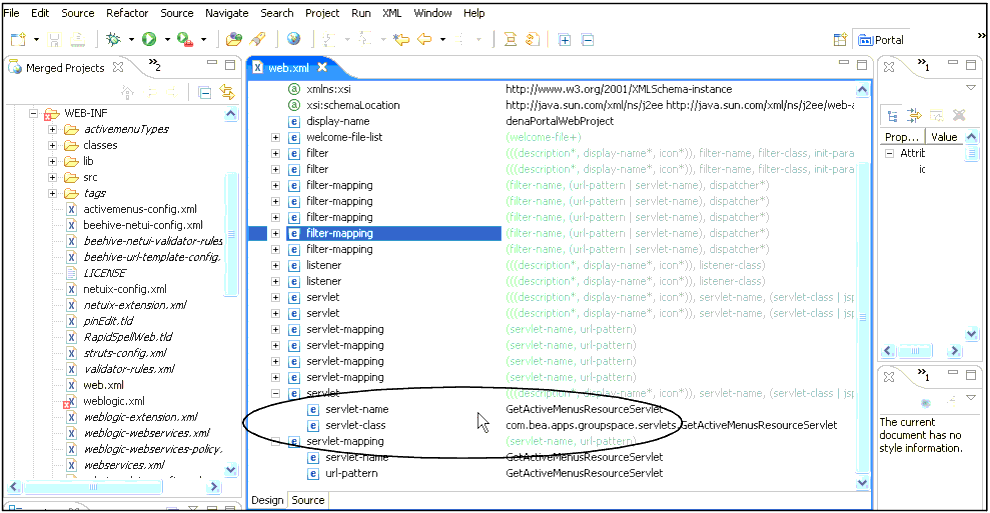
You can copy portlets or other resources from a J2EE Shared Library into your portal application and modify them as needed. A portlet existing in your project will supersede a portlet of the same name in a J2EE Shared Library. To see a list of available portlets, you can use the Merged Projects View of the workbench; resources contained in J2EE Shared Libraries are shown in italic print. You can expand the tree to see the resources that are stored in the various modules. For a reference list of all the J2EE Libraries and their locations on your file system, you can select Window > Preferences > WebLogic > J2EE Libraries.
After you locate a portlet that you want to use, you can right-click the portlet in the Merged Projects View and select the Copy to Project option. Figure 5-1 shows an example of a J2EE Shared Library portlet in the Merged Projects view with the Copy to Project option selected.
| Caution: | Portlets that are part of the GroupSpace sample application cannot be used in a non-GroupSpace-enabled application. |
| Caution: | If you copy J2EE Shared Library resources into your project, keep in mind that with future updates to the WebLogic Portal product, you might have to perform manual steps in order to incorporate product changes that affect those resources. With any future patch installations, WebLogic Portal supports only configurations that do not have copied J2EE library resources in the project. |
For more information about J2EE Shared Libraries, refer to the Portal Development Guide.
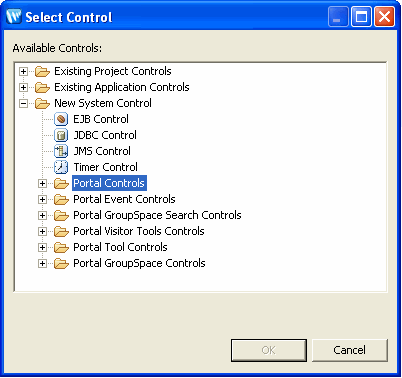
An important tool that you can use to create portlets from scratch is the WebLogic Portal Portlet Wizard. The following sections describe the Portlet Wizard in detail:
In general, you choose the portlet type on the first dialog of the wizard; when generating a portlet based on an existing resource, the Portlet Wizard automatically detects the portlet type whenever possible.
This section provides an overview of the two methods you can use to begin creating a portlet—creating the portlet resource information/file first or creating the portlet itself first.
You might already have a JSP file, for example, that you want to use as the basis for a portlet. (In addition to JSP files, you can drag other resources onto the portal (such as content selectors) to automatically start the portlet wizard.)
If you have an existing resource that you want to use as the basis of a portlet, follow these steps:
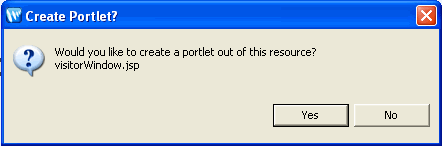
.portal file in WorkSpace Studio. WorkSpace Studio prompts you with a dialog similar to the example in Figure 5-2.
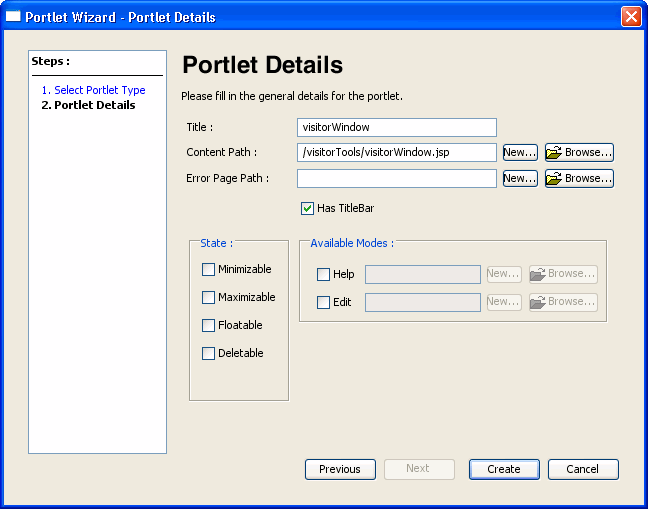
If you click Yes, the Portlet Wizard uses information from the resource file to begin the process of creating a portlet, and displays the Portlet Details dialog. Figure 5-3 shows an example:
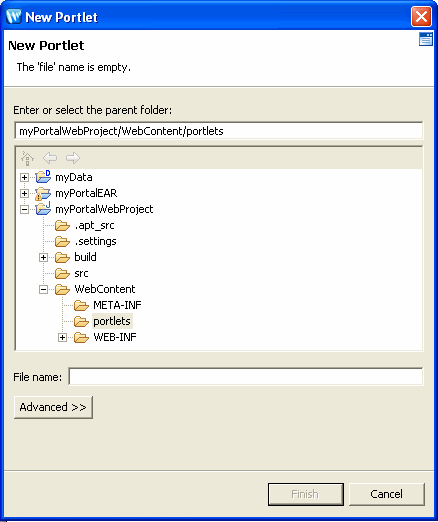
If you do not have an existing source file to start with, you can create the portlet using the New Portlet dialog and the Portlet Wizard. To do so, right-click a folder in your portal web project and select New > Portlet. Figure 5-4 shows an example of the New Portlet dialog.
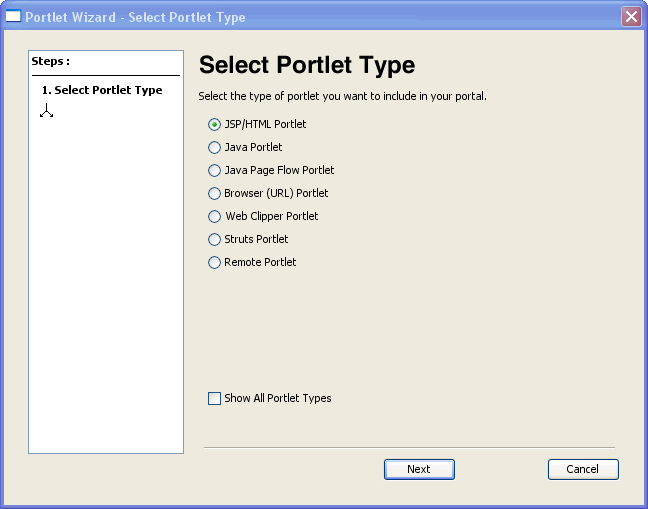
After you confirm or change the parent folder, name the portlet, and click Finish, the Portlet Wizard begins and displays the Select Portlet Type dialog. Figure 5-5 shows an example dialog.
Detailed instructions for creating each type of portlet are contained in How to Build Each Type of Portlet.
WorkSpace Studio invokes the Portlet Wizard any time you perform one of these operations:
portal file is open in the editor view of the workbench.) WorkSpace Studio prompts you with a dialog similar to the example in Figure 5-6.If you click Yes, the Portlet Wizard uses information from the resource file to begin the process of creating a portlet.
When you use File > New > Portlet to create a new portlet, a New Portlet dialog displays before the Portlet Wizard begins. Figure 5-4 shows an example of the New Portlet dialog.
The parent folder defaults to the location from which you selected to add the portlet.
This dialog requires that you select a project and directory for the new portlet, and provide a portlet file name. (The file name appears in the Package Explorer view after you create the portlet.) The Finish button is initially disabled; the button enables when you select a valid project/directory and portlet name. If you select an invalid portal project in the folder tree on this dialog, an error message appears in the status area near the top of the dialog explaining that the project is not a valid portal project. You cannot continue until you have selected a valid project (if one is available).
| Note: | With WebLogic Portal Version 9.2 and later versions, the option to convert a non-portal project to a portal project is not offered. For information on how to integrate portal J2EE Shared Libraries into an already existing project, see the Portal Development Guide. |
When the Portlet Wizard starts, it determines the valid portlet types to offer on the Select Portlet Type dialog, based on the type of project that you are working in.
For example, if you are working within a Portal Web Project that has only the WSRP-Producer feature (and its required accompanying features) installed, it does not have the full set of portal libraries. In this case, only the JPF, JSF, Browser, and Struts portlet types are valid selections; the other portlet types are not included in the Select Portlet Type dialog.
If no valid portlet types exist based on the project type, an informational message displays.
Figure 5-8 shows an example of the Select Portlet Type dialog.
| Tip: | The Java Server Faces (JSF) Portlet selection only appears by default if you have added the JSF Project facet to you portal web project. In some cases, you may wish to manaully install the modules that are required to create JSF portlets. Although this method is not recommended, if you manually install the appropriate modules, you can force the JSF portlet option to appear in the dialog by selecting Show All Portlet Types. For more information on JSF portlets, see JSF Portlets. . |
The Show All Portlet Types option forces all portlet types to appear in the Select Portlet Type dialog even if their modules were not installed. For example, the Java Server Faces (JSF) Portlet selection only appears by default if you have added the JSF Project facet to your portal web project. In some cases, you may wish to manaully install the modules that are required to create JSF portlets. Although this method is not recommended, if you manually install the appropriate modules, you can force the JSF portlet option to appear in the dialog by selecting Show All Portlet Types. For more information on JSF portlets, see JSF Portlets.
| WARNING: | If you create and publish portlets that require modules that have not been properly installed, unexpected behavior and server runtime errors can occur. |
The Portlet Details dialogs that display after you select a portlet type vary according to the type of portlet you are creating. The portlet-building tasks that are described in How to Build Each Type of Portlet contain detailed information about each data entry field of the portlet details dialogs.
The following sections describe how to create each type of portlet supported by WebLogic Portal:
JSP portlets are very similar to simple JSP files. In most cases you can use existing JSP files to build portlets from them. JSP portlets are recommended when the portlet is simple and doesn’t require the implementation of complex business logic. Also, JSP portlets are ideally suited for single page portlets.
There are several ways to invoke the Portlet Wizard, as explained in the section Starting the Portlet Wizard. This description assumes that you create a portlet based on an existing JSP file.
To create a JSP portlet, follow these steps:
The Portlet Wizard displays the Portlet Details dialog; Figure 5-9 shows an example.
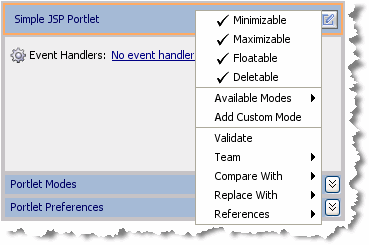
Select the desired check boxes to allow the user to minimize, maximize, float, or delete the portlet. For a more detailed description of portlet states, refer to Portlet States.
|
|
|
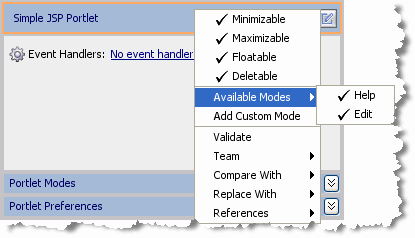
To enable an option, select the desired check box and provide the path to the JSP page that will provide the appropriate function. For a more detailed description of portlet modes, refer to Portlet Modes.
|
The WorkSpace Studio window updates, adding the Portlet_Name.portlet file to the display tree; by default, WorkSpace Studio places the portlet file in the same directory as the content file.
Java portlets are based on the JSR 168 specification that establishes rules for portlet portability. Java portlets are intended for software companies and other enterprises that are concerned with portability across multiple portlet containers.
WebLogic Portal provides capabilities for Java portlets beyond those listed in the JSR168 spec. For example, you can set threading options, use a backing file, and so on. To implement these additional features, WebLogic Portal uses a combination of the typical .portlet file—which you create in the same way that you create other portlet types—as well as the standard portlet.xml file and the weblogic-portlet.xml file.
To create a Java portlet, follow these steps:
The New Portlet dialog displays.
The Portlet Wizard displays the Select Portlet Type dialog.
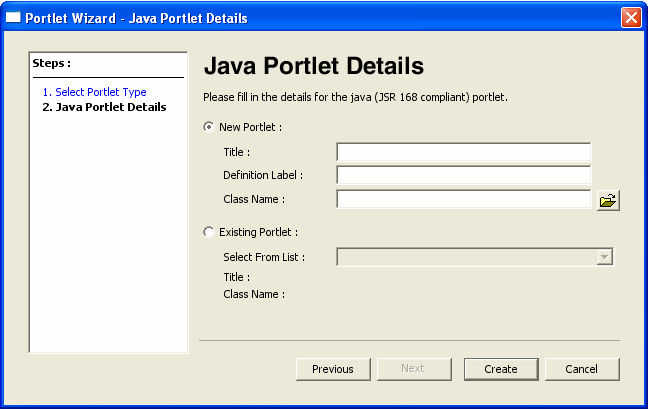
The Java Portlet Details dialog displays. Figure 5-10 shows an example.
portlet.xml file) by selecting the appropriate radio button. If you are creating a new portlet, WebLogic Portal uses the information that you enter in the wizard to perform these two tasks:
.portlet fileportlet.xml file (if this is the first Java portlet that you are creating in the project), or add an entry in the portlet.xml file, which is located in the WEB-INF directory.
If you choose to refer to an existing portlet in the wizard, the wizard displays a selection for every entry in the portlet.xml file, allowing you to create a new .portlet file and associate it with an existing entry in the portlet.xml file.
Based on these values that you entered, the Wizard creates a .portlet file, and adds an entry to /WEB-INF/portlet.xml, if it already exists, or creates the file if needed.
WorkSpace Studio displays the newly created portlet and its current properties. Figure 5-11 shows an example of a Java portlet’s appearance and properties.
The portlet-name attribute in the portlet.xml file matches the definitionLabel property in the .portlet file.
After you create the portlet, you can modify its properties in the Properties view, or double-click the portlet in the editor to view and edit the generated Java class.
| Note: | If you delete a .portlet file, the corresponding entry remains in the portlet.xml file. You might want to clean up the portlet.xml file periodically; these extra entries do not cause problems when running the portal but do result in error messages in the log file. |
The separate portlet.xml deployment descriptor file for Java portlets is located in the WEB-INF directory. In addition, the weblogic-portlet.xml file is an optional BEA-specific file that you can use to inject some additional features.
Listing 5-1 shows an example of how entries might look in the portlet.xml file:
<?xml version="1.0" encoding="UTF-8"?>
<portlet-app version="1.0"
xmlns="http://java.sun.com/xml/ns/portlet/portlet-app_1_0.xsd"
xmlns:xsi="http://www.w3.org/2001/XMLSchema-instance">
<portlet>
<description>Description goes here</description>
<portlet-name>helloWorld</portlet-name>
<portlet-class>aJavaPortlet.HelloWorld</portlet-class>
<portlet-info><title>Hello World!</title></portlet-info>
<supports>
<mime-type>text/html</mime-type>
<portlet-mode>view</portlet-mode>
</supports>
<portlet-info><title>new Java Portlet</title></portlet-info>
</portlet>
</portlet-app>
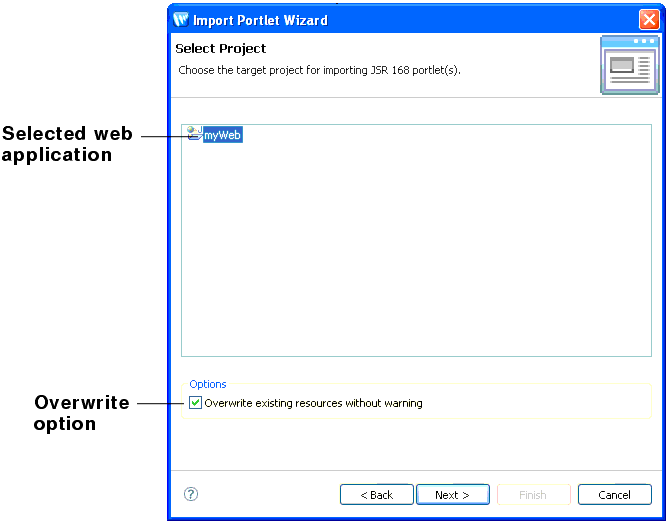
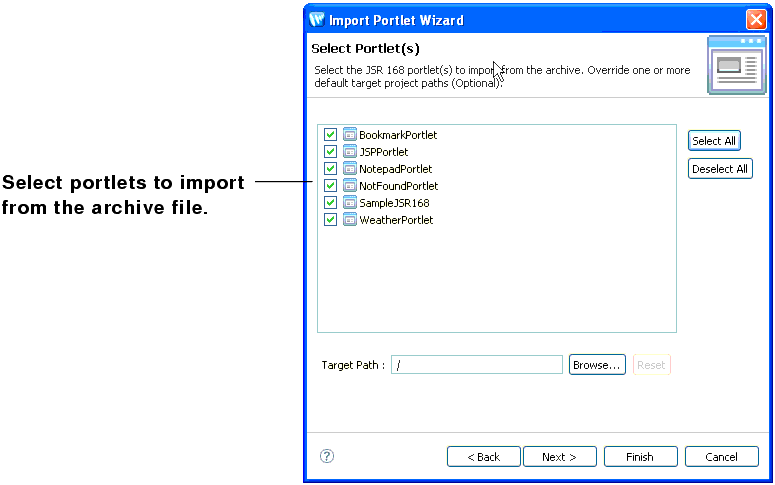
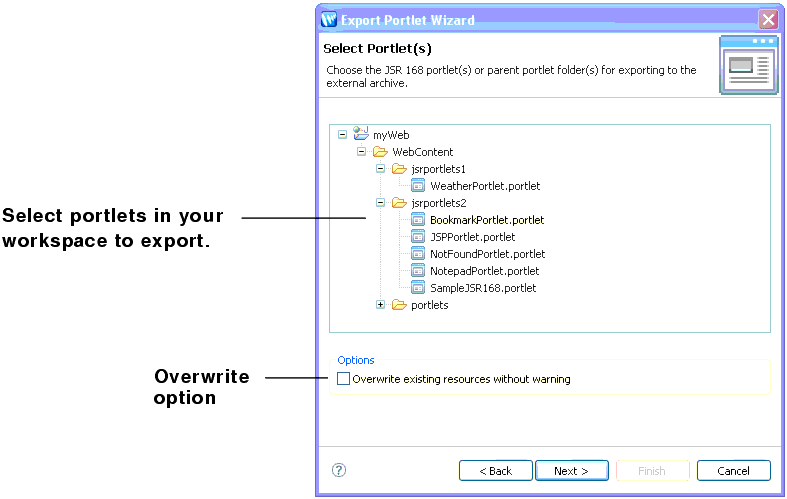
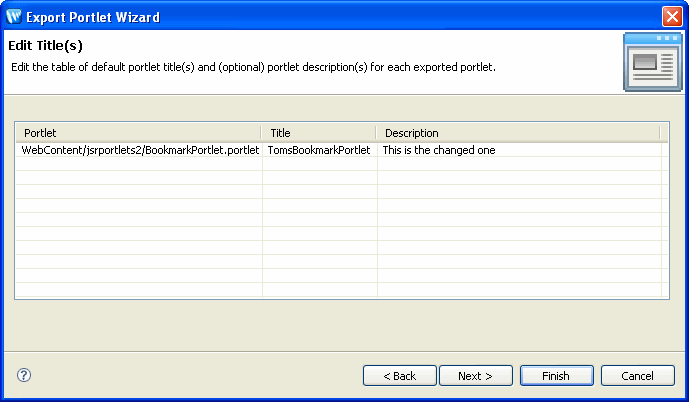
WebLogic Portal produces Java portlets that conform to the JSR 168 specification and can be used universally across operating systems. WorkSpace Studio lets you export Java portlets to a supported archive file (WAR, JAR, or ZIP) that can be deployed on any supported server. You can also use the Import feature to import archive files containing Java portlets into your WorkSpace Studio workspace. For details, see Importing and Exporting Java Portlets.
WebLogic Portal allows you to add more functionality to java portlets than you can obtain using the standard JSR 168 specification. You can use the optional weblogic-portlet.xml file to inject some additional features. The following sections provide some examples.
If you want to create a floatable Java portlet, you can do so by declaring a custom state in weblogic-portlet.xml as shown in the following example code:
<portlet-name>fooPortlet</portlet-name>
<mime-type>text/html</mime-type>
To add an icon to a Java portlet, you need to edit the weblogic-portlet.xml file, as described in this section.
weblogic-portlet.xml file to open it. This file is located in the portal's WEB-INF folder, for example:
myPortal/WEB-INF/weblogic-portlet.xml
weblogic-portlet.xml file: <portlet>
<portlet-name>myPortlet</portlet-name>
<supports>
<mime-type>text/html</mime-type>
<titlebar-presentation>
<icon-url>myIcon.gif</icon-url>
</titlebar-presentation>
</supports>
</portlet>
The init-param element contains a name/value pair as an initialization parameter of the portlet. You can use the getInitParameterNames and getInitParameter methods of the javax.portlet.PortletConfig interface to return these initialization parameter names and values in your portlet code. Init-params are described in the JSR168 specification.
You can add init-params to your Java portlet by dragging a New Init-Param icon from the Design Palette onto the Java portlet in the portlet editor. Then, click on the init-param section of the portlet to display the parameter’s properties in the Property view. In the Property view, you can enter the following init-param data:
For example, if you created an init-param called “Color” and set the default value to “green,” the following entry will be made in the portlet.xml file:
<init-param>
    <description>My init param</description>
    <name>Color</name>
    <value>green</value>
</init-param>
You can use the Portlet Wizard to built a portlet that uses Apache Beehive Page Flows to retrieve its content.
To create a page flow portlet, follow these steps:
The New Portlet dialog displays.
The Portlet Wizard displays the Select Portlet Type dialog.
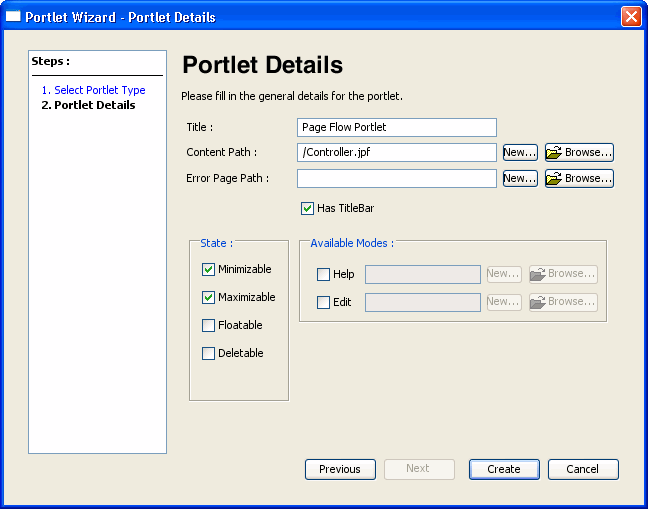
The Portlet Wizard displays the Portlet Details dialog; Figure 5-12 shows an example.
The Page Flow Request URI. You can type a value here, or click the Browse button
 to open a class picker and select the appropriate class. to open a class picker and select the appropriate class.
If you use the class picker to choose a page flow class, this fully-qualified class name is converted to a URI path of a JPF. The JPF does not reside in the project, but is referred to by the
.portlet file when the portlet is created.
If you enter or navigate to a
.java that has no corresponding class in the project or J2EE Shared Libraries, the Portlet Wizard creates the .java file for the page flow. If multiple project source directories exist, then the wizard prompts you to store the new .java file in the source directory of your choice.
|
|
Select the desired check boxes to allow the user to minimize, maximize, float, or delete the portlet. For a more detailed description of portlet states, refer to Portlet States.
|
|
|
To enable an option, select the desired check box and provide the path to the JSP page or page flow that will provide the appropriate function. For a more detailed description of portlet modes, refer to Portlet Modes.
|
The WorkSpace Studio window updates, adding the Portlet_Name.portlet file to the display tree; by default, WorkSpace Studio places the portlet file in the same directory as the content file.
In order to fully understand the process of creating a page flow portlet, you should be familiar with the concept of Page Flows. For more information on using page flows with WebLogic Portal, refer to the Portal Development Guide.
If you want to create a page flow portlet that calls a web service, refer to Web Service Portlets.
You can create JSF portlets for a WSRP producer or a framework web application that has the JSF facet installed (that is, you selected the JSF facet when you created the portal web project).
| Note: | The Java Server Faces (JSF) Portlet selection only appears in the Portlet Wizard if you have added the JSF Project Facet to you portal web project. To add the JSF Project Facet, right-click the portal web project in the Package Explorer. In the Properties dialog, select Project Facets in the tree on the left. Click Add/Remove Project Facets, select JSF in the Project Facets dialog, and click Finish. |
To create a JSF portlet, follow these steps:
The New Portlet dialog displays. Figure 5-15 shows an example of the New Portlet dialog.
The parent folder defaults to the location from which you selected to add the portlet.
The Finish button is initially disabled; the button enables when you select a valid parent folder and portlet name. If you select an invalid portal project in the folder tree on this dialog, an error message appears in the status area near the top of the dialog explaining that the project is not a valid portal project.
The Portlet Wizard displays the Select Portlet Type dialog.
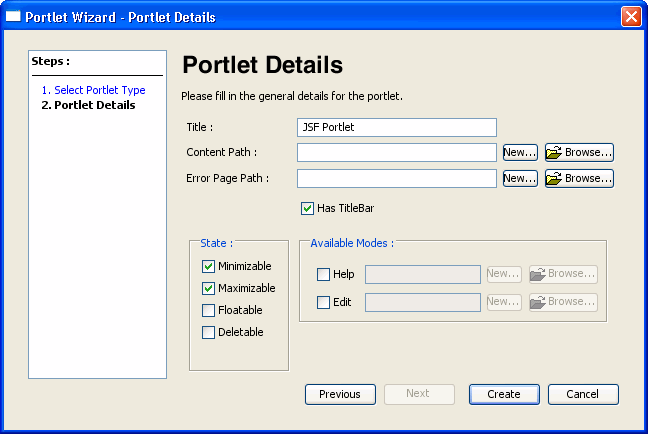
The Portlet Wizard displays the Portlet Details dialog; Figure 5-14 shows an example.
|
|||
Select the desired check boxes to allow the user to minimize, maximize, float, or delete the portlet. For a more detailed description of portlet states, refer to Portlet States.
|
|||
|
To enable an option, select the desired check box and provide the path to the file that will provide the appropriate function. For a more detailed description of portlet modes, refer to Portlet Modes.
|
The WorkSpace Studio window updates, adding the Portlet_Name.portlet file to the display tree.
If you want to have more than one JSF portlet on a portal page, use the namingContainer JSP tag immediately after a JSF view tag, in order to provide component naming in the generated component tree. See Supporting Unique JSF Component Identifiers for an example.
If you are using JSPs in your JSF portlets, be aware that you will only see your JSP edits when you view the portlet in a new session. A simple page refresh is not sufficient. This behavior differs from typical JSP development behavior, where changes are compiled and made available after a page refresh. Normally, JSPs are handled by the servlet container, which checks for updated JSPs. JSF, on the other hand, uses JSPs as a source for the component tree, which typically is loaded only once per session, depending on how the JSF implementation handles or does not handle changed JSP source. To see your JSP changes reflected in a JSF portlet, you must view the portlet in a new session. Typically, you can do this by opening a new browser to view the portal.
JSF applications associate a unique identifier with each JSF component in the component tree. When multiple JSF applications appear on a portal page, it becomes necessary to further scope these unique identifiers.
WLP provides the following features to support scoping JSF component identifiers on a portal page:
These features are discussed in the WLP Javadoc for the com.bea.portlet.adapter.faces package.
Listing 5-2 is an example that demonstrates how to use the <namingContainer> tag. The <namingContainer> tag is described in detail in the JSP Tag Javadoc.
<%@ page language='java' contentType='text/html;charset=UTF-8'%>
<%@ taglib uri='http://java.sun.com/jsf/core' prefix='f' %>
<%@ taglib uri='http://bea.com/faces/adapter/tags-naming' prefix='jsf-naming' %>
<%@ taglib uri='http://java.sun.com/jsf/html' prefix='h' %>
<f:view>
	<jsf-naming:namingContainer id='myPortlet'>
		<h:outputText value='Hello World'/> 	</jsf-naming:namingContainer>
</f:view>
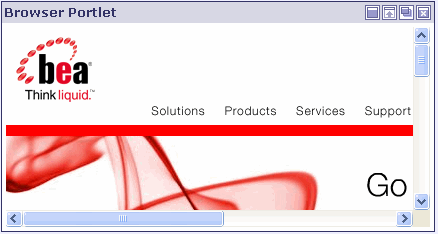
Browser portlets, also called Content URI portlets, are basically HTML portlets that use URLs to retrieve their content. Unlike other portlet types that are limited to displaying data contained within the portal project, browser portlets can display URL content that is outside from the portal project.
| Tip: | A clipper portlet also lets you include remote web content in a portal page. For information on clipper portlets and how they differ from browser portlets, see Creating Clipper Portlets. |
There are several ways to invoke the Portlet Wizard, as explained in the section Starting the Portlet Wizard. This description assumes that you right-click in the Package Explorer view tree within a portal project and select New > Portlet from the menu.
To create a browser portlet, follow these steps:
The New Portlet dialog displays. Figure 5-15 shows an example of the New Portlet dialog.
The parent folder defaults to the location from which you selected to add the portlet.
The Finish button is initially disabled; the button enables when you select a valid parent folder and portlet name. If you select an invalid portal project in the folder tree on this dialog, an error message appears in the status area near the top of the dialog explaining that the project is not a valid portal project.
The Portlet Wizard displays the Select Portlet Type dialog.
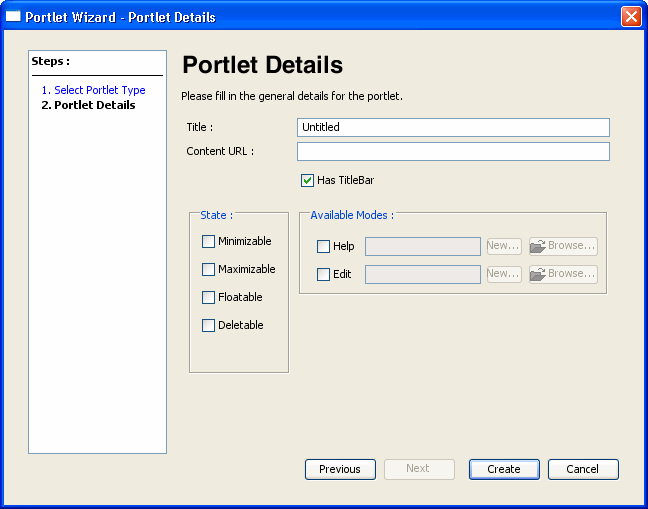
The Portlet Wizard displays the Portlet Details dialog; Figure 5-16 shows an example.
Select the desired check boxes to allow the user to minimize, maximize, float, or delete the portlet. For a more detailed description of portlet states, refer to Portlet States.
|
|
|
To enable an option, select the desired check box and provide the path to the JSP page that will provide the appropriate function. For a more detailed description of portlet modes, refer to Portlet Modes.
|
The WorkSpace Studio window updates, adding the Portlet_Name.portlet file to the display tree; by default, WorkSpace Studio places the portlet file in the same directory as the content file.
| Note: | The internal implementation of Browser portlets depends on asynchronous portlet content rendering; because of this, the portlet attribute Async Content displayed in the Properties view is set to none and is read-only. For more information about asynchronous content rendering, refer to Asynchronous Portlet Content Rendering. |
A clipper portlet is a portlet that renders content from another web site. A clipper portlet can include all or a subset of another web site’s content using a process called “web clipping.” Clipper portlets are discussed in Creating Clipper Portlets.
Use the Portlet Wizard to generate a portlet based on a Struts module, as explained in this section.
Before you can create a Struts portlet, you must first integrate your existing Struts application into your portal web application. For detailed information on integrating Struts applications into WebLogic Portal, refer to the Portal Development Guide.
| Tip: | It is highly recommended that you fully develop and test a Struts application before attempting to host it within a portal. This helps to separate the complexities of developing a working Struts application from the additional issues involved in putting the Struts application into a portlet. |
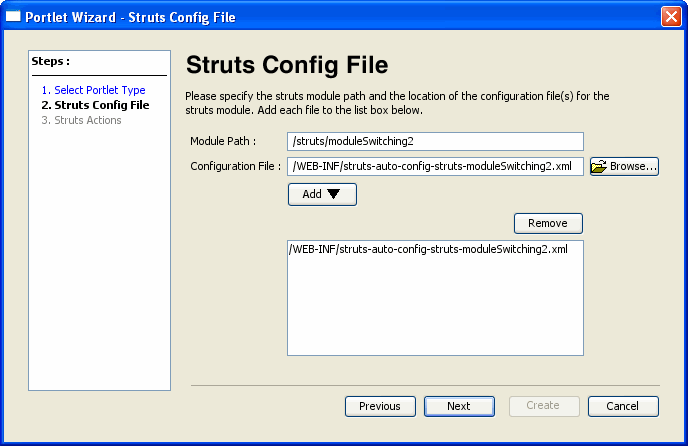
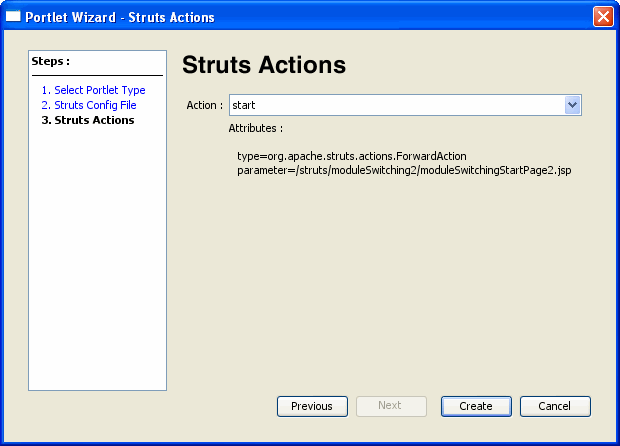
To create a Struts portlet, follow these steps:
WEB-INF directory of the portal web application.
The WorkSpace Studio window updates, adding the Portlet_Name.portlet file to the display tree; by default, WorkSpace Studio places the portlet file in the directory that you specified in the Struts Module Path dialog of the wizard.
Because remote portlet development is a fundamental task in a federated portlet environment, the task of creating remote portlets is described in detail within the BEA WebLogic Portal Federated Portals Guide.
The following types of portlets can be exposed with WSRP inside a WebLogic portal:
A web service portlet is a special type of page flow portlet, allowing you to call a web service. You create web service portlets using the features of WorkSpace Studio and WebLogic Portal.
Before you can create a portlet that calls a web service, you must perform the following prerequisite tasks:
Instructions on performing these tasks are contained in the WorkSpace Studio.
After you have performed the setup tasks, you can create a web service portlet by following these steps:
WebLogic Portal supports the use of detached portlets, which provide popup-style behavior. Technically, a detached portlet is defined as anything outside of the calling portal context. Any portlet type supported by WebLogic Portal can be rendered as a detached portlet.
Keep the following considerations in mind as you implement detached portlets:
You use the standalonePortletUrl class or associated JSP tag to create URLs to detached portlets.
To create a detached portlet URL from a JSP page, you use the render:standalonePortletUrl JSP tag or class; the following example shows the syntax of the JSP tag:
<render:standalonePortletUrl portletUri="/absolute_path/detached_portlet_name.portlet" …/>
To create a detached portlet URL from Java code, use the following example as a guide:
StandalonePortletURL detachedURL = StandalonePortletURL.createStandalonePortletURL(request, response);
detachedURL.setPortletUri(“/path/to/detached.portlet”);
A file-based portlet can exist either as a stand-alone .portlet file or as an inlined portlet. Typically, within the WorkSpace Studio portal editing framework, .portlet files are included in portals by reference. For instance, when you drag a .portlet file onto a portal, page or book, a reference is created to the portlet file inside the portal, page, or book. On the other hand, an inlined portlet’s entire XML definition is embedded directly in a page or book.
Inlined portlets are created under the following circumstances:
.book or .page file. For detailed information on creating remote books and pages, see the Federated Portals Guide. .book or .page file that contains portlets, those portlets will be inlined if they were originally inlined. If the original page contained referenced portlets, they will be referenced when the page is extracted. For detailed information on the Export/Import Utility, see the Production Operations User Guide. You can drag and drop, cut, copy, and paste inline portlets from one page or book to another from within the portal editor.
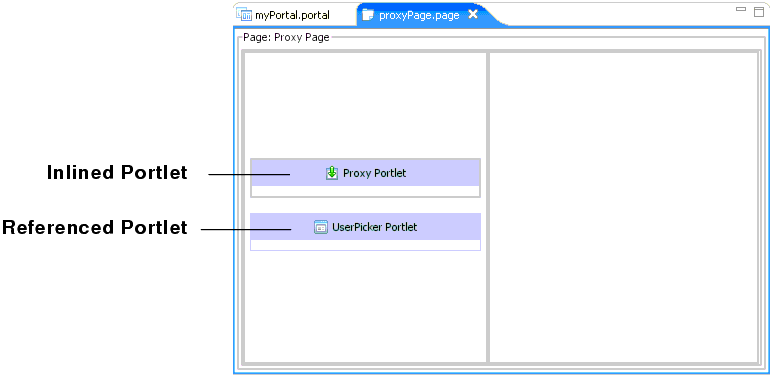
Figure 5-19 shows a remote page that contains an inlined portlet and a referenced portlet. Note that the icon used in an inlined portlet is distinct from a referenced portlet.
| Tip: | You can edit the properties of inlined portlets exactly like file-based portlets; however, portlet states and modes are not editable for inlined portlets. |
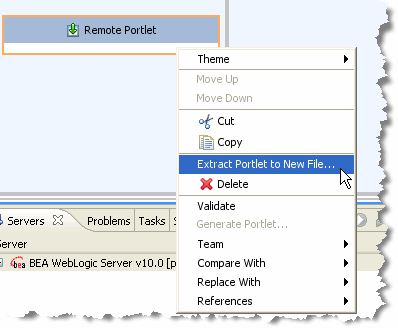
You can export an inlined portlet to a .portlet file. When you do this, the resulting .portlet file is functionally equivalent to any other .portlet file. When you extract an inlined portlet, the inlined portlet XML code is automatically removed from the source file (a page or book) and replaced with a reference to the newly created .portlet file.
| Note: | After you extract an inlined portlet, you can undo the operation (re-inline the portlet). However, note that the .portlet file that was created during the extraction will not be deleted from your system. The source document will simply not reference the .portlet file any longer. |
To extract an inlined portlet, do the following:
| Tip: | If you receive errors after extracting a portlet, be sure to save the source file and run the Project > Clean command. |
You can set the theme of an inlined portlet exactly as you would for a referenced portlet. To set the theme, right-click the inlined portlet in the book or page editor, and pick a theme from the Theme menu. The theme is retained for that portlet as long as it remains referenced in the page or book.
You can extract any book or page in a portal to a .book or .page file. Once a book or page is extracted, you are free to use it in another portal within the same portal web application if you wish.
The procedure for extracting books and pages is similar to the procedure for extracting inlined portlets, described in Extracting Inlined Portlets. To extract a book or page, do the following:
| Tip: | Any theme applied to a book or page is retained for an extracted book or page as long as the book or page remains referenced in the portal. |
Portlet properties are named attributes of the portlet that uniquely identify it and define its characteristics. Some properties—such as title, definition label, and content URI—are required; many optional properties allow you to enable specific functions for the portlet such as scrolling, presentation properties, pre-processing (such as for authorization) and multi-threaded rendering. The specific properties that you use for a portlet vary depending on your expected use for that portlet.
During the development phase of the portal life cycle, you generally edit portlet properties using the WorkSpace Studio interface; this section describes properties that you can edit using WorkSpace Studio.
During staging and production phases, you typically use the WebLogic Portal Administration Console to edit portlet properties; only a subset of properties are editable at that point. For instructions on editing portlet properties from the WebLogic Portal Administration Console, refer to Modifying Library Portlet Properties and Modifying Desktop Portlet Properties.
For a detailed description of all portlet properties, refer to Portlet Properties in the Portal Properties View and Portlet Properties in the Portlet Properties View.
This section contains the following topics:
To edit portlet properties, follow these steps:
.portlet file to open it in the workbench editor. The displayed properties vary according to the active area that you select. If you click the outer border, properties for the entire portlet appear; if you click the inner border, properties for the content of the portlet appear, and so on.
If you click on a property field, a description of that field displays in the status bar.
Values for some portlet properties are not editable after you create the portlet.
In some cases, from the property field you can view associated information pertaining to that portlet property; for example, the Java portlet Class Name property contains a read-only value with an Open button to view the associated Java file. For more information about options available in the Properties view, refer to Tips for Using the Properties View.
The behavior of the Properties view varies depending on the type of field you are editing. The following tips might help you as you manipulate the content of the data fields in the Properties view.
.portlet file in the Package Explorer view and choose Edit with > XML Editor to open the file using the basic XML editor that Eclipse provides. | Caution: | The Eclipse XML editor has limited validation capabilities. BEA recommends the use of a robust validation tool to ensure that your hand-edited XML is valid. |
 to launch the page flow class picker dialog. If you open the dialog, the page flow class name is converted to a URI when you leave the dialog. WebLogic Portal stores the URI in the
 .portlet file when you save the portlet. The property editor validates the page flow URI specified and warns you if you choose a URI that has no corresponding page flow class. You can choose to proceed anyway and store an invalid URI; you should create a valid class later so that the portlet works correctly.
The properties described in this section are contained within the .portal file and are editable using the WorkSpace Studio workbench. The values you enter here override the corresponding value in the .portal file, if a value exists there.
To display the portlet properties that display in the Properties view for a portal, follow these steps:
| Note: | These steps assume that you have an existing portal that contains portlets. |
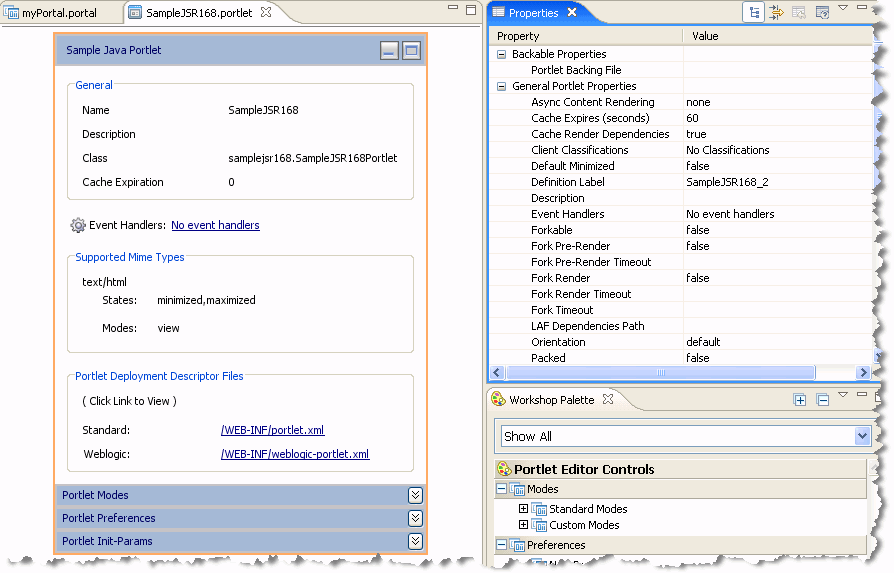
The Properties view displays the properties of the portlet instance; Figure 5-22 shows an example.
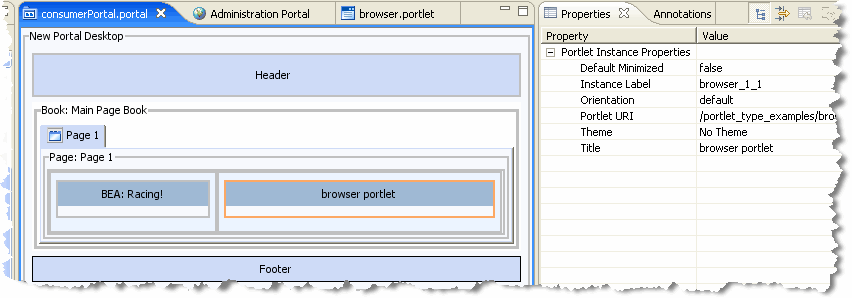
Table 5-6 describes these properties and their values.
Required. A single portlet, represented by a
.portlet file, can be used multiple times in a portal. Each use of that portlet is a portlet instance, and each portlet instance must have a unique ID, or Instance Label. A default value is entered automatically, but you can change the value. Instance labels help WebLogic Portal manage the runtime state of multiple instances of portlets independently of each other on the server. WebLogic Portal also uses instance labels during URL rewriting and scoping of various HTML controls such as names of forms, and ID attributes.
|
|
The properties described in this section are contained within the .portlet file and are editable using the WorkSpace Studio workbench. The values you enter here override the corresponding value in the .portlet file, if a value exists there.
When you select the outer border of a portlet instance in the editor, a related set of properties appears in the Properties view. The displayed properties vary according to the type of portlet that you are viewing. Figure 5-1 shows a portion of the Properties view for a portlet.
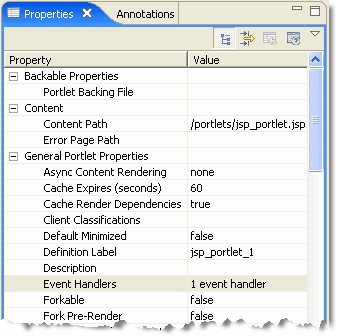
Table 5-7 describes these properties and their values.
Optional. If you want to use a class for preprocessing (for example, authentication) prior to rendering the portlet, enter the fully qualified name of that class. That class should implement the interface com.bea.netuix.servlets.controls.content.backing.JspBacking or extend com.bea.netuix.servlets.controls.content.backing.AbstractJspBacking. From the data field you can choose to browse to a class or open the currently displayed class.
|
|||
Required. The path (relative to the project) to the file/class to be used for the portlet's content. From the data field you can choose to browse to a file (or class for page flow portlets) or open the currently displayed file/class. For example, if the content is stored in
Project/myportlets/my.jsp, the Content URI is /myportlets/my.jsp.
|
|||
Allows you to specify whether to use asynchronous content for a given portlet and the implementation to use. An editable dropdown menu provides the selections
none, ajax, and iframe. Portlet files that do not contain the asyncContent attribute appear with the initial value none displayed.
For more information, refer to Asynchronous Portlet Content Rendering.
|
|||
This instance-scoped boolean property appears in the Properties view whenever a window portlet or proxy portlet is loaded, allowing render dependencies to be cached. See also Portlet Dependencies.
The value defaults to
true if the attribute is not already included in the .portlet file. The value is read-only for proxy portlets and editable for all other portlet types. For proxy portlets, the value is initialized from th e producer whenever a proxy portlet is generated from the portlet wizard.
|
|||
Optional. Select the multichannel devices on which the portlet can be viewed. The list of displayed devices is obtained from the file Project_Path
\WEB-INF\client-classifications.xml. You must create this file to map clients to classifications in your portal web project. For more information about this task, refer to the Portal Development Guide.
|
|||
Required. Each portlet must have a unique value within the web project. For Java portlets, you type the desired value when creating the portlet; for the remaining portlet types, a value is generated automatically when you create the portlet. Definition labels can be used to navigate to portlets. Also, components must have Definition Labels for entitlements and delegated administration.
As a best practice, you should edit this value in WorkSpace Studio to create a meaningful value. This is especially true when offering portlets remotely, as it makes it easier to identify them from the producer list.
|
|||
Optional. Use this value to configure interportlet communication using portlet events. The default is
No event handlers. To select or add an event handler, click Browse in the Properties view. You an also click the Event Handlers link in the portlet editor. Both of these methods bring up the Portlet Event Handlers dialog box.
|
|||
For details on this property, refer to Portlet Forking.
|
|||
For details on this property, refer to Portlet Forking.
|
|||
For details on this property, refer to Portlet Forking.
|
|||
For details on this property, refer to Portlet Forking.
|
|||
For details on this property, refer to Portlet Forking.
|
|||
Optional. Hint to the skeleton to position the portlet title bar on the top, bottom, left, or right side of the portlet. You must build your own skeleton to support this property in the .portal file. Following are the numbers used in the .portal file for each orientation value: top=0, left=1, right=2, bottom=3.
|
|||
Optional. To enhance performance, set to
true to cache the portlet. For example, portlets that call web services perform frequent, expensive processing. Caching web service portlets greatly enhances performance.
For more information, refer to Portlet Caching.
|
|||
Required. Enter the title for the portlet's title bar. You can override this title in each instance of the portlet (in the portal editor, as described in Portlet Properties in the Portal Properties View).
|
|||
Optional. Possible values are
none, session, and transient-session. This attribute controls attribute persistence for Page Flow, JSF, and Struts portlets. The default is session, where request attributes populated by an action are persisted into a collection class that is placed into a session attribute so that the portal framework can safely include the forwarded JSP on subsequent requests without re-running the action. Using the value session can cause session memory consumption and replication that would not otherwise occur in a standalone Page Flow, JSF, or Struts application. The value transient-session places a serializable wrapper class around a HashMap into the session. The value none performs no persistence operation.
JPF or Struts portlets that have the
transient-session value applied generally have the same behavior as existing portlets; however, in failover cases, the persisted request attributes disappear on the failed-over-to server. In the failover case, you must write forward JSPs to handle this contingency gracefully by, at a minimum, not expecting any particular request attribute to be populated; ideally you should include the ability to either repopulate automatically or present the user with a link to re-run the last action to repopulate the request attributes. For non-failover cases, request attributes are persisted, providing a performance advantage for non-postback portlets identical to default session persistence portlets.
Portlets that have the
none value applied will never have request attributes available on refresh requests; you must write forward JSPs to assume that they will not be available. You can use this option to completely remove the framework-induced session memory loading for persisted request attributes.
|
|||
(Optional) Lets you add name/action pairs to a JSF portlet. The name field is simply an alias. Event handlers (and the Event Handler dialog) can simply reference this name. The action is a reference to a JSF view ID, such as
myfaces/foo.face. For more information on adding event handlers, see Portlet Events.
|
|||
|
For proper rendering, the class must exist in a cascading style sheet (CSS) file in the Look and Feel’s selected skin, and the skin’s skin.xml file must reference the CSS file.
Sample: If you enter “my-custom-class”, the rendered HTML from the default skeletons looks like this:
The properties you enter are added to the component's parent <div> tag. This property also applies to books and pages. For more information, refer to the Portal Development Guide.
|
|||
Optional. Defines whether the portlet is accessible using the WSRP producer. The default is
true, which allows the portlet to be accessed. For more information about entitling remote portlets, refer to the Federated Portals Guide.
|
|||
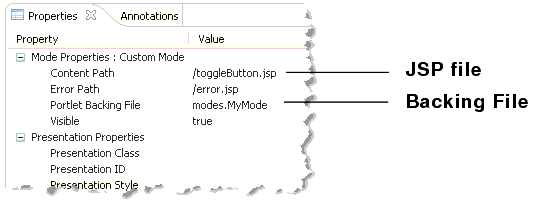
Optional. If you want to use a backing file for content prior to rendering the portlet, enter the fully qualified name of the appropriate class. That class should implement the interface com.bea.netuix.servlets.controls.content.backing.JspBacking or extend com.bea.netuix.servlets.controls.content.backing.AbstractJspBacking.
|
|||
Optional. If set to
true the portlet can be floated into a separate window. For instructions on creating a floatable Java portlet, which requires editing the weblogic-portlet.xml file, in Customizing Java Portlets Using weblogic-portlet.xml.
|
|||
Optional. If you want to use a class for preprocessing (for example, authentication) prior to rendering the portlet's mode page (such as the edit page), enter the fully qualified name of that class. That class should implement the interface com.bea.netuix.servlets.controls.content.backing.JspBacking or extend com.bea.netuix.servlets.controls.content.backing.AbstractJspBacking.
|
|||
This property is described in the Portal Development Guide.
|
|||
This property is described in the Portal Development Guide.
|
|||
This property is described in the Portal Development Guide.
|
|||
This property is described in the Portal Development Guide.
|
|||
This boolean property allows the consumer to obtain render dependencies from the producer during the pre-render life cycle of a proxy portlet.
When a portlet on a producer has a
lafDependenciesUri value, the producer exposes the invokeRenderDependencies boolean in the portlet description. For more information on this attribute, refer to Portlet Dependencies.
|
|||
Required. The purpose of this value is to cut down on network traffic by sending the user's context (including the profile) only once per session. For WebLogic Portal producers it will always be
true. For third party producers it can be true or false, depending on the response from GetServiceDescription. If it is false, the entire user context will be sent on every getMarkup and performBlockingInteraction request. If true it will be sent only once per producer session.
|
|||
(Deprecated) Allows this portlet to invoke an action when another portlet invokes the same action. This functionality has been replaced with the more complete interportlet communication mechanism. For more information on interportlet communication, refer to Local Interportlet Communication.
|
|||
Optional. The action to be performed in the struts module when the page is refreshed but the portlet itself is not targeted. |
|||
Required. The content control takes a URI that is expected to be a URL for a standalone application or web page, and embeds the URL as portlet content. |
|||
Portlet preferences provide the primary means of associating application data with portlets. This feature is key to personalizing portlets based on their usage. This section describes portlet preferences in detail.
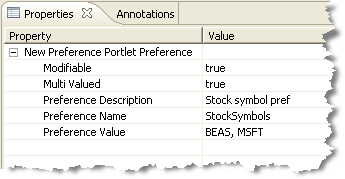
After you create a portlet, you can instantiate it several times. Because you can create several instances of a portlet, it is natural to expect each instance to behave differently yet use the same code and user interface. For instance, consider a typical portlet to display a Stock Portfolio. Given a list of stock symbols, this portlet retrieves quotes from a stock quote web service periodically, and displays the quotes in the portlet window. By letting each user change the list of stock symbols and a time interval to reload the quote data, you can let each user customize this portlet.
The portlet needs to be able to store the list of stock symbols and the retrieval interval persistently, and update these values whenever a user customizes these values. In particular, the following data must be persistently managed:
Technically, a portlet preference is a named piece of string data. For example, a Stock Portfolio portlet could have the following portlet preferences:
You can associate several such preferences with a portlet. WebLogic Portal provides the following means to manage portlet preferences:
When you are building a portlet using the WorkSpace Studio workbench, you can specify the names and default values of preferences for each portlet. All portlet instances derived from this portlet will, by default, assume the values specified during development.
WebLogic Portal allows portal administrators to modify preferences for a given portlet instance.This task occurs during the staging phase and uses the WebLogic Portal Administration Console.
At request time, your portlets can programmatically access and update preferences using a javax.portlet.PortletPreferences object. You can create an edit page for your portlet to let users update preferences, or you can automatically update preferences as part of your normal portlet application flow.
This section contains the following topics:
The steps to associate preferences with a portlet depend on the type of portlet you are building. If you are using the Java Portlet API, described in Getting and Setting Preferences for Java Portlets Using the Preferences API, the steps follow those specified in the Java Portlet Specification. For other kinds of portlets, such as those using Java Page Flows, Struts, or JSPs, you can use the WorkSpace Studio workbench to add preferences to a portlet.
You can also allow the administrator to create new preferences using the Administration Console. However, because the portlet developer is more likely to be aware of how portlet preferences are used by the portlet, it is generally better to create portlet preferences during the development phase.
For portlets using Java Portlet API, you can specify preferences in the portlet deployment descriptor according to the specification. For all portlets in a web project, the deployment descriptor is portlet.xml, found in the WEB-INF directory of the web project. Listing 5-3 provides an example.
<portlet>
   <description>This portlet displays a stock portfolio.</description>
   <portlet-name>portfolioPortlet</portlet-name>
   <portlet-class>portlets.stock.PortfolioPortlet </portlet-class>
      <supports>
         <mime-type>text/html</mime-type>
         <portlet-mode>edit</portlet-mode>
      </supports>
      <portlet-info>
         <title>My Portfolio</title>
      </portlet-info>
      <portlet-preferences>
         <preference>
            <name>stockSymbols</name>
               <value>BEAS, MSFT</value>
         </preference>
         <preference>
            <name>refreshInterval</name>
            <value>600</value>
         </preference>
   </portlet-preferences>
</portlet>
This snippet deploys the portfolio portlet with two preferences: a preference with name stockSymbols and value BEAS, MSFT, and another preference refreshInterval with value 600.
Instead of specifying a single value for the stockSymbols preference, you can declare each symbol as a separate value as shown in Listing 5-4 below, with the value elements shown in bold.
<portlet>
   <description>
      This portlet displays a stock portfolio.
   </description>
   <portlet-name>portfolioPortlet</portlet-name>
   <portlet-class>portlets.stock.PortfolioPortlet </portlet-class>
   <supports>
      <mime-type>text/html</mime-type>
      <portlet-mode>edit</portlet-mode>
   </supports>
   <portlet-info>
      <title>My Portfolio</title>
   </portlet-info>
   <portlet-preferences>
      <preference>
         <name>stockSymbols</name>
         <value>BEAS</value>
         <value>MSFT</value>
         </preference>
      <preference>
         <name>refreshInterval</name>
         <value>600</value>
      </preference>
   /portlet-preferences>
</portlet>
If you prefer that portlets should not be allowed to programmatically update any given preference, you can mark the preference as read-only. Listing 5-5 shows an example of preventing a portlet from changing the refreshInterval.
<portlet>
   <description>
      This portlet displays a stock portfolio.
   </description>
   <portlet-name>portfolioPortlet
   <portlet-class>portlets.stock.PortfolioPortlet
   <supports>
      <mime-type>text/html</mime-type>
      <portlet-mode>edit</portlet-mode>
   </supports>
   <portlet-info>
      <title>My Portfolio</title>
   </portlet-info>
   <portlet-preferences>
      <preference>
         <name>stockSymbols</name>
         <value>BEAS</value>
         <value>MSFT</value>
      /preference>
      <preference>
         <name>refreshInterval</name>
         <value>600</value>
         <read-only>true</read-only>
      </preference>
   </portlet-preferences>
</portlet>
Note that by marking a preference read-only, you are preventing the portlet from changing the current value only at request time. Portal administrators can always change the value(s) of a preference using the Administration Console.
If you are building other kinds of portlets (such as those using Java Page Flows, Struts, or simple JSPs), you can add preferences using WorkSpace Studio.
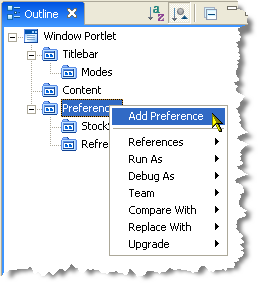
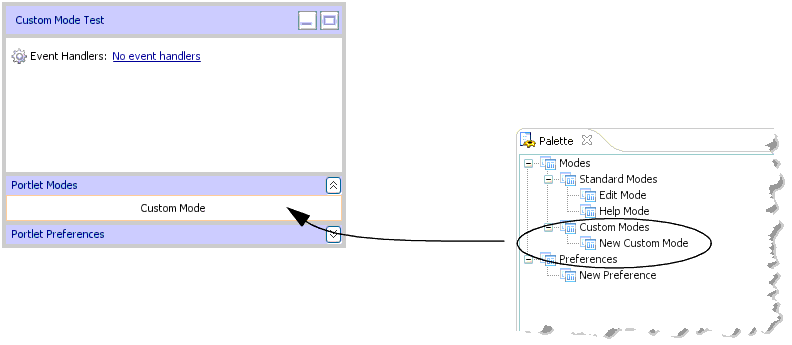
To add a preference, follow these steps:
A new preference is added to the tree hierarchy with the name New Preference Preference.
Table 5-8 describes the attributes for portlet preferences as shown in the Properties view.
At request time, portlet preferences for a given portlet are represented as instances of the javax.portlet.PortletPreferences interface. This interface is part of the Java Portlet API. This interface specifies methods to access and modify portlet preferences.
Table 5-9 describes methods that allow a portlet to access its preferences.
String getValue(String name, String default) |
|
String[] getValues(String name, String[] defaults) |
|
boolean isReadOnly(String name) |
|
Enumeration getNames() |
|
Map getMap() |
Table 5-10 describes methods that allow a portlet to change preference values.
void setValue(String name, String value) |
|
void setValues(String name, String[] values) |
|
void store() |
|
void reset(String name) |
After modifying preferences by calling setValue(), setValues() and reset() methods, you must call store() explicitly to make the changes permanent; otherwise, changes will not be made permanent.
For portlets written using the Java Portlet API, you can obtain an instance of javax.portlet.PortletPreferences object from the incoming portlet request – javax.portlet.RenderRequest within the processAction() method, or javax.portlet.ActionRequest within the render() method.
In Listing 5-6, the portlet displays a form to edit the current values of portlet preferences in a JSP page included from the doEdit() method of the portfolio portlet.
<%@ taglib uri="http://java.sun.com/portlet" prefix="portlet"%>
<%@ page import="javax.portlet.PortletPreferences" %>

<portlet:defineObjects/>

<%
   PortletPreferences prefs = renderRequest.getPreferences();
   String refreshInterval = prefs.getValue("refreshInterval", "600");
   String symbols = prefs.getValue("stockSymbols", "BEAS, MSFT");
%>

<form method="POST" action="">
   <table>
      <tr>
         <td>Symbols</td><td><input name="symbols"          value="<%=symbols>"/></td>
      </tr>
      <tr>
         <td>Refresh Interval</td><td><input name="refreshInterval"
         value="<%=refreshInterval>"/></td>
      </tr>
      <tr>
         <td></td>
         <td><input type="submit" value="Submit"/></td>
      </tr>
   </table>
</form>
The portlet updates the preferences in its processAction() method, as shown in Listing 5-7.
public class PortfolioPortlet extends GenericPortlet
{
{
public void doEdit(RenderRequest renderRequest, RenderResponse
renderResponse)
throws IOException, PortletException
{
...
}
public void processAction(ActionRequest actionRequest, ActionResponse
actionResponse)
throws PortletException
{
String refreshInterval =
actionRequest.getParameter(“refreshInterval”);
String symbols = actionRequest.getParameter(“stockSymbols”);
PortletPreferences prefs = actionRequest.getPreferences();
prefs.setValue(“refreshInterval”, refreshInterval);
prefs.setValue(“stockSymbols”, symbols);
try
{
prefs.store();
}
catch(SecurityException se) {
// Thrown when the user does not have enough privileges to store
// preferences. Make sure that the user logged into the portal.
...
}
catch(catch(IOException ioe) {
// There is an error storing preferences
...
}
}}
During processAction(), this portlet uses the javax.portlet.ActionRequest object to obtain preferences.
Portlet preferences can be accessed and updated from other kinds of portlets too. The main difference is in the way your portlets obtain an instance of the javax.portlet.PortletPreferences object.
com.bea.netuix.servlets.controls.portlet.PortletBackingContext to obtain portlet preferences; for example, in a page flow action, or in the handlePostbackData() method of the backing file associated with the portlet. com.bea.netuix.servlets.controls.portlet.PortletPresentationContext to obtain portlet preferences; for example, in a JSP associated with a page flow.
Both these classes provide a method getPortletPreferences(HttpServletRequest req) that takes javax.servlet.HttpServletRequest as an argument and return an object of type javax.portlet.PortletPreferences.
WebLogic Portal provides a JSP tag library for setting up portlet preferences. Table 5-11 describes the applicable JSP tags.
getPreference |
|
getPreferences |
|
forEachPreference |
|
ifModifible |
|
else |
For more information on the Java classes associated with these tags, refer to the Javadoc.
In WebLogic Portal, the framework includes a default implementation that manages portlet preferences in the built-in PF_PORTLET_PREFERENCE and PF_PORTLET_PREFERENCE_VALUE database tables. If desired, you can replace this implementation with your own.
You can use the Portlet Preferences SPI to allow portal applications to manage portlet preferences outside framework-managed database tables. For example, you can store preferences along with other application data in another back-end system or a different set of database tables.
When propagating a portal, the preferences SPI participates in the propagation process. When you exporting data for the propagation, the SPI is called to obtain the preferences, and when you are importing data, the SPI is called to store the preferences.
The following sections describe how to use the Portlet Preferences SPI.
You specify the SPI using the interface com.bea.portlet.prefs.IPreferenceAppStore. An implementation of this class must be deployed as a EJB jar file.
Listing 5-8 provides an example.
public interface IPreferenceAppStore extends EJBObject
{
   /**
   * Returns preferences for a portlet entity with the given uniqueId.
   *
   * The returned java.util.Map contains
   * com.bea.netuix.application.prefs.Preference
   * objects keyed against their names.</p>
   *
   * @param uniqueId unique ID
   * @return preferences
   */
   public Map getPreferences(PortletPreferencesId uniqueId) throws
   RemoteException, PreferenceAppStoreException;

   /**
   * Writes the preferences to the underlying persistence.
   *
   * This method should be implemented to be atomic. That is, the
   * implemenation should guarantee that either all preference
   * values are persisted or none at all.
   *
   * The java.util.Map argument should contain
   * com.bea.netuix.application.prefs.Preference
   * objects keyed against their names.
   *
   * @param uniqueId unique ID
   * @param preferences preferences
   */
   public void storePreferences(PortletPreferencesId uniqueId,
   Map preferences) throws RemoteException, PreferenceAppStoreException;

   /**
   * Clear all preferences for the given unique ID from the
   * underlying persistence store.
   *
   * @param uniqueIds unique IDs
   */
   public void removePreferences(PortletPreferencesId[] uniqueIds) throws
   RemoteException, PreferenceAppStoreException;
}
To cause the framework to use a new SPI in place of the default SPI, you must update the EJB named PreferencePersistenceManager in the ejb-jar.xml file within netuix.jar. The value BEA_netuix.DefaultStore must be changed to the name of the SPI EJB as specified in its deployment descriptor (ejb-jar.xml). The value com.bea.portlet.prefs.provider.DefaultStoreHome must be changed to the home interface of the SPI implementation.
| Caution: | To edit the ejb-jar.xml file you need to copy the J2EE library resources into your project. Keep in mind that with future updates to the WebLogic Portal product, you might have to perform manual steps in order to incorporate product changes that affect those resources. |
The code segment in Listing 5-9 shows the default entries, which you must change to use the SPI.
<session>
   <ejb-name>PreferencePersistenceManager</ejb-name>
   <home>com.bea.portlet.prefs.PreferencePersistenceManagerHome</home>
   <remote>com.bea.portlet.prefs.PreferencePersistenceManager</remote>
   <ejb-class>com.bea.portlet.prefs.PreferencePersistenceManagerImpl
   </ejb-class>
   <session-type>Stateless</session-type>
   <transaction-type>Container</transaction-type>
   <env-entry>
      <env-entry-name>prefs-spi-jndi-name</env-entry-name>
      <env-entry-type>java.lang.String</env-entry-type>
      <env-entry-value>BEA_netuix.DefaultStore</env-entry-value>
   </env-entry>
   <env-entry>
      <env-entry-name>prefs-spi-home-class-name</env-entry-name>
      <env-entry-type>java.lang.String</env-entry-type>
      <env-entry-value>com.bea.portlet.prefs.provider.DefaultStoreHome
      </env-entry-value>
   </env-entry>
<!-- Snip -->
</session>
In order to view and test the preferences that you have created, you must use a desktop view from the WebLogic Portal Administration Console rather than WorkSpace Studio’s Open on Server view.
Portlets accessed from .portal files cannot store preferences. If you update a preference using a .portal file, your portlet encounters a java.lang.UnsupportedOperationException error.
You must provide a means for users to log in before they can update preferences; users who are updating portlet preferences must first be authenticated. If an anonymous user attempts to update a portlet, a java.lang.SecurityException error occurs.
Note that portlets can always get portlet preferences whether or not the user is anonymous or whether the portlet is accessed via a .portal file.
It is tempting to store arbitrary application data as portlet preferences. For example, if you have a portlet that allows users to upload and store documents on the server, it might seem appropriate to store those documents as portlet preferences. This is not a good practice. The purpose of portlet preferences is to associate some properties for a portlet instance without having to be aware of any implementation-specific portlet instance IDs. These properties allow customization of the portlet’s behavior. The underlying implementation of portlet preferences is not designed for storing arbitrary application data.
The following steps outline an alternative implementation that can meet the needs of the portlet:
This procedure ensures that your application data is always scoped to portlet instances.
The portal framework maintains instance identity using internally generated instance IDs. Portlets can access their instance IDs using getInstanceId() methods on com.bea.netuix.servlets.controls.portlet.PortletPresentationContext and com.bea.netuix.servlets.controls.portlet.PortletBackingContext.
Storing data directly in the database using portlet instance IDs does not work, for the following reasons:
The most common means of influencing portlet behavior within the control life cycle is to use a portlet backing file. A portlet backing file is a Java class that can contain methods corresponding to portal control life cycle stages, such as init() and preRender(). A portlet’s backing context, an abstraction of the portlet control itself, can be used to query and alter the portlet’s characteristics. For example, in the init() life cycle method, a request parameter might be evaluated, and depending on the parameter’s value, the portlet backing context can be used to specify whether the portlet is visible or hidden. For more information about backing contexts, refer to the Portal Development Guide.
Backing files can be attached to portals either by using WorkSpace Studio or coding them directly into a .portlet file.
Backing files are simple Java classes that implement the com.bea.netuix.servlets.controls.content.backing.JspBacking interface or extend the com.bea.netuix.servlets.controls.content.backing.AbstractJspBacking interface abstract class. The methods on the interface mimic the controls life cycle methods (refer to How Backing Files are Executed) and are invoked at the same time the controls life cycle methods are invoked.
The following portal controls support backing files:
The interportlet communication example in Local Interportlet Communication uses backing files.
This section contains the following topics:
All backing files are executed before and after the JSP is called. In its life cycle, each backing file calls these methods:
Figure 5-25 illustrates the life cycle of a backing file.
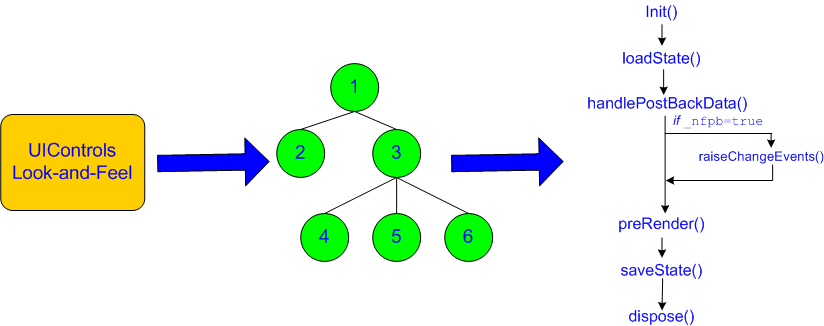
On every request, the following sequence occurs:
| Note: | In the following steps, the methods are called unless items on inactive pages have been “optimized away” if tree optimization is enabled. For example, if tree optimization is enabled and items on an inactive page are not included on the resulting partial control tree, then the method is not called. |
init() methods are called on all backing files in depth-first order (that is, in the order they appear in the tree). This method is called whether or not the control (the portal, page, book, or desktop) is on an active page. _nfpb parameter is set to true, all handlePostbackData() methods are called. | Tip: | You can use the method AbstractJspBacking.isRequestTargeted(request) to determine if a request is for a particular portlet. |
A new instance of a backing file is created per request, so you do not have to worry about thread safety issues. New Java VMs are specially tuned for short-lived objects, so this is not the performance issue it was in the past. Also, JspContent controls support a special type of backing file that allows you to specify whether or not the backing file is thread safe. If this value is set to true, only one instance of the backing file is created and shared across all requests.
The difference between having a backing file as part of <netuix: portlet backingfile =some_value> or part of <netuix: jspContent backingfile=some_value> is related to scoping.
For example, if you have the backing file on the portlet itself, you can actually stop the portlet from rendering. If the backing file is at the jspContent level, the portlet portion of the control tree has already run; you use this implementation to run processes that are specifically for the JSP in the portlet.
Follow these guidelines when creating a backing file:
Listing 5-10 shows an example backing file.In this example, the AbstractJspBacking class is extended to provide the backing functionality required by the portlet. The example uses a session attribute because of the volatility of the HTTPRequest object; BEA recommends that you pass data between life cycle methods using the session rather than the request object.
package backing;
import javax.servlet.http.HttpServletRequest;
import javax.servlet.http.HttpServletResponse;
import javax.servlet.http.HttpSession;
import com.bea.netuix.events.Event;
import com.bea.netuix.events.CustomEvent;
import com.bea.netuix.servlets.controls.content.backing.AbstractJspBacking;
public class ListenCustomerName extends AbstractJspBacking
{
   public void listenCustomerName(HttpServletRequest request,
   HttpServletResponse response, Event event)
   {
      CustomEvent customEvent = (CustomEvent) event;
      String message = (String) customEvent.getPayload();
      HttpSession mySession = request.getSession();
      mySession.setAttribute("customerName", message);
   }
}
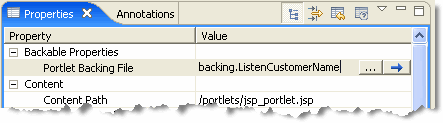
You can add a backing file to a portlet either from within WorkSpace Studio or by coding it directly into the file to which you are attaching it. Simply specify the backing file in the Backing File field of the Properties view, as shown in Figure 5-26. You need to specify the backing directory and, following a dot-separator, only the backing file name. Do not include the backing file extension; for example enter this:
backing.ListenCustomerName.java
For the preceding example, if you include the file extension, the application interprets it as the file name—because the file path is specified by a dot-separator—and looks for a non-existent file called java in a non-existent directory called ListenCustomerName.
To add the backing file by coding it into a .portlet file, use the backingFile parameter within the <netuix:jspContent> element, as shown in Listing 5-11.
<netuix:content>
<netuix:jspContent
backingFile="portletToPortlet.pageFlowSelectionDisplayOnly.menu.contentUri="/portletToPortlet/pageFlowSelectionDisplayOnly/menu/
backing.MenuBacking"
menu.jsp"/>
</netuix:content>
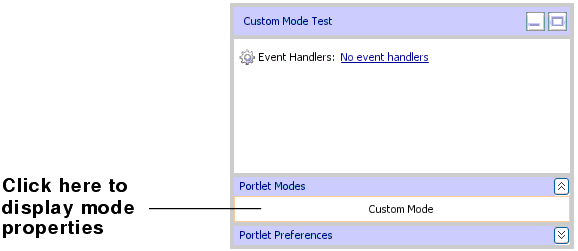
Some aspects of portlet appearance are controlled by default at the portal level, such as colors, layouts, and themes. Appearance/rendering characteristics and portlet-specific features include the use of title bars and associated states (minimize, maximize, float, and delete) and modes that affect portlet content (edit mode, help mode, and custom modes).
The following sections describe how to work with portlet-specific appearance/content features and modes:
In a rendered HTML page, the proper place to include most types of resources, such as script files or style sheet references, is in the header of the document. Portlets sometimes need to specify resources that are required for rendering the portlet in the page. In the past, methods for making required elements available on the page included placing elements into the skeleton, which is not recommended because this creates a coupling between the skeleton and the portlet; or putting references directly in the portlet content, leading to the possibility of creating invalid HTML.
The problem was exacerbated in a federated (WSRP) environment because remote portlets are potentially included in several places and there was no way for one of these portlets to indicate that it relies on, for example, a piece of a CSS that resides in an external file.
WebLogic Portal now provides an explicit way to handle this requirement, using the portlet dependencies feature.
The concepts related to skin and skeleton resource dependencies are more formally known as render dependencies and script dependencies. Typical examples of such dependencies are CSS files and JavaScript files.
Both skins and skeletons can now specify such dependencies as well as associated search paths to be used for resolving these dependencies. Additionally, mechanisms exist to eliminate redundancy and to provide a reliable ordering for dependencies related to skins, skeletons, and theme skin and skeletons. These same capabilities are now available for portlets as well as portals, so that a portlet can specify necessary dependencies in a standards-compliant way; you identify these dependencies using appropriate elements located in the head section of the rendered page. The other advantages of the Look & Feel dependencies framework are also realized at a portlet level, such as reliable ordering and redundancy elimination.
This section contains the following topics:
The configuration of portlet dependencies shares the same mechanisms as the standard Look & Feel—you use an XML configuration document conforming to a standard Look & Feel schema. This XML document is referenced from a .portlet file using an attribute on the portlet element.
As with a Look & Feel’s render dependencies, you can resolve a portlet’s render dependencies utilizing a set of application search paths. Additionally, the search paths of the Look & Feel skin, or any appropriate Theme skin, are used before the portlet’s own search paths to resolve a portlet’s render dependencies.
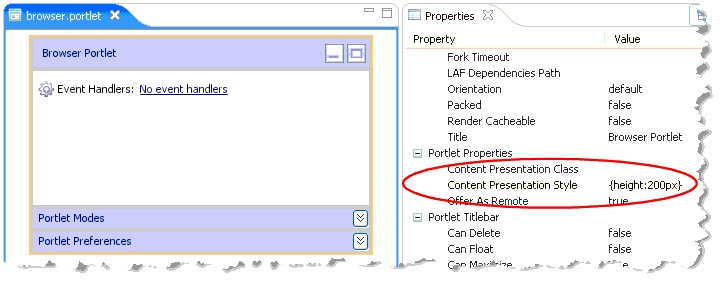
You can specify a portlet’s dependencies configuration file in the WorkSpace Studio Properties view by entering the value in LAF Dependencies Path field. Alternatively, you can add the attribute lafDependenciesUri to the portlet element in a .portlet file, as shown in the following example:
<netuix:portlet definitionLabel="myPortlet" title="My Portlet" lafDependenciesUri="/portlets/example/myPortlet.dependencies">
By convention, you should adhere to the following guidelines when setting up a portlet’s dependencies configuration file:
Although the guidelines listed here are not required, deviating from them can lead to unexpected behavior. For more information, refer to Considerations and Limitations.
The portlet dependencies configuration file uses standard types from the standard Look & Feel schemas and looks similar to the example shown in Listing 5-12.
<?xml version="1.0" encoding="UTF-8"?>
<p:window
xmlns:p="http://www.bea.com/servers/portal/framework/laf/1.0.0"
xmlns:xsi="http://www.w3.org/2001/XMLSchema-instance"
xsi:schemaLocation="http://www.bea.com/servers/portal/framework/laf/1.0.0
laf-window-1_0_0.xsd ">
   <p:render-dependencies>
     <p:html>
       <p:links>
         <p:search-path>
           <p:path-element>.</p:path-element>
         </p:search-path>
         <p:link rel="stylesheet" type="text/css" href="my.css"/>
       </p:links>
     </p:html>
   </p:render-dependencies>
</p:window>
The configuration file shown in Listing 5-12 causes a CSS file to be included in the rendered page output (as a link element in the HTML head section). First, the search occurs for the CSS file relative to the Look & Feel or Theme skin search paths for the links element. If the CSS file is not found, then the search path in the configuration file is used. Relative search paths use the directory of the configuration file as a base.
The default behavior is to look first in the Look & Feel or Theme– specified search paths. This behavior allows a Look & Feel/Theme the ability to properly skin portlet resources. However, portlet-level resources should not be placed in the Look & Feel/Theme directories. If a situation arises when you do not want to use this behavior, you can disable it by specifying a value of false for the use-skin-paths attribute on the render-dependencies element.
You can use WorkSpace Studio to create a valid dependency file that you can then complete using Workshop’s XML editor.
| Tip: | For example dependency files, see Listing 5-12, Listing 5-13, and Listing 5-14. |
The simplest way to create a dependency file is to select File > New > Other > Markup Files > Render Dependencies. The .dependencies file must reside in a WebLogic Portal framework project, within the web content folder (typically named WebContent).
You can also create a dependency file as follows:
laf-window-1_0_0.xsd as the schema. Click Next. .xml to .dependencies. You can use the WorkSpace Studio XML editor to add elements and attributes to the dependency file. Right-click on an element and use the menu to select child elements and add attributes. As shown in Figure 5-27, valid choices based on the schema file are automatically populated in the menu.

| Tip: | The standard Eclipse hover-window help is available for XML schema elements in the Source view of the XML editor. Simply hover the mouse pointer over the element and a help pop-up appears. Also, in the Source view, you can click in an element and press F2 to display the help pop-up. |
This section includes the following examples:
Listing 5-13 illustrates how to include both an external JavaScript file as well as an embedded script.
<p:window
    xmlns:p='http://www.bea.com/servers/portal/framework/laf/1.0.0'
    xmlns:xsi='http://www.w3.org/2001/XMLSchema-instance'
    xsi:schemaLocation='http://www.bea.com/servers/portal/framework/laf/1.0.0
    laf-window-1_0_0.xsd '>
   <p:render-dependencies>
     <p:html>
       <p:scripts>
         <p:search-path>
           <p:path-element>.</p:path-element>
         </p:search-path>
         <p:script type='text/javascript' src='my.js'/>
         <p:script type='text/javascript'>
             alert('hello world');
         </p:script>
       </p:scripts>
     </p:html>
   </p:render-dependencies>
</p:window>
Listing 5-14 shows the use of both the metas and styles elements. The metas element lets you specify HTML meta tags, and the styles element lets you embed HTML style tags.
<p:window
    xmlns:p='http://www.bea.com/servers/portal/framework/laf/1.0.0'
    xmlns:xsi='http://www.w3.org/2001/XMLSchema-instance'
    xsi:schemaLocation='http://www.bea.com/servers/portal/framework/laf/1.0.0
    laf-window-1_0_0.xsd '>
   <p:render-dependencies>
     <p:html>
       <p:metas>
         <p:meta name='keywords' content='pirate, ninja'/>
       </p:metas>
       <p:styles>
         <p:style type='text/css'>
           div.myClass {
             background-color: red;
           }
         </p:style>
       </p:styles>
     </p:html>
   </p:render-dependencies>
</p:window>
At this time, WorkSpace Studio does not provide editing capabilities for portlet render dependencies configuration files; you can use the included Eclipse-based XML file editor for this purpose.
BEA recommends that you not share a single .dependencies file across several portlets. Although WebLogic Portal does not prevent this usage, sharing a single file might lead to confusion when coordinating updates to the file later.
Whenever you place multiple instances of a portlet on a page, you can encounter scoping problems with JavaScript variables and CSS styles. For example, if a portlet includes inlined JavaScript and you place two instances of that portlet on a page, it is possible that changing a JavaScript variable in one portlet will affect the other portlet.
To ensure that JavaScript and CSS styles are scoped to a specific portlet instance, add the token wlp_rewrite_ to the front of the variable or style class name. When the portlet is rendered, this token is replaced by the portlet instance label, which is unique for each portlet instance.
For example, to ensure portlet instance-level scoping of a JavaScript variable called stockQuote that is defined in a .js file that is referenced from a .dependencies file, you need to append wlp_rewrite_ to the front of the variable name:
var wlp_rewrite_stockQuote
To ensure portlet instance-level scoping of a CSS class name called portlet_bg that is defined in a .css file that is referenced from a .dependencies file, you need to append wlp_rewrite_ to the front of the class name. For example:
.wlp_rewrite_portlet_bg { background_color:white; }In both of these cases, the wlp_rewrite_ token is replaced by the portlet’s instance label, which is a unique identifier.
| Note: | The scoping mechanism described in this section only works for .css and .js files that are referenced with the content-uri dependency file attribute. Files linked with the src attribute or the link tag will not be rewritten. |
WebLogic Portal also has the ability to rewrite URLs contained in the content of files referenced in a <script> or <style> section of a .dependencies file. The URLs are rewritten based on the standard Look and Feel URL Templating mechanism using the window-resource url-template-ref, as described in the section
Optional Look And Feel URL Templates in the WebLogic Portal Development Guide.
For example, if your .dependencies file specifies:
...
<p:styles>
<p:search-path>
<p:path-element>styles</p:path-element>
</p:search-path>
<p:style content-uri='my-style.css' type='text/css'/>
</p:styles>
...
and the contents of my-style.css look like this:
{ background-image: url('wlp_rewrite?/images/picture.gif/wlp_rewrite');}
then when the portlet is rendered, the value of /images/picture.gif will be templatized based on the standard Look and Feel URL Templating mechanism.
In a non-WSRP case, this value can take one of two forms:
window-resource url-template-ref is found, the value returned will be templatized accordingly. Using the example from the section
Optional Look And Feel URL Templates in the WebLogic Portal Development Guide, this value would be http://my.domain.com/resources/laf/images/picture.gif.window-resource url-template-ref is found, the value returned in this case will be http://host:port/context/images/picture.gif.
When the portlet that specifies the .dependencies file is being accessed remotely through a WLP remote (WSRP) portlet, then this rewritten URL also takes one of two forms:
window-resource url-template-ref is found on the producer, the value returned will be templatized accordingly. Using the example from the section
Optional Look And Feel URL Templates in the WebLogic Portal Development Guide, this value would be http://my.domain.com/resources/laf/images/picture.gif. In this case, the resulting URL may or may not be rewritten to be proxied via the ResourceProxyServlet; it is up to the URL template developer to ensure that resources are serviced appropriately.window-resource url-template-ref is found on the producer, the value returned in this case will be templatized based on the resource url-template-ref (see the section
URL Templates and Web Services for Remote Portlets (WSRP) in the WebLogic Portal Development Guide. In this way, the resource URL will be wrapped in a ProxyResourceServlet URL, so that it can be served by the producer from the consumer.| Note: | The rewriting mechanism described in this section only works for files that are referenced with the content-uri dependency file attribute. Files linked with the src attribute or the link tag will not be rewritten. |
All portlets created with WebLogic Portal support the use of modes. Modes allow you to affect the end user’s ability to edit the portlet or display Help for the portlet. You add icon buttons to a portlet’s title bar to indicate the availability of a mode.
The following pre-defined modes exist for WebLogic Portal:
You can also create your own custom portlet modes using WebLogic Portal.
Buttons for the selected modes appear in the portlet’s title bar. Figure 5-28 shows an example of the default buttons for the portlet modes when displayed in the editor; Figure 5-29 shows the appearance of the mode icons in a running portlet.
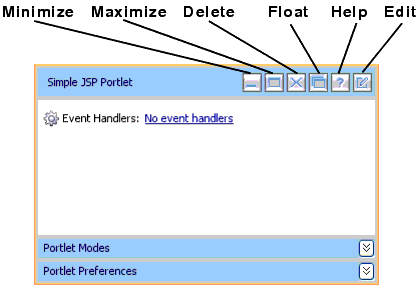
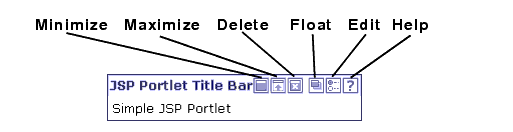
When you use the Portlet Wizard to create a portlet, mode and state settings are available on the Portlet Details dialog. These settings can also be edited in the portlet’s Properties view: The following sections describe possible methods of performing these tasks.
To add or remove the Help or Edit mode from the title bar, follow these steps:
Checkmarks on the submenu indicate the available modes for this portlet, which were determined when you created it. Figure 5-31 shows an example of the submenu.
 disappears from the title bar.
You can view and edit the mode's property details in the Properties view. For example, you can edit the Portlet Backing File property if you want to perform preprocessing before rendering the portlet's mode page (such as the edit page).
To display the mode properties for the portlet, click the expand/contract toggle button  in the Portlet Mode area of the portlet. Edit mode properties and Help mode properties display in the Properties view.
For descriptions of the mode properties, refer to Table 5-7.
A custom mode is a portlet mode that you implement. Like with the help and edit modes, a custom mode is activated with a button that appears in the portlet’s title bar. To implement a custom mode, you need to supply a display part, typically a JSP, and a backing file. This section includes an example that explains how to create a simple custom mode that lets a user add or remove the Maximize button from a portlet. Once you understand the basic principles involved in writing a custom mode, you can create a custom mode to perform the specific tasks you want.
Figure 5-32 shows the example portlet and the portlet’s custom mode view. When the user clicks the custom mode button in the example portlet on the left, the portlet display changes to the custom mode view on the right. In this example, the custom mode offers a way for the user to add or remove the portlet’s Maximize button.
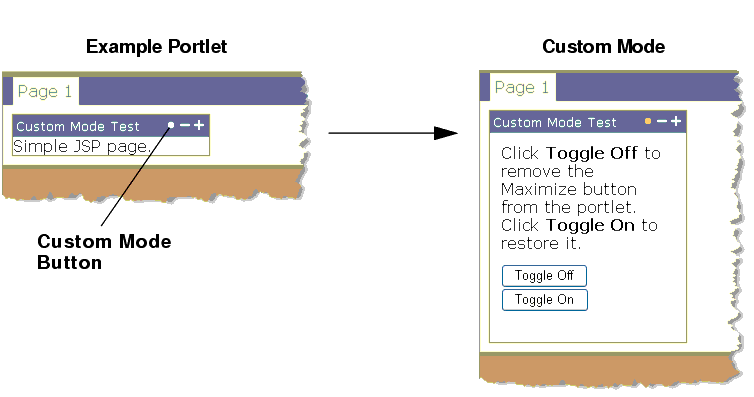
togglebutton.jsp. <%@ page import="com.bea.portlet.PostbackURL"%>
<%
PostbackURL url = PostbackURL.createPostbackURL(request, response);
%>
<TABLE CELLSPACING="10" ID="toggleButtonsTable">
<TH>Using a Button and Backing File</TH>
<TR>
<TD>
Click <b>Toggle</b> Off to remove the Maximize button from the portlet.<br>
Click <b>Toggle On</b> to restore it.
</TD>
</TR>
<TR>
<TD>
<FORM method="post" name="Toggle" action="<%=url.toString()%>">
<INPUT ID="toggle_off" TYPE="SUBMIT" NAME="toggle_off" VALUE="Toggle Off">
<INPUT ID="do_nothing" TYPE="SUBMIT" NAME="do_nothing" VALUE="Toggle On">
</FORM>
</TD>
</TR>
</TABLE>
package modes;

import javax.servlet.http.HttpServletRequest;
import javax.servlet.http.HttpServletResponse;
import com.bea.netuix.servlets.controls.content.backing.JspBacking;
import com.bea.netuix.servlets.controls.portlet.backing.PortletBackingContext;
import com.bea.netuix.servlets.controls.window.WindowCapabilities;
import com.bea.p13n.util.debug.Debug;

public class MyMode implements JspBacking {

    public void dispose() {
    }

    public boolean handlePostbackData(HttpServletRequest arg0,
    HttpServletResponse arg1) {
        return true;
    }

    public void init(HttpServletRequest arg0, HttpServletResponse arg1) {
    }

    public boolean preRender(HttpServletRequest request, HttpServletResponse         response) {
        PortletBackingContext pbc =
        PortletBackingContext.getPortletBackingContext(request);
        if (request.getParameter("toggle_off") != null)
        {
             try
             {
                pbc.setCapabilityVisible(WindowCapabilities.MAXIMIZED.getName(),
                false);
             }
             catch (NullPointerException npe)
             {
                  //
             }
        }
        return true;
    }
}
| Tip: | The Properties view lets you set many other custom mode properties, such as an image for the custom mode button, a rollover image, button text, alternate text, and others. Refer to Table 5-12 at the end of this section for information on each of the custom mode properties. |
Table 5-12 briefly describes each of the custom mode properties:
Required. The path (relative to the project) to the file/class to be used for the custom mode portlet's content. From the data field you can choose to browse to a file (or class for page flow portlets) or open the currently displayed file/class. For example, if the content is stored in
Project/myportlets/my.jsp, the Content URI is /myportlets/my.jsp.
|
|
Optional. If you want to use a class for preprocessing (for example, authentication) prior to rendering the portlet, enter the fully qualified name of that class. That class should implement the JspBacking interface or extend AbstractJspBacking. From the data field you can choose to browse to a class or open the currently displayed class.
|
|
This property is described in the Portal Development Guide.
|
|
This property is described in the Portal Development Guide.
|
|
This property is described in the Portal Development Guide.
|
|
This property is described in the Portal Development Guide.
|
|
States determine the end user’s ability to affect the rendering of a portlet. WebLogic Portal supports these portlet states:
Normal – the typical rendered appearance of the portlet.
When you use the Portlet Wizard to create a portlet, state and mode settings are available on the Portlet Details dialog. These settings can also be edited in the portlet’s Properties view: The following sections describe possible methods of performing these tasks.
You can select which of the states you want to include with the portlet by following these steps:
A context menu showing applicable states appears. Figure 5-37 shows an example of the title bar context menu showing all states as available.
Selecting a state adds it to the portlet, while deselecting the state removes it from the portlet. For example, in Figure 5-37, all four states are selected, and appear in the title bar. If you click to deselect Deletable, the Delete button  on the portlet disappears.
You can minimize or maximize a portlet either in the portlet file or in a portlet’s backing file. The actual code is the same for both. Here is an example of maximizing a (Java page flow) portlet:
PortletBackingContext context = PortletBackingContext.getPortletBackingContext(request);
context.setupStateChangeEvent(WindowCapabilities.MAXIMIZED.getName());
You can put this code in an action method of the Java page flow or in the handlePostbackData method of the backing file. When using the backing file, in order to get the handlePostbackData method to be called, you must have '_nfpb=true' in the URL.
These mechanisms do not work if asynchronous content rendering is enabled for the portlet.
The default state and mode icons used in portlet title bars are stored in the wlp-lookandfeel-web-lib J2EE Shared Library; you can view them in Merged Projects view in the various subdirectories of framework/skins.
All portlets created with WebLogic Portal support height and scrolling.
You can control the height of portlets and determine whether or not their contents scroll.
Portlet height and scrolling is controlled by the following CSS style attributes:
You can set these attributes on a portlet that is open in the workbench editor.
To set these properties, follow these steps:
| Note: | The distinction between Presentation Style and Content Presentation Style, for example, is the location where the styling is applied (portlet or content). The use of one or the other depends on the specifics of what the specific styling is trying to accomplish. |
Figure 5-38 shows an example of a height property, set using Content Presentation Style.
Based on the entries shown in Figure 5-38, the result looks similar to the example in Figure 5-39.
If you use the Presentation Class property instead of the Presentation Style property, you must have the corresponding style class defined in a CSS file.
For example, if you use the value .portlet-scroll in the Content Presentation Class field, you must have the following style class definition already set up in your CSS file:
To provide portlet height and scrolling automatically, you can specify an additional rule for the standard portlet content CSS class. For example, you can do one of the following:
<style> element to the skin.xml file for your Look & Feel containing this rule:
.bea-portal-window-content
{
     height: 250px;
     overflow: auto;
}
<style> or <link> element in the skin.xml file that references the custom CSS file. For more information on portal skins, themes, and skeletons, refer to the Portal Development Guide.
A page flow stores information in the requests. If you have a portal page with multiple page flow portlets, you need a way for each page flow to individually store and retrieve that information. For example, the request object for a page might have a variable car_type, with a value of x. When the page flow runs, it obtains this value and uses it in some way. If you have another page flow portlet with a car_type value of z, and if only one request exists for the whole page, the two page flow portlets might interfere with each other. To prevent this problem, WebLogic Portal essentially makes a copy of the outer (portal) request to make separate scoped requests, one for each portlet. This gives each page flow portlet its own unique request to use to store its information.
In some cases, you might want to use information that is stored at the outer request rather than within the scoped request.
For example, if you use regular HTML tags within Netui form tags, you might have something similar to this:
<netui:form action="myAction">
   <input type="check box" name="test"/>
   <netui:button value="myAction"></netui:button>
</netui:form>
Based on the tags used above, you might typically use a regular getParameter request like this:
<%request.getParameter("test")%>
However, to get that HTML input value from the outer request, use the following:
<%@page import="org.apache.beehive.netui.pageflow.scoping.ScopedServletUtils"%>
   <%
   HttpServletRequest outerRequest = ScopedServletUtils.getOuterRequest
   ( request );
   %>
   test: <%=outerReq.getParameter("test")%>
WebLogic Portal provides JSP tags that you can use within JSPs. You can view available JSP tags in the Design Palette and then drag them into the Source View of your JSP, and use the Properties view to edit elements of the code.
WebLogic Portal also provides custom Java controls that make it easy for you to quickly add pre-built modules to your portal; custom Java controls exist for event management, Visitor Tools, Community management, and so on. For example, most user management functionality can be easily exposed with a User Manager Control on a page flow.
| Note: | The term control is also used to refer to the portal (netuix) framework controls, such as desktop, book, page, and so on. These controls are referred to in the text as portal framework controls. |
When you open a JSP in WorkSpace Studio, you can use the Design Palette to display all the JSP tags currently loaded and available; Figure 5-40 shows a portion of the display.
To use a tag, drag it into the editor, use the Source View to edit the code directly, and use the Properties view to set properties, as shown in Figure 5-41:
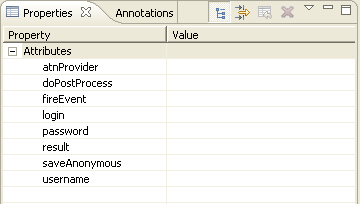
For information about the Java class associated with each JSP tag, refer to the Javadoc.
To view the available custom controls provided by WebLogic Portal when viewing a page flow:
.java file) or create a new page flow. For information about creating page flows using WorkSpace Studio, refer to the BEA Workshop User’s Guide.
The Select Control dialog box displays, as shown in Figure 5-2.
After you add a custom WebLogic Portal control, all the methods in the control become available to your Page Flow.
For more information about the custom controls provided by WebLogic Portal, refer to the Portal Development Guide. For details about each control, refer to the Javadoc. (Links to the Javadoc for each of the controls packages are conveniently listed in the Javadoc Overview frame.)
You can control portlet state persistence using the persistence-enabled attribute in the netuix-config.xml file, which is located by default in the WEB-INF directory. Using this attribute causes the state to be saved in the WebLogic Portal database. The attribute is set to false by default.
The following code segment shows an example of the attribute syntax:
<control-state-location>
<session persistence-enabled="true"/>
</control-state-location>
WebLogic Portal places an entry for the control tree state in the PROPERTY_KEY table, with the following PROPERTY_SET_NAME value:
In the development phase of the portal life cycle, you add portlets to a portal using the WorkSpace Studio workbench.
| Note: | A page must have a layout before you can add a portlet to it. The vertical or horizontal placement of portlets in a placeholder is determined by the selected layout for the page. |
.portal file) to which you want to add the portlet. The portal displays in the editor.
.portlet file) onto the portal page at the desired location.Figure 5-3 shows an example of this step.
With the portlet selected, you can use the Properties view to customize desired portlet properties.
For detailed information about portlet properties, refer to Portlet Properties.
When you add a portlet to a page in the workbench editor, a reference to that portlet is added to the .portal file. You can use the .portal file as a template for creating desktops in the WebLogic Portal Administration Console. When a portal administrator creates a desktop based on that template, the portlet is added to the portal resource library where it can be added to pages in streaming desktops. For an overview of file-based portals compared with streaming portals, refer to the Portal Development Guide.
In the Staging phase of the portal life cycle, you use the WebLogic Portal Administration Console to configure portlets on desktops. A single portlet definition can be associated with one or more portals (desktops) by creating instances of the portlet. Each of these portlet instances can have its own “personality” and behavior as specified by a variety of different configuration options.
For details in adding a portlet to a portal desktop in the WebLogic Portal Administration Console, refer to Managing Portlets on Pages.
To remove a portlet from a portal without deleting the portlet from your portal web project, right-click the portlet in the WorkSpace Studio workbench editor and click Delete.
To delete a portlet from your portal web project, right-click the portlet in the Package Explorer view and choose Delete.
To remove a portlet after you have assembled portlet instances into portal desktops using the Administration Console, refer to Deleting a Portlet.
During the Development phase, you can use tag libraries to add features to a GroupSpace Community, a custom Community, or a portal web application. This section discusses the following tag libraries:
See the Communities Guide for additional information.
You can add the ActiveMenus JSP tag library to a GroupSpace Community, a custom Community, or a portal web application.
The ActiveMenus JSP tag library lets you set up a popup menu that displays when the mouse hovers over specific text. An activemenus-config.xml file controls the contents of each menu. The activemenus_taglib.jar file contains the ActiveMenus tag library.
By default, a GroupSpace Community has ActiveMenus enabled, so you only need to configure the ActiveMenus tag (see Configuring the ActiveMenus Tag). See Figure 5-4 for an example of the ActiveMenus tag in a GroupSpace Community.
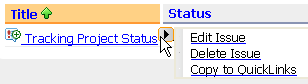
You can tie a user’s capability to the ActiveMenu that you see when you hover your mouse over an item (an Issue, for example) and hover over the arrow that appears. In this example, if your assigned capabilities include the ability to delete items, you will see the Delete choice, as shown in Figure 5-4.
| Tip: | You do not need to perform the following steps if you have a GroupSpace Community; ActiveMenus are enabled by default for GroupSpace Communities. |
Perform the following steps to enable ActiveMenus in a custom Community:
activemenus_taglib.jar file available to your portal web project. When you create your portal web project, you must enable the GroupSpace facets by selecting the WebLogic Portal Collaboration check boxes.activemenus-config.xml file to your /WEB-INF directory in your portal web project. Add the file by right-clicking the activemenus-config.xml file and choosing Copy To Project. Configure the file by follow the instructions in Configuring the ActiveMenus Tag to edit the activemenus-config.xml file.GetActiveMenusResourceServlet by adding the servlet and servlet-mapping to the web.xml file in the /WEB-INF directory in your portal web project. You can edit the file in WorkSpace Studio by double-clicking the web.xml file. Right-click the web-app line in the file and choose Add Child > message-destination - welcome-file-list > servlet. Add GetActiveMenusResourceServlet to the servlet-name line. Add com.bea.apps.groupspace.servlets.GetActiveMenusResourceServlet to the servlet-class line. See Figure 5-5 to view the edited file in WorkSpace Studio.The code sample in Listing 5-1 shows the new information you added.
<!-- ActiveMenus Servlet Mappings -->
<servlet>
     <servlet-name>GetActiveMenusResourceServlet</servlet-name>
     <servlet-class>
          com.bea.apps.groupspace.servlets.GetActiveMenusResourceServlet
     </servlet-class>
</servlet>
<servlet-mapping>
     <servlet-name>GetActiveMenusResourceServlet</servlet-name>
     <url-pattern>GetActiveMenusResourceServlet</url-pattern>
</servlet-mapping>
After you enable the ActiveMenus, you must configure the ActiveMenus tag.
To use the ActiveMenus tag, you must set up the activemenus-config.xml file (the XSD that defines this config file is located in the activemenus_taglib.jar file as activemenus-config.xsd). This activemenus-config.xml file file must exist in your web application's /WEB-INF directory. Multiple menus can be set up that consist of completely different items, styles, and icons.
Use the following sections to configure the activemenus-config.xml file file:
Use the typeInclude tag to keep your configuration file clean. Rather than adding the type tag (see Using The Type Tag) you can add this tag and point its href attribute to an XML file (relative to the web application) that contains all of the type information. An example of the typeInclude tag is:
<typeInclude xhref="/WEB-INF/activemenuTypes/username.xml"/>.
You can also use the type tag with the typeInclude tag in the configuration file. See the code sample in Listing 5-2.
<typeInclude xhref="/WEB-INF/activemenuTypes/username.xml"/>
<type>
     <menuItem>
          <param name="linkId"/>
          <action action="editLink">
               <i18nNamebundleName="com.bea.apps.groupspace.links.
                    LinksPopupMenu" key="edit.link"/>
          </action>
          <img xsrc="wlpAppsCollaborationCore/images/wlp-edit-16.gif"/>
     </menuItem>
</type>
When you point to another XML file, ensure that you namespace it correctly, as shown in Listing 5-3.
<type name="username"
     xmlns="http://www.bea.com/servers/apps/groupspace/ui/
          activemenus-config/9.0"
     xmlns:xsi="http://www.w3.org/2001/XMLSchema-instance"
     xsi:schemaLocation="http://www.bea.com/servers/apps/groupspace/ui/
          activemenus-config/9.0">
...
</type>
The type tag defines the individual menus to use within the web application. The name attribute must be unique for each menu, because the name is how the menu is referenced when you use the ActiveMenus tag. Following is an example of the type tag:
<type name="foo">
</type>| Note: | The TypeDefault and MenuItem tags must be contained within the type tag. |
The typeDefault tag defines what displays in the browser where the ActiveMenus tag is used. You can control the text that displays, the style of the text, and the image that appears on the mouseover of that text (which denotes the menu itself).
The following items display within the browser where you used the ActiveMenus tag:
displayText Attribute – Defines the actual text that displays. If the displayText is not defined, whatever text is placed in the display attribute of the ActiveMenus tag appears. However, if you want to display other text, you can specify a class and a method within that class that returns a String to display. The following example shows how to display other text.GetUserNameFromProfile.java
public class GetUserNameFromProfile
{
public static String getName(String userName)
{
return "XXX-" + username + "-XXX";
}
}
If you use this code, the configuration defined above, and the following ActiveMenus tag: <activemenus display="UserName" type="foo"/>, the following displays in the browser: XXX-UserName-XXX.
This example allows you to use the information entered in the body of the ActiveMenus tag to look up other information to display. For instance, a username can be used to look up a user's full name to display. The only rules surrounding this action is that the method used for the display text is public, static, takes in a String, and returns a String. No other information can be passed into that method.
displayTextStyle Attribute – Defines the CSS style or class that stylizes the display text. In order for the class attribute to work correctly, the class must be defined on the page (or the CSS file that defines the class must be imported). displayMenuImage Attribute – Defines the image that appears when the display text is passed over with the mouse. If this tag is not defined, the default image is used. This image is in the activemenus_taglib.jar file and is called menu_default.gif. menuStyle Attribute – Defines the CSS style or class that stylizes the menu itself, which can include the border or background color. For the class attribute to work correctly, the class must be defined on the page (or the CSS file that defines the class must be imported).| Note: | The TypeDefault and MenuItem tags must be contained within the type tag. |
The menuItem tag defines the individual items within the popup menu. Listing 5-4 shows a code sample using the menuItem tag.
<menuItem><param name="q" value="foo"/>
<param name="userId"/>
<xmlHttp url="GetFirstNameServlet"/>
<row class="menuRow" style="backround-color:red"/>
<text class="menuText" style="color:#000000"/>
<rowRollover class="menuRowRollover" style="background-color:green"/>
<textRollover class="menuTextRollover" style="color:#FFFFFF"/>
</menuItem>
<menuItem>
<javascript>
<name>Testing</name>
<script>testing(this);</script>
</javascript>
</menuItem>
<menuItem default="true" showMenuItem="false">
<link url="http://www.google.com">
<name>Google</name>
</link>
</menuItem><menuItem>
<showMenuItem className="com.foo.CheckUserRights" methodName=
"doesUserHaveRights">
<rights name="can_view"/>
<rights name="can_edit"/>
</showMenuItem>
<allParams/>
<action action="addEditLink" disableAsync="true">
<i18nName bundleName="com.foo.LinksPopupMenu" key="edit.link"/>
</action>
</menuItem>
<menuItem>
<allParams/>
<dcAction action="showFeedData" dcContainerId="feedDataContainer">
<i18nName bundleName="com.foo.LinksPopupMenu" key="show.
feedData"/>
</dcAction>
</menuItem>
The menuItem tag defines the individual items within the popup menu with the following four types:
javascript Element – This element can be any JavaScript that you want to run when the user clicks this menu item. To make this more useful, you can retrieve the values that you specify in the param tag (see the code sample below) through custom parameters that are added to the menu item. Following is a basic example of how to implement JavaScript....
<activeMenus:activemenus display="Foo Link" type="link">
<param name="linkId" value="${fooLink.id}"/>
<param name="linkParent" value="${fooLink.parent}"/>
</activeMenus:activemenus>
...The next step is to define the custom JavaScript in your configuration file. The JavaScript must pass in the code shown in Listing 5-5.
...<
<type name="link">
menuItem>
<allParams/>
<javascript>
<name>Testing</name>
<script>fooTest(this);</script>
</javascript>
</menuItem>
</type>
...
The last step in implementing the JavaScript element is to access the values in your JavaScript function, as shown in the following code sample.
...
     <script>
     function fooTest(object)
     {
          var linkId = object.getAttribute("linkId");
          var linkParentName = object.getAttribute("linkParent");
     }
</script> ...xmlHttp Element – The xmlHttp references a servlet (which must follow all standard servlet configuration). Whatever the servlet outputs is shown in that row of the menu. If "" or null is returned from the xmlHttp servlet, the menu item row does not appear in the menu. The information is retrieved through an xmlHttp request, which allows the information to be updated without refreshing the page. For example, you could show a user’s online status that would update without having to make a full post. The two rules that surround writing your servlet for this is that all the processing must happen in the servlet's doPost() method. The second rule is that the defined parameters are passed in as request parameters. Following is an example of getting the query parameters:
String userName = request.getHeader("linkId");
link Element – This static URL opens a new browser window pointed to the defined URL. This tag can take in either a name tag or an i18nName tag (defined below) that is displayed within the menu itself. Any defined parameters are added to the end of the link as regular request parameters.action Element – This action name must be available to the page or portlet that contains the ActiveMenus tag. This element runs the action within the current browser, so you can use forwards to control your page flow. This tag can take in a name tag or an i18nName tag (defined below) that will appear within the menu itself. Any defined parameters passed in are available on the request as parameters. Following is an example of retrieving these values from a page flow:String linkId = getRequest().getParameter("linkId");
You can also use an attribute called disableAsync within AJAX-enabled portlets. If you want your menu item action to submit outside of the AJAX framework (so the page makes a full post), set this attribute to true. By default, the attribute is set to false.
dcAction Element – If you have a Dynamic Content container set up within your page, you can set up a menu item to call an action and have it update the Dynamic Content container. This works the same as an action menu item, and takes in the action name to execute. The only difference is you must specify the dcContainerId and it must correspond to a dcContainerId that is defined within a <dc:executeContainerAction> tag on the page. showMenuItem Element – Add this element if you need to conditionally show the menu item (for example, based on a set of rights for the current user). You define a class name and a method name that determines if the menu item should be shown. You can use multiple showMenuItem tags, each using different classes, methods, or rights. If you use more than one tag, all cases must be satisfied in order for the menu item to appear. For example, if the user passes nine of 10 cases, the menu item does not appear because all cases were not passed. Listing 5-6 shows how you can use the showMenuItem tag.public class CheckUserRights}
{
public static boolean doesUserHaveRights(HttpServletRequest request,
String[] rights)
{
for(int i=0;i<rights.length;i++)
{
if(!checkAccess(request, rights[i]))
{
return false;
}
return true;
}
}
default Attribute – When this attribute is used in a menuItem tag and set to true, the display text anchor's href will be the link or action. Use this attribute when you want a default action to occur when clicking the main link, and you also want to display the action for consistency purposes. The default value for this attribute is false.showMenuItem Attribute – When this attribute is used in a menuItem tag and set to false, the menu item does not appear in the ActiveMenu. Use this attribute when you want a default action to occur when you click the main link, but you do not want to display the action. The default value for this attribute is true.| Note: | Do not wrap an ActiveMenus tag in an anchor tag because you can get undesired results. Instead, use the default and showMenuItem attributes to control the ActiveMenu display text link |
allParams Element – This element specifies that all of the parameters defined on the tag (see Using the ActiveMenus Tag) are set up on this menu item. If this element is not used (and the param element is not used), then parameters are not set up on the menu item.param Element – This element sets the specified parameters on the menu item. The param element has a name attribute that must match the name attribute on a param element that is set within the ActiveMenu tag (see Using the ActiveMenus Tag). This also has a value attribute that can be used to hard code a value at configuration time. If this value attribute has been set, but a value was also specified at run-time (for example, using the param tag within the ActiveMenu tag), the run-time value takes precedence over the hard-coded value. Also, if just the hard-coded value is to be used, the param tag does not have to be specified when you use the ActiveMenus tag.name Element – This element displays only the static name defined within the tag as the menu item.i18nName Element – This element has both a bundleName attribute, which must map to an available .properties file, and a key attribute. The bundleName attribute uses the standard Java ResourceBundle convention. The key attribute defines the key to grab within the specified bundle. The text that relates to this key within this bundle is what appears in the menu item.img Element – This element adds the specified image to the left column as an icon. You must specify the path to the image file in relation to your web application.bgImg Element – This element replaces the background image used in the left column with the specified image. You must specify the path to the image file in relation to your web application.class attribute to work correctly, the class must be defined on the page (or the CSS file that defines the class must be imported).text Element – This element defines the CSS style or class that stylizes the text of the menu item. For the class attribute to work correctly, the class must be defined on the page (or the CSS file that defines the class must be imported).rowRollover Element – This element defines the CSS style or class that stylizes the row of the menu item when it is rolled over. For the class attribute to work correctly, you must define the class on the page (or the CSS file that defines the class must be imported). textRollover Element – This element defines the CSS style or class that stylizes the text of the menu item when it is rolled over. For the class attribute to work correctly, you must define the class on the page (or the CSS file that defines the class must be imported). | Note: | The TypeDefault and MenuItem tags must be contained within the type tag. |
The taglib.tld file is located in the activemenus_taglib.jar file.
You can use the following attributes and elements with the ActiveMenus tag:
display Attribute – This attribute defines what appears in place of the tag itself. If you use the displayText attribute, this is the value that is passed to the method defined in the displayText tag.activemenus-config.xml file.href Attribute – This optional attribute can override the default anchor href for the display text of the tag.newWindow Attribute – This optional href attribute specifies the link to open in a new browser window. This is a Boolean attribute, and you set it to true or false. class Attribute – This optional attribute defines a CSS class for the display text. style Attribute – This optional attribute defines a CSS style to place on the display text. rightClick Attribute – This Boolean attribute turns the menu into a right-click menu, rather than a rollover menu. The default is false. If this attribute is set to true, you right-click the display text to bring up the menu. The menu appears under the mouse. escapeXml Attribute – This attribute is the same as escapeXml within the JSTL tags. If you set it to true, characters are converted to their corresponding character entity codes. param Element – This element sets up parameters that can be passed in and used for the different menu items. The following two attributes are both required:name Attribute – This is the parameter name and must match the name attribute (if used) when defining a menu item in the activemenus-config.xml file. The name attribute also references the parameter within your menu item code. You can use a runtime expression.value Attribute – This is the parameter value, and you can use a runtime expression.| Notes: | If a class is specified on the tag, the default class specified in the activemenus-config.xml file is overridden and the default style is not placed on the activename. If a style is specified on the tag, the default class is placed on the activename. If a class="" is specified on the tag, the default class is not placed on the activename. |
You can use the DragDrop JSP tag library to enable drag and drop functionality in a GroupSpace Community, a custom Community, or a portal web application. You must identify draggable objects that are displayed on a JSP, and identify drop zones that are configured to react to a dropped draggable object. The drop zones react by triggering Page Flow actions, calling JavaScript functions, or posting data to a servlet.
Perform the following actions before you use the DragDrop tag library:
dragdrop_taglib.jar file in the web application’s CLASSPATHweb.xml file<servlet>
<servlet-name>DragDropResourceServlet</servlet-name>
<servlet-class>com.bea.apps.communities.servlets.
GetDragDropResourceServlet
</servlet-class>
</servlet>
<servlet-mapping>
<servlet-name>DragDropResourceServlet</servlet-name>
<url-pattern>DragDropResourceServlet</url-pattern>
</servlet-mapping>
Three tags are defined in the DragDrop tag library. Following are descriptions of how each tag is used, along with sample JSP code:
dragDropScript Tag – This tag includes the necessary DragDrop JavaScript libraries in the page. The logic embedded into the tag ensures that these libraries are included only once per request. draggableResource Tag – This tag identifies a draggable resource on the page. resourceDropZone Tag – This tag identifies an area on the page that reacts when a draggable resource is dropped.
You must include the dragDropScript tag before you use any other DragDrop tags on the page. This tag ensures that the appropriate JavaScript libraries are included. The dragDropScript tag does not take any attributes.
The following example shows how to use the dragDropScript tag: <dragdrop:dragDropScript/>.
The draggableResource tag specifies a draggable resource on the page. The tag takes the following attributes:
The draggableResource tag performs a search for a child img tag that has a dragdrop:image attribute. This image becomes the image that is displayed while performing the drag operation. The image must have an absolute height and width attribute.
The resourceId value is accessible through the JavaScript function getSourceId(), when the value is dropped onto a resourceDropZone. The resourceId value is also available as a parameter in the request named sourceId, when it is dropped onto a resourceDropZone that triggers a POST action. See Listing 5-7.
<dragdrop:draggableResource imageId="0" resourceId="${id}"resourceName=
    "${name}">
     <img src="/image.gif" width="16px" height="16px"dragdrop:image="true"/>
         ${name}
</dragdrop:draggableResource>
The resourceDropZone tag identifies an area where draggable resources can be dropped.
The tag takes the following attributes:
targetId Attribute – The unique identifier of the drop zone object. This identifier can be an ID that can be used by the underlying business logic to uniquely identify which object received the drop action. jsFunctionCall Attribute – A JavaScript function that executes when a draggableResource is dropped on this resourceDropZone. pageFlowAction Attribute – A valid Page Flow action that is initiated when a draggableResource is dropped on this resourceDropZone. formAction Attribute – A valid JSP or servlet that receives a POST action when a draggableResource is dropped on this resourceDropZone.
Only one of the following attributes is required: jsFunctionCall, pageFlowAction, or formAction. The jsFunctionCall takes precedence, then pageFlowAction, and finally formAction.
The targetId value is accessible through the JavaScript function getTargetId() when a draggable resource is dropped. It is also available as a parameter in the targetId request when a draggable resource is dropped that triggers a POST action. The following code shows how this works:
<dragdrop:resourceDropZone targetId="${id}" pageFlowAction="moveIssue">
     <img src="/folder.gif"/>Issues Folder
</dragdrop:resourceDropZone>
Listing 5-8 demonstrates how the moveIssue action can be coded in a file called IssuesPageFlowController.java.
@Jpf.Action(forwards={ @Jpf.Forward(name = "success", path =
     "displayIssuesTree.do")})
     protected Forward moveIssue() {
          Forward forward = new Forward("success");
          String sourceId = getRequest().getParameter("sourceId");
          String targetId = getRequest().getParameter("targetId");
          move(sourceId, targetId);
          return forward;
     }
You can use the DynamicContent tag library to quickly update parts of a JSP page in a GroupSpace Community, a custom Community, or a portal web application.
The DynamicContent tags let you use an AJAX request to update part of a JSP page within a Page Flow-based portlet. The tags allow parts of the page to be updated without performing a full portal request. These AJAX requests are smaller and faster than full portal requests, and therefore provide a more responsive user experience when interacting with a portal application.
These tags are easy to incorporate into standard Page Flow-based portlet development and can help create advanced user interface features that improve a user’s portal experience.
| Note: | The DynamicContent tags are not related to Asynchronous Portlet Content Rendering. Asynchronous portlets allow for the entire portlet content to be rendered independently of the portal. The DynamicContent tags are designed to affect small parts of a JSP page within a portlet. |
This section describes the main tags in the DynamicContent tag library.
The Container tag designates a place on the JSP page that contains the HTML output from the execution of a Page Flow action. The only required attribute for this tag is a container id. This id is referenced by other DynamicContent tags to identify the container. The following code shows how this tag is used: <dc:container dcContainerId="outputContainer"/>.
This tag is a child of the Container tag and identifies a Page Flow action that can be executed and whose HTML output is placed inside the parent container. The containerActionScript tag takes the following attributes:
action attribute – The Page Flow action name.initial attribute – Designates an action in the container as the initial action. This is the action that initially populates the container.async attribute – Specifies if the action is performed synchronously or asynchronously. The default is synchronous.onErrorCallback Attribute – A user-defined JavaScript function that is called if a client-side error occurs during the AJAX request creation and processing.
Only the action attribute is required. The following code sample shows how this tag is used in the parent Container tag:
<dc:container dcContainerId="outputContainer">
     <dc:containerActionScript action="resetDynamicContentContainer"
          initial="true"/>
     <dc:containerActionScript action="showServerTime"/>
<dc:container/>
The Execute Container Action tag is used to create a call to a specific action inside a container. This tag takes the following attributes:
dcContainerId attribute – The id of the container in which the action is defined.action attribute – The Page Flow action name.async attribute – This specifies if the action is performed synchronously or asynchronously. The default is synchronous.var attribute – A request attribute variable that holds a reference to the action JavaScript call.
The dcContainerId and action attributes are required. Following is a sample of how this tag is used:
<dc:executeContainerAction action="showServerTime" dcContainerId=
     "outputContainer"
          var="showServerTimeVar"/>
In the previous example, the call to the specified action is stored in the variable showServerTimeVar. This variable can then be referenced, as shown in the following HTML code:
<form>
     <input type="button" onclick="${showServerTimeVar}" value="Show Server
          Time"/>
</form>
When the user clicks a button, an AJAX request is created that executes the showServerTime action and places the HTML output generated by that action into the container with the id of outputContainer.
The DynamicContent tags also include tags for parameters that are passed into the action through the request. You can define parameters within the executeContainerAction tag or the containerActionScript tag. These parameters are then accessible in the Page Flow action by calling the request.getParameter() method.
Some critical limitations are associated with the DynamicContent tags. The AJAX requests used to trigger the Page Flow actions are not processed through the main portal servlet. These requests go through a special servlet that performs some processing to ensure that the proper Page Flow instance is used. Many key elements that are normally available in the request are not accessible from these AJAX requests. For example, in Community-based portal applications, the CommunityContext object is not accessible from the AJAX request. The lack of access to some of these framework elements could have an impact on things like entitlements and security.
Because of these limitations, the DynamicContent tags are best suited for specific uses that involve small amounts of processing, with few dependencies on larger framework services. The following use cases could benefit from the DynamicContent tags:
DynamicContent tags provide a tool to avoid an expensive portal request to view each photo.
See
dev2dev for sample code and utilities contained in the sample.zip file.
During the Development phase, you can use the UserPicker tag library to add a form button to a JSP page in a GroupSpace Community, a custom Community, or a portal web application.
The UserPicker:popupButton tag provides the developer with the ability to add a form button to a JSP page which opens a popup window that displays a list of current users. You can select a user from this list. The name of the selected user is populated into a specified form field on the parent window.
This section describes the UserPicker:popupButton tag in a custom Community and how to use the following attributes:
inputId Tag – The id of the HTML form input element that is populated with the selected user’s name. This tag is optional.inputTagId Tag – The tagId of the netui-based form input element that is populated with the selected user’s name. If the inputId tag is provided, the inputTagId tag is ignored. This tag is optional.buttonImage Tag – The src path to the image for the popup button. This tag is required.atnProviderName Tag – The Authentication Provider name. If an atnProviderName is supplied, there is no provider drop-down box in the popup window. If an atnProviderName is not supplied, the default provider is used. If you have configured multiple Authentication Providers, a drop-down box appears in the popup window to allow you to specify a provider. This tag is optional.| Tip: | When the UserPicker:popupButton tag is used in a Community, the Community members are listed, rather than users. |
WorkSpace Studio lets you import and export Java (JSR168) portlets. You can import Java portlets from a Web Archive (WAR), Java Archive (JAR), or ZIP file directly into your workspace. WorkSpace Studio automatically creates .portlet files for all imported Java portlets, making them available for immediate use in your portal. You can also export Java portlets from your workspace to a supported archive file.
| Note: | Throughout this section, supported archive files refer to WAR, JAR, and ZIP files. |
By default, WorkSpace Studio imports and exports the portlet.xml, any Java class files required by the portlet, and any Java source files. Also, if any class or source Java files are found within a JAR or ZIP archive, that archive is also imported or exported. You can optionally specify additional files to be imported or exported. Once exported, a Java portlet contained in a supported archive file can be used with any compatible web server.
| Tip: | You can use the JSR168 Import utility to deploy a Java portlet contained in a supported archive file directly to a WebLogic Server instance. Once deployed with this utility, the portlets can be available to consumers through WSRP. For more information on this utility, see Using the JSR168 Import Utility. |
To import Java portlets packaged in a supported archive file into your WorkSpace Studio workspace:
| Note: | If the selected archive does not contain any Java portlets, then no standard artifacts will be selected. This is because the default archive format plugin does not recognize the archive as a Java portlet archive. In this case, the wizard allows you to select an archive format and allows you to select files manually to import. This is not a typical use case. |
| Tip: | You can create a new folder for your imported portlets simply by typing the folder name in the Target Path field. For example, if you enter /portlets, then the folder WebContent/portlets will be created and the portlet(s) will be placed in that folder. You can assign a specific target path to one or more portlets simply by selecting the portlet(s) and entering a target path. The Reset button restores the original path. You can multi-select a group of portlets and assign a target path to the selected group. |
| Tip: | Optional files are any files in the supported archive file that were not specified as required in the Import Template. The default Import Template requires the archive to contain a portlet.xml file and any class files required by the portlet. |
| Tip: | If you develop your own custom import plugin, it will also show up in the dropdown list of formats in the Select Format dialog. You can create a custom portlet import plugin if you want to specify the format of the imported archive and the default format is not sufficient. To create the plugin, you need to implement the PortletImporterPlugin interface. For more information, refer to the Javadoc on this interface. |
.portlet files are created automatically in your workspace. | Tip: | If you encounter problems with the import, it is possible that the a conflict exists with artifacts that already exist in your project workspace. In this event, use the Back button to change the target paths of conflicting artifacts, or select the wizard option on the Select Project dialog that forces the wizard to overwrite existing resources (see Figure 5-42). |
You can export Java portlets to a new or existing supported archive file (WAR, JAR, or ZIP). To export Java portlets to a supported archive file:
Select the Overwrite existing resources without warning checkbox to force the export tool to overwrite duplicate files automatically.
| Note: | All selected portlets must exist within the same Web project. You cannot select portlets for export across different Web projects. |
portlet.xml file. Click Next to continue. | Note: | A Title is required for each portlet. If any Title field is blank, the Next button is disabled until you supply a title. |
| Tip: | If you develop your own custom export plugin, it will also show up in the dropdown list of formats in the Select Format dialog. You can create a custom portlet export plugin if you want to specify the format of the exported archive and the default format is not sufficient. To create the plugin, you need to implement the PortletExporterPlugin interface. For more information, refer to the Javadoc on this interface. |
portlet.xml) are automatically selected in the dialog. You can associate a Target Path path with any selected files. Those files will be placed in the specified target path within the archive file. By default, all files are stored relative to the root directory of the archive. WebLogic Portal provides a utility for automatically deploying JSR-168 portlets that are packaged in JSR-168 WAR files. This utility lets you import JSR-168 WAR files containing JSR-168 portlets, and expose the portlets in WSRP producers. For detailed information on this utility, see the chapter “Deploying Portal Applications” in the Production Operations Guide.


|